m (+ navs) |
m (spelling/grammar/fixes) |
||
| (18 intermediate revisions by 4 users not shown) | |||
| Line 1: | Line 1: | ||
{{ | {{Header Nav|game=BS The Legend of Zelda: Inishie no Sekiban}} | ||
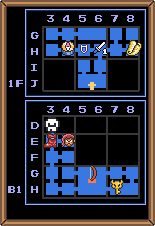
[[Image:BS The Legend of Zelda Inishie no Sekiban Dungeon 1.png|right]] | |||
[[Image: | :Dungeon items:[[Image:Zelda ALttP item L-1 Sword.png]]'''L-1 Sword''', [[Image:Zelda ALttP item Bombs.png]] '''Bombs''',[[Image:Zelda ALttP item Small Shield.png]]'''Small Shield''',[[Image:Zelda ALttP item Bow.png]]'''Bow''', [[Image:Zelda ALttP item Pegasus Boots.png]] '''Pegasus Boots''' | ||
Go through the left-hand door. Let the bee kill the tentacles while you | Go through the left-hand door. Let the bee kill the tentacles while you look under the top-left pot for a[[Image:Zelda ALttP item Small Key.png]]'''Small Key'''. The bottom-right pot hides a door-release button. The other two hold arrows so you might as well grab them while you're here. Go back down through the door you came in by. | ||
Now go through the right-hand door. Once the tentacle monsters are destroyed, unlock the door and go through. | Now go through the right-hand door. Once the tentacle monsters are destroyed, unlock the door and go through. | ||
[[Image:BS Zelda AST L-1 Sword get.png|left]] | |||
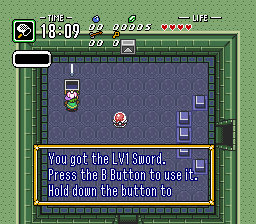
Here at last is your[[Image:Zelda ALttP item L-1 Sword.png]]'''L-1 Sword'''! If you want to keep the Gold Bee, switch to the Bug-Catching Net and bottle it, otherwise you'll lose it forever after opening the sword chest. Now hit the sphere to lower the blocks and go through the door to the right. | |||
{{YouTube | |||
|video=RuwwyWLn49o | |||
|title=Dungeon 1 walkthrough | |||
|duration=09:05 | |||
|image=1 | |||
|description=Watch a video walkthrough covering from the start of the game to the end of Dungeon 1. | |||
}} | |||
Open the chest for [[Image:Zelda ALttP item Bombs.png]] '''10 Bombs''' (bomb the wall above you if you want 60 rupees). Lift the top-left pot for a[[Image:Zelda ALttP item Small Key.png]]'''Small Key'''. Go to the right and open the chest for the [[Image:Zelda ALttP item Map.png]] '''Map'''. The pots contain [[Image:Zelda ALttP item Bombs.png]] '''Bombs''' so fill up. If you want 40 rupees, bomb the top wall. Otherwise go west, west, and bomb the wall to continue. | |||
Open the chest for the[[Image:Zelda ALttP item Small Shield.png]]'''Small Shield''' then go through the locked door (if the blocks are raised go back east and hit the sphere to lower them). Open the chest for the [[Image:Zelda ALttP item Compass.png]] '''Compass''' (bomb the western wall for 40 rupees if you wish). Anyway head upwards. You can bomb the left wall for 40 rupees, and killing the Stalfos opens the other door. Go through it. | |||
Go down the stairs to B1. Go through the door directly to the right (the wall to the left hides 40 rupees if you want them) and kill the tentacles to proceed. In the next room, lift the right-hand pot for a[[Image:Zelda ALttP item Small Key.png]]'''Small Key'''. Go down the stairs and through the door. | |||
Go west, up the stairs, lift the pot, hit the button and get the [[Image:Zelda ALttP item Big Key.png]] '''Big Key'''! Now go to the left. | |||
Go down the stairs | Go down the stairs and open the Big Chest for the[[Image:Zelda ALttP item Bow.png]]'''Bow'''! Now go back up the stairs, unlock the door, and go through it. | ||
In this next room lift the central pots to restock your arrows. In the next room use arrows or pots to kill the Eyegore for a[[Image:Zelda ALttP item Small Key.png]]'''Small Key'''. Open the door, kill or avoid the two Eyegores and again collect the arrows. By now you should have 30, so unlock the Boss Door and go in. Shoot the red Eyegore to kill it (you can throw pots at the other if you wish, but they won't kill the red one). The left-hand wall hides 40 rupees if you want them. | |||
Go to the | {{sidebar|width=150px|title=[[Image:Zelda ALttP item Bow.png]]Bow Upgrade|contents=Go through the door to the right of the Pegasus Boots chest and talk to the thief to trade 50 Rupees for +10 max arrows.}} | ||
In the next room lift the top-left pot for a[[Image:Zelda ALttP item Small Key.png]]'''Small Key'''. Open the chest for the [[Image:Zelda ALttP item Pegasus Boots.png]]'''Pegasus Boots'''. You can now run everywhere. Unlike in [[The Legend of Zelda: A Link to the Past]] you can even change direction when running. | |||
[[Image:BS Zelda AST boss Armos.png|left]] | |||
If the clock has reached or passed {{BS The Legend of Zelda: Inishie no Sekiban/Clock|1|6}} you'll notice an infinity symbol (∞) beneath the arrow icon. This means you have unlimited arrows, so you can shoot at the bosses without worrying about running out. | |||
{{sidebar|width=150px|title=No Red Armos|contents=When two statues remain with only one health each it is possible to destroy both simultaneously using the Pegasus Boots. If done correctly both will die together and you will skip fighting one of them in the final red form. This is most easily achieved by running at them during the charge, following the floor pattern to aim directly between them.}} | |||
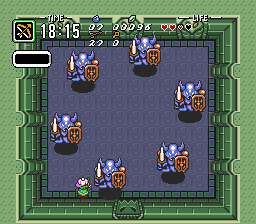
Now unlock the door and fight the Armos Knights. They move in two simple patterns (a gradually expanding circle, then a horizontal charge from the top of the screen to the bottom, then the circle again) so it is fairly easy to predict their movements. You can defeat them using the bow or by charging at them with the Pegasus Boots. It takes two hits to destroy one of the knights. They will keep doing these patterns until only one remains. The final one will turn red and start jumping towards you, trying to squash you. He takes three hits to defeat. | |||
Collect the [[Image:Zelda ALttP item Heart Container.png]] '''Heart Container''' and[[Image:BS Zelda AST item Tablet.png]]'''Tablet''' and you can [[BS The Legend of Zelda: Inishie no Sekiban/Week 1/Overworld part 2|leave the dungeon]]. | |||
{{Footer Nav|game=BS The Legend of Zelda: Inishie no Sekiban|prevpage=Week 1/Overworld part 1|prevname=Overworld part 1|nextpage=Week 1/Overworld part 2|nextname=Overworld part 2}} | |||
Latest revision as of 01:06, 19 January 2012

Go through the left-hand door. Let the bee kill the tentacles while you look under the top-left pot for a![]() Small Key. The bottom-right pot hides a door-release button. The other two hold arrows so you might as well grab them while you're here. Go back down through the door you came in by.
Small Key. The bottom-right pot hides a door-release button. The other two hold arrows so you might as well grab them while you're here. Go back down through the door you came in by.
Now go through the right-hand door. Once the tentacle monsters are destroyed, unlock the door and go through.

Here at last is your![]() L-1 Sword! If you want to keep the Gold Bee, switch to the Bug-Catching Net and bottle it, otherwise you'll lose it forever after opening the sword chest. Now hit the sphere to lower the blocks and go through the door to the right.
L-1 Sword! If you want to keep the Gold Bee, switch to the Bug-Catching Net and bottle it, otherwise you'll lose it forever after opening the sword chest. Now hit the sphere to lower the blocks and go through the door to the right.
Watch a video walkthrough covering from the start of the game to the end of Dungeon 1.
Open the chest for ![]() 10 Bombs (bomb the wall above you if you want 60 rupees). Lift the top-left pot for a
10 Bombs (bomb the wall above you if you want 60 rupees). Lift the top-left pot for a![]() Small Key. Go to the right and open the chest for the
Small Key. Go to the right and open the chest for the ![]() Map. The pots contain
Map. The pots contain ![]() Bombs so fill up. If you want 40 rupees, bomb the top wall. Otherwise go west, west, and bomb the wall to continue.
Bombs so fill up. If you want 40 rupees, bomb the top wall. Otherwise go west, west, and bomb the wall to continue.
Open the chest for the![]() Small Shield then go through the locked door (if the blocks are raised go back east and hit the sphere to lower them). Open the chest for the
Small Shield then go through the locked door (if the blocks are raised go back east and hit the sphere to lower them). Open the chest for the ![]() Compass (bomb the western wall for 40 rupees if you wish). Anyway head upwards. You can bomb the left wall for 40 rupees, and killing the Stalfos opens the other door. Go through it.
Compass (bomb the western wall for 40 rupees if you wish). Anyway head upwards. You can bomb the left wall for 40 rupees, and killing the Stalfos opens the other door. Go through it.
Go down the stairs to B1. Go through the door directly to the right (the wall to the left hides 40 rupees if you want them) and kill the tentacles to proceed. In the next room, lift the right-hand pot for a![]() Small Key. Go down the stairs and through the door.
Small Key. Go down the stairs and through the door.
Go west, up the stairs, lift the pot, hit the button and get the ![]() Big Key! Now go to the left.
Big Key! Now go to the left.
Go down the stairs and open the Big Chest for the![]() Bow! Now go back up the stairs, unlock the door, and go through it.
Bow! Now go back up the stairs, unlock the door, and go through it.
In this next room lift the central pots to restock your arrows. In the next room use arrows or pots to kill the Eyegore for a![]() Small Key. Open the door, kill or avoid the two Eyegores and again collect the arrows. By now you should have 30, so unlock the Boss Door and go in. Shoot the red Eyegore to kill it (you can throw pots at the other if you wish, but they won't kill the red one). The left-hand wall hides 40 rupees if you want them.
Small Key. Open the door, kill or avoid the two Eyegores and again collect the arrows. By now you should have 30, so unlock the Boss Door and go in. Shoot the red Eyegore to kill it (you can throw pots at the other if you wish, but they won't kill the red one). The left-hand wall hides 40 rupees if you want them.
In the next room lift the top-left pot for a![]() Small Key. Open the chest for the
Small Key. Open the chest for the ![]() Pegasus Boots. You can now run everywhere. Unlike in The Legend of Zelda: A Link to the Past you can even change direction when running.
Pegasus Boots. You can now run everywhere. Unlike in The Legend of Zelda: A Link to the Past you can even change direction when running.

If the clock has reached or passed ![]()
![]()
![]() you'll notice an infinity symbol (∞) beneath the arrow icon. This means you have unlimited arrows, so you can shoot at the bosses without worrying about running out.
you'll notice an infinity symbol (∞) beneath the arrow icon. This means you have unlimited arrows, so you can shoot at the bosses without worrying about running out.
Now unlock the door and fight the Armos Knights. They move in two simple patterns (a gradually expanding circle, then a horizontal charge from the top of the screen to the bottom, then the circle again) so it is fairly easy to predict their movements. You can defeat them using the bow or by charging at them with the Pegasus Boots. It takes two hits to destroy one of the knights. They will keep doing these patterns until only one remains. The final one will turn red and start jumping towards you, trying to squash you. He takes three hits to defeat.
Collect the ![]() Heart Container and
Heart Container and![]() Tablet and you can leave the dungeon.
Tablet and you can leave the dungeon.