<noinclude>{{All Game Nav|game=BS Zelda: Kodai no Sekiban}}</noinclude>
{{Header Nav|game=BS The Legend of Zelda: Inishie no Sekiban}}
:''This page is written with the Walls Patch in mind. If you are not using that patch refer to <span class="plainlinks">[http://strategywiki.org/w/index.php?title=BS_Zelda:_Kodai_no_Sekiban/Week_1/Dungeon_2&oldid=47326 this revision]</span> instead.''
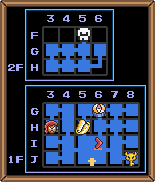
[[Image:BS The Legend of Zelda Inishie no Sekiban Dungeon 2.png|right|An annotated map of the dungeon.]]
[[Image:BS Zelda Kodai no Sekiban Dungeon 2.png|right|An annotated map of the dungeon.]]
|| Bomb the section of wall to the right if you want 40 rupees, otherwise head down the stairs and then up the other set to J-7.
|| Bomb the wall to the right if you want 40 rupees, otherwise head down the stairs and then up the other set to J-7.
|-
|-
|align=center| J-7
|align=center| J-7
|| The bottom-right pot hides a door button. Step on it and go up to J-8.
|| The bottom-right pot hides a door button. Step on it and go up to J-8.
|-
|}
|align=center| J-8
{{sidebar|width=150px|title=[[Image:Zelda ALttP item Bombs.png]] Bomb Upgrade|contents=H-3 conceals an Upgrade Thief who charges 50 rupees for +10 bombs. This is optional. Go back to G-3 and up the stairs.}}
{|
|width="30" align=center| J-8
|| Open the chest for the [[Image:Zelda ALttP item Big Key.png]] '''Big Key'''. Lift the pot beside it for the door-release button. Head back to the previous area and go through the door between the two staircases.
|| Open the chest for the [[Image:Zelda ALttP item Big Key.png]] '''Big Key'''. Lift the pot beside it for the door-release button. Head back to the previous area and go through the door between the two staircases.
|-
|-
Line 64:
Line 66:
|-
|-
|align=center| G-3
|align=center| G-3
|| If you want to carry more bombs, bomb the wall and head down to H-3.
|| If you want to carry more bombs, bomb the wall and head down to H-3, otherwise go up the stairs.
|-
|-
|| H-3
|| H-3
|| This room conceals an Upgrade Thief, 50 rupees for +10 bombs. Go back to G-3 and up the stairs.
|| This room conceals an Upgrade Thief, 50 rupees for +10 bombs. Go back to G-3 and up the stairs.
|-
|}
|}
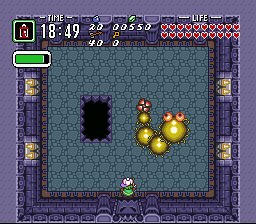
[[Image:BS Zelda AST Dungeon 2 boss Moldorm.png|right|The Hero of Light battles Moldorm.]]
[[Image:BS Zelda AST Dungeon 2 boss Moldorm.png|right|The Hero of Light battles Moldorm.]]
Line 92:
Line 93:
|| Now you have to fight Moldorm. Hit his tail bulb three times to defeat him.
|| Now you have to fight Moldorm. Hit his tail bulb three times to defeat him.
|-
|-
| || Collect the [[Image:Zelda ALttP item Heart Container.png]] '''Heart Container''' and[[Image:BS Zelda AST item Tablet.png]]'''Tablet''', press 9 again, and you can finally [[../Overworld part 3|leave this dungeon]].
|}
|}
<noinclude>{{Footer_Nav|game=BS Zelda: Kodai no Sekiban|backpage=Week 1/Overworld part 2|backname=Overworld part 2|here=Dungeon 2|nextpage=Week 1/Overworld part 3|nextname=Overworld part 3}}</noinclude>
Collect the [[Image:Zelda ALttP item Heart Container.png]] '''Heart Container''' and[[Image:BS Zelda AST item Tablet.png]]'''Tablet''', and you can finally [[BS The Legend of Zelda: Inishie no Sekiban/Week 1/Overworld part 3|leave this dungeon]].
{{Footer Nav|game=BS The Legend of Zelda: Inishie no Sekiban|prevpage=Week 1/Overworld part 2|prevname=Overworld part 2|nextpage=Week 1/Overworld part 3|nextname=Overworld part 3}}
Push one of the blocks up and the other to the side, go up and light the torches with the Lamp, and then go through the shutter-door that just opened.
H-6
Go down the stairs and head north.
G-6
open the chest to get the Compass, then go back down to H-6.
H-6
Head right.
H-7
Head right again.
H-8
Kill the water bugs, lift the pots for aSmall Key, and use the Ocarina to warp back to the central room.
I-5
This time unlock the top-left door and go through it.
H-5
Kill the Stalfos and claim the Map (the tongue can't be pulled). Continue to G-5.
G-5
Head right to G-6 (kill the Eyegores if you wish).
G-6
Go through the door to the right.
G-7
Kill the Eyegores and Stalfos and then bomb the wall to the right.
G-8
Push the block and open the chest for 100 rupees. Return to the previous room and head down and down again to I-7.
I-7
Bomb the wall to the right if you want 40 rupees, otherwise head down the stairs and then up the other set to J-7.
J-7
The bottom-right pot hides a door button. Step on it and go up to J-8.
Bomb Upgrade
H-3 conceals an Upgrade Thief who charges 50 rupees for +10 bombs. This is optional. Go back to G-3 and up the stairs.
J-8
Open the chest for the Big Key. Lift the pot beside it for the door-release button. Head back to the previous area and go through the door between the two staircases.
I-6
Open the Big Chest and claim theBoomerang! Go through the far left door.
J-4
Enter the bottom-left door if you want 20 Rupees, otherwise head up the stairs to I-4.
I-4
Bomb the left-hand wall if you want 20 Rupees, otherwise go through the Boss Door.
H-4
Head up to G-4. Use your Boomerang to collect theSmall Key on your way there. Then unlock the door.
G-3
If you want to carry more bombs, bomb the wall and head down to H-3, otherwise go up the stairs.
H-3
This room conceals an Upgrade Thief, 50 rupees for +10 bombs. Go back to G-3 and up the stairs.
The Hero of Light battles Moldorm.
2F
G-3
Work your way around to the bottom (bomb the right-hand wall if you want 20 Rupees) and go through the bottom door to H-3.
H-3
Head to the left-hand side and trip the switch (watch out for the Anti-Faerie) and go through the right-hand door to H-4.
H-4
Ignore the torches and head up to G-4.
G-4
Kill the Stalfos (the blue one has aSmall Key), and go through the other door to G-5.
G-5
Bomb the bottom wall to explore various optional treasure rooms (some are hidden, use the Map to find the unexplored rooms). When you're ready, unlock the door in this room and go through to F-5.
F-5
Now you have to fight Moldorm. Hit his tail bulb three times to defeat him.
Collect the Heart Container andTablet, and you can finally leave this dungeon.
 Bomb Upgrade

 Boomerang