m (moved BS Zelda: Kodai no Sekiban/Week 2/Dungeon 4 to BS The Legend of Zelda: Inishie no Sekiban/Week 2/Dungeon 4: correcting game name) |
m (fixed game name) |
||
| Line 1: | Line 1: | ||
{{Header Nav|game=BS Zelda: | {{Header Nav|game=BS The Legend of Zelda: Inishie no Sekiban}} | ||
[[Image:BS Zelda | [[Image:BS The Legend of Zelda Inishie no Sekiban Dungeon 4.png|right]] | ||
:Items:[[Image:Zelda ALttP item Fire Shield.png]]'''Fire Shield''',[[Image:Zelda ALttP item Hookshot.png]]'''Hookshot''' | :Items:[[Image:Zelda ALttP item Fire Shield.png]]'''Fire Shield''',[[Image:Zelda ALttP item Hookshot.png]]'''Hookshot''' | ||
Go through the door. Next go through the door to the top-right. Go through the door directly to the left and get the [[Image:Zelda ALttP item Map.png]] '''Map''' from the chest. Go back out and head up. Fall down either of the holes. | Go through the door. Next go through the door to the top-right. Go through the door directly to the left and get the [[Image:Zelda ALttP item Map.png]] '''Map''' from the chest. Go back out and head up. Fall down either of the holes. | ||
| Line 11: | Line 11: | ||
Head north and open the Big Chest fot the[[Image:Zelda ALttP item Hookshot.png]]'''Hookshot'''. If you want to skip the following part warp back to the entrance and open the Big Key door in the main room. Otherwise head back towards the fire and this time head right. Kill the Stalfos and Eyegores and continue onwards. In the next room use the Hookshot to cross the gaps and then go upstairs. | Head north and open the Big Chest fot the[[Image:Zelda ALttP item Hookshot.png]]'''Hookshot'''. If you want to skip the following part warp back to the entrance and open the Big Key door in the main room. Otherwise head back towards the fire and this time head right. Kill the Stalfos and Eyegores and continue onwards. In the next room use the Hookshot to cross the gaps and then go upstairs. | ||
{{sidebar|width=200px|title=[[Image:Zelda ALttP item Bow.png]]Bow Upgrade | {{sidebar|width=200px|title=[[Image:Zelda ALttP item Bow.png]]Bow Upgrade|contents=Head to H-7 (the room with the Stalfos and Eyegores), bomb the top centre of the wall and pay 100 Rupees for +10 arrows.}} | ||
In this room use the Boomerang to fetch the[[Image:Zelda ALttP item Small Key.png]]'''Small Key''' (the Hookshot can't grab it). In the next room Hookshot down, right, and finally left to cross the spikes without damage. Go through the door. | In this room use the Boomerang to fetch the[[Image:Zelda ALttP item Small Key.png]]'''Small Key''' (the Hookshot can't grab it). In the next room Hookshot down, right, and finally left to cross the spikes without damage. Go through the door. | ||
[[Image:BS Zelda AST boss Arrghus.png|left]] | [[Image:BS Zelda AST boss Arrghus.png|left]] | ||
| Line 20: | Line 20: | ||
Once his bits are all gone he'll jump up into the ceiling and try to crush you. | Once his bits are all gone he'll jump up into the ceiling and try to crush you. | ||
Collect the [[Image:Zelda ALttP item Heart Container.png]] '''Heart Container''' and[[Image:BS Zelda AST item Tablet.png]]'''Tablet''', and you can [[BS Zelda: | Collect the [[Image:Zelda ALttP item Heart Container.png]] '''Heart Container''' and[[Image:BS Zelda AST item Tablet.png]]'''Tablet''', and you can [[BS The Legend of Zelda: Inishie no Sekiban/Week 2/Overworld part 3|leave the dungeon]]. | ||
{{Footer_Nav|game=BS Zelda: | {{Footer_Nav|game=BS The Legend of Zelda: Inishie no Sekiban|prevpage=Week 2/Overworld part 2|prevname=Overworld part 2|nextpage=Week 2/Overworld part 3|nextname=Overworld part 3}} | ||
Latest revision as of 10:35, 18 January 2012

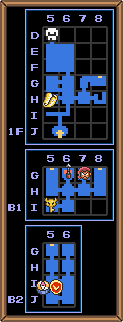
Go through the door. Next go through the door to the top-right. Go through the door directly to the left and get the ![]() Map from the chest. Go back out and head up. Fall down either of the holes.
Map from the chest. Go back out and head up. Fall down either of the holes.
Kill the bomb bugs to proceed. Head down (avoiding the fire snake) and go into the bottom-left door. Push the statue onto the button under the top-left pot and open the chests for the![]() Fire Shield and
Fire Shield and ![]() Compass. Now head back out and into the door to the top-left.
Compass. Now head back out and into the door to the top-left.
Light the torches to reveal a chest with a![]() Small Key. In the next room simply go upstairs. The holes will drop you down onto the floor you were just on, so try not to get knocked into them by the cannons. At the bottom lift the left-hand pot for door-opening button.
Small Key. In the next room simply go upstairs. The holes will drop you down onto the floor you were just on, so try not to get knocked into them by the cannons. At the bottom lift the left-hand pot for door-opening button.
In the next room head down and into the left-hand door (avoid the spike thing by going around it and timing your actions). Pull the left-hand tongue to reveal a chest with the ![]() Big Key. Return to the room with the circling fire.
Big Key. Return to the room with the circling fire.
Head north and open the Big Chest fot the![]() Hookshot. If you want to skip the following part warp back to the entrance and open the Big Key door in the main room. Otherwise head back towards the fire and this time head right. Kill the Stalfos and Eyegores and continue onwards. In the next room use the Hookshot to cross the gaps and then go upstairs.
Hookshot. If you want to skip the following part warp back to the entrance and open the Big Key door in the main room. Otherwise head back towards the fire and this time head right. Kill the Stalfos and Eyegores and continue onwards. In the next room use the Hookshot to cross the gaps and then go upstairs.
In this room use the Boomerang to fetch the![]() Small Key (the Hookshot can't grab it). In the next room Hookshot down, right, and finally left to cross the spikes without damage. Go through the door.
Small Key (the Hookshot can't grab it). In the next room Hookshot down, right, and finally left to cross the spikes without damage. Go through the door.

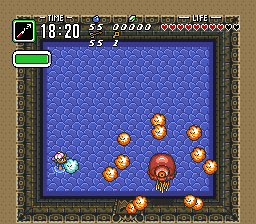
Now you're back in the main room! Head up and unlock the Big Key door. Use the Hookshot to go up, left, down, left, up, up, down, right, right, up, left, and finally though the Big Key door to fight the boss, Arrghus.
Use the Hookshot to pull the pieces away from his body, and then hack them up. Remember you're invulnerable when the Hookshot is extended, so you can use it to protect yourself when he does his "spin ball bits around body" move.
Once his bits are all gone he'll jump up into the ceiling and try to crush you.
Collect the ![]() Heart Container and
Heart Container and![]() Tablet, and you can leave the dungeon.
Tablet, and you can leave the dungeon.