Notmyhandle (talk | contribs) (Image->File, cleanup) |
(Renamed image and added rematch links) Tags: Mobile edit Mobile web edit |
||
| (47 intermediate revisions by 20 users not shown) | |||
| Line 1: | Line 1: | ||
{{Header Nav|game=Pokémon FireRed and LeafGreen}} | {{Header Nav|game=Pokémon FireRed and LeafGreen}} | ||
The Rock Tunnel Connects Route 10 to Lavender Town. To get through, it is very useful to have a Pokémon that knows '''HM05 - {{bpm|Flash}}'''. | |||
If you picked {{bp|Squirtle}} or {{bp|Bulbasaur}} as your starter and leveled it up decently, you'll have little problem getting through. Those who picked {{bp|Charmander}} as their starter will struggle though, as the Rock types here are super effective against Fire types, though its move {{bpm|Metal Claw}} should make things easier. | |||
Pick up as many Super Potions as you can in Vermillion City, as you'll be using them. For now, worry about getting to the other side and come back for the items/Pokémon later once you have a stronger team. | |||
==1F== | |||
There are plenty of new and rare Pokémon to encounter on the first floor of Rock Tunnel. If you don't feel like running into them, buy some Repels from Cerulean City. | |||
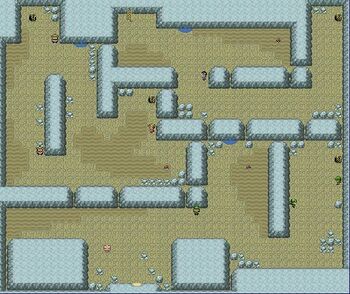
[[File:Pokemon FRLG Rock Tunnel 1F.jpg|thumb|350px|left|Rock Tunnel 1F]] | |||
{{-}} | |||
===Items=== | |||
* Escape Rope (Southeast of Hiker Lucas) | |||
* Pearl (North of Picnicker Dana) | |||
* Repel (Northeast corner) | |||
===Pokémon found=== | |||
{{ContentBoxContainer}} | |||
{{Pokemon/Wild|FRLG}} | |||
{{Pokemon/Wild row|FRLG||041|15-16|30|bp=1}} | |||
{{Pokemon/Wild row|FRLG||056|16-17|15|bp=1}} | |||
{{Pokemon/Wild row|FRLG||066|16-17|15|bp=1}} | |||
{{Pokemon/Wild row|FRLG||074|15-16|35|bp=1}} | |||
{{Pokemon/Wild row|FRLG||095|13-15|5|bp=1}} | |||
| | |||
|15 | |||
| | |||
|16-17 | |||
|15 | |||
| | |||
|16-17 | |||
|15 | |||
| | |||
| | |||
|15- | |||
|35 | |||
| | |||
|13- | |||
|5 | |||
|} | |} | ||
</div> | |||
===Trainers=== | |||
{{ContentBoxContainer}} | |||
{{Pokemon/Trainer|FRLG}} | |||
{{Pokemon/Trainer row|FRLG|Hiker|Lenny|684}} | |||
{{Pokemon/Trainer mon|FRLG|074|19}} | |||
{{Pokemon/Trainer mon|FRLG|066|19}} | |||
{{Pokemon/Trainer mon|FRLG|074|19}} | |||
{{Pokemon/Trainer mon|FRLG|074|19}} | |||
{{Pokemon/Trainer row|FRLG|Hiker|Oliver|720}} | |||
{{Pokemon/Trainer mon|FRLG|095|20}} | |||
{{Pokemon/Trainer mon|FRLG|095|20}} | |||
{{Pokemon/Trainer mon|FRLG|074|20}} | |||
{{Pokemon/Trainer row|FRLG|Hiker|Lucas|756}} | |||
{{Pokemon/Trainer mon|FRLG|074|21}} | |||
{{Pokemon/Trainer mon|FRLG|075|21}} | |||
{{Pokemon/Trainer row|FRLG|Picnicker|Ariana|380}} | |||
{{Pokemon/Trainer mon|FRLG|016|19}} | |||
{{Pokemon/Trainer mon|FRLG|019|19}} | |||
{{Pokemon/Trainer mon|FRLG|019|19}} | |||
{{Pokemon/Trainer mon|FRLG|069|19}} | |||
{{Pokemon/Trainer row|FRLG|Picnicker|Dana|400}} | |||
{{Pokemon/Trainer mon|FRLG|052|20}} | |||
{{Pokemon/Trainer mon|FRLG|043|20}} | |||
{{Pokemon/Trainer mon|FRLG|016|20}} | |||
{{Pokemon/Trainer row|FRLG|Picnicker|Leah|440}} | |||
{{Pokemon/Trainer mon|FRLG|069|22}} | |||
{{Pokemon/Trainer mon|FRLG|035|22}} | |||
|} | |||
</div> | |||
==B1F== | |||
On this level, in the southwest corner, there is a '''Move Tutor''' who will teach your Pokémon {{bpm|Rock Slide}}. He'll only teach it once, and this is the most powerful Rock-type move in the game, so choose wisely! | |||
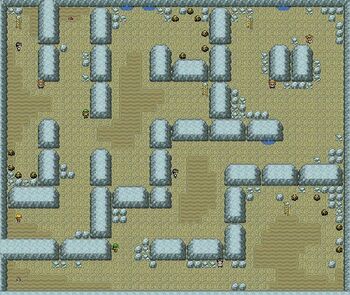
[[File:Pokemon FRLG Rock Tunnel B1F.jpg|thumb|350px|left|Rock Tunnel B1F]] | |||
{{-}} | |||
===Items=== | |||
* Max Ether (North of Picnicker Sofia and Hiker Dudley) | |||
* Revive (Southwest corner) | |||
== | ===Pokémon found=== | ||
{{ContentBoxContainer}} | |||
{{Pokemon/Wild|FRLG}} | |||
{{Pokemon/Wild row|FRLG||041|15-16|30|bp=1}} | |||
{{Pokemon/Wild row|FRLG||056|16-17|15|bp=1}} | |||
{{Pokemon/Wild row|FRLG||066|17|10|bp=1}} | |||
{{Pokemon/Wild row|FRLG||074|15-16|35|bp=1}} | |||
{{Pokemon/Wild row|FRLG||095|13-17|10|bp=1}} | |||
| | |||
| | |||
| | |||
|- | |||
| | |||
| | |||
|- | |||
| | |||
| | |||
| | |||
| | |||
| | |||
| | |||
|- | |||
| | |||
| | |||
|13 | |||
| | |||
| | |||
|} | |} | ||
</div> | |||
== | ===Trainers=== | ||
{| {{ | {{ContentBoxContainer}} | ||
| | {{Pokemon/Trainer|FRLG}} | ||
{{Pokemon/Trainer row|FRLG|Pokemaniac|Ashton|1104}} | |||
{{Pokemon/Trainer mon|FRLG|104|23}} | |||
{{Pokemon/Trainer mon|FRLG|079|23}} | |||
{{Pokemon/Trainer row|FRLG|Pokemaniac|Cooper|960}} | |||
{{Pokemon/Trainer mon|FRLG|079|20}} | |||
{{Pokemon/Trainer mon|FRLG|079|20}} | |||
{{Pokemon/Trainer mon|FRLG|079|20}} | |||
| | {{Pokemon/Trainer row|FRLG|Pokemaniac|Steve|1056}} | ||
| | {{Pokemon/Trainer mon|FRLG|004|22}} | ||
| | {{Pokemon/Trainer mon|FRLG|104|22}} | ||
| | {{Pokemon/Trainer row|FRLG|Pokemaniac|Winston|1200}} | ||
| | {{Pokemon/Trainer mon|FRLG|079|25}} | ||
| | {{Pokemon/Trainer row|FRLG|Hiker|Allen|900}} | ||
| | {{Pokemon/Trainer mon|FRLG|074|25}} | ||
| | {{Pokemon/Trainer row|FRLG|Hiker|Dudley|756}} | ||
| | {{Pokemon/Trainer mon|FRLG|074|21}} | ||
| | {{Pokemon/Trainer mon|FRLG|074|21}} | ||
| | {{Pokemon/Trainer mon|FRLG|075|21}} | ||
| | {{Pokemon/Trainer row|FRLG|Hiker|Eric|720}} | ||
| | {{Pokemon/Trainer mon|FRLG|066|20}} | ||
| | {{Pokemon/Trainer mon|FRLG|095|20}} | ||
| | {{Pokemon/Trainer row|FRLG|Picnicker|Martha|440}} | ||
| | {{Pokemon/Trainer mon|FRLG|043|22}} | ||
| | {{Pokemon/Trainer mon|FRLG|001|22}} | ||
| | {{Pokemon/Trainer row|FRLG|Picnicker|Sofia|420}} | ||
| | {{Pokemon/Trainer mon|FRLG|039|21}} | ||
| | {{Pokemon/Trainer mon|FRLG|052|21}} | ||
| | {{Pokemon/Trainer mon|FRLG|016|21}} | ||
| | |||
| | |||
| | |||
| | |||
| | |||
| | |||
| | |||
| | |||
| | |||
| | |||
| | |||
|} | |} | ||
</div> | |||
===New Pokémon=== | |||
{{ContentBoxContainer}} | |||
{{Pokemon/New|title=#66 Machop|contents=[[File:Pokemon 066Machop.png|right]] | |||
The second Fighting type Pokemon you can catch in the game, Machop is a potential bulkier replacement for a Mankey if you caught one earlier. Machop can be used effectively for most of the game, but you may choose to replace him with Hitmonlee or Hitmonchan once they become available. | |||
== | Machop gets tons of Fighting type moves and evolves twice, first into {{bp|Machoke}} at level 28, and then into {{bp|Machamp}} after being traded.}} | ||
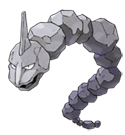
{{Pokemon/New|title=#95 Onix|contents=[[File:Pokemon 095Onix.png|left]] | |||
Onix is the second Rock type Pokémon you encounter in the game following the Geodudes you ran into inside Mt. Moon. | |||
While it receives some good coverage moves, including {{bpm|Dragon Breath}} at level 30 and {{bpm|Iron Tail}} at level 45, it has a poor stat distribution, including an awful HP stat, and an Attack stat lower than {{bp|Rattata}}'s. You're better off evolving Geodude into a {{bp|Graveler}} and using that instead, even if you can't evolve it by trading. | |||
Onix can evolve into {{bp|Steelix}} when traded holding a '''Metal Coat'''. Unfortunately, this cannot happen until beating the Elite Four.}} | |||
</div> | |||
==Route 10== | |||
You will exit Rock Tunnel on the south side of Route 10. | |||
===Trainers=== | |||
{{ContentBoxContainer}} | |||
{{Pokemon/Trainer|FRLG}} | |||
{{Pokemon/Trainer row|FRLG|Picnicker|Carol|420}} | |||
{{Pokemon/Trainer mon|FRLG|016|21}} | |||
{{Pokemon/Trainer mon|FRLG|017|21}} | |||
{{Pokemon/Trainer row|FRLG|Hiker|Clark|756}} | |||
{{Pokemon/Trainer mon|FRLG|074|21}} | |||
{{Pokemon/Trainer mon|FRLG|095|21}} | |||
{{Pokemon/Trainer row|FRLG|Hiker|Trent|684|notes=[[../Rematches#Hiker Trent|Rematch]]}} | |||
{{Pokemon/Trainer mon|FRLG|095|19}} | |||
{{Pokemon/Trainer mon|FRLG|075|19}} | |||
{{Pokemon/Trainer row|FRLG|Pokemaniac|Herman|960|notes=[[../Rematches#Pokemaniac Herman|Rematch]]}} | |||
{{Pokemon/Trainer mon|FRLG|104|20}} | |||
{{Pokemon/Trainer mon|FRLG|079|20}} | |||
|} | |||
</div> | |||
{{Footer Nav|game=Pokémon FireRed and LeafGreen|prevpage=Route 10|nextpage=Lavender Town}} | {{Footer Nav|game=Pokémon FireRed and LeafGreen|prevpage=Route 10|nextpage=Lavender Town}} | ||
Latest revision as of 23:47, 5 April 2024
The Rock Tunnel Connects Route 10 to Lavender Town. To get through, it is very useful to have a Pokémon that knows HM05 - Flash.
If you picked Squirtle or Bulbasaur as your starter and leveled it up decently, you'll have little problem getting through. Those who picked Charmander as their starter will struggle though, as the Rock types here are super effective against Fire types, though its move Metal Claw should make things easier.
Pick up as many Super Potions as you can in Vermillion City, as you'll be using them. For now, worry about getting to the other side and come back for the items/Pokémon later once you have a stronger team.
1F[edit]
There are plenty of new and rare Pokémon to encounter on the first floor of Rock Tunnel. If you don't feel like running into them, buy some Repels from Cerulean City.

Items[edit]
- Escape Rope (Southeast of Hiker Lucas)
- Pearl (North of Picnicker Dana)
- Repel (Northeast corner)
Pokémon found[edit]
| FireRed and LeafGreen | |||
|---|---|---|---|
| Pokémon | Level | Rate | |
| Zubat | 15-16 | 30% | |
| Mankey | 16-17 | 15% | |
| Machop | 16-17 | 15% | |
| Geodude | 15-16 | 35% | |
| Onix | 13-15 | 5% | |
Trainers[edit]
| FireRed and LeafGreen | |
|---|---|
| Trainer | Pokemon |
 Hiker Lenny Reward: |
|
 Hiker Oliver Reward: |
|
 Hiker Lucas Reward: |
|
Picnicker Ariana Reward: |
|
Picnicker Dana Reward: |
|
Picnicker Leah Reward: |
|
B1F[edit]
On this level, in the southwest corner, there is a Move Tutor who will teach your Pokémon Rock Slide. He'll only teach it once, and this is the most powerful Rock-type move in the game, so choose wisely!

Items[edit]
- Max Ether (North of Picnicker Sofia and Hiker Dudley)
- Revive (Southwest corner)
Pokémon found[edit]
| FireRed and LeafGreen | |||
|---|---|---|---|
| Pokémon | Level | Rate | |
| Zubat | 15-16 | 30% | |
| Mankey | 16-17 | 15% | |
| Machop | 17 | 10% | |
| Geodude | 15-16 | 35% | |
| Onix | 13-17 | 10% | |
Trainers[edit]
New Pokémon[edit]

The second Fighting type Pokemon you can catch in the game, Machop is a potential bulkier replacement for a Mankey if you caught one earlier. Machop can be used effectively for most of the game, but you may choose to replace him with Hitmonlee or Hitmonchan once they become available.
Machop gets tons of Fighting type moves and evolves twice, first into Machoke at level 28, and then into Machamp after being traded.

Onix is the second Rock type Pokémon you encounter in the game following the Geodudes you ran into inside Mt. Moon. While it receives some good coverage moves, including Dragon Breath at level 30 and Iron Tail at level 45, it has a poor stat distribution, including an awful HP stat, and an Attack stat lower than Rattata's. You're better off evolving Geodude into a Graveler and using that instead, even if you can't evolve it by trading.
Onix can evolve into Steelix when traded holding a Metal Coat. Unfortunately, this cannot happen until beating the Elite Four.
Route 10[edit]
You will exit Rock Tunnel on the south side of Route 10.
