From StrategyWiki, the video game walkthrough and strategy guide wiki
Jump to navigation Jump to search
No edit summary
(Image name fix)
Tags: Mobile edit Mobile web edit
 
(41 intermediate revisions by 19 users not shown)
Line 1: Line 1:
{{Header Nav|game=Pokémon FireRed and LeafGreen}}
{{floatingtoc}}
 
{| {{prettytable|notwide=1|float=right}}
It turns out that Silph Co. is being forced to produce advanced technology for Team Rocket. You must reach the top floor and free the company president from Giovanni's clutches. If you roust Giovanni, you won't have to defeat the rest of Team Rocket's agents individually. When you need to heal your Pokémon, look for a woman at the bottom-left corner of the ninth floor.
! style="background-color:#{{Pokemon color|FireRed}}" | FireRed
 
! style="background-color:#{{Pokemon color|LeafGreen}}" | LeafGreen
== 1F ==
|- valign="center"
[[File:Pokemon FRLG Silph Co. 1F.png|left|thumb|350px|Silph Co. 1F]]
| colspan=2 | [[File:Pokemon_131Lapras.png|40px]]{{bp|Lapras}}
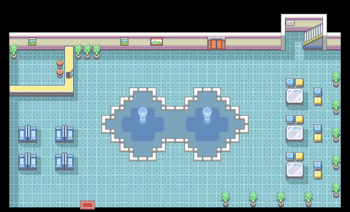
This 11 floor building, with 31 trainer battles, only seems difficult. If you know where to go, you can make it to the top and save the President quickly and easily. Then, after scaring Team Rocket away, you can get the items without opposition. You will need the card to open the door for a warping panel that leads to the Rocket boss. While the warping panels are annoying, the items are well worth it!
 
The first floor lobby is eerily empty, so just advance to the stairs in the back. Note that the guard blocking the entrance to the building won't stand aside to let you in until you've cleared Pokémon Tower.
 
Note that the red circles on this map indicate the warp points that connect two teleportation tiles with the same letter to one another. Also, Silph Co. is one of the very few buildings that you can use your running shoes in.
 
Finally, while it is not recommended, you can skip most fights by following the instructions detailed in the Fifth Floor section.
 
== 2F ==
[[File:Pokemon FRLG Silph Co. 2F.png|left|thumb|350px|Silph Co. 2F]]
 
===Trainers===
{{ContentBoxContainer}}
{{Pokemon/Trainer|FRLG}}
{{Pokemon/Trainer row|FRLG|Team Rocket Grunt||800|gender=M}}
{{Pokemon/Trainer mon|FRLG|042|25}}
{{Pokemon/Trainer mon|FRLG|041|25}}
{{Pokemon/Trainer mon|FRLG|020|25}}
{{Pokemon/Trainer mon|FRLG|041|25}}
{{Pokemon/Trainer row|FRLG|Scientist|Jerry|1344}}
{{Pokemon/Trainer mon|FRLG|081|28}}
{{Pokemon/Trainer mon|FRLG|100|28}}
{{Pokemon/Trainer mon|FRLG|082|28}}
{{Pokemon/Trainer row|FRLG|Team Rocket Grunt||928|gender=M}}
{{Pokemon/Trainer mon|FRLG|104|29}}
{{Pokemon/Trainer mon|FRLG|041|29}}
{{Pokemon/Trainer row|FRLG|Scientist|Connor|1248}}
{{Pokemon/Trainer mon|FRLG|088|26}}
{{Pokemon/Trainer mon|FRLG|110|26}}
{{Pokemon/Trainer mon|FRLG|109|26}}
{{Pokemon/Trainer mon|FRLG|110|26}}
|}
|}
'''''It turns out that Silph Co. is being forced to produce advanced technology for Team Rocket.  You must reach the top floor and free the company president from Giovanni's clutches.  If you roust Giovanni, you won't have to defeat the rest of Team Rocket's agents individually.  When you need to heal your Pokémon, look for a woman at the bottom-left corner of the ninth floor.'''''
</div>
A Move Tutor lady in the northwest office next to the boxes will teach {{bpm|Thunder Wave}}.


== First Floor ==
===Items===
[[File:Pokemon FRLG Silph Comapany-1f.png|left|thumb|400px|Silph Company Floor 1]]
* Ultra Ball (Hidden in the bottom plant of the southwest office)
This 11 level building, with 31 trainer battles, only seems difficult.  If you know where to go, you can make it to the top and save the President quickly and easily.  Then, after scaring Team Rocket away, you can get the items without opposition. You will need the card to open the door for a warping panel that leads to the Rocket boss. While the warping panels are annoying, the items are well worth it!


The first floor lobby is eerily empty, so just advance to the stairs in the back.  Note that the guard blocking the entrance to the building won't stand aside to let you in until you've cleared Pokémon Tower.
==3F==
[[File:Pokemon FRLG Silph Co. 3F.png|left|thumb|350px|Silph Co. 3F]]
If you need combat experience, don't hesitate to seek out every Team Rocket agent and challenge them to duel.


Note that the red circles on this map indicate the warp points that connect two teleportation tiles with the same letter to one another.  Also, Silph Co. is one of the very few buildings that you can use your running shoes in.
However, if you want a quick end to this situation, follow the instructions from Fifth Floor so you can grab the '''Card Key''', which will open every electronic door in the building. Then come to the Third Floor, and use warp tile '''O''' to reach the 7th floor, then step on warp tile '''P''' to reach the hallway outside of the president's office.
{{-|left}}


== Second Floor ==
Read the info in Seventh Floor for information on the challenges and rewards that await you on that Floor and beyond!
[[File:Pokemon FRLG Silph Comapany-2f.png|left|thumb|400px|Silph Company Floor 2]]
 
{| {{prettytable|notwide=1|text center=1|}}
===Trainers===
|-
{{ContentBoxContainer}}
! style="background-color:#{{Pokemon color|Poison light}};color:#ffffff;" | Name
{{Pokemon/Trainer|FRLG}}
! style="background-color:#{{Pokemon color|Poison light}};color:#ffffff;" | 1st
{{Pokemon/Trainer row|FRLG|Team Rocket Grunt||896|gender=M}}
! style="background-color:#{{Pokemon color|Poison light}};color:#ffffff;" | 2nd
{{Pokemon/Trainer mon|FRLG|020|28}}
! style="background-color:#{{Pokemon color|Poison light}};color:#ffffff;" | 3rd
{{Pokemon/Trainer mon|FRLG|097|28}}
! style="background-color:#{{Pokemon color|Poison light}};color:#ffffff;" | 4th
{{Pokemon/Trainer mon|FRLG|020|28}}
! style="background-color:#{{Pokemon color|Poison light}};color:#ffffff;" | 5th
{{Pokemon/Trainer row|FRLG|Scientist|Jose|1392}}
! style="background-color:#{{Pokemon color|Poison light}};color:#ffffff;" | Money
{{Pokemon/Trainer mon|FRLG|101|29}}
|- align="center"
{{Pokemon/Trainer mon|FRLG|110|29}}
|[[File:Pokemon FRLG Team Rocket Grunt M.png]]Grunt
| style="background-color:#{{Pokemon color|Poison}};" | [[File:Pokemon 042Golbat.png|40px]]{{bp|Golbat}} 25
| style="background-color:#{{Pokemon color|Poison}};" | [[File:Pokemon 041Zubat.png|40px]]{{bp|Zubat}} 25
| style="background-color:#{{Pokemon color|Poison}};" | [[File:Pokemon 041Zubat.png|40px]]{{bp|Zubat}} 25
| style="background-color:#{{Pokemon color|Normal}};" | [[File:Pokemon 020Raticate.png|40px]]{{bp|Raticate}} 25
| style="background-color:#{{Pokemon color|Poison}};" | [[File:Pokemon 041Zubat.png|40px]]{{bp|Zubat}} 25
|<br>[[File:Pokebuck.png]]800
|- align="center"
|[[File:Pokemon FRLG Scientist.png]]Jerry
| style="background-color:#{{Pokemon color|Electric}};" | [[File:Pokemon 081Magnemite.png|40px]]{{bp|Magnemite}} 28
| style="background-color:#{{Pokemon color|Electric}};" | [[File:Pokemon 100Voltorb.png|40px]]{{bp|Voltorb}} 28
| style="background-color:#{{Pokemon color|Electric}};" | [[File:Pokemon 082Magneton.png|40px]]{{bp|Magneton}} 28
|
|
|<br>[[File:Pokebuck.png]]1344
|- align="center"
|[[File:Pokemon FRLG Team Rocket Grunt M.png]]Grunt
| style="background-color:#{{Pokemon color|Ground}};" | [[File:Pokemon 104Cubone.png|40px]]{{bp|Cubone}} 29
| style="background-color:#{{Pokemon color|Poison}};" | [[File:Pokemon 041Zubat.png|40px]]{{bp|Zubat}} 29
|
|
|
|<br>[[File:Pokebuck.png]]928
|- align="center"
|[[File:Pokemon FRLG Scientist.png]]Connor
| style="background-color:#{{Pokemon color|Poison}};" | [[File:Pokemon 088Grimer.png|40px]]{{bp|Grimer}} 26
| style="background-color:#{{Pokemon color|Poison}};" | [[File:Pokemon 110Weezing.png|40px]]{{bp|Weezing}} 26
| style="background-color:#{{Pokemon color|Poison}};" | [[File:Pokemon 109Koffing.png|40px]]{{bp|Koffing}} 26
| style="background-color:#{{Pokemon color|Poison}};" | [[File:Pokemon 110Weezing.png|40px]]{{bp|Weezing}} 26
|
|<br>[[File:Pokebuck.png]]1248
|}
|}
</div>
===Items===
* Hyper Potion (Found near the scientist)
* Protein (Hidden in the middle plant, among the plants in the southeast corner)
==4F==
[[File:Pokemon FRLG Silph Co. 4F.png|left|thumb|350px|Silph Co. 4F]]


== Third Floor ==
===Trainers===
[[File:Pokemon FRLG Silph Comapany-3f.png|left|thumb|400px|Silph Company Floor 3]]
{{ContentBoxContainer}}
If you need combat experience, don't hesitate to seek out every Team Rocket agent and challenge him or her to duel.  If you want a quick end to this situation, however, run straight up the stairs to the fifth floor and grab the '''Card Key''', which will open every electronic door in the building.  Then come to the 3rd floor, and use warp tile '''O''' to reach the 7th floor, then step on warp tile '''P''' to reach the hallway outside of the president's office.
{{Pokemon/Trainer|FRLG}}
{| {{prettytable|notwide=1|text center=1|}}
{{Pokemon/Trainer row|FRLG|Team Rocket Grunt||800|gender=M}}
|-
{{Pokemon/Trainer mon|FRLG|023|28}}
! style="background-color:#{{Pokemon color|Normal light}};color:#ffffff;" | Name
{{Pokemon/Trainer mon|FRLG|041|28}}
! style="background-color:#{{Pokemon color|Normal light}};color:#ffffff;" | 1st
{{Pokemon/Trainer mon|FRLG|104|28}}
! style="background-color:#{{Pokemon color|Normal light}};color:#ffffff;" | 2nd
{{Pokemon/Trainer row|FRLG|Team Rocket Grunt||928|gender=M}}
! style="background-color:#{{Pokemon color|Normal light}};color:#ffffff;" | 3rd
{{Pokemon/Trainer mon|FRLG|066|29}}
! style="background-color:#{{Pokemon color|Normal light}};color:#ffffff;" | Money
{{Pokemon/Trainer mon|FRLG|096|29}}
|- align="center"
{{Pokemon/Trainer row|FRLG|Scientist|Rodney|1584}}
|[[File:Pokemon FRLG Team Rocket Grunt M.png]]Grunt
{{Pokemon/Trainer mon|FRLG|101|33}}
| style="background-color:#{{Pokemon color|Normal}};" | [[File:Pokemon 020Raticate.png|40px]]{{bp|Raticate}} 28
| style="background-color:#{{Pokemon color|Psychic}};" | [[File:Pokemon 097Hypno.png|40px]]{{bp|Hypno}} 28
| style="background-color:#{{Pokemon color|Normal}};" | [[File:Pokemon 020Raticate.png|40px]]{{bp|Raticate}} 28
|<br>[[File:Pokebuck.png]]896
|- align="center"
|[[File:Pokemon FRLG Scientist.png]]Jose
| style="background-color:#{{Pokemon color|Electric}};" | [[File:Pokemon 101Electrode.png|40px]]{{bp|Electrode}} 29
| style="background-color:#{{Pokemon color|Poison}};" | [[File:Pokemon 110Weezing.png|40px]]{{bp|Weezing}} 29
|
|<br>[[File:Pokebuck.png]]1392
|}
|}
{{-}}
</div>


== Fourth PoopHead ==
===Items===
[[File:Pokemon FRLG Silph Comapany-4f.png|left|thumb|400px|Silph Company Floor 4]]
* TM41 {{bpm|Torment}} (On a table in the southeast room)
{| {{prettytable|notwide=1|text center=1|}}
* Iron (Hidden in the bottom right plant of the southeast room)
|-
* Full Heal (In the left room, unlocked after obtaining the Card Key)
! style="background-color:#{{Pokemon color|Poison light}};color:#ffffff;" | Name
* Max Revive (In the left room, unlocked after obtaining the Card Key)
! style="background-color:#{{Pokemon color|Poison light}};color:#ffffff;" | 1st
* Escape Rope (In the left room, unlocked after obtaining the Card Key)
! style="background-color:#{{Pokemon color|Poison light}};color:#ffffff;" | 2nd
! style="background-color:#{{Pokemon color|Poison light}};color:#ffffff;" | 3rd
! style="background-color:#{{Pokemon color|Poison light}};color:#ffffff;" | Money
|- align="center"
|[[File:Pokemon FRLG Team Rocket Grunt M.png]]Grunt
| style="background-color:#{{Pokemon color|Poison}};" | [[File:Pokemon 023Ekans.png|40px]]{{bp|Ekans}} 28
| style="background-color:#{{Pokemon color|Poison}};" | [[File:Pokemon 041Zubat.png|40px]]{{bp|Zubat}} 28
| style="background-color:#{{Pokemon color|Ground}};" | [[File:Pokemon 104Cubone.png|40px]]{{bp|Cubone}} 28
|<br>[[File:Pokebuck.png]]800
|- align="center"
|[[File:Pokemon FRLG Team Rocket Grunt M.png]]Grunt
| style="background-color:#{{Pokemon color|Fighting}};" | [[File:Pokemon 066Machop.png|40px]]{{bp|Machop}} 29
| style="background-color:#{{Pokemon color|Psychic}};" | [[File:Pokemon 096Drowzee.png|40px]]{{bp|Drowzee}} 29
|
|<br>[[File:Pokebuck.png]]928
|- align="center"
|[[File:Pokemon FRLG Scientist.png]]Rodney
| style="background-color:#{{Pokemon color|Electric}};" | [[File:Pokemon 101Electrode.png|40px]]{{bp|Electrode}} 33
|
|
|<br>[[File:Pokebuck.png]]1584
|}
{{-}}


== Fifth Floor ==
==5F==
[[File:Pokemon FRLG Silph Comapany-5f.png|left|thumb|400px|Silph Company Floor 5]]
[[File:Pokemon FRLG Silph Co. 5F.png|left|thumb|350px|Silph Co. 5F]]
Don't be confused by all the teleporters: The elevator will take you to any floor you want, and you only need to use one series of teleporters to get to the right part of Floor 11.


First go to Floor 9 take warp tile G to floor 5 and get item A, the '''Card Key'''. With that you can open any of the locked doors.  Then head down to level 3, unlock the door in front of the teleporter marked '''O''', and then take that to the 7th floor, where Gary awaits.
First take warp tile G, then come back though the same warp tile, and follow the path to the right and you'll find the '''Card Key'''. With that you can open any of the locked doors! Check the info in Floor 3 to make your way up to the top!


Be wary of the bald guy on this floor--he's the one of the only ones to use Psychic-types Kadabra and Mr. Mime. If there's a Pokémon on your front line with low HP, it'll be knocked out pretty quick, so be sure to put a strong Pokémon on top before entering battle.
Be wary of the bald guy on this floor, for he's the one of the only ones to use Psychic-types Kadabra and Mr. Mime. If there's a Pokémon on your front line with low HP, it'll be quickly knocked out, so be sure to put a strong Pokémon on top before entering battle.
{{-}}
 
{| {{prettytable|notwide=1|text center=1|}}
===Trainers===
|-
{{ContentBoxContainer}}
! style="background-color:#{{Pokemon color|Psychic light}};color:#ffffff;" | Name
{{Pokemon/Trainer|FRLG}}
! style="background-color:#{{Pokemon color|Psychic light}};color:#ffffff;" | 1st
{{Pokemon/Trainer row|FRLG|Team Rocket Grunt||1056|gender=M}}
! style="background-color:#{{Pokemon color|Psychic light}};color:#ffffff;" | 2nd
{{Pokemon/Trainer mon|FRLG|097|33}}
! style="background-color:#{{Pokemon color|Psychic light}};color:#ffffff;" | 3rd
{{Pokemon/Trainer row|FRLG|Juggler|Dalton|1160}}
! style="background-color:#{{Pokemon color|Psychic light}};color:#ffffff;" | 4th
{{Pokemon/Trainer mon|FRLG|064|29}}
! style="background-color:#{{Pokemon color|Psychic light}};color:#ffffff;" | Money
{{Pokemon/Trainer mon|FRLG|122|29}}
|- align="center"
{{Pokemon/Trainer row|FRLG|Scientist|Beau|1248}}
|[[File:Pokemon FRLG Team Rocket Grunt M.png]]Grunt
{{Pokemon/Trainer mon|FRLG|082|26}}
| style="background-color:#{{Pokemon color|Psychic}};" | [[File:Pokemon 097Hypno.png|40px]]{{bp|Hypno}} 33
{{Pokemon/Trainer mon|FRLG|081|26}}
|
{{Pokemon/Trainer mon|FRLG|109|26}}
|
{{Pokemon/Trainer mon|FRLG|110|26}}
|
{{Pokemon/Trainer row|FRLG|Team Rocket Grunt||928|gender=M}}
|<br>[[File:Pokebuck.png]]1056
{{Pokemon/Trainer mon|FRLG|024|33}}
|- align="center"
|[[File:Pokemon FRLG Juggler.png]]Dalton
| style="background-color:#{{Pokemon color|Psychic}};" | [[File:Pokemon 064Kadabra.png|40px]]{{bp|Kadabra}} 29
| style="background-color:#{{Pokemon color|Psychic}};" | [[File:Pokemon 122Mr.Mime.png|40px]]{{bp|Mr. Mime}} 29
|
|
|<br>[[File:Pokebuck.png]]1160
|- align="center"
|[[File:Pokemon FRLG Scientist.png]]Beau
| style="background-color:#{{Pokemon color|Electric}};" | [[File:Pokemon 082Magneton.png|40px]]{{bp|Magneton}} 26
| style="background-color:#{{Pokemon color|Electric}};" | [[File:Pokemon 081Magnemite.png|40px]]{{bp|Magnemite}} 26
| style="background-color:#{{Pokemon color|Poison}};" | [[File:Pokemon 109Koffing.png|40px]]{{bp|Koffing}} 26
| style="background-color:#{{Pokemon color|Poison}};" | [[File:Pokemon 110Weezing.png|40px]]{{bp|Weezing}} 26
|<br>[[File:Pokebuck.png]]1248
|- align="center"
|[[File:Pokemon FRLG Team Rocket Grunt M.png]]Grunt
| style="background-color:#{{Pokemon color|Poison}};" | [[File:Pokemon 024Arbok.png|40px]]{{bp|Arbok}} 33
|
|
|
|<br>[[File:Pokebuck.png]]928
|}
|}
{{-}}
</div>


== Sixth Floor ==
===Items===
[[File:Pokemon FRLG Silph Comapany-6f.png|left|thumb|400px|Silph Company Floor 6]]
* Protein (In the northwest room, unlocked after obtaining the Card Key)
{| {{prettytable|notwide=1|text center=1|}}
* TM01 {{bpm|Focus Punch}} (In the southwest room, unlocked after obtaining the Card Key)
|-
* PP Up (Hidden in the central right room, in the top right plant)
! style="background-color:#{{Pokemon color|Poison light}};color:#ffffff;" | Name
* Elixir (Hidden in the central left room in the bottom plant)
! style="background-color:#{{Pokemon color|Poison light}};color:#ffffff;" | 1st
* '''Card Key''' (Around the southern area)
! style="background-color:#{{Pokemon color|Poison light}};color:#ffffff;" | 2nd
 
! style="background-color:#{{Pokemon color|Poison light}};color:#ffffff;" | 3rd
==6F==
! style="background-color:#{{Pokemon color|Poison light}};color:#ffffff;" | 4th
[[File:Pokemon FRLG Silph Co. 6F.png|left|thumb|350px|Silph Co. 6F]]
! style="background-color:#{{Pokemon color|Poison light}};color:#ffffff;" | 5th
 
! style="background-color:#{{Pokemon color|Poison light}};color:#ffffff;" | Money
===Trainers===
|- align="center"
{{ContentBoxContainer}}
|[[File:Pokemon FRLG Team Rocket Grunt M.png]]Grunt
{{Pokemon/Trainer|FRLG}}
| style="background-color:#{{Pokemon color|Fighting}};" | [[File:Pokemon 066Machop.png|40px]]{{bp|Machop}} 29
{{Pokemon/Trainer row|FRLG|Team Rocket Grunt||928|gender=M}}
| style="background-color:#{{Pokemon color|Fighting}};" | [[File:Pokemon 067Machoke.png|40px]]{{bp|Machoke}} 29
{{Pokemon/Trainer mon|FRLG|066|29}}
|
{{Pokemon/Trainer mon|FRLG|067|29}}
|
{{Pokemon/Trainer row|FRLG|Team Rocket Grunt||896|gender=M}}
|
{{Pokemon/Trainer mon|FRLG|041|28}}
|<br>[[File:Pokebuck.png]]928
{{Pokemon/Trainer mon|FRLG|041|28}}
|- align="center"
{{Pokemon/Trainer mon|FRLG|042|28}}
|[[File:Pokemon FRLG Team Rocket Grunt M.png]]Grunt
{{Pokemon/Trainer row|FRLG|Scientist|Taylor|1200}}
| style="background-color:#{{Pokemon color|Poison}};" | [[File:Pokemon 041Zubat.png|40px]]{{bp|Zubat}} 28
{{Pokemon/Trainer mon|FRLG|100|25}}
| style="background-color:#{{Pokemon color|Poison}};" | [[File:Pokemon 041Zubat.png|40px]]{{bp|Zubat}} 28
{{Pokemon/Trainer mon|FRLG|109|25}}
| style="background-color:#{{Pokemon color|Poison}};" | [[File:Pokemon 042Golbat.png|40px]]{{bp|Golbat}} 28
{{Pokemon/Trainer mon|FRLG|082|25}}
|
{{Pokemon/Trainer mon|FRLG|081|25}}
|
{{Pokemon/Trainer mon|FRLG|109|25}}
|<br>[[File:Pokebuck.png]]896
|- align="center"
|[[File:Pokemon FRLG Scientist.png]]Taylor
| style="background-color:#{{Pokemon color|Electric}};" | [[File:Pokemon 100Voltorb.png|40px]]{{bp|Voltorb}} 25
| style="background-color:#{{Pokemon color|Poison}};" | [[File:Pokemon 109Koffing.png|40px]]{{bp|Koffing}} 25
| style="background-color:#{{Pokemon color|Electric}};" | [[File:Pokemon 082Magneton.png|40px]]{{bp|Magneton}} 25
| style="background-color:#{{Pokemon color|Electric}};" | [[File:Pokemon 081Magnemite.png|40px]]{{bp|Magnemite}} 25
| style="background-color:#{{Pokemon color|Poison}};" | [[File:Pokemon 109Koffing.png|40px]]{{bp|Koffing}} 25
|<br>[[File:Pokebuck.png]]1200
|}
|}
{{-}}
</div>
<br>


== Seventh Floor ==
===Items===
[[File:Pokemon FRLG Silph Comapany-7f.png|left|thumb|400px|Silph Company Floor 7]]
* HP Up (In the southwest room, unlocked after obtaining the Card Key)
Even if you can best the Rocket members and Scientists here, you'll still be in for a tough fight with your rival.  Bring a wide variety of Pokémon types to exploit his party's weaknesses and ensure that your Pokemon are at least level 40 or above.
* X Special (In the southwest room, unlocked after obtaining the Card Key)
* Carbos (Hidden in the northwest room, in the plant on the left)


After defeating your rival, go back and heal at a Pokemon Center. You only have tougher fights ahead.
==7F==
[[File:Pokemon FRLG Silph Co. 7F.png|left|thumb|350px|Silph Co. 7F]]
Even if you can best the Rocket members and Scientists here, you'll still be in for a tough fight with Blue. Before stepping out of pad '''O''', make sure to bring a wide variety of Pokémon types to exploit his party's weaknesses and ensure that your Pokémon are at least level 35 or above.


Also - you can recieve a level 25 Lapras from the person standing at the other side of the room. It's a very powerful water pokemon, so it's advised you at very least keep it for later stages of the game.
After defeating your rival, go back and heal at either the Pokémon Center, or on the beds located in the Ninth Floor. You only have tougher fights ahead.
 
Also, this is where you can receive a level 25 {{bp|Lapras}} from the person standing at the other side of the room. Lapras can be an excellent addition to your team, especially if you did not choose Squirtle as your starter, as it is a very powerful Water/Ice Pokémon. Step on pad '''P''' and head to the Eleventh Floor and your next challenge!


{{-}}
===Rival battle===
===Rival battle===
{| {{prettytable|notwide=1|text center=1|}}
{{ContentBoxContainer}}
|+If the Player chose Bulbasaur
{{Pokemon/Trainer|FRLG}}
|-
|+'''If you chose Bulbasaur'''
! style="background-color:#{{Pokemon color|Fire light}};color:#ffffff;" | Name
{{Pokemon/Trainer row|FRLG|Rival|Blue|1440}}
! style="background-color:#{{Pokemon color|Fire light}};color:#ffffff;" | 1st
{{Pokemon/Trainer mon|FRLG|018|37}}
! style="background-color:#{{Pokemon color|Fire light}};color:#ffffff;" | 2nd
{{Pokemon/Trainer mon|FRLG|065|35}}
! style="background-color:#{{Pokemon color|Fire light}};color:#ffffff;" | 3rd
{{Pokemon/Trainer mon|FRLG|102|38}}
! style="background-color:#{{Pokemon color|Fire light}};color:#ffffff;" | 4th
{{Pokemon/Trainer mon|FRLG|130|35}}
! style="background-color:#{{Pokemon color|Fire light}};color:#ffffff;" | 5th
{{Pokemon/Trainer mon|FRLG|006|40}}
! style="background-color:#{{Pokemon color|Fire light}};color:#ffffff;" | Money
|- align="center"
|[[File:Pokemon FRLG Rival.png]]Blue
| style="background-color:#{{Pokemon color|Normal}};" | [[File:Pokemon 018Pidgeot.png|40px]]{{bp|Pidgeot}} 37
| style="background-color:#{{Pokemon color|Psychic}};" | [[File:Pokemon 065Alakazam.png|40px]]{{bp|Alakazam}} 35
| style="background-color:#{{Pokemon color|Grass}};" | [[File:Pokemon 102Exeggcute.png|40px]]{{bp|Exeggcute}} 38
| style="background-color:#{{Pokemon color|Water}};" | [[File:Pokemon 130Gyarados.png|40px]]{{bp|Gyarados}} 35
| style="background-color:#{{Pokemon color|Fire}};" | [[File:Pokemon 006Charizard.png|40px]]{{bp|Charizard}} 40
|<br>[[File:Pokebuck.png]]1440
|}
|}
{| {{prettytable|notwide=1|text center=1|}}
{{Pokemon/Trainer|FRLG}}
|+If the Player chose Charmander
|+'''If you chose Charmander'''
|-
{{Pokemon/Trainer row|FRLG|Rival|Blue|1440}}
! style="background-color:#{{Pokemon color|Water light}};color:#ffffff;" | Name
{{Pokemon/Trainer mon|FRLG|018|37}}
! style="background-color:#{{Pokemon color|Water light}};color:#ffffff;" | 1st
{{Pokemon/Trainer mon|FRLG|065|35}}
! style="background-color:#{{Pokemon color|Water light}};color:#ffffff;" | 2nd
{{Pokemon/Trainer mon|FRLG|058|38}}
! style="background-color:#{{Pokemon color|Water light}};color:#ffffff;" | 3rd
{{Pokemon/Trainer mon|FRLG|102|35}}
! style="background-color:#{{Pokemon color|Water light}};color:#ffffff;" | 4th
{{Pokemon/Trainer mon|FRLG|009|40}}
! style="background-color:#{{Pokemon color|Water light}};color:#ffffff;" | 5th
! style="background-color:#{{Pokemon color|Water light}};color:#ffffff;" | Money
|- align="center"
|[[File:Pokemon FRLG Rival.png]]Blue
| style="background-color:#{{Pokemon color|Normal}};" | [[File:Pokemon 018Pidgeot.png|40px]]{{bp|Pidgeot}} 37
| style="background-color:#{{Pokemon color|Psychic}};" | [[File:Pokemon 065Alakazam.png|40px]]{{bp|Alakazam}} 35
| style="background-color:#{{Pokemon color|Fire}};" | [[File:Pokemon 058Growlithe.png|40px]]{{bp|Growlithe}} 38
| style="background-color:#{{Pokemon color|Grass}};" | [[File:Pokemon 102Exeggcute.png|40px]]{{bp|Exeggcute}} 35
| style="background-color:#{{Pokemon color|Water}};" | [[File:Pokemon 009Blastoise.png|40px]]{{bp|Blastoise}} 40
|<br>[[File:Pokebuck.png]]1440
|}
|}
{| {{prettytable|notwide=1|text center=1|}}
{{Pokemon/Trainer|FRLG}}
|+If the Player chose Squirtle
|+'''If you chose Squirtle'''
|-
{{Pokemon/Trainer row|FRLG|Rival|Blue|1440}}
! style="background-color:#{{Pokemon color|Grass light}};color:#ffffff;" | Name
{{Pokemon/Trainer mon|FRLG|018|37}}
! style="background-color:#{{Pokemon color|Grass light}};color:#ffffff;" | 1st
{{Pokemon/Trainer mon|FRLG|003|40}}
! style="background-color:#{{Pokemon color|Grass light}};color:#ffffff;" | 2nd
{{Pokemon/Trainer mon|FRLG|130|38}}
! style="background-color:#{{Pokemon color|Grass light}};color:#ffffff;" | 3rd
{{Pokemon/Trainer mon|FRLG|058|35}}
! style="background-color:#{{Pokemon color|Grass light}};color:#ffffff;" | 4th
{{Pokemon/Trainer mon|FRLG|065|35}}
! style="background-color:#{{Pokemon color|Grass light}};color:#ffffff;" | 5th
! style="background-color:#{{Pokemon color|Grass light}};color:#ffffff;" | Money
|- align="center"
|[[File:Pokemon FRLG Rival.png]]Blue
| style="background-color:#{{Pokemon color|Normal}};" | [[File:Pokemon 018Pidgeot.png|40px]]{{bp|Pidgeot}} 37
| style="background-color:#{{Pokemon color|Psychic}};" | [[File:Pokemon 065Alakazam.png|40px]]{{bp|Alakazam}} 35
| style="background-color:#{{Pokemon color|Water}};" | [[File:Pokemon 130Gyarados.png|40px]]{{bp|Gyarados}} 38
| style="background-color:#{{Pokemon color|Fire}};" | [[File:Pokemon 058Growlithe.png|40px]]{{bp|Growlithe}} 35
| style="background-color:#{{Pokemon color|Grass}};" | [[File:Pokemon 003Venusaur.png|40px]]{{bp|Venusaur}} 40
|<br>[[File:Pokebuck.png]]1440
|}
|}
{{-}}
</div>
<br>
 
{| {{prettytable|notwide=1|text center=1|}}
===More Trainers===
|-
{{ContentBoxContainer}}
! style="background-color:#{{Pokemon color|Ground light}};color:#ffffff;" | Name
{{Pokemon/Trainer|FRLG}}
! style="background-color:#{{Pokemon color|Ground light}};color:#ffffff;" | 1st
{{Pokemon/Trainer row|FRLG|Team Rocket Grunt||928|gender=M}}
! style="background-color:#{{Pokemon color|Ground light}};color:#ffffff;" | 2nd
{{Pokemon/Trainer mon|FRLG|104|29}}
! style="background-color:#{{Pokemon color|Ground light}};color:#ffffff;" | 3rd
{{Pokemon/Trainer mon|FRLG|104|29}}
! style="background-color:#{{Pokemon color|Ground light}};color:#ffffff;" | 4th
{{Pokemon/Trainer row|FRLG|Team Rocket Grunt||832|gender=M}}
! style="background-color:#{{Pokemon color|Ground light}};color:#ffffff;" | Money
{{Pokemon/Trainer mon|FRLG|020|26}}
|- align="center"
{{Pokemon/Trainer mon|FRLG|041|26}}
|[[File:Pokemon FRLG Team Rocket Grunt M.png]]Grunt
{{Pokemon/Trainer mon|FRLG|042|26}}
| style="background-color:#{{Pokemon color|Ground}};" | [[File:Pokemon 104Cubone.png|40px]]{{bp|Cubone}} 29
{{Pokemon/Trainer mon|FRLG|019|26}}
| style="background-color:#{{Pokemon color|Ground}};" | [[File:Pokemon 104Cubone.png|40px]]{{bp|Cubone}} 29
{{Pokemon/Trainer row|FRLG|Scientist|Joshua|1392}}
|
{{Pokemon/Trainer mon|FRLG|101|29}}
|
{{Pokemon/Trainer mon|FRLG|089|29}}
|<br>[[File:Pokebuck.png]]928
{{Pokemon/Trainer row|FRLG|Team Rocket Grunt||928|gender=M}}
|- align="center"
{{Pokemon/Trainer mon|FRLG|027|29}}
|[[File:Pokemon FRLG Team Rocket Grunt M.png]]Grunt
{{Pokemon/Trainer mon|FRLG|028|29}}
| style="background-color:#{{Pokemon color|Normal}};" | [[File:Pokemon 020Raticate.png|40px]]{{bp|Raticate}} 26
| style="background-color:#{{Pokemon color|Poison}};" | [[File:Pokemon 041Zubat.png|40px]]{{bp|Zubat}} 26
| style="background-color:#{{Pokemon color|Poison}};" | [[File:Pokemon 042Golbat.png|40px]]{{bp|Golbat}} 26
| style="background-color:#{{Pokemon color|Normal}};" | [[File:Pokemon 019Rattata.png|40px]]{{bp|Rattata}} 26
|<br>[[File:Pokebuck.png]]832
|- align="center"
|[[File:Pokemon FRLG Scientist.png]]Joshua
| style="background-color:#{{Pokemon color|Electric}};" | [[File:Pokemon 101Electrode.png|40px]]{{bp|Electrode}} 29
| style="background-color:#{{Pokemon color|Poison}};" | [[File:Pokemon 089Muk.png|40px]]{{bp|Muk}} 29
|
|
|<br>[[File:Pokebuck.png]]1392
|- align="center"
|[[File:Pokemon FRLG Team Rocket Grunt M.png]]Grunt
| style="background-color:#{{Pokemon color|Ground}};" | [[File:Pokemon 027Sandshrew.png|40px]]{{bp|Sandshrew}} 29
| style="background-color:#{{Pokemon color|Ground}};" | [[File:Pokemon 028Sandslash.png|40px]]{{bp|Sandslash}} 29
|
|
|<br>[[File:Pokebuck.png]]928
|}
|}
</div>
===New Pokemon===
The person right below your rival will give you a free Lapras!
{{ContentBoxContainer}}
{{Pokemon/New|title=#131 Lapras|contents={{PokePic|Lapras|left}}
Talk to the Silph Co. employee next to Blue after your fight for a well-deserved reward: a Water/Ice-type {{bp|Lapras}}. Apart from Icefall Cave, this is the only place you can get one in the game.
It comes at level 25 without Water Gun but with a bunch of HP. To get anything else good, you'll need to level it up significantly. Level 31's {{bpm|Ice Beam}} and level 49's {{bpm|Hydro Pump}} are fairly strong and you can teach it Surf once you get HM03 from Fuchsia, which is decently powerful, so it should fill in some holes in your offensive line-up.}}
</div>
===Items===
* TM08 {{bpm|Bulk Up}} (In the top room on the east side, unlocked after obtaining the Card Key)
* Calcium (Around the southwest, near the scientist)
* Zinc (Hidden in the top room on the east side, hidden in the bottom plant, unlocked after obtaining the Card Key)
==8F==
[[File:Pokemon FRLG Silph Co. 8F.png|left|thumb|350px|Silph Co. 8F]]


== Eighth Floor ==
===Trainers===
[[File:Pokemon FRLG Silph Comapany-8f.png|left|thumb|400px|Silph Company Floor 8]]
{{ContentBoxContainer}}
{| {{prettytable|notwide=1|text center=1|}}
{{Pokemon/Trainer|FRLG}}
|-
{{Pokemon/Trainer row|FRLG|Team Rocket Grunt||832|gender=M}}
! style="background-color:#{{Pokemon color|Poison light}};color:#ffffff;" | Name
{{Pokemon/Trainer mon|FRLG|020|26}}
! style="background-color:#{{Pokemon color|Poison light}};color:#ffffff;" | 1st
{{Pokemon/Trainer mon|FRLG|042|26}}
! style="background-color:#{{Pokemon color|Poison light}};color:#ffffff;" | 2nd
{{Pokemon/Trainer mon|FRLG|024|26}}
! style="background-color:#{{Pokemon color|Poison light}};color:#ffffff;" | 3rd
{{Pokemon/Trainer mon|FRLG|109|26}}
! style="background-color:#{{Pokemon color|Poison light}};color:#ffffff;" | 4th
{{Pokemon/Trainer row|FRLG|Team Rocket Grunt||896|gender=M}}
! style="background-color:#{{Pokemon color|Poison light}};color:#ffffff;" | Money
{{Pokemon/Trainer mon|FRLG|110|28}}
|- align="center"
{{Pokemon/Trainer mon|FRLG|109|28}}
|[[File:Pokemon FRLG Team Rocket Grunt M.png]]Grunt
{{Pokemon/Trainer mon|FRLG|042|28}}
| style="background-color:#{{Pokemon color|Normal}};" | [[File:Pokemon 020Raticate.png|40px]]{{bp|Raticate}} 26
{{Pokemon/Trainer row|FRLG|Scientist|Parker|1392}}
| style="background-color:#{{Pokemon color|Poison}};" | [[File:Pokemon 042Golbat.png|40px]]{{bp|Golbat}} 26
{{Pokemon/Trainer mon|FRLG|088|29}}
| style="background-color:#{{Pokemon color|Poison}};" | [[File:Pokemon 024Arbok.png|40px]]{{bp|Arbok}} 26
{{Pokemon/Trainer mon|FRLG|101|29}}
| style="background-color:#{{Pokemon color|Poison}};" | [[File:Pokemon 109Koffing.png|40px]]{{bp|Koffing}} 26
|<br>[[File:Pokebuck.png]]832
|- align="center"
|[[File:Pokemon FRLG Team Rocket Grunt M.png]]Grunt
| style="background-color:#{{Pokemon color|Poison}};" | [[File:Pokemon 110Weezing.png|40px]]{{bp|Weezing}} 28
| style="background-color:#{{Pokemon color|Poison}};" | [[File:Pokemon 109Koffing.png|40px]]{{bp|Koffing}} 28
| style="background-color:#{{Pokemon color|Poison}};" | [[File:Pokemon 042Golbat.png|40px]]{{bp|Golbat}} 28
|
|<br>[[File:Pokebuck.png]]896
|- align="center"
|[[File:Pokemon FRLG Scientist.png]]Parker
| style="background-color:#{{Pokemon color|Poison}};" | [[File:Pokemon 088Grimer.png|40px]]{{bp|Grimer}} 29
| style="background-color:#{{Pokemon color|Electric}};" | [[File:Pokemon 101Electrode.png|40px]]{{bp|Electrode}} 29
|
|
|<br>[[File:Pokebuck.png]]1392
|}
|}
{{-}}
</div>


== Ninth Floor ==
===Items===
[[File:Pokemon FRLG Silph Comapany-9f.png|left|thumb|400px|Silph Company Floor 9]]
* Iron (In the east room)
By the time you reach the 9th floor, your team is bound to be a bit worse for the wear.  Visit the woman in the lower-left corner of the floor to fully recover your Pokémon's HP and PP.
* Nugget (Hidden in the east room, in the top plant)
{| {{prettytable|notwide=1|text center=1|}}
|-
! style="background-color:#{{Pokemon color|Psychic light}};color:#ffffff;" | Name
! style="background-color:#{{Pokemon color|Psychic light}};color:#ffffff;" | 1st
! style="background-color:#{{Pokemon color|Psychic light}};color:#ffffff;" | 2nd
! style="background-color:#{{Pokemon color|Psychic light}};color:#ffffff;" | 3rd
! style="background-color:#{{Pokemon color|Psychic light}};color:#ffffff;" | Money
|- align="center"
|[[File:Pokemon FRLG Team Rocket Grunt M.png]]Grunt
| style="background-color:#{{Pokemon color|Poison}};" | [[File:Pokemon 042Golbat.png|40px]]{{bp|Golbat}} 28
| style="background-color:#{{Pokemon color|Psychic}};" | [[File:Pokemon 096Drowzee.png|40px]]{{bp|Drowzee}} 28
| style="background-color:#{{Pokemon color|Psychic}};" | [[File:Pokemon 097Hypno.png|40px]]{{bp|Hypno}} 28
|<br>[[File:Pokebuck.png]]896
|- align="center"
|[[File:Pokemon FRLG Team Rocket Grunt M.png]]Grunt
| style="background-color:#{{Pokemon color|Psychic}};" | [[File:Pokemon 096Drowzee.png|40px]]{{bp|Drowzee}} 28
| style="background-color:#{{Pokemon color|Poison}};" | [[File:Pokemon 088Grimer.png|40px]]{{bp|Grimer}} 28
| style="background-color:#{{Pokemon color|Fighting}};" | [[File:Pokemon 066Machop.png|40px]]{{bp|Machop}} 28
|<br>[[File:Pokebuck.png]]896
|- align="center"
|[[File:Pokemon FRLG Scientist.png]]Ed
| style="background-color:#{{Pokemon color|Electric}};" | [[File:Pokemon 100Voltorb.png|40px]]{{bp|Voltorb}} 28
| style="background-color:#{{Pokemon color|Electric}};" | [[File:Pokemon 082Magneton.png|40px]]{{bp|Magneton}} 28
| style="background-color:#{{Pokemon color|Poison}};" | [[File:Pokemon 109Koffing.png|40px]]{{bp|Koffing}} 28
|<br>[[File:Pokebuck.png]]1344
|}
{{-}}


== Tenth Floor ==
==9F==
[[File:Pokemon FRLG Silph Comapany-10f.png|left|thumb|400px|Silph Company Floor 10]]
[[File:Pokemon FRLG Silph Co. 9F.png|left|thumb|350px|Silph Co. 9F]]
{| {{prettytable|notwide=1|text center=1|}}
By the time you reach the Ninth Floor, your team is bound to be a bit worse for the wear. Visit the woman between the beds in the lower-left corner of the floor to fully recover your Pokémon's HP and PP.
|-
! style="background-color:#{{Pokemon color|Poison light}};color:#ffffff;" | Name
! style="background-color:#{{Pokemon color|Poison light}};color:#ffffff;" | 1st
! style="background-color:#{{Pokemon color|Poison light}};color:#ffffff;" | 2nd
! style="background-color:#{{Pokemon color|Poison light}};color:#ffffff;" | Money
|- align="center"
|[[File:Pokemon FRLG Team Rocket Grunt M.png]]Grunt
| style="background-color:#{{Pokemon color|Fighting}};" | [[File:Pokemon_067Machoke.png|40px]]{{bp|Machoke}} 33
|
|<br>[[File:Pokebuck.png]]1056
|- align="center"
|[[File:Pokemon FRLG Scientist.png]]Travis
| style="background-color:#{{Pokemon color|Electric}};" | [[File:Pokemon 081Magnemite.png|40px]]{{bp|Magnemite}} 29
| style="background-color:#{{Pokemon color|Poison}};" | [[File:Pokemon 109Koffing.png|40px]]{{bp|Koffing}} 29
|<br>[[File:Pokebuck.png]]1392
|}
{{-}}


== Eleventh Floor ==
===Trainers===
[[File:Pokemon FRLG Silph Comapany-11f.png|left|thumb|400px|Silph Company Floor 11]]
{{ContentBoxContainer}}
The teleporter right past Gary (P) takes you directly to the 11th floor, where players will have to deal with two more Rockets before approaching their boss.
{{Pokemon/Trainer|FRLG}}
{| {{prettytable|notwide=1|text center=1|}}
{{Pokemon/Trainer row|FRLG|Team Rocket Grunt||896|gender=M}}
|-
{{Pokemon/Trainer mon|FRLG|042|28}}
! style="background-color:#{{Pokemon color|Normal light}};color:#ffffff;" | Name
{{Pokemon/Trainer mon|FRLG|096|28}}
! style="background-color:#{{Pokemon color|Normal light}};color:#ffffff;" | 1st
{{Pokemon/Trainer mon|FRLG|097|28}}
! style="background-color:#{{Pokemon color|Normal light}};color:#ffffff;" | 2nd
{{Pokemon/Trainer row|FRLG|Team Rocket Grunt||896|gender=M}}
! style="background-color:#{{Pokemon color|Normal light}};color:#ffffff;" | 3rd
{{Pokemon/Trainer mon|FRLG|096|28}}
! style="background-color:#{{Pokemon color|Normal light}};color:#ffffff;" | 4th
{{Pokemon/Trainer mon|FRLG|088|28}}
! style="background-color:#{{Pokemon color|Normal light}};color:#ffffff;" | 5th
{{Pokemon/Trainer mon|FRLG|066|28}}
! style="background-color:#{{Pokemon color|Normal light}};color:#ffffff;" | Money
{{Pokemon/Trainer row|FRLG|Scientist|Ed|1344}}
|- align="center"
{{Pokemon/Trainer mon|FRLG|100|28}}
|[[File:Pokemon FRLG Team Rocket Grunt M.png]]Grunt
{{Pokemon/Trainer mon|FRLG|082|28}}
| style="background-color:#{{Pokemon color|Normal}};" | [[File:Pokemon 019Rattata.png|40px]]{{bp|Rattata}} 25
{{Pokemon/Trainer mon|FRLG|109|28}}
| style="background-color:#{{Pokemon color|Poison}};" | [[File:Pokemon 041Zubat.png|40px]]{{bp|Zubat}} 25
| style="background-color:#{{Pokemon color|Poison}};" | [[File:Pokemon 023Ekans.png|40px]]{{bp|Ekans}} 25
| style="background-color:#{{Pokemon color|Normal}};" | [[File:Pokemon 019Rattata.png|40px]]{{bp|Rattata}} 25
| style="background-color:#{{Pokemon color|Normal}};" | [[File:Pokemon 019Rattata.png|40px]]{{bp|Rattata}} 25
|<br>[[File:Pokebuck.png]]800
|- align="center"
|[[File:Pokemon FRLG Team Rocket Grunt M.png]]Grunt
| style="background-color:#{{Pokemon color|Ground}};" | [[File:Pokemon 104Cubone.png|40px]]{{bp|Cubone}} 32
| style="background-color:#{{Pokemon color|Psychic}};" | [[File:Pokemon 096Drowzee.png|40px]]{{bp|Drowzee}} 32
| style="background-color:#{{Pokemon color|Ground}};" | [[File:Pokemon 105Marowak.png|40px]]{{bp|Marowak}} 32
|
|
|<br>[[File:Pokebuck.png]]1024
|}
|}
{{-}}
</div>
<br>
 
== Boss ==
Then there's Giovanni, the leader of Rocket. After you busted up his racket in [[Pokémon FireRed and LeafGreen/Celadon City|Celadon City]], Giovanni moved his base to [[Pokémon FireRed and LeafGreen/Saffron City|Saffron City]].  It's too bad for him you arrived in time to short-circuit his new scheme.  Defeat Giovanni's {{bp|Nidorino}}, {{bp|Rhyhorn}}, {{bp|Nidoqueen}}, and {{bp|Kangaskhan}} to rescue the Silph Co. president.


He's not any tougher than Gary, but you'll definitely need to be in peak condition to stand a chance.  Before engaging Giovanni, use Dig to warp back to the Pokémon Center, or retrace your steps and take the elevator up to floor 9, where the girl will heal you.
===Items===
* Max Potion (Hidden in the room to the right of the beds, in a space beside the boxes)
* Calcium (Hidden in a room on top of the one containing the boxes, in the plant on the right)


Giovanni is tough, but easily beatable if you make use of type advantages. Nidorino is weak to ground, so dig will make quick work of him here. Rhyhorn is a ground/rock type, so metal claw or water moves work well here. Use a high power attack on Kangaskhan that KOs it in one or two hits. Nidoqueen is a poison/ground Pokemon that is weak against water, ground, psychic, and ice.  
==10F==
[[File:Pokemon FRLG Silph Co. 10F.png|left|thumb|350px|Silph Co. 10F]]


{| {{prettytable|notwide=1|text center=1|}}
===Trainers===
|-
{{ContentBoxContainer}}
! style="background-color:#{{Pokemon color|Poison light}};color:#ffffff;" | Name
{{Pokemon/Trainer|FRLG}}
! style="background-color:#{{Pokemon color|Poison light}};color:#ffffff;" | 1st
{{Pokemon/Trainer row|FRLG|Team Rocket Grunt||1056|gender=M}}
! style="background-color:#{{Pokemon color|Poison light}};color:#ffffff;" | 2nd
{{Pokemon/Trainer mon|FRLG|067|33}}
! style="background-color:#{{Pokemon color|Poison light}};color:#ffffff;" | 3rd
{{Pokemon/Trainer row|FRLG|Scientist|Travis|1392}}
! style="background-color:#{{Pokemon color|Poison light}};color:#ffffff;" | 4th
{{Pokemon/Trainer mon|FRLG|081|29}}
! style="background-color:#{{Pokemon color|Poison light}};color:#ffffff;" | Money
{{Pokemon/Trainer mon|FRLG|109|29}}
|- align="center"
|[[File:Pokemon FRLG Boss Giovanni.png]]Boss Giovanni
| style="background-color:#{{Pokemon color|Poison}};" | [[File:Pokemon 033Nidorino.png|40px]]{{bp|Nidorino}} 37
| style="background-color:#{{Pokemon color|Ground}};" | [[File:Pokemon 111Rhyhorn.png|40px]]{{bp|Rhyhorn}} 37
| style="background-color:#{{Pokemon color|Normal}};" | [[File:Pokemon 115Kangaskhan.png|40px]]{{bp|Kangaskhan}} 35
| style="background-color:#{{Pokemon color|Poison}};" | [[File:Pokemon 031Nidoqueen.png|40px]]{{bp|Nidoqueen}} 41
|[[File:Pokebuck.png]]4100
|}
|}
</div>


After deafeating Giovanni, if you need to, use the PC in the corner. Store and then withdraw a Pokemon to completely heal it. Head back the way you came to the room your battled your rival in and talk to the worker. He'll give you a level 25 Lapras, a water/ice Pokemon that's one of the strongest in the game.
===Items===
* Carbos (In the southwestern room, unlocked after obtaining the Card Key)
* Rare Candy (In the southwestern room, unlocked after obtaining the Card Key)
* Ultra Ball (In the southwestern room, unlocked after obtaining the Card Key)
* HP Up (Hidden in the northeast room's plant)


When you've sent Giovanni running, the president of Silph Co. will be ecstatic that you interrupted his "meeting" with Giovanni. To reward you for breaking Team Rocket's hold on his company, he'll hook you up with the incredible '''Master Ball'''. This technological wonder will catch any Pokémon without fail,but this is the only one you'll get in the entire game, so be sure to save it for a special occasion (such as the [[bp:Legendary beasts|Legendary beasts]]).  When you're finished, you can collect the items in the now Rocket-free lower floors.
==11F==
[[File:Pokemon FRLG Silph Co. 11F.png|left|thumb|350px|Silph Co. 11F]]
The teleporter right past Gary (P) takes you directly to the Eleventh floor, where players will have to deal with two more Rockets before approaching their boss.


== All Roads Lead to Fuchsia City ==
===Trainers===
{| {{prettytable|notwide=1}} width="50%" align="right"
{{ContentBoxContainer}}
! style="background-color:#c080ff;color:#ffffff;" width="50%"| #131 Lapras
{{Pokemon/Trainer|FRLG}}
|-
{{Pokemon/Trainer row|FRLG|Team Rocket Grunt||1024|gender=M}}
|[[File:Pokemon_131Lapras.png|right]]Talk to the Silph Co. employee next to Blue after your fight for a well-deserved reward: a Water/Ice-type {{bp|Lapras}}.  Apart from Icefall Cave, this is the only place you can get one in the game.
{{Pokemon/Trainer mon|FRLG|104|32}}{{Pokemon/Trainer mon|FRLG|096|32}}
 
{{Pokemon/Trainer mon|FRLG|105|32}}
It comes at level 25 without Water Gun but with a bunch of HP. To get anything else good, you'll need to level it up significantly.  Level 31's Ice Beam and level 49's Hydro Pump are fairly strong and you can teach it Surf once you get HM03  from Fuchsia, which is decently powerful, so it should fill in some holes in your offensive line-up.
{{Pokemon/Trainer row|FRLG|Team Rocket Grunt||800|gender=M}}
{{Pokemon/Trainer mon|FRLG|019|25}}
{{Pokemon/Trainer mon|FRLG|041|25}}
{{Pokemon/Trainer mon|FRLG|023|25}}
{{Pokemon/Trainer mon|FRLG|019|25}}
|}
|}
The next destination is [[Pokémon Red and Blue/Fuchsia City|Fuchsia City]], where you can finally get '''HM 03''' (Surf) and '''HM 04''' (Strength), the last items needed on your quest.  There are two major routes you can take: [[Pokémon Red and Blue/Route 12-13|Routes #12 through #15]], which is south of [[Pokémon Red and Blue/Lavender Town|Lavender]], and [[Pokémon Red and Blue/Route 16-18|Routes #16 through #18]], west of [[Pokémon Red and Blue/Celadon City|Celadon City]].  The latter path is quicker (and you can pick up '''HM 02''', Fly, on the way!), so it is covered first.  But you'll need to take [[Pokémon Red and Blue/Route 12-13|Route #12]] to get the '''Super Rod''' at some point.
</div>
{{-}}


== Items ==
===Boss===
===2F===
Then there's Giovanni, the leader of Rocket. After you busted up his racket in [[Pokémon FireRed and LeafGreen/Celadon City|Celadon City]], Giovanni moved his base to [[Pokémon FireRed and LeafGreen/Saffron City|Saffron City]]. It's too bad for him you arrived in time to short-circuit his new scheme. Defeat Giovanni's {{bp|Nidorino}}, {{bp|Rhyhorn}}, {{bp|Nidoqueen}}, and {{bp|Kangaskhan}} to rescue the Silph Co. president.
*Ultra Ball: (hidden) found in the bottom plant of the southwest office.
*Thunder Wave (TM): Lady in the Northwest Office next to boxes.


===3F===
He's not any tougher than Gary, but you'll definitely need to be in peak condition to stand a chance. Before engaging Giovanni, use Dig to warp back to the Pokémon Center, or retrace your steps and take the elevator up to the Ninth Floor, where the girl by the beds will heal you.
*Hyper potion: found near the scientist
*Protein: (hidden) found in the middle plant among the plants in the southeast corner.


===4F===
Giovanni is tough, but easily beatable if you make use of type advantages. Nidorino is weak to ground, so Dig will make quick work of him here. Rhyhorn is a ground/rock type, so Metal Claw or Water moves work well here. Use a high power attack on Kangaskhan that KOs it in one or two hits. Nidoqueen is a Poison/Ground Pokémon that is weak against Water, Ground, Psychic, and Ice.
*TM41 (Torment): found on a table in the southeast room.
*Iron: (hidden) found in the bottom right plant of the southeast room.
*Full heal: found in the left room, unlocked after obtaining the card key.
*Max Revive: found in the left room, unlocked after obtaining the card key.
*Escape Rope: found in the left room, unlocked after obtaining the card key.
===5F===
*Card Key: around the southern area.
*Protein: in the northwest room, unlocked after obtaining the Card Key.
*TM01 (Focus Punch): found in southwest room, unlocked after obtaining the Card Key.
*PP Up: (hidden) found in the central right room in the top right plant.
*Elixer:: (hidden) found in the central left room in the bottom plant.
===6F===
*HP Up: in the southwest room, unlocked after obtaining the Card Key.
*X Special: in the southwest room, unlocked after obtaining the Card Key.
*Carbos: (hidden) found in the northwest room, in the plant on the left.
===7F===
*TM08 (Bulk Up): found in the top room on the east side, unlocked after obtaining the Card Key.
*Calcium: around the southwest, near the scientist.
*Zinc: (hidden) in the top room on the east side, hidden in the bottom plant, unlocked after obtaining the Card Key.


===8F===
{{ContentBoxContainer}}
*Iron: in the east room.
{{Pokemon/Trainer|FRLG}}
*Nugget: (hidden) in the east room, in the top plant.
{{Pokemon/Trainer row|FRLG|Boss Giovanni||4100}}
{{Pokemon/Trainer mon|FRLG|033|37}}
{{Pokemon/Trainer mon|FRLG|111|37}}
{{Pokemon/Trainer mon|FRLG|115|35}}
{{Pokemon/Trainer mon|FRLG|031|41}}
|}
</div>


===9F===
When you've sent Giovanni running, the president of Silph Co. will be ecstatic that you interrupted his "meeting" with Giovanni. To reward you for breaking Team Rocket's hold on his company, he'll hook you up with the incredible '''Master Ball'''. This technological wonder will catch any Pokémon without fail, but this is the only one you'll get in the entire game, so be sure to save it for a special occasion (such as the Legendary beasts). When you're finished, you can collect the items in the now Rocket-free lower floors.
*Max Potion: (hidden) in the room to the right of the beds, in a space beside the boxes.
*Calcium: (hidden) in a room on top of the one containing the boxes, in the plant on the right.


===10F===
===Items===
*Carbos: found in the southwestern room, unlocked after obtaining the Card Key.
* Zinc (On the east side of the floor, reached by taking the elevator up)
*Rare Candy: found in the southwestern room, unlocked after obtaining the Card Key.
* Revive (Hidden outside of the President's office in the middle plant)
*Ultra ball: found in the southwestern room, unlocked after obtaining the Card Key.
* Master Ball (Given to you by Silph Co.'s President after defeating Giovanni)
*HP Up: (hidden) found in the northeast room, in the plant.


===11F===
==Finishing up Saffron City==
*Zinc: found on the east side of the floor, reached by taken the elevator up.
Now that Team Rocket's plans have been thwarted, all the buildings that were blocked by grunts are now accessible such as the Gym and the mimic girl's house. Head back to the {{s|Saffron City|Saffron City Gym}}
*Revive: (hidden) found outside the President's office in the middle plant.


{{Footer Nav|game=Pokémon FireRed and LeafGreen|prevpage=Saffron City|nextpage=Route 16}}

Latest revision as of 18:28, 6 April 2024

It turns out that Silph Co. is being forced to produce advanced technology for Team Rocket. You must reach the top floor and free the company president from Giovanni's clutches. If you roust Giovanni, you won't have to defeat the rest of Team Rocket's agents individually. When you need to heal your Pokémon, look for a woman at the bottom-left corner of the ninth floor.

1F[edit]
Silph Co. 1F

This 11 floor building, with 31 trainer battles, only seems difficult. If you know where to go, you can make it to the top and save the President quickly and easily. Then, after scaring Team Rocket away, you can get the items without opposition. You will need the card to open the door for a warping panel that leads to the Rocket boss. While the warping panels are annoying, the items are well worth it!

The first floor lobby is eerily empty, so just advance to the stairs in the back. Note that the guard blocking the entrance to the building won't stand aside to let you in until you've cleared Pokémon Tower.

Note that the red circles on this map indicate the warp points that connect two teleportation tiles with the same letter to one another. Also, Silph Co. is one of the very few buildings that you can use your running shoes in.

Finally, while it is not recommended, you can skip most fights by following the instructions detailed in the Fifth Floor section.

2F[edit]
Silph Co. 2F

Trainers[edit]

FireRed and LeafGreen
Trainer Pokemon
Team Rocket Grunt
Team Rocket Grunt
Reward: Pokebuck.png800
  • Golbat Golbat Lv. 25
  • Zubat Zubat Lv. 25
  • Zubat Zubat Lv. 25
  • Raticate Raticate Lv. 25
  • Zubat Zubat Lv. 25
Scientist Jerry
Scientist Jerry
Reward: Pokebuck.png1344
  • Magnemite Magnemite Lv. 28
  • Voltorb Voltorb Lv. 28
  • Magneton Magneton Lv. 28
Team Rocket Grunt
Team Rocket Grunt
Reward: Pokebuck.png928
  • Cubone Cubone Lv. 29
  • Zubat Zubat Lv. 29
Scientist Connor
Scientist Connor
Reward: Pokebuck.png1248
  • Grimer Grimer Lv. 26
  • Weezing Weezing Lv. 26
  • Koffing Koffing Lv. 26
  • Weezing Weezing Lv. 26

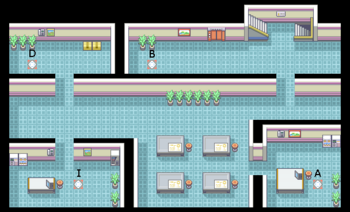
A Move Tutor lady in the northwest office next to the boxes will teach Thunder Wave.

Items[edit]

  • Ultra Ball (Hidden in the bottom plant of the southwest office)

3F[edit]
Silph Co. 3F

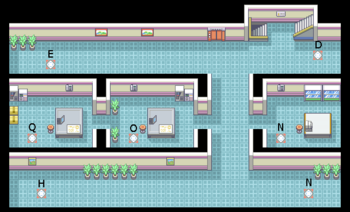
If you need combat experience, don't hesitate to seek out every Team Rocket agent and challenge them to duel.

However, if you want a quick end to this situation, follow the instructions from Fifth Floor so you can grab the Card Key, which will open every electronic door in the building. Then come to the Third Floor, and use warp tile O to reach the 7th floor, then step on warp tile P to reach the hallway outside of the president's office.

Read the info in Seventh Floor for information on the challenges and rewards that await you on that Floor and beyond!

Trainers[edit]

FireRed and LeafGreen
Trainer Pokemon
Team Rocket Grunt
Team Rocket Grunt
Reward: Pokebuck.png896
  • Raticate Raticate Lv. 28
  • Hypno Hypno Lv. 28
  • Raticate Raticate Lv. 28
Scientist Jose
Scientist Jose
Reward: Pokebuck.png1392
  • Electrode Electrode Lv. 29
  • Weezing Weezing Lv. 29

Items[edit]

  • Hyper Potion (Found near the scientist)
  • Protein (Hidden in the middle plant, among the plants in the southeast corner)

4F[edit]
Silph Co. 4F

Trainers[edit]

FireRed and LeafGreen
Trainer Pokemon
Team Rocket Grunt
Team Rocket Grunt
Reward: Pokebuck.png800
  • Ekans Ekans Lv. 28
  • Zubat Zubat Lv. 28
  • Cubone Cubone Lv. 28
Team Rocket Grunt
Team Rocket Grunt
Reward: Pokebuck.png928
  • Machop Machop Lv. 29
  • Drowzee Drowzee Lv. 29
Scientist Rodney
Scientist Rodney
Reward: Pokebuck.png1584
  • Electrode Electrode Lv. 33

Items[edit]

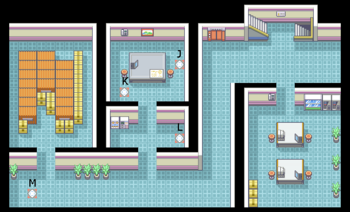
  • TM41 Torment (On a table in the southeast room)
  • Iron (Hidden in the bottom right plant of the southeast room)
  • Full Heal (In the left room, unlocked after obtaining the Card Key)
  • Max Revive (In the left room, unlocked after obtaining the Card Key)
  • Escape Rope (In the left room, unlocked after obtaining the Card Key)

5F[edit]
Silph Co. 5F

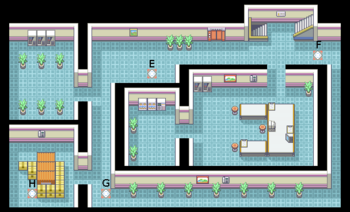
Don't be confused by all the teleporters: The elevator will take you to any floor you want, and you only need to use one series of teleporters to get to the right part of Floor 11.

First take warp tile G, then come back though the same warp tile, and follow the path to the right and you'll find the Card Key. With that you can open any of the locked doors! Check the info in Floor 3 to make your way up to the top!

Be wary of the bald guy on this floor, for he's the one of the only ones to use Psychic-types Kadabra and Mr. Mime. If there's a Pokémon on your front line with low HP, it'll be quickly knocked out, so be sure to put a strong Pokémon on top before entering battle.

Trainers[edit]

FireRed and LeafGreen
Trainer Pokemon
Team Rocket Grunt
Team Rocket Grunt
Reward: Pokebuck.png1056
  • Hypno Hypno Lv. 33
Juggler Dalton
Juggler Dalton
Reward: Pokebuck.png1160
  • Kadabra Kadabra Lv. 29
  • Mr. Mime Mr. Mime Lv. 29
Scientist Beau
Scientist Beau
Reward: Pokebuck.png1248
  • Magneton Magneton Lv. 26
  • Magnemite Magnemite Lv. 26
  • Koffing Koffing Lv. 26
  • Weezing Weezing Lv. 26
Team Rocket Grunt
Team Rocket Grunt
Reward: Pokebuck.png928
  • Arbok Arbok Lv. 33

Items[edit]

  • Protein (In the northwest room, unlocked after obtaining the Card Key)
  • TM01 Focus Punch (In the southwest room, unlocked after obtaining the Card Key)
  • PP Up (Hidden in the central right room, in the top right plant)
  • Elixir (Hidden in the central left room in the bottom plant)
  • Card Key (Around the southern area)

6F[edit]
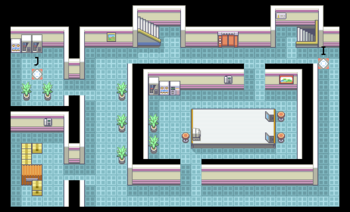
Silph Co. 6F

Trainers[edit]

FireRed and LeafGreen
Trainer Pokemon
Team Rocket Grunt
Team Rocket Grunt
Reward: Pokebuck.png928
  • Machop Machop Lv. 29
  • Machoke Machoke Lv. 29
Team Rocket Grunt
Team Rocket Grunt
Reward: Pokebuck.png896
  • Zubat Zubat Lv. 28
  • Zubat Zubat Lv. 28
  • Golbat Golbat Lv. 28
Scientist Taylor
Scientist Taylor
Reward: Pokebuck.png1200
  • Voltorb Voltorb Lv. 25
  • Koffing Koffing Lv. 25
  • Magneton Magneton Lv. 25
  • Magnemite Magnemite Lv. 25
  • Koffing Koffing Lv. 25

Items[edit]

  • HP Up (In the southwest room, unlocked after obtaining the Card Key)
  • X Special (In the southwest room, unlocked after obtaining the Card Key)
  • Carbos (Hidden in the northwest room, in the plant on the left)

7F[edit]
Silph Co. 7F

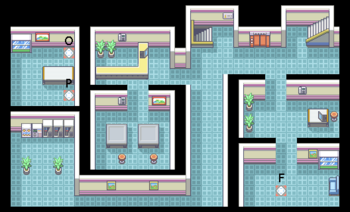
Even if you can best the Rocket members and Scientists here, you'll still be in for a tough fight with Blue. Before stepping out of pad O, make sure to bring a wide variety of Pokémon types to exploit his party's weaknesses and ensure that your Pokémon are at least level 35 or above.

After defeating your rival, go back and heal at either the Pokémon Center, or on the beds located in the Ninth Floor. You only have tougher fights ahead.

Also, this is where you can receive a level 25 Lapras from the person standing at the other side of the room. Lapras can be an excellent addition to your team, especially if you did not choose Squirtle as your starter, as it is a very powerful Water/Ice Pokémon. Step on pad P and head to the Eleventh Floor and your next challenge!

Rival battle[edit]

FireRed and LeafGreen
Trainer Pokemon
If you chose Bulbasaur
Rival Blue
Rival Blue
Reward: Pokebuck.png1440
  • Pidgeot Pidgeot Lv. 37
  • Alakazam Alakazam Lv. 35
  • Exeggcute Exeggcute Lv. 38
  • Gyarados Gyarados Lv. 35
  • Charizard Charizard Lv. 40
FireRed and LeafGreen
Trainer Pokemon
If you chose Charmander
Rival Blue
Rival Blue
Reward: Pokebuck.png1440
  • Pidgeot Pidgeot Lv. 37
  • Alakazam Alakazam Lv. 35
  • Growlithe Growlithe Lv. 38
  • Exeggcute Exeggcute Lv. 35
  • Blastoise Blastoise Lv. 40
FireRed and LeafGreen
Trainer Pokemon
If you chose Squirtle
Rival Blue
Rival Blue
Reward: Pokebuck.png1440
  • Pidgeot Pidgeot Lv. 37
  • Venusaur Venusaur Lv. 40
  • Gyarados Gyarados Lv. 38
  • Growlithe Growlithe Lv. 35
  • Alakazam Alakazam Lv. 35

More Trainers[edit]

FireRed and LeafGreen
Trainer Pokemon
Team Rocket Grunt
Team Rocket Grunt
Reward: Pokebuck.png928
  • Cubone Cubone Lv. 29
  • Cubone Cubone Lv. 29
Team Rocket Grunt
Team Rocket Grunt
Reward: Pokebuck.png832
  • Raticate Raticate Lv. 26
  • Zubat Zubat Lv. 26
  • Golbat Golbat Lv. 26
  • Rattata Rattata Lv. 26
Scientist Joshua
Scientist Joshua
Reward: Pokebuck.png1392
  • Electrode Electrode Lv. 29
  • Muk Muk Lv. 29
Team Rocket Grunt
Team Rocket Grunt
Reward: Pokebuck.png928
  • Sandshrew Sandshrew Lv. 29
  • Sandslash Sandslash Lv. 29

New Pokemon[edit]

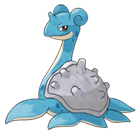
The person right below your rival will give you a free Lapras!
#131 Lapras
Pokemon 131Lapras.png

Talk to the Silph Co. employee next to Blue after your fight for a well-deserved reward: a Water/Ice-type Lapras. Apart from Icefall Cave, this is the only place you can get one in the game.

It comes at level 25 without Water Gun but with a bunch of HP. To get anything else good, you'll need to level it up significantly. Level 31's Ice Beam and level 49's Hydro Pump are fairly strong and you can teach it Surf once you get HM03 from Fuchsia, which is decently powerful, so it should fill in some holes in your offensive line-up.

Items[edit]

  • TM08 Bulk Up (In the top room on the east side, unlocked after obtaining the Card Key)
  • Calcium (Around the southwest, near the scientist)
  • Zinc (Hidden in the top room on the east side, hidden in the bottom plant, unlocked after obtaining the Card Key)

8F[edit]
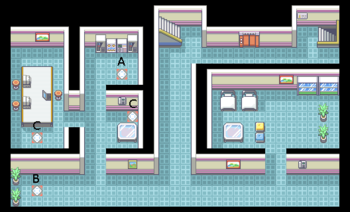
Silph Co. 8F

Trainers[edit]

FireRed and LeafGreen
Trainer Pokemon
Team Rocket Grunt
Team Rocket Grunt
Reward: Pokebuck.png832
  • Raticate Raticate Lv. 26
  • Golbat Golbat Lv. 26
  • Arbok Arbok Lv. 26
  • Koffing Koffing Lv. 26
Team Rocket Grunt
Team Rocket Grunt
Reward: Pokebuck.png896
  • Weezing Weezing Lv. 28
  • Koffing Koffing Lv. 28
  • Golbat Golbat Lv. 28
Scientist Parker
Scientist Parker
Reward: Pokebuck.png1392
  • Grimer Grimer Lv. 29
  • Electrode Electrode Lv. 29

Items[edit]

  • Iron (In the east room)
  • Nugget (Hidden in the east room, in the top plant)

9F[edit]
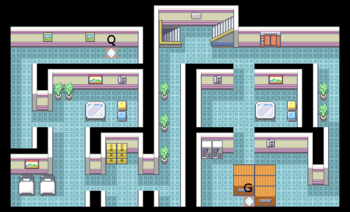
Silph Co. 9F

By the time you reach the Ninth Floor, your team is bound to be a bit worse for the wear. Visit the woman between the beds in the lower-left corner of the floor to fully recover your Pokémon's HP and PP.

Trainers[edit]

FireRed and LeafGreen
Trainer Pokemon
Team Rocket Grunt
Team Rocket Grunt
Reward: Pokebuck.png896
  • Golbat Golbat Lv. 28
  • Drowzee Drowzee Lv. 28
  • Hypno Hypno Lv. 28
Team Rocket Grunt
Team Rocket Grunt
Reward: Pokebuck.png896
  • Drowzee Drowzee Lv. 28
  • Grimer Grimer Lv. 28
  • Machop Machop Lv. 28
Scientist Ed
Scientist Ed
Reward: Pokebuck.png1344
  • Voltorb Voltorb Lv. 28
  • Magneton Magneton Lv. 28
  • Koffing Koffing Lv. 28

Items[edit]

  • Max Potion (Hidden in the room to the right of the beds, in a space beside the boxes)
  • Calcium (Hidden in a room on top of the one containing the boxes, in the plant on the right)

10F[edit]
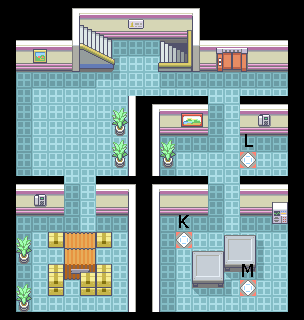
Silph Co. 10F

Trainers[edit]

FireRed and LeafGreen
Trainer Pokemon
Team Rocket Grunt
Team Rocket Grunt
Reward: Pokebuck.png1056
  • Machoke Machoke Lv. 33
Scientist Travis
Scientist Travis
Reward: Pokebuck.png1392
  • Magnemite Magnemite Lv. 29
  • Koffing Koffing Lv. 29

Items[edit]

  • Carbos (In the southwestern room, unlocked after obtaining the Card Key)
  • Rare Candy (In the southwestern room, unlocked after obtaining the Card Key)
  • Ultra Ball (In the southwestern room, unlocked after obtaining the Card Key)
  • HP Up (Hidden in the northeast room's plant)

11F[edit]
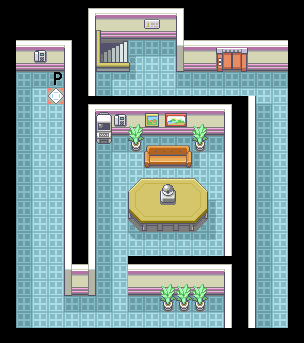
Silph Co. 11F

The teleporter right past Gary (P) takes you directly to the Eleventh floor, where players will have to deal with two more Rockets before approaching their boss.

Trainers[edit]

FireRed and LeafGreen
Trainer Pokemon
Team Rocket Grunt
Team Rocket Grunt
Reward: Pokebuck.png1024
  • Cubone Cubone Lv. 32
  • Drowzee Drowzee Lv. 32
  • Marowak Marowak Lv. 32
Team Rocket Grunt
Team Rocket Grunt
Reward: Pokebuck.png800
  • Rattata Rattata Lv. 25
  • Zubat Zubat Lv. 25
  • Ekans Ekans Lv. 25
  • Rattata Rattata Lv. 25
  • Rattata Rattata Lv. 25

Boss[edit]

Then there's Giovanni, the leader of Rocket. After you busted up his racket in Celadon City, Giovanni moved his base to Saffron City. It's too bad for him you arrived in time to short-circuit his new scheme. Defeat Giovanni's Nidorino, Rhyhorn, Nidoqueen, and Kangaskhan to rescue the Silph Co. president.

He's not any tougher than Gary, but you'll definitely need to be in peak condition to stand a chance. Before engaging Giovanni, use Dig to warp back to the Pokémon Center, or retrace your steps and take the elevator up to the Ninth Floor, where the girl by the beds will heal you.

Giovanni is tough, but easily beatable if you make use of type advantages. Nidorino is weak to ground, so Dig will make quick work of him here. Rhyhorn is a ground/rock type, so Metal Claw or Water moves work well here. Use a high power attack on Kangaskhan that KOs it in one or two hits. Nidoqueen is a Poison/Ground Pokémon that is weak against Water, Ground, Psychic, and Ice.

FireRed and LeafGreen
Trainer Pokemon
Boss Giovanni
Boss Giovanni
Reward: Pokebuck.png4100
  • Nidorino Nidorino Lv. 37
  • Rhyhorn Rhyhorn Lv. 37
  • Kangaskhan Kangaskhan Lv. 35
  • Nidoqueen Nidoqueen Lv. 41

When you've sent Giovanni running, the president of Silph Co. will be ecstatic that you interrupted his "meeting" with Giovanni. To reward you for breaking Team Rocket's hold on his company, he'll hook you up with the incredible Master Ball. This technological wonder will catch any Pokémon without fail, but this is the only one you'll get in the entire game, so be sure to save it for a special occasion (such as the Legendary beasts). When you're finished, you can collect the items in the now Rocket-free lower floors.

Items[edit]

  • Zinc (On the east side of the floor, reached by taking the elevator up)
  • Revive (Hidden outside of the President's office in the middle plant)
  • Master Ball (Given to you by Silph Co.'s President after defeating Giovanni)

Finishing up Saffron City[edit]

Now that Team Rocket's plans have been thwarted, all the buildings that were blocked by grunts are now accessible such as the Gym and the mimic girl's house. Head back to the Saffron City Gym