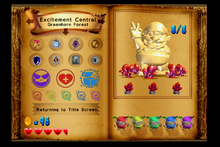
Wario World features a very large assortment of various collectibles throughout Wario's journey across the lands. Each of them serve their own unique purpose. Only several Red Diamonds (to remove the Stone Doohickey covering the boss arena) and the first Spriteling are required to complete the game, but where's the fun in adventure without treasure?
All collectibles can be viewed on the pause screen. A ring of Red Diamonds will surround the Gold Statue in the main panel of the screen, with Spritelings in another panel and Treasures in a third. To review Spriteling tips, simply hover over them with the cursor and press A. The counter on the main panel counts Gold Statue Parts, not Red Diamonds.
Collectibles can also be observed through the To-Do List signs next to level entrances in a condensed fashion. Collecting everything in a stage awards a stamp, listed here.
Red Diamonds[edit]
There are eight Red Diamonds per stage, and they are exclusively located within Trapdoors. Near exclusively they are located at the very end, although a few in the late stages are approximately halfway instead. Upon re-entering a Trapdoor where a Red Diamond has already been collected, the Diamond and the pillar it is on are replaced with a Wooden Chest filled with coins. Unlike most collectibles, there is no reward for getting all eight in a stage, only the required amount to enter the boss arena. The totals required are as follows:
| Diamonds Needed | |
|---|---|
| Excitement Central | 3 |
| Spooktastic World | 4 |
| Thrillsville | 5 |
| Sparkle Land | 6 |
Gold Statue Parts[edit]
There are eight Gold Statue Parts in each level. They can be found either in the main stage or in a Trapdoor, often hidden at the end of puzzles or next to a Red Diamond. As more pieces are collected, they will appear in the Courtyard until the full statue is complete. When all eight pieces are collected in a stage, a cutscene will play and Wario will gain another half heart of health! This is an incredibly useful boost in strength, so try to get every Gold Statue Part possible. While this guide does its best to explain where all parts are, they emit a small glow and a fluttering sound when near, which can help locating parts just out of view.
Spritelings[edit]
There are five colored Spritelings per level. They are trapped in boxes, and make quite a lot of noise to get your attention! Like Gold Statue Parts, they can be found in both the main level or in Trapdoors. If a Trapdoor has a Spriteling, it won't have a Gold Statue Part (and vice versa). When freed, they will give Wario a little piece of advice, generally about something about to show up in the stage. These can be useful tips, so do pay attention to them. The amount of Spritelings freed impacts the ending of the game, so aim to free all 40 for the best ending.
Treasures and Treasure Buttons[edit]
Treasures are the good stuff! There are eight colored Treasures in each stage. Finding the Treasure isn't that simple though, as in order to make the Treasure Chest appear, the Treasure Button must first be pressed. Each Treasure Button and Treasure Chest are color-coordinated. The colors for Treasures are red, yellow, chartreuse, green, light blue, dark blue, purple, and pink. Most Treasures tend to follow a general theme throughout a stage. Collecting every Treasure in a stage will unlock a selection of microgames in the Courtyard.


