Pokémon FireRed and LeafGreen/S.S. Anne: Difference between revisions
TheDragoon (talk | contribs) (Added Maps) |
(Renamed images and redid some section headers) Tags: Mobile edit Mobile web edit |
||
| (35 intermediate revisions by 18 users not shown) | |||
| Line 1: | Line 1: | ||
{{Header Nav|game=Pokémon FireRed and LeafGreen}} | {{Header Nav|game=Pokémon FireRed and LeafGreen}} | ||
This luxury liner is packed with Pokémon trainers from all over the world. It's also the place where you will get HM01 {{bpm|Cut}}. Your best way through the ship is to start by heading to the right. There are many items hidden in this ship and plenty of opportunities to level up your Pokémon and | This luxury liner is packed with Pokémon trainers from all over the world. It's also the place where you will get '''HM01 - {{bpm|Cut}}'''. Your best way through the ship is to start by heading to the right. There are many items hidden in this ship and plenty of opportunities to level up your Pokémon and raise some money by fighting trainers, so don't make the mistake of rushing right through to the Captain at the cockpit, because once you're there, the ship will leave the port and never come back. | ||
==1F== | |||
[[File:Pokemon FRLG S.S. Anne 1F.png|thumb|S.S. Anne 1F]] | |||
On this floor you'll find quite a few trainers, as well as access to the basement and second floors. At the far end of the western hallway you'll find the kitchen, which contains most of the items on this floor. If at any point during your time on the S.S. Anne you find yourself in need of healing, just visit the room directly across from the hallway you entered in. Speak to the girl there to take a break and heal up. | |||
{{-}} | |||
{| {{ | ===Trainers=== | ||
| | {{ContentBoxContainer}} | ||
{{Pokemon/Trainer|FRLG}} | |||
{{Pokemon/Trainer row|FRLG|Gentleman|Thomas|1296}} | |||
{{Pokemon/Trainer mon|FRLG|058|18}} | |||
{{Pokemon/Trainer mon|FRLG|058|18}} | |||
| | {{Pokemon/Trainer row|FRLG|Gentleman|Arthur|1368}} | ||
| | {{Pokemon/Trainer mon|FRLG|032|19}} | ||
| | {{Pokemon/Trainer mon|FRLG|029|19}} | ||
| | {{Pokemon/Trainer row|FRLG|Youngster|Tyler|336}} | ||
| | {{Pokemon/Trainer mon|FRLG|032|21}} | ||
{{Pokemon/Trainer row|FRLG|Lass|Ann|288}} | |||
{{Pokemon/Trainer mon|FRLG|016|18}}{{Pokemon/Trainer mon|FRLG|029|18}} | |||
|} | |} | ||
</div> | |||
== | ===Items=== | ||
{ | * TM 31 {{bpm|Brick Break}} | ||
* Great Ball | |||
* Chesto Berry (Kitchen, hidden in a trash can) | |||
* Cheri Berry (Kitchen, hidden in a trash can) | |||
* Pecha Berry (Kitchen, hidden in a trash can) | |||
==B1F== | |||
[[File:Pokemon FRLG S.S. Anne B1F.png|thumb|S.S. Anne BF1]] | |||
| | To get to this floor, take the stairs in the southeast corner of floor 1. This floor contains lots of sailors itching for a fight as well as a couple items. Remember to head upstairs if any of your Pokémon need healing. All but one Pokémon on this floor is a water type, so keep that in mind as you prepare for battle. | ||
| | {{-}} | ||
| | |||
| | ===Trainers=== | ||
| | {{ContentBoxContainer}} | ||
| | {{Pokemon/Trainer|FRLG}} | ||
| | {{Pokemon/Trainer row|FRLG|Sailor|Duncan |544}} | ||
| | {{Pokemon/Trainer mon|FRLG|116|17}} | ||
| | {{Pokemon/Trainer mon|FRLG|090|17}} | ||
| | {{Pokemon/Trainer mon|FRLG|072|17}} | ||
| | {{Pokemon/Trainer row|FRLG|Sailor|Leonard|672}} | ||
{{Pokemon/Trainer mon|FRLG|090|21}} | |||
| | {{Pokemon/Trainer row|FRLG|Sailor|Dylan|544}} | ||
| | {{Pokemon/Trainer mon|FRLG|116|17}} | ||
| | {{Pokemon/Trainer mon|FRLG|116|17}} | ||
| | {{Pokemon/Trainer mon|FRLG|116|17}} | ||
| | {{Pokemon/Trainer row|FRLG|Sailor|Huey|576}} | ||
| | {{Pokemon/Trainer mon|FRLG|072|18}} | ||
| | {{Pokemon/Trainer mon|FRLG|120|18}} | ||
| | {{Pokemon/Trainer row|FRLG|Fisherman|Barney|612}} | ||
| | {{Pokemon/Trainer mon|FRLG|072|17}} | ||
| | {{Pokemon/Trainer mon|FRLG|120|17}} | ||
| | {{Pokemon/Trainer mon|FRLG|090|17}} | ||
| | {{Pokemon/Trainer row|FRLG|Sailor|Philip|640}} | ||
{{Pokemon/Trainer mon|FRLG|066|20}} | |||
|} | |||
</div> | |||
===Items=== | |||
* TM 44 {{bpm|Rest}} | |||
* Hyper Potion (Hidden near the stairs, in a trash can) | |||
* Super Potion | |||
* Ether | |||
==2F== | |||
[[File:Pokemon FRLG S.S. Anne 2F.png|thumb|S.S. Anne 2F]] | |||
You can access this floor from the stairs on the west side of floor 1. Before you head down to the far eastern end of the hallway, make sure to heal up, as you'll run into your Rival right before the stairs to the 3rd floor. His Abra has evolved into a Kadabra now, so you'll need to watch out for his psychic attacks. Dark moves are the most viable option here, so any Pokémon with Bite should do. | |||
{{-}} | |||
===Trainers=== | |||
{{ContentBoxContainer}} | |||
{{Pokemon/Trainer|FRLG}} | |||
{{Pokemon/Trainer row|FRLG|Fisherman|Dale|612}} | |||
{{Pokemon/Trainer mon|FRLG|118|17}} | |||
{{Pokemon/Trainer mon|FRLG|072|17}} | |||
{{Pokemon/Trainer mon|FRLG|118|17}} | |||
{{Pokemon/Trainer row|FRLG|Gentleman|Brooks|1656}} | |||
{{Pokemon/Trainer mon|FRLG|025|23}} | |||
{{Pokemon/Trainer row|FRLG|Lass|Dawn|288}} | |||
{{Pokemon/Trainer mon|FRLG|019|18}} | |||
{{Pokemon/Trainer mon|FRLG|025|18}} | |||
{{Pokemon/Trainer row|FRLG|Gentleman|Lamar|1224}} | |||
{{Pokemon/Trainer mon|FRLG|058|17}} | |||
{{Pokemon/Trainer mon|FRLG|077|17}} | |||
|} | |||
</div> | |||
===Rival Battle=== | |||
{{ContentBoxContainer}} | |||
{{Pokemon/Trainer|FRLG}} | |||
|+'''If you chose Bulbasaur''' | |||
{{Pokemon/Trainer row|FRLG|Rival|Blue|720}} | |||
{{Pokemon/Trainer mon|FRLG|017|19}} | |||
{{Pokemon/Trainer mon|FRLG|020|16}} | |||
{{Pokemon/Trainer mon|FRLG|064|18}} | |||
{{Pokemon/Trainer mon|FRLG|005|20}} | |||
|} | |} | ||
</div> | |||
{{ContentBoxContainer}} | |||
{{Pokemon/Trainer|FRLG}} | |||
|+'''If you chose Charmander''' | |||
{{Pokemon/Trainer row|FRLG|Rival|Blue|720}} | |||
{{Pokemon/Trainer mon|FRLG|017|19}} | |||
{{Pokemon/Trainer mon|FRLG|020|16}} | |||
{{Pokemon/Trainer mon|FRLG|064|18}} | |||
{{Pokemon/Trainer mon|FRLG|008|20}} | |||
| | |||
| | |||
| | |||
| | |||
| | |||
| | |||
| | |||
|} | |} | ||
</div> | |||
{{ContentBoxContainer}} | |||
{{Pokemon/Trainer|FRLG}} | |||
|+'''If you chose Squirtle''' | |||
{{Pokemon/Trainer row|FRLG|Rival|Blue|720}} | |||
{{Pokemon/Trainer mon|FRLG|017|19}} | |||
{{Pokemon/Trainer mon|FRLG|020|16}} | |||
{{Pokemon/Trainer mon|FRLG|064|18}} | |||
{{Pokemon/Trainer mon|FRLG|002|20}} | |||
| | |||
| | |||
| | |||
| | |||
| | |||
| | |||
| | |||
| | |||
|} | |} | ||
</div> | |||
===Items=== | |||
* Stardust | |||
* X Attack | |||
==Deck== | |||
[[File:Pokemon FRLG S.S. Anne Deck.png|thumb|S.S. Anne Deck]] | |||
There's not much going on up here, just fight the trainers and then head back down the hallway toward's the captain's quarters. | |||
{{-}} | |||
===Trainers=== | |||
| | {{ContentBoxContainer}} | ||
| | {{Pokemon/Trainer|FRLG}} | ||
| | {{Pokemon/Trainer row|FRLG|Sailor|Trevor|544}} | ||
| | {{Pokemon/Trainer mon|FRLG|066|17}} | ||
| | {{Pokemon/Trainer mon|FRLG|072|17}} | ||
| | {{Pokemon/Trainer row|FRLG|Sailor|Edmond|576}} | ||
| | {{Pokemon/Trainer mon|FRLG|066|18}} | ||
{{Pokemon/Trainer mon|FRLG|090|18}} | |||
|} | |} | ||
</div> | |||
==Captain's quarters== | |||
Here is where you'll find the captain. Make sure not to speak with him until you're completely done with the S.S. Anne, since the ship will leave the next time you disembark. Now that the captain has gifted you '''HM01 - Cut''', you'll be able to get into the gym here in Vermillion City. Make sure to enter Diglett's Cave, so you can head back to Route 2 and pick up '''HM05 - Flash''' before you move on to Route 9, as you'll need it to get through the Rock Tunnel at the end of Route 10. | |||
==Items== | ===Items=== | ||
* | * '''HM 01''' {{bpm|Cut}} (Given to you by the Captain) | ||
{{Footer Nav|game=Pokémon FireRed and LeafGreen|prevpage=Vermilion City|nextpage=Route 11}} | {{Footer Nav|game=Pokémon FireRed and LeafGreen|prevpage=Vermilion City|nextpage=Route 11}} | ||
Latest revision as of 15:32, 4 April 2024
This luxury liner is packed with Pokémon trainers from all over the world. It's also the place where you will get HM01 - Cut. Your best way through the ship is to start by heading to the right. There are many items hidden in this ship and plenty of opportunities to level up your Pokémon and raise some money by fighting trainers, so don't make the mistake of rushing right through to the Captain at the cockpit, because once you're there, the ship will leave the port and never come back.
1F[edit]

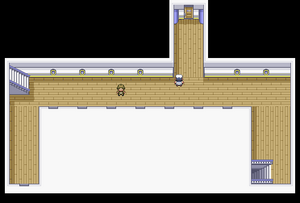
On this floor you'll find quite a few trainers, as well as access to the basement and second floors. At the far end of the western hallway you'll find the kitchen, which contains most of the items on this floor. If at any point during your time on the S.S. Anne you find yourself in need of healing, just visit the room directly across from the hallway you entered in. Speak to the girl there to take a break and heal up.
Trainers[edit]
| FireRed and LeafGreen | |
|---|---|
| Trainer | Pokemon |
Gentleman Thomas Reward: |
|
Gentleman Arthur Reward: |
|
Youngster Tyler Reward: |
|
Lass Ann Reward: |
|
Items[edit]
- TM 31 Brick Break
- Great Ball
- Chesto Berry (Kitchen, hidden in a trash can)
- Cheri Berry (Kitchen, hidden in a trash can)
- Pecha Berry (Kitchen, hidden in a trash can)
B1F[edit]

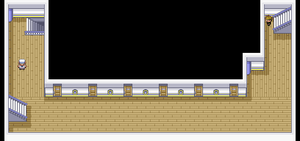
To get to this floor, take the stairs in the southeast corner of floor 1. This floor contains lots of sailors itching for a fight as well as a couple items. Remember to head upstairs if any of your Pokémon need healing. All but one Pokémon on this floor is a water type, so keep that in mind as you prepare for battle.
Trainers[edit]
| FireRed and LeafGreen | |
|---|---|
| Trainer | Pokemon |
Sailor Duncan Reward: |
|
Sailor Leonard Reward: |
|
Sailor Dylan Reward: |
|
Sailor Huey Reward: |
|
 Fisherman Barney Reward: |
|
Sailor Philip Reward: |
|
Items[edit]
- TM 44 Rest
- Hyper Potion (Hidden near the stairs, in a trash can)
- Super Potion
- Ether
2F[edit]

You can access this floor from the stairs on the west side of floor 1. Before you head down to the far eastern end of the hallway, make sure to heal up, as you'll run into your Rival right before the stairs to the 3rd floor. His Abra has evolved into a Kadabra now, so you'll need to watch out for his psychic attacks. Dark moves are the most viable option here, so any Pokémon with Bite should do.
Trainers[edit]
| FireRed and LeafGreen | |
|---|---|
| Trainer | Pokemon |
 Fisherman Dale Reward: |
|
Gentleman Brooks Reward: |
|
Lass Dawn Reward: |
|
Gentleman Lamar Reward: |
|
Rival Battle[edit]
| FireRed and LeafGreen | |
|---|---|
| Trainer | Pokemon |
Rival Blue Reward: |
|
Items[edit]
- Stardust
- X Attack
Deck[edit]

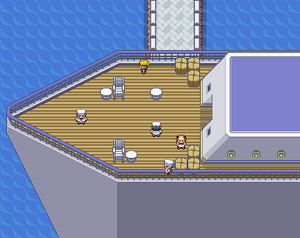
There's not much going on up here, just fight the trainers and then head back down the hallway toward's the captain's quarters.
Trainers[edit]
Captain's quarters[edit]
Here is where you'll find the captain. Make sure not to speak with him until you're completely done with the S.S. Anne, since the ship will leave the next time you disembark. Now that the captain has gifted you HM01 - Cut, you'll be able to get into the gym here in Vermillion City. Make sure to enter Diglett's Cave, so you can head back to Route 2 and pick up HM05 - Flash before you move on to Route 9, as you'll need it to get through the Rock Tunnel at the end of Route 10.
Items[edit]
- HM 01 Cut (Given to you by the Captain)