m (Outdated link.) |
m (Text replacement - "BSM(.*).PNG" to "BSM$1.png") |
||
| (6 intermediate revisions by 6 users not shown) | |||
| Line 7: | Line 7: | ||
==The ''Nachi''== | ==The ''Nachi''== | ||
[[ Image:BSM JavaSea2. | [[ Image:BSM JavaSea2.png|right|thumb|Always try to go broadside with a Tone.]] | ||
Before starting though, there are some things you should know about the ''Nachi''. | Before starting though, there are some things you should know about the ''Nachi''. | ||
*Never, EVER, let your enemies behind you. The ''Nachi'' is a Tone-class heavy cruiser, and is the only class in the game with no rear armament whatsoever. | *Never, EVER, let your enemies behind you. The ''Nachi'' is a ''Tone''-class heavy cruiser, and is the only class in the game with no rear armament whatsoever. | ||
*Unlike the American | *Unlike the American heavy cruisers, the ''Nachi'' carries torpedoes. Use them. | ||
*Ties in with the first point: Always try and go broadside with the enemy. Look at the way the guns are positioned: | *Ties in with the first point: Always try and go broadside with the enemy. Look at the way the guns are positioned: | ||
**Starting from the bow, gun #1 is at deck level. | **Starting from the bow, gun #1 is at deck level. | ||
| Line 19: | Line 19: | ||
==Waves of Cruisers== | ==Waves of Cruisers== | ||
[[Image:BSM_JavaSea1. | [[Image:BSM_JavaSea1.png|right|thumb|Aim for the fuel reserves for a big explosion and a sinking enemy ship.]] | ||
Your group consists of the ''Nachi'' and two Fubuki destroyers on escort. The first wave of Allied ships come in from the northwest, so sail and intercept them. However, take a lesson from the History Channel - when the Japanese attacked, they would form a column, allowing all ships in the formation to fire broadsides at the enemy. Therefore, the first thing you should do is open the Formations menu and arrange your ships so they are in a sharp column, with the enemy coming in from the side. | Your group consists of the ''Nachi'' and two Fubuki destroyers on escort. The first wave of Allied ships come in from the northwest, so sail and intercept them. However, take a lesson from the History Channel - when the Japanese attacked, they would form a column, allowing all ships in the formation to fire broadsides at the enemy. Therefore, the first thing you should do is open the Formations menu and arrange your ships so they are in a sharp column, with the enemy coming in from the side. | ||
| Line 25: | Line 25: | ||
The enemy destroyers will often try to torpedo you here. Do everything you can to evade them. Most players who have passed the mission say that they took at most two torpedo hits from enemy destroyers. You'll need all the help you can get. | The enemy destroyers will often try to torpedo you here. Do everything you can to evade them. Most players who have passed the mission say that they took at most two torpedo hits from enemy destroyers. You'll need all the help you can get. | ||
[[ Image:BSM JavaSea3. | [[ Image:BSM JavaSea3.png|left|thumb|If you can sink the ''Houston'', congratulations!]] | ||
Hopefully by the time you've blown up the destroyers, the enemy cruiser will pull into view. As three of the five enemy cruisers are of the light and not the heavy variety, you should find yourself taking minimal damage, especially from the Atlanta-class; these ships' guns are equivalent to that of a destroyer. | Hopefully by the time you've blown up the destroyers, the enemy cruiser will pull into view. As three of the five enemy cruisers are of the light and not the heavy variety, you should find yourself taking minimal damage, especially from the Atlanta-class; these ships' guns are equivalent to that of a destroyer. | ||
| Line 31: | Line 31: | ||
Regrettably, there is little strategy involved in this map - like [[Battlestations: Midway/Steel Monsters|Steel Monsters]], this mission relies solely on good seamanship. | Regrettably, there is little strategy involved in this map - like [[Battlestations: Midway/Steel Monsters|Steel Monsters]], this mission relies solely on good seamanship. | ||
There is a more time consuming way to win this mission however, and will most likely result in your forces taking less damage. | |||
After the Allied ships spawn, turn your formation away from them so they are chasing your ships. This way their destroyers will catch up to you and the cruiser will be left on its own, allowing you to take away the threat of torpedoes and destroyers getting in your way when attacking the bigger ships. | |||
Be careful, however, not to be cornered when turning. This will obviously result in having nowhere to run but through the Allied ships or trying to go around, putting you in range of the cruiser's guns and all the torpedoes. | |||
{{Footer Nav|game=Battlestations: Midway|prevpage=Strike on the Monster|nextpage=Hunt for the Cruiser}} | {{Footer Nav|game=Battlestations: Midway|prevpage=Strike on the Monster|nextpage=Hunt for the Cruiser}} | ||
Latest revision as of 20:01, 10 August 2022
Primary Objectives
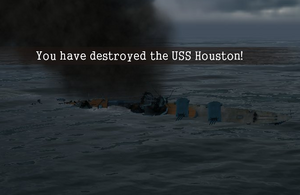
- Destroy the USS Houston
- The Nachi must survive
This mission is extremely tough, but is similar to Strike on the Monster. However, instead of them coming to you, chances are you're going to them. The Allies come in five waves, each consisting of, in most cases, a light cruiser (heavy cruisers are the biggest opponents you'll see - battleships don't appear here, thankfully) and two destroyers sailing escort.
The Nachi[edit]

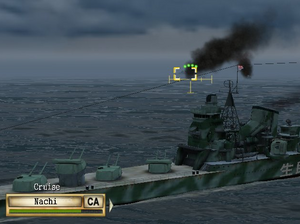
Before starting though, there are some things you should know about the Nachi.
- Never, EVER, let your enemies behind you. The Nachi is a Tone-class heavy cruiser, and is the only class in the game with no rear armament whatsoever.
- Unlike the American heavy cruisers, the Nachi carries torpedoes. Use them.
- Ties in with the first point: Always try and go broadside with the enemy. Look at the way the guns are positioned:
- Starting from the bow, gun #1 is at deck level.
- Gun #2 is elevated above gun #1.
- Guns #3 and #4, however, are at deck level, and cannot fire over gun #2.
The Nachi, therefore, has a firing arc of about 270 degrees, only 40 in which all four cannons may fire on a single target.
Waves of Cruisers[edit]

Your group consists of the Nachi and two Fubuki destroyers on escort. The first wave of Allied ships come in from the northwest, so sail and intercept them. However, take a lesson from the History Channel - when the Japanese attacked, they would form a column, allowing all ships in the formation to fire broadsides at the enemy. Therefore, the first thing you should do is open the Formations menu and arrange your ships so they are in a sharp column, with the enemy coming in from the side.
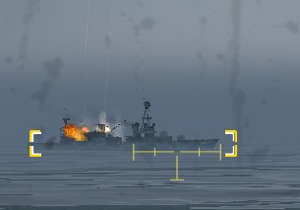
Your first thought may to be to allow your ships to use torpedoes, but you'll likely want to save them for later. The trick here is to aim for the fuel or ammo on an enemy ship - destroying this section will prompt the huge explosion which will sink an enemy ship regardless of how much health it has.
The enemy destroyers will often try to torpedo you here. Do everything you can to evade them. Most players who have passed the mission say that they took at most two torpedo hits from enemy destroyers. You'll need all the help you can get.

Hopefully by the time you've blown up the destroyers, the enemy cruiser will pull into view. As three of the five enemy cruisers are of the light and not the heavy variety, you should find yourself taking minimal damage, especially from the Atlanta-class; these ships' guns are equivalent to that of a destroyer.
By the time the third cruiser rolls around, you'll want to start using your torpedoes. The third wave consists of the Java, the last Atlanta-class cruiser. The Nachi should have little problem eliminating it. The Chester is a Northampton-class heavy cruiser and the second-to-last cruiser in the game - you'll likely take most damage from Chester. You can take advantage of her lack of secondary batteries to close to torpedo range against it. In fact, up-close, your ships have the advantage - the AI is not smart enough to aim for magazine hits. One player recounts of how he charged the Houston and her escorts with his two destroyers, destroying both with point-blank magazine shots, before lodging as many torpedoes as possible into Houston to sink her.
Regrettably, there is little strategy involved in this map - like Steel Monsters, this mission relies solely on good seamanship.
There is a more time consuming way to win this mission however, and will most likely result in your forces taking less damage.
After the Allied ships spawn, turn your formation away from them so they are chasing your ships. This way their destroyers will catch up to you and the cruiser will be left on its own, allowing you to take away the threat of torpedoes and destroyers getting in your way when attacking the bigger ships.
Be careful, however, not to be cornered when turning. This will obviously result in having nowhere to run but through the Allied ships or trying to go around, putting you in range of the cruiser's guns and all the torpedoes.
