(Page started) |
(Page complete) |
||
| Line 12: | Line 12: | ||
The talk of the town is all about the sunken pirate ship Relentless, and its supposed lost treasure, the ''Echoing Flute''. If you haven't found it yet, it would be worth your while to find it. The man who lives in the home just off the port in Lianport is the gentleman looking to reclaim the treasure. You will find an item shop with a good collection of strong weapons and armor, including the Dragon Killer and Magic Armor. In the original version, Magic Armor is a good upgrade for the Prince of Cannock, and an expensive boost in magical defense over the Steel Armor for the Prince of Midenhall. In the remix version, Magic Armor is actually a trade off with the Evade Cloak. You will trade the boost in ability to avoid hits for a small increase in defense against sleep spells. | The talk of the town is all about the sunken pirate ship Relentless, and its supposed lost treasure, the ''Echoing Flute''. If you haven't found it yet, it would be worth your while to find it. The man who lives in the home just off the port in Lianport is the gentleman looking to reclaim the treasure. You will find an item shop with a good collection of strong weapons and armor, including the Dragon Killer and Magic Armor. In the original version, Magic Armor is a good upgrade for the Prince of Cannock, and an expensive boost in magical defense over the Steel Armor for the Prince of Midenhall. In the remix version, Magic Armor is actually a trade off with the Evade Cloak. You will trade the boost in ability to avoid hits for a small increase in defense against sleep spells. | ||
<gallery> | |||
Image:DQ2_Osterfair_Arena.png|Challenging the Saber Lion | |||
Image:DQ2_Osterfair_Crest.png|Being awarded the Moon Crest | |||
</gallery> | |||
{{col|2|begin}} | |||
{| {{prettytable|notwide=1}} style="width:90%;" | |||
|+Osterfair | |||
|- | |||
!colspan="2"|WEAPON SHOP | |||
|- | |||
|Broad Sword||1500G | |||
|- | |||
|Giant Hammer||4000G | |||
|- | |||
|Dragon Killer||8000G | |||
|- | |||
|Clothes Hiding||1250G | |||
|- | |||
|Magic Armor||4300G | |||
|- | |||
|Iron Helmet||3150G | |||
|- | |||
!colspan="2"|INN | |||
|- | |||
|Per person||25G | |||
|} | |||
{{col|2}} | |||
{| {{prettytable|notwide=1}} style="width:90%;" | |||
|+Zahan | |||
|- | |||
!colspan="2"|ITEM SHOP | |||
|- | |||
|Medical Herb||15G | |||
|- | |||
|Anitdote Herb||8G | |||
|- | |||
|Fairy Water||40G | |||
|- | |||
|Dragon's Bane||640G | |||
|- | |||
!colspan="2"|INN | |||
|- | |||
|Per person||20G | |||
|} | |||
{{col|2|end}} | |||
{{-}} | {{-}} | ||
== Zahan == | == Zahan == | ||
| Line 24: | Line 69: | ||
{{spoiler|title=What's up with the dog?|content=The dog knows something important, and is trying to tell you about something it found. When you talk to it, it runs over to the right and stops, facing in the direction of what it discovered. Walk in front of the dog and ''SEARCH'' the tile. You will discover the Gold Key, and will finally be able to return to all of the gold doors you have seen in the past and explore what lies behind them!}} | {{spoiler|title=What's up with the dog?|content=The dog knows something important, and is trying to tell you about something it found. When you talk to it, it runs over to the right and stops, facing in the direction of what it discovered. Walk in front of the dog and ''SEARCH'' the tile. You will discover the Gold Key, and will finally be able to return to all of the gold doors you have seen in the past and explore what lies behind them!}} | ||
== Unlocking old doors == | == Unlocking old doors == | ||
With the Gold Key in hand, we can now revisit older locations that were previously inaccessible. If you wish to find these for yourself, or do not wish to read any spoilers, do not read this section, and continue to the [[Dragon_Warrior_II/Wellgarth_and_Tuhn|next page]]. | |||
{| {{prettytable}} | |||
! Osterfair || Midenhall | |||
|- | |||
| [[Image:DQ2_Osterfair_Gold_Door.png|thumb|left|The gold door of Osterfair]] | |||
A man wanders around the weapon's shop of Osterfair, asking if anyone knows the location of the Armor of Gaia. Interestingly enough, there is a gold door behind the shop keep. It may not be obvious, but if you wander around to the opposite side of the interior of the castle wall, where the Travelers Gate is, the black spot in the wall lines up perfectly with that gold door. Use the key on the door, and you can walk into the shop keep's area. He won't like it, but there's not much he can do about it. You are free to ''SEARCH'' the two chests on either side of him, and you will discover a Magic Knife in the chest below, and the elusive Armor of Gaia in the chest above. Equip the Prince of Midenhall with this impressive armor. | |||
| [[Image:DQ2_Midenhall_Gold_Door.png|thumb|right|The gold door of Midenhall]] | |||
Back where the game started, you may remember a dark corridor where you needed either the Gold Key or the Silver Key to explore any further. Now that you found the Gold Key, the treasure trove that was visible in the south portion of the castle is now accessible. Inside, you will find a few items of small use, except for one chest, which contains the Seal of Erdrick! This is the proof you need of your heritage. Hang on to it, as it is important. If you are playing the remix version of the game, you will also find other substantially more useful items, such as the Life Acorn, STR Seed, and Mystic Nut, which can be used to boost your stats. | |||
|- | |||
! Cannock || Hamlin | |||
|- | |||
| [[Image:DQ2_Cannock_Gold_Door.png|thumb|left|The gold door of Cannock]] | |||
Another important gold door in Cannock separates you from an old man guarding a treasure chest. Surely its contents must be important to be given such a large portion of the castle floor plan. If you visit this area and open the door, you will be invited to the contents of the chest. ''SEARCH'' it and you will find yet another valuable heirloom from the might Erdrick; the Shield of Erdrick. Only the Prince of Midenhall can equip himself with this strongest (uncursed) shield available in the game. | |||
| [[Image:DQ2_Hamlin_Gold_Door.png|thumb|right|The gold door of Hamlin]] | |||
Another old man sits on his own in a small island within the town of Hamlin, where you broke the curse of the Princess of Moonbrooke. A small building sits to the right of the island, and is locked with a gold door. If you open it, you will find a staircase that leads down. Upon visiting it, you will notice a strange sight of two Gremlins locked away in a dungeon which you cannot yet open. It would be best to remember this location. Upon climbing the stairs on the other side, you will find your way to the old man's island, where all he will do is inform you of the assistance that the spirit of Rubiss will provide you with once you collect the five crests, not unlike the information given to you by the descendant of the Dragon Lord in Charlock Castle. | |||
|- | |||
! colspan="2"|Tantegal | |||
|- | |||
| [[Image:DQ2_Tantegal_Gold_Door.png|thumb|left|The gold door of Tantegal]] | |||
Behind this gold door, you will find a woman who declares the building as a sewing shop. She asks if you are looking for some Dew Yarn, and if you say that you are, she will respond by telling you that she is out, but she will politely inform you of where you can find some for yourself: on the third floor of the north Dragon Horn tower. Remember this useful information. | |||
| [[Image:DQ2_Tantegal_Gold_Door2.png|thumb|right|Another gold door in Tantegal]] | |||
You have always been able to see what lies beyond the gold door that is tucked away above the staircase in the weapon shop of Tantegal, but now you can finally open it and talk to the resident inside. As you may have already suspected, this is indeed the cowardly king who fled the occupation of his throne in fear of a potential attack on his life by Hargon and his minions. Even opening the door and talking to him cannot restore his courage. | |||
|} | |||
=== More business in Alefgard === | |||
[[Image:DQ2_Alefgard_Monolith.png|thumb|right|Showing proof of your heritage]] | |||
There are two more things that you can accomplish now in Alefgard. If you are playing the original version of the game, then you can reenter Charlock Castle and explore the locked treasure room all the way at the bottom of the castle, on the same floor as the descendant of the Dragon Lord. However, this is not recommended as the items found down there are generally not worth the effort. If you are playing the remix version, you would have already had the opportunity to plunder its depth and collect the valuable World Map, which makes navigating the open seas far easier. The second task is far more valuable. If you used the gold key to open the door in Midenhall Castle, and opened the chests within, you have picked up the Seal of Erdrick. There is a rather grumpy old man who sits in the Monolith far to the south of Alefgard (where a man once performed a miracle by creating the Rainbow Drop out of the Sun Stone and the Staff of Rain), who refuses to deal with anyone who does not possess proof of their heritage. With the Seal of Erdrick in your possession, you have such proof, and by showing it to him, he will provide you with the Helmet of Erdrick, another valuable defensive item that only the Prince of Midenhall can equip. Once he gives this to you, he will have nothing more to say. | |||
{{Footer Nav|game=Dragon Warrior II|prevpage=The Lighthouse|nextpage=Wellgarth and Tuhn}} | {{Footer Nav|game=Dragon Warrior II|prevpage=The Lighthouse|nextpage=Wellgarth and Tuhn}} | ||
Revision as of 05:14, 29 November 2008
Osterfair

How to find
Osterfair is the easiest island of the eastern hemisphere to identify and locate, as it is rather large. Merely sailing south from Midenhall Castle we'll take you directly to the west side of the island, which is the only side you can access the rest of the island from. A river provides access to the lagoon in the center of the island, from which you can disembark and travel north to the castle above. The enemies which occupy the island are quite powerful, so be sure that you are strong enough to handle the enemies here (approximately Level 20 for the Prince of Midenhall) before visiting.

Osterfair has a few unusual details. You always enter through the interior of the fortress wall, which you can explore all the way around to the other side where you will find a Travelers Gate and a door locked with the Gold Key. Without the Gold Key, you will be unable to both open this door, or the doors that you find upon your arrival to the other side of the Travelers Gate. The inside of the castle holds more interest for now.
Upon arriving inside the castle, you will first wander into an arena area situated in front of the king for his viewing pleasure. If you are at all low on hit points, don't chat with the king just yet; visit the Inn first and restore your health, then approach the king. The king will invite you to take the arena challenge, in which you will be pitted against a fearsome Saber Lion. The Saber Lions are much stronger than their tiger cousins, but you should have an ample amount of hit points to sustain a few hits from the lion before you're in trouble. This three on one fight shouldn't be terribly difficult, and your reward for winning the battle will be one of the five prized crests, the Moon Crest.
The talk of the town is all about the sunken pirate ship Relentless, and its supposed lost treasure, the Echoing Flute. If you haven't found it yet, it would be worth your while to find it. The man who lives in the home just off the port in Lianport is the gentleman looking to reclaim the treasure. You will find an item shop with a good collection of strong weapons and armor, including the Dragon Killer and Magic Armor. In the original version, Magic Armor is a good upgrade for the Prince of Cannock, and an expensive boost in magical defense over the Steel Armor for the Prince of Midenhall. In the remix version, Magic Armor is actually a trade off with the Evade Cloak. You will trade the boost in ability to avoid hits for a small increase in defense against sleep spells.
-
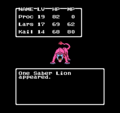
Challenging the Saber Lion
-
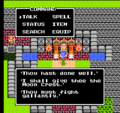
Being awarded the Moon Crest


| WEAPON SHOP | |
|---|---|
| Broad Sword | 1500G |
| Giant Hammer | 4000G |
| Dragon Killer | 8000G |
| Clothes Hiding | 1250G |
| Magic Armor | 4300G |
| Iron Helmet | 3150G |
| INN | |
| Per person | 25G |
| ITEM SHOP | |
|---|---|
| Medical Herb | 15G |
| Anitdote Herb | 8G |
| Fairy Water | 40G |
| Dragon's Bane | 640G |
| INN | |
| Per person | 20G |
Zahan

How to find
The island of Zahan is the smallest populated island in the whole world. On top of that, it's in a very isolated portion of the southern sea. There are two ways to ensure that you will find it when you set sail. One way is to sail to the east side of Osterfair island until only the shoals are visible on the left side of your screen, and then sail south until Zahan comes into view. Another way is to travel above the Spring of Bravery to the three small islands that branch off the continent to the right, and sail north from the center island. If you are approaching from the west, you will find Zahan if you sail east just south of the island that contains the World Tree. The monolith visible to the island's left contains the Travel Gate that is connected to Midenhall Castle.

When you first visit Zahan, there won't be a tremendous amount for you to do here besides talk to people and explore. But there's one important item here that you should find that will open new realms for you to explore. Most of the women here are concerned about the fact that all of the husbands and fathers are gone fishing. But a few have some interesting clues to give about a volcanic sea cave surrounded by shoals, and the fact that you cannot enter it without a fragment of the moon. But they offer no suggestion about where you might find such a fragment.
One boy in town is particularly concerned with the dog on the east side of town, who keeps tugging at his shirt. If you investigate the dog, he will begin to bark, and run a few steps over to the right and stop. Further efforts to interact with him yield no different response. It's obviously trying to tell you something, but what? The entire northern portion of town is occupied by a structure which is apparently home to a wizard. He has covered the floor in a barrier material that damages those who walk on it without the spell of Stepguard to protect them. Even if you do take the time to explore the building, you will find that either of the two rooms toward the back are locked with a prison door to which you do not yet have a key, so you will have to remember this area and return.
The dog knows something important, and is trying to tell you about something it found. When you talk to it, it runs over to the right and stops, facing in the direction of what it discovered. Walk in front of the dog and SEARCH the tile. You will discover the Gold Key, and will finally be able to return to all of the gold doors you have seen in the past and explore what lies behind them!
Unlocking old doors
With the Gold Key in hand, we can now revisit older locations that were previously inaccessible. If you wish to find these for yourself, or do not wish to read any spoilers, do not read this section, and continue to the next page.
| Osterfair | Midenhall |
|---|---|
 A man wanders around the weapon's shop of Osterfair, asking if anyone knows the location of the Armor of Gaia. Interestingly enough, there is a gold door behind the shop keep. It may not be obvious, but if you wander around to the opposite side of the interior of the castle wall, where the Travelers Gate is, the black spot in the wall lines up perfectly with that gold door. Use the key on the door, and you can walk into the shop keep's area. He won't like it, but there's not much he can do about it. You are free to SEARCH the two chests on either side of him, and you will discover a Magic Knife in the chest below, and the elusive Armor of Gaia in the chest above. Equip the Prince of Midenhall with this impressive armor. |
 Back where the game started, you may remember a dark corridor where you needed either the Gold Key or the Silver Key to explore any further. Now that you found the Gold Key, the treasure trove that was visible in the south portion of the castle is now accessible. Inside, you will find a few items of small use, except for one chest, which contains the Seal of Erdrick! This is the proof you need of your heritage. Hang on to it, as it is important. If you are playing the remix version of the game, you will also find other substantially more useful items, such as the Life Acorn, STR Seed, and Mystic Nut, which can be used to boost your stats. |
| Cannock | Hamlin |
 Another important gold door in Cannock separates you from an old man guarding a treasure chest. Surely its contents must be important to be given such a large portion of the castle floor plan. If you visit this area and open the door, you will be invited to the contents of the chest. SEARCH it and you will find yet another valuable heirloom from the might Erdrick; the Shield of Erdrick. Only the Prince of Midenhall can equip himself with this strongest (uncursed) shield available in the game. |
 Another old man sits on his own in a small island within the town of Hamlin, where you broke the curse of the Princess of Moonbrooke. A small building sits to the right of the island, and is locked with a gold door. If you open it, you will find a staircase that leads down. Upon visiting it, you will notice a strange sight of two Gremlins locked away in a dungeon which you cannot yet open. It would be best to remember this location. Upon climbing the stairs on the other side, you will find your way to the old man's island, where all he will do is inform you of the assistance that the spirit of Rubiss will provide you with once you collect the five crests, not unlike the information given to you by the descendant of the Dragon Lord in Charlock Castle. |
| Tantegal | |
 Behind this gold door, you will find a woman who declares the building as a sewing shop. She asks if you are looking for some Dew Yarn, and if you say that you are, she will respond by telling you that she is out, but she will politely inform you of where you can find some for yourself: on the third floor of the north Dragon Horn tower. Remember this useful information. |
 You have always been able to see what lies beyond the gold door that is tucked away above the staircase in the weapon shop of Tantegal, but now you can finally open it and talk to the resident inside. As you may have already suspected, this is indeed the cowardly king who fled the occupation of his throne in fear of a potential attack on his life by Hargon and his minions. Even opening the door and talking to him cannot restore his courage. |
More business in Alefgard

There are two more things that you can accomplish now in Alefgard. If you are playing the original version of the game, then you can reenter Charlock Castle and explore the locked treasure room all the way at the bottom of the castle, on the same floor as the descendant of the Dragon Lord. However, this is not recommended as the items found down there are generally not worth the effort. If you are playing the remix version, you would have already had the opportunity to plunder its depth and collect the valuable World Map, which makes navigating the open seas far easier. The second task is far more valuable. If you used the gold key to open the door in Midenhall Castle, and opened the chests within, you have picked up the Seal of Erdrick. There is a rather grumpy old man who sits in the Monolith far to the south of Alefgard (where a man once performed a miracle by creating the Rainbow Drop out of the Sun Stone and the Staff of Rain), who refuses to deal with anyone who does not possess proof of their heritage. With the Seal of Erdrick in your possession, you have such proof, and by showing it to him, he will provide you with the Helmet of Erdrick, another valuable defensive item that only the Prince of Midenhall can equip. Once he gives this to you, he will have nothing more to say.