WhosAsking (talk | contribs) (Finished section; added image showing location of Kirisa Plant.) |
(Undo revision 1032274 by StonyPony (talk), differences should be documented since GBC was just a port of NES version) |
||
| (14 intermediate revisions by 6 users not shown) | |||
| Line 1: | Line 1: | ||
{{Header Nav|game=Crystalis}} | {{Header Nav|game=Crystalis}} | ||
{| {{prettytable|float=right}} | == Waterfall Valley == | ||
[[File:Crystalis Map WaterfallValley.png|center|800px]] | |||
! | {{-}} | ||
{| {{prettytable|float=right|text center=1}} | |||
! Items to Obtain | |||
|- | |- | ||
| | |[[File:Crystalis PowerUp BallOfWater.gif|44px|Ball of Water]] | ||
|} | |||
{{-|left}} | |||
;Key points | |||
#To/from '''[[../Nadare's|Mt. Sabre North]]'''. Once you go down the slope, you can't reach this again without '''Flight'''. | |||
#To/from '''[[#Portoa|Portoa]]'''. | |||
#To/from '''[[#Waterfall Cave|Waterfall Cave]]'''. | |||
#'''Sacred Lime Tree''' and '''Rage.''' Find the '''Sword of Water''' and he will give you the '''Ball of Water'''.<br/>He also tells you to freeze a bridge using a '''<span style="color:#000080;">Level 2 Water bolt</span>'''. | |||
#'''Mesia's''' Cryogenic Cell. She has left a message for you. | |||
#Fire a '''<span style="color:#000080;">Level 2 Water bolt</span>''' to create ice bridges across these channels. | |||
#To/from '''[[#East Cave|East Cave]]'''. | |||
#To/from '''[[#Kirisa Valley Cave|Kirisa Valley Cave]]'''. | |||
{{-}} | |||
After getting through Mt. Sabre, you should arrive at the top of a slope overlooking the Waterfall Valley. Once you slide down the slope, Portoa is just to your left. | |||
{{-}} | |||
== Portoa == | |||
[[File:Crystalis Map Portoa.png|center]] | |||
{{-}} | |||
{| {{prettytable|float=right|text center=1}} | |||
! Items to Obtain | |||
|- | |- | ||
| | |[[File:Crystalis EventItem FluteOfLime.gif|44px|Flute of Lime]] | ||
|} | |||
{{-|left}} | |||
;Key points | |||
#To/from '''[[#Waterfall Valley|Waterfall Valley]]'''. | |||
#'''Fortune Teller'''. She's not always here... | |||
#A '''Guard''' sometimes blocks the way to the Throne Room. You can '''paralyze''' the guard. | |||
#'''Queen of Portoa'''. She's not always here...<br/>Learn some secrets and she will give you a '''Flute of Lime'''. | |||
#To/from '''[[#Portoa Caves|Portoa Caves]] #1'''. | |||
#To/from '''[[#Portoa Caves|Portoa Caves]] #3'''. | |||
#To/from '''[[#Portoa Caves|Portoa Caves]] #4'''. | |||
#Boat Keeper's House. Find his '''Fog Lamp''' to use his boat to access '''#9'''. | |||
#To '''[[../Joel|Angry Sea]]'''. | |||
{{-}} | |||
{| {{prettytable|float=left|text center=1}} | |||
|+ Stores | |||
! colspan=8 | Pawn Shop Available | |||
|- | |- | ||
| | ! rowspan=2 style="vertical-align:middle"| Inn | ||
! colspan=3 | Armor Shop | |||
! colspan=4 | Tool Shop | |||
|- | |- | ||
| Fruit of Lime | |[[File:Crystalis Armor Bronze.gif|44px|Bronze Armor]] | ||
|[[File:Crystalis Armor Platinum.gif|44px|Platinum Armor]] | |||
|[[File:Crystalis Shields Platinum.gif|44px|Platinum Shield]] | |||
|[[File:Crystalis Consumables MedicalHerb.gif|44px|Medical Herb]] | |||
|[[File:Crystalis Consumables WarpBoots.gif|44px|Warp Boots]] | |||
|[[File:Crystalis Consumables LysisPlant.gif|44px|Lysis Plant]] | |||
|[[File:Crystalis Consumables FruitOfLime.gif|44px|Fruit of Lime]] | |||
|- | |- | ||
| | | 140 || 600 || 2000 || 1500 || 90 || 120 || 200 || 180 | ||
|} | |||
Portoa has a few buildings to visit and an armor ship that offers improved equipment, but the most important location is the castle. Enter the castle. The first time she talks, she seems bored. Once you talk to her and leave, you won't be able to go back in. But the fortune teller will be at her shop now. But she will direct you back to the Queen's chamber. To break this back and forth exchange, leave and return to the palace. Before the guard can block the way to the throne room, cast Paralysis on him and pass through the throne room and the door in the back which is now clear. You will see a cave but won't be able to explore much. But after you do this and then see the fortune teller, the Queen will direct you to the Waterfall Cave and give you a Flute of Lime to use there. | |||
{{-}} | |||
== Waterfall Cave == | |||
[[File:Crystalis Map WaterfallCave.png|center]] | |||
{{-}} | |||
{| {{prettytable|float=right|text center=1}} | |||
! Items to Obtain | |||
|- | |- | ||
| | |[[File:Crystalis EventItem FluteOfLime.gif|44px|Flute of Lime]][[File:Crystalis Weapons SwordOfWater.gif|44px|Sword of Water]][[File:Crystalis WornItems ShieldRing.gif|44px|Shield Ring]] | ||
| | |||
| | |||
|} | |} | ||
{{-|left}} | |||
;Key points | |||
#To/from '''[[#Waterfall Valley|Waterfall Valley]]'''. | |||
#Fire a <span style="color:orange;">'''Level 2 Fire bolt'''</span> to melt each of these ice walls. | |||
#Two petrified people block the way. Play the '''Flute of Lime''' to reanimate them and open the way. | |||
#'''Sword of Water'''. | |||
#'''Flute of Lime'''. | |||
#'''Akahana''' stands here, petrified. Play the '''Flute of Lime''' to reanimate him and get the '''Shield Ring'''. | |||
{{-}} | |||
The flute is used to depetrify two statues blocking further access to the cave. | The flute is used to depetrify two statues blocking further access to the cave. | ||
Be careful in this area. It's full of Medusae. Not only are they invulnerable to any sword you currently have, the grey spells they cast can turn you to stone. Keep a Fruit of | Be careful in this area. It's full of Medusae. Not only are they invulnerable to any sword you currently have, the grey spells they cast can turn you to stone. Keep a Fruit of Lime handy in case you get hit when surrounded. It might also help to have the Paralysis spell on hand in case you need to stun one so you can get around it. | ||
Continue north to the stairs. | Continue north to the stairs. It's best to go for the Sword of Water first, which you get by taking the right fork and melting an Ice Wall. This is because the Medusae are vulnerable to water, giving you a chance to actually fight them back; they give good experience for your level, and combined with Paralysis, you can dispatch plenty of them. | ||
Now return to the fork and go left instead; search along the riverbank for a second Flute of Lime, then look nearby for another statue (it is Akahana). Once he is released, you will receive the Shield Ring, which can double your defense against projectile attacks. | |||
If you return to Portoa, the fortune teller will now direct you to a lake to the south. At the southwest end of the valley is another area with an exit to the north. Here, you will find the lake and Rage, guardian of the Sacred Lime Tree. He will not admit you until you find the Sword of Water; then he will give you the Ball of Water and instruct you to freeze the water where he once stood. This creates a bridge to a room inside the tree. The room is a cryogenic cell like yours. When you enter, a hologram begins to play a message. The woman in the hologram is Mesia, a woman vaguely mentioned previously. Like you, she is from the past and is on a mission. The messsage says she has gone ahead of you and to follow her. | |||
If you return to Portoa, the fortune teller will direct you to a lake to the south. | {{-}} | ||
You | == Portoa Caves == | ||
[[File:Crystalis Map PortoaCaves.png|center|800px]] | |||
{{-}} | |||
{| {{prettytable|float=right|text center=1}} | |||
! Items to Obtain | |||
|- | |||
|[[File:Crystalis Spell Recover.png|44px|Recover Spell]][[File:Crystalis EventItem ShellFlute.gif|44px|Shell Flute]][[File:Crystalis EventItem LovePendant.gif|44px|Love Pendant]] | |||
|} | |||
{{-|left}} | |||
;Key points | |||
#To/from '''[[#Portoa|Portoa]] #5'''. | |||
#Fire a '''<span style="color:#000080;">Level 2 Water bolt</span>''' to create ice bridges across these channels. | |||
#To/from '''[[#Portoa|Portoa]] #6'''. | |||
#To/from '''[[#Portoa|Portoa]] #7'''. | |||
#'''Asina the Elder''' She reveals herself and teaches you '''Recover'''. | |||
#Injured '''Dolphin.''' Offer a '''Medical Herb''' and he will give you the '''Shell Flute'''. | |||
#'''Love Pendant'''. Accessible only when you enter from the Angry Sea | |||
#To/from '''[[../Joel|Angry Sea]]'''. | |||
{{-}} | |||
Now would be a good time to return to Portoa. Be sure to have a Medical Herb on hand. This time, when you go to the palace, the Guard will allow you past and into the underground caves. Using the Ball of Water, freeze a bridge in the underground passage and continue onward. You will emerge in the back of the fortune teller's shop. Proceed through the other door, freeze another bridge, and you will find the hideout of Asina (the true identity of the Queen and the Fortune Teller). She will teach you the magic of Recover, which will let you heal from different conditions. She will also direct you to calm the Angry Sea. On your way out, though, break off to the left and up, creating another ice bridge. You will find a wounded Dolphin there. Offer him your Medical Herb and he will recover. In gratitude, he will give you a Shell Flute to use to call him once you reach the Angry Sea. | |||
{{-}} | |||
== Kirisa Valley Cave == | |||
[[File:Crystalis Map KirisaValleyCave.png|center]] | |||
{{-}} | |||
{| {{prettytable|float=right|text center=1}} | |||
! Items to Obtain | |||
|- | |||
|[[File:Crystalis EventItem KirisaPlant.gif|44px|Kirisa Plant]] | |||
|} | |||
{{-|left}} | |||
;Key points | |||
#To/from '''[[#Waterfall Valley|Waterfall Valley]]'''. | |||
#Fire a <span style="color:#008080;">'''Level 2 Wind bolt'''</span> to blast each of these crumbling walls. | |||
#'''Antidote'''. | |||
#'''Kirisa Plant'''. | |||
{{-}} | |||
[[Image:Crystalis-KirisaPlant.png|right|thumb|The location of the Kirisa Plant]] | |||
To the far southeast of Portoa, you should find a narrow river segment that may be frozen. Cross it, and enter the cave. The simple cave only has one branch to the right, which contains an Antidote on the NES version, or a chest mimic on the GBC version. If you continue south, you should reach the secluded Kirisa Valley, where you can collect Kirisa plants. Avoid the flying insects and the dangerous pollen they scatter and pick one of the plants. This is required if you want to visit [[../Amazones/]]. | |||
{{-}} | |||
== | == East Cave == | ||
[[File:Crystalis Map EastCave.png|center|800px]] | |||
[[ | {{-}} | ||
{| {{prettytable|float=right|text center=1}} | |||
! Items to Obtain | |||
To the east of Portoa, across the river, is the East Cave. | |- | ||
|[[File:Crystalis EventItem FogLamp.gif|44px|Fog Lamp]] | |||
|} | |||
{{-|left}} | |||
;Key points | |||
#To/from '''[[#Waterfall Valley|Waterfall Valley]]'''. | |||
#Fire a <span style="color:#008080;">'''Level 2 Wind bolt'''</span> to blast each of these crumbling walls. | |||
#'''Lysis Plant'''. | |||
#'''Fog Lamp'''. | |||
{{-}} | |||
To the east of Portoa, across the river, is the East Cave. It is a more complex cave, with branches that loop among themselves. | |||
A Lysis plant is found by going straight up at the first branch. | A Lysis plant is found by going straight up at the first branch. | ||
If you're looking for the fog lamp, take the right path on the first branch, south on the second, and right on the third. | If you're looking for the fog lamp, take the right path on the first branch, south on the second, and right on the third. When you go down the stairs, you may go left or right, but turn south at the next branch. At the end of this long and winding path, you should find the Fog Lamp. | ||
With the | With the Fog Lamp, head to the boat rental shop on the west end of town. You will now be able to use the Boat, and thus reach the [[../Joel|Angry Sea]]. | ||
{{Footer Nav|game=Crystalis|prevpage=Nadare's|nextpage=Joel}} | {{Footer Nav|game=Crystalis|prevpage=Nadare's|nextpage=Joel}} | ||
Latest revision as of 09:45, 27 June 2023
Waterfall Valley[edit | edit source]
| Items to Obtain |
|---|
- Key points
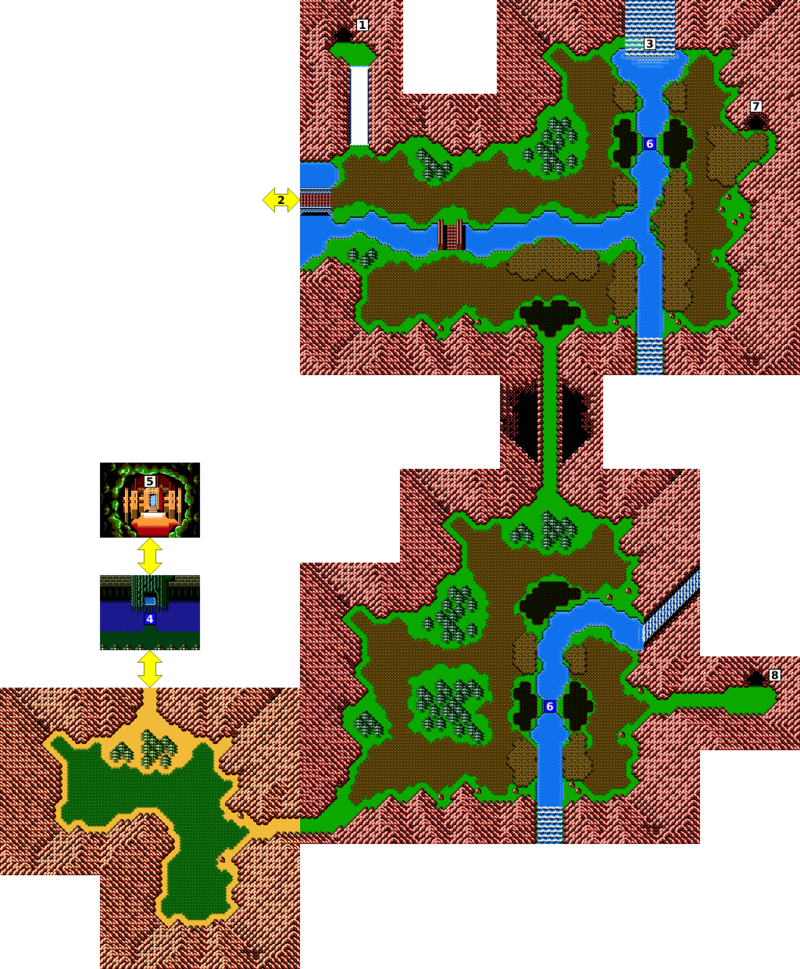
- To/from Mt. Sabre North. Once you go down the slope, you can't reach this again without Flight.
- To/from Portoa.
- To/from Waterfall Cave.
- Sacred Lime Tree and Rage. Find the Sword of Water and he will give you the Ball of Water.
He also tells you to freeze a bridge using a Level 2 Water bolt. - Mesia's Cryogenic Cell. She has left a message for you.
- Fire a Level 2 Water bolt to create ice bridges across these channels.
- To/from East Cave.
- To/from Kirisa Valley Cave.
After getting through Mt. Sabre, you should arrive at the top of a slope overlooking the Waterfall Valley. Once you slide down the slope, Portoa is just to your left.
Portoa[edit | edit source]
| Items to Obtain |
|---|
- Key points
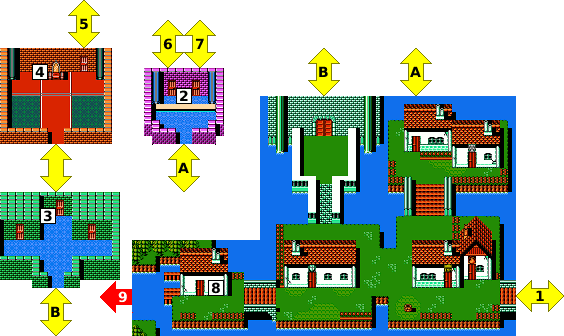
- To/from Waterfall Valley.
- Fortune Teller. She's not always here...
- A Guard sometimes blocks the way to the Throne Room. You can paralyze the guard.
- Queen of Portoa. She's not always here...
Learn some secrets and she will give you a Flute of Lime. - To/from Portoa Caves #1.
- To/from Portoa Caves #3.
- To/from Portoa Caves #4.
- Boat Keeper's House. Find his Fog Lamp to use his boat to access #9.
- To Angry Sea.
| Pawn Shop Available | |||||||
|---|---|---|---|---|---|---|---|
| Inn | Armor Shop | Tool Shop | |||||
| 140 | 600 | 2000 | 1500 | 90 | 120 | 200 | 180 |
Portoa has a few buildings to visit and an armor ship that offers improved equipment, but the most important location is the castle. Enter the castle. The first time she talks, she seems bored. Once you talk to her and leave, you won't be able to go back in. But the fortune teller will be at her shop now. But she will direct you back to the Queen's chamber. To break this back and forth exchange, leave and return to the palace. Before the guard can block the way to the throne room, cast Paralysis on him and pass through the throne room and the door in the back which is now clear. You will see a cave but won't be able to explore much. But after you do this and then see the fortune teller, the Queen will direct you to the Waterfall Cave and give you a Flute of Lime to use there.
Waterfall Cave[edit | edit source]
| Items to Obtain |
|---|
- Key points
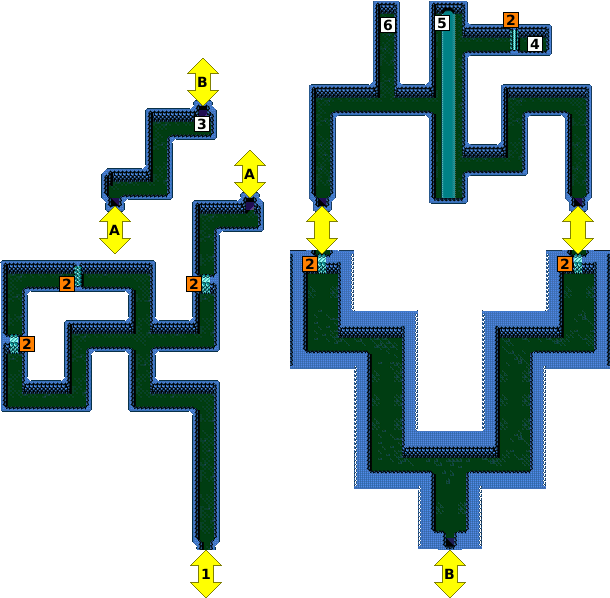
- To/from Waterfall Valley.
- Fire a Level 2 Fire bolt to melt each of these ice walls.
- Two petrified people block the way. Play the Flute of Lime to reanimate them and open the way.
- Sword of Water.
- Flute of Lime.
- Akahana stands here, petrified. Play the Flute of Lime to reanimate him and get the Shield Ring.
The flute is used to depetrify two statues blocking further access to the cave.
Be careful in this area. It's full of Medusae. Not only are they invulnerable to any sword you currently have, the grey spells they cast can turn you to stone. Keep a Fruit of Lime handy in case you get hit when surrounded. It might also help to have the Paralysis spell on hand in case you need to stun one so you can get around it.
Continue north to the stairs. It's best to go for the Sword of Water first, which you get by taking the right fork and melting an Ice Wall. This is because the Medusae are vulnerable to water, giving you a chance to actually fight them back; they give good experience for your level, and combined with Paralysis, you can dispatch plenty of them.
Now return to the fork and go left instead; search along the riverbank for a second Flute of Lime, then look nearby for another statue (it is Akahana). Once he is released, you will receive the Shield Ring, which can double your defense against projectile attacks.
If you return to Portoa, the fortune teller will now direct you to a lake to the south. At the southwest end of the valley is another area with an exit to the north. Here, you will find the lake and Rage, guardian of the Sacred Lime Tree. He will not admit you until you find the Sword of Water; then he will give you the Ball of Water and instruct you to freeze the water where he once stood. This creates a bridge to a room inside the tree. The room is a cryogenic cell like yours. When you enter, a hologram begins to play a message. The woman in the hologram is Mesia, a woman vaguely mentioned previously. Like you, she is from the past and is on a mission. The messsage says she has gone ahead of you and to follow her.
Portoa Caves[edit | edit source]
| Items to Obtain |
|---|
- Key points
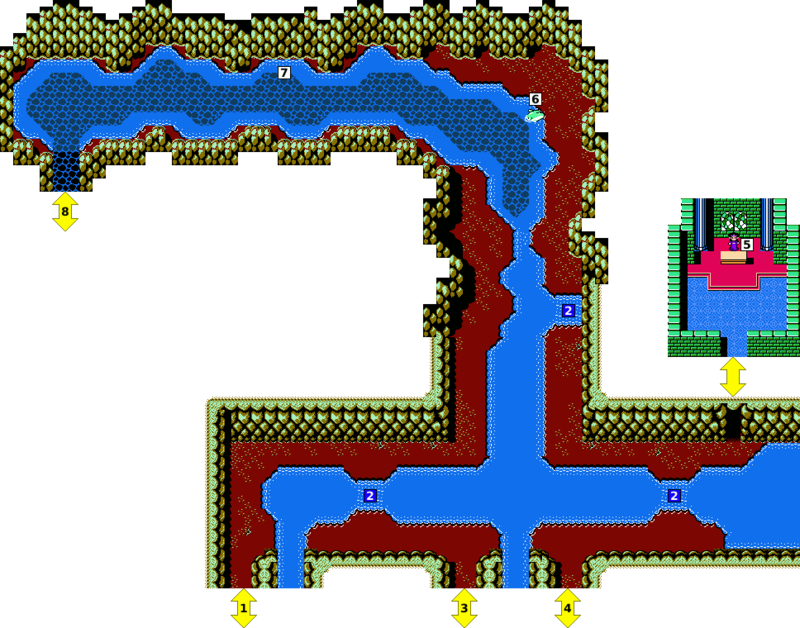
- To/from Portoa #5.
- Fire a Level 2 Water bolt to create ice bridges across these channels.
- To/from Portoa #6.
- To/from Portoa #7.
- Asina the Elder She reveals herself and teaches you Recover.
- Injured Dolphin. Offer a Medical Herb and he will give you the Shell Flute.
- Love Pendant. Accessible only when you enter from the Angry Sea
- To/from Angry Sea.
Now would be a good time to return to Portoa. Be sure to have a Medical Herb on hand. This time, when you go to the palace, the Guard will allow you past and into the underground caves. Using the Ball of Water, freeze a bridge in the underground passage and continue onward. You will emerge in the back of the fortune teller's shop. Proceed through the other door, freeze another bridge, and you will find the hideout of Asina (the true identity of the Queen and the Fortune Teller). She will teach you the magic of Recover, which will let you heal from different conditions. She will also direct you to calm the Angry Sea. On your way out, though, break off to the left and up, creating another ice bridge. You will find a wounded Dolphin there. Offer him your Medical Herb and he will recover. In gratitude, he will give you a Shell Flute to use to call him once you reach the Angry Sea.
Kirisa Valley Cave[edit | edit source]
| Items to Obtain |
|---|
- Key points
- To/from Waterfall Valley.
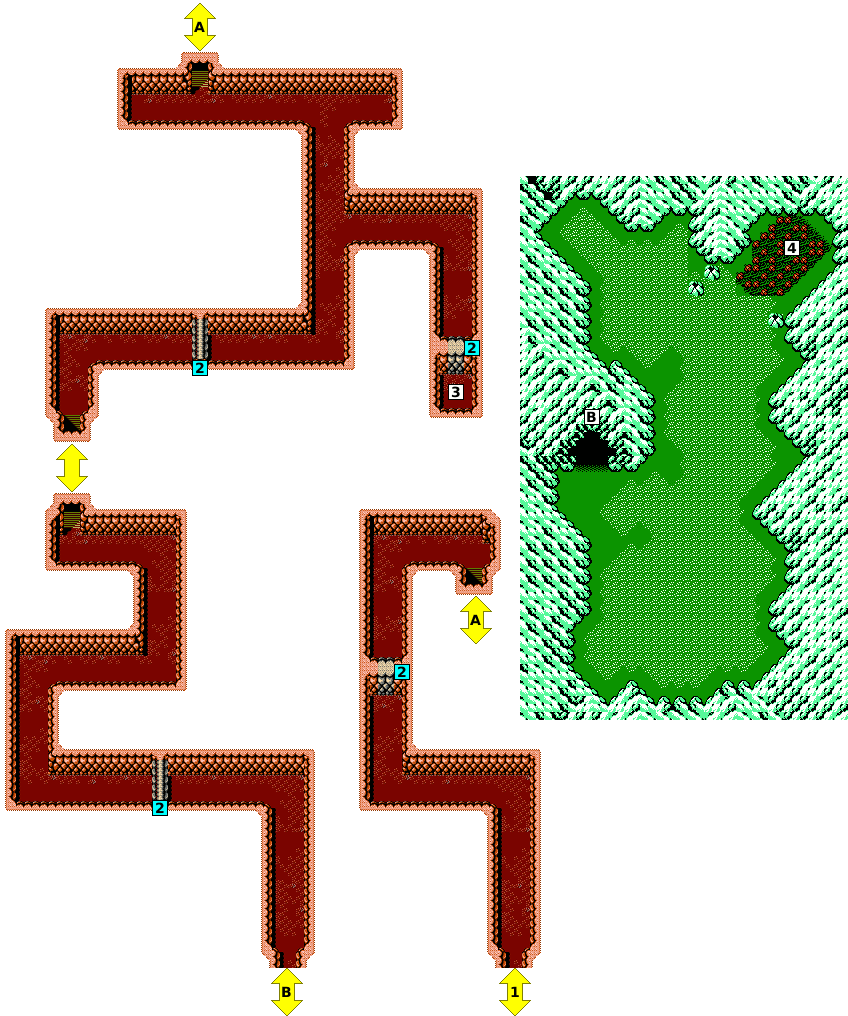
- Fire a Level 2 Wind bolt to blast each of these crumbling walls.
- Antidote.
- Kirisa Plant.
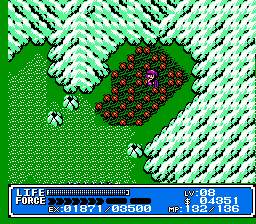
To the far southeast of Portoa, you should find a narrow river segment that may be frozen. Cross it, and enter the cave. The simple cave only has one branch to the right, which contains an Antidote on the NES version, or a chest mimic on the GBC version. If you continue south, you should reach the secluded Kirisa Valley, where you can collect Kirisa plants. Avoid the flying insects and the dangerous pollen they scatter and pick one of the plants. This is required if you want to visit Amazones.
East Cave[edit | edit source]
| Items to Obtain |
|---|
- Key points
- To/from Waterfall Valley.
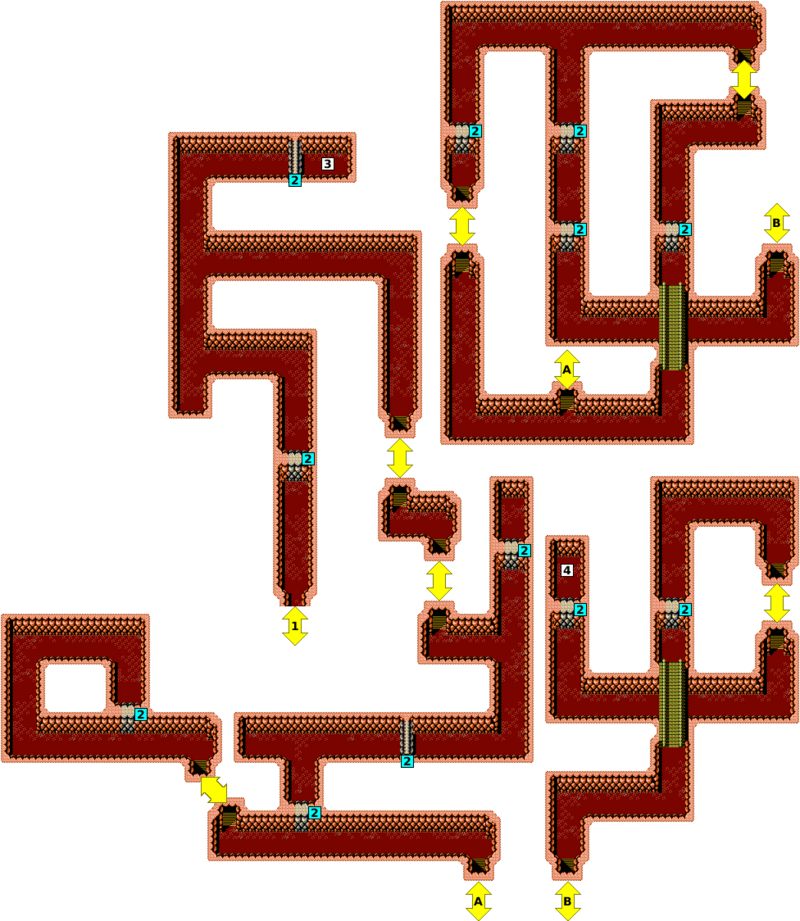
- Fire a Level 2 Wind bolt to blast each of these crumbling walls.
- Lysis Plant.
- Fog Lamp.
To the east of Portoa, across the river, is the East Cave. It is a more complex cave, with branches that loop among themselves.
A Lysis plant is found by going straight up at the first branch.
If you're looking for the fog lamp, take the right path on the first branch, south on the second, and right on the third. When you go down the stairs, you may go left or right, but turn south at the next branch. At the end of this long and winding path, you should find the Fog Lamp.
With the Fog Lamp, head to the boat rental shop on the west end of town. You will now be able to use the Boat, and thus reach the Angry Sea.
