Eight worlds of blood, sweat and tears boil down to a final assault on Bowser's menacing Castle. It's been a long and difficult fight, but you've made it to Bowser's creepy looking Castle of Koopa. A long time has passed since Mario and Bowser first met. You've seen how Mario has changed since then—now find out how time has treated Bowser!
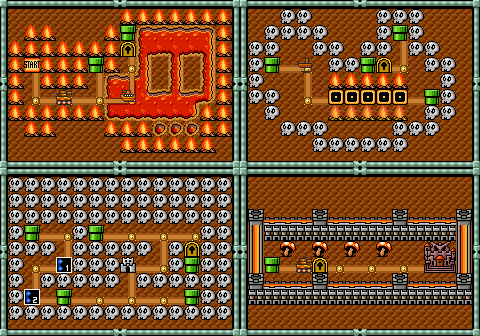
*Right at the beginning run forward. The Bowser statues here shoot lasers, and you don't want to get hit by these.
* '''1''': Bowser is a vain creature, and the statues he set up in his own image shoot laser beams from their mouths! Dash as fast as you can underneath the statues. If you slow down, you'll get drilled by a laser.
*When you see a gap in the ceiling, walk to it and a platform will automatically transport you up. Once there, run to the right and onto the donut block to fall down again. After having climbed the stairs, you can get a hidden 1-up mushroom by jumping at the northeast corner.
[[File:SMB3 W8 BC c.png|right]]
*The large area with donut blocks has four possible paths. The second one from the top just has a raccoon leaf, the bottommost one is a trap and leads back to the entrance. The topmost one and the third one from the top, however, lead to the second part.
* '''2''': Catch the Donut Lift in the area to the corridor above. The lift is invisible until you walk on top of it. If you miss the lift go through the door and come back again—it'll be there for you. The door will transport you to the room shown to the right. When you reach the top, stay on the Donut Lift until you see an opening to the right, then jump for it. If you miss the opening, you'll fall into a bottomless pit.
* '''3''': This stairway can be tricky. Crouch on the step near the hub of the Roto-Disc to avoid its whirling attack. Then move slowly past them to ensure you don't get burned. While you're at the top, grab the 1-Up in the Invisible Block.
* '''4''': Bowser's Fortress is like a maze—if you take the wrong path, you'll end up back at the beginning! Enter the door to reset all of the '''?''' Blocks in Bowser's Castle. Go back and grab a power-up as many times as you need.
{{Scrolling map|SMB3 W8 BC b.png}}
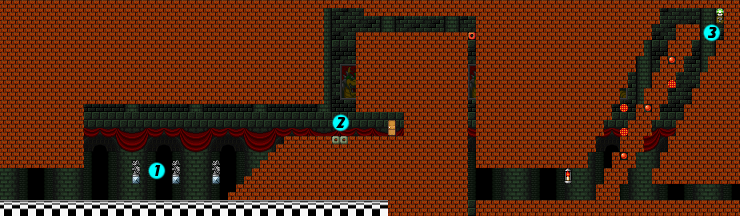
* '''5''': Donut Lifts will crash down if you hesitate too long between jumps, so keep on trucking at a brisk pace. Podoboos leap out of the lava and guard several gaps that you must cross. Try to make your way up as high as you can on these Donut Lifts, it will be to your advantage. In any event, be careful; these lifts are the only thing between you and molten lava.
* '''6''': One method of reaching Bowser is to take the top of the three passages at the end of the fiery chamber. You'll be taken to the top map of Part 2, where you'll have to content with fewer laser spitting statues, but more precision jumping.
* '''7''': At the end of the middle of the three passages on the far-right side of the fiery chamber, you can pick up a much needed power-up. Use the Donut Lift to drop to the passage below.
* '''8''': Bowser's Castle is full of crafty traps. Spring this Thwomp, then jump over him onto the Donut Lift. Fall down with the lift, and jump off at the last moment to reach the door which will take you to the lower of the two maps in Part 2.
* '''9''': You will reach this map if you took the door to the right of point 6. You'll have to dodge the lasers from four Bowser statues, until you reach the Donut Lifts. Bowser breathes fire at you while you try to cross the lava. The fireballs move slowly, making them hard to jump over. What's worse, you can't stand on the Donut Lifts for long before they begin to sink into the lava. No matter what, you must keep moving.
{{Scrolling map|SMB3 W8 BC e.png}}
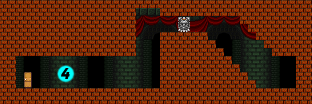
*If you took the top path, the room looks like on the top map. If you took the bottom path, the room looks like on the bottom map. In both cases, go forward and jump over the Bowser statue. Only the first one shoots lasers, the others don't this time around.
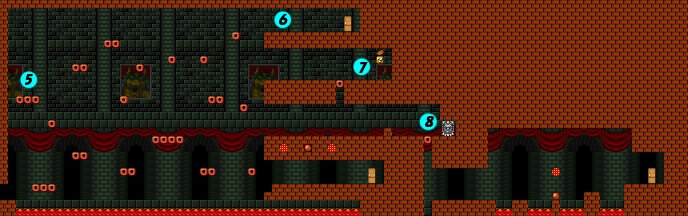
* '''10''': You'll reach this map instead if you dropped down with the Donut Lift at point 8, and made your way to the door below. This route has 5 laser shooting Bowser statues to contend with, but it offers a small reward in the form of a power-up in the '''?''' Block. Rather than dealing with Donut Lifts, you can strategically time your jumps over Bowser's breath on the solid brick platforms, but leap carefully, as they are quite small and difficult to land on.
*The top path has large platforms of donut blocks and is thus easier. The bottom path has narrow blocks and is considered the harder path to take. In both cases, Bowser will start shooting flames at you which you have to avoid while crossing the lava pit.
*Yes, there are two different Bowser fights! If you took the top path, it will be the top one, if you took the bottom path you'll arrive at the bottom one.
===B: Bowser===
*Bowser's attacking pattern consists of first shooting flames at you, then trying to buttstomp you which you have to avoid.
The King of the Koopas has barricaded himself in the bowels of his grand castle. Innumerable traps guard every approach to Bowser's throne room—use every technique you've mastered to reach the final confrontation.
*Unlike his Koopalings, you cannot jump on Bowser. However, the red brick blocks break when Bowser buttstomps them. Use this to your advantage by dodging him until he has dug all the way to the bottom. Once he has created a hole like this, he will fall down and die. The bottom Bowser is considered easier because it makes it much easier for Bowser to fall down.
{|
*You can also shoot fireballs at Bowser to defeat him, but it will be a long fight - he takes a total of 25 fireballs before he finally dies, which is sure to take a very long time.
| [[File:SMB3 W8 BC f1.png|thumb|From the top map of Part 2]]
*If you managed to take Hammer Mario all the way to Bowser, you'll get a huge bonus - Bowser dies to three hammers thrown at him. Since he is largely stationary, it is dead easy to throw hammers at him (unlike Boom-Boom), which ensures a quick win.
| style="vertical-align:top;" | [[File:SMB3 W8 BC f2.png|thumb|right|From the bottom map of Part 2]]
*After Bowser has died, wait until the fanfare ends. The door will open, enter it to rescue the Princess! The credits will start afterwards.
* When Bowser unleashes his horrendous breath, either jump or crouch to avoid the fireballs. Stay in position until Bowser leaps into the air, then scurry away to a safe spot.
*If you wish, you can start a new game after the credits have ended. There is no second quest for you, but instead you start out with 28 P-Wings - a large bonus!
* After breathing fire at you, Bowser will jump high into the air and crash down on the place you were standing just before he jumped. When he lands, he'll bust through a layer of blocks beneath him.
* When Bowser jumps again, move into the depression he just landed in and wait there, dodging fireballs, until he leaps into the air. Hop out of the way at the last instant. Bowser will pound the weakened area of the floor you just scrambled out of. If he crashes down onto the same section three times, Bowser will fall into a bottomless pit!
* You score 100 points if you defeat Bowser with fireballs.
* And finally, Mario will rescue Princess Toadstool from Bowser.
|}
{{Footer Nav|game=Super Mario Bros. 3|prevpage=World 8 Part 2}}
{{Footer Nav|game=Super Mario Bros. 3|prevpage=World 8 Part 2}}
Eight worlds of blood, sweat and tears boil down to a final assault on Bowser's menacing Castle. It's been a long and difficult fight, but you've made it to Bowser's creepy looking Castle of Koopa. A long time has passed since Mario and Bowser first met. You've seen how Mario has changed since then—now find out how time has treated Bowser!
1: Bowser is a vain creature, and the statues he set up in his own image shoot laser beams from their mouths! Dash as fast as you can underneath the statues. If you slow down, you'll get drilled by a laser.
2: Catch the Donut Lift in the area to the corridor above. The lift is invisible until you walk on top of it. If you miss the lift go through the door and come back again—it'll be there for you. The door will transport you to the room shown to the right. When you reach the top, stay on the Donut Lift until you see an opening to the right, then jump for it. If you miss the opening, you'll fall into a bottomless pit.
3: This stairway can be tricky. Crouch on the step near the hub of the Roto-Disc to avoid its whirling attack. Then move slowly past them to ensure you don't get burned. While you're at the top, grab the 1-Up in the Invisible Block.
4: Bowser's Fortress is like a maze—if you take the wrong path, you'll end up back at the beginning! Enter the door to reset all of the ? Blocks in Bowser's Castle. Go back and grab a power-up as many times as you need.
5: Donut Lifts will crash down if you hesitate too long between jumps, so keep on trucking at a brisk pace. Podoboos leap out of the lava and guard several gaps that you must cross. Try to make your way up as high as you can on these Donut Lifts, it will be to your advantage. In any event, be careful; these lifts are the only thing between you and molten lava.
6: One method of reaching Bowser is to take the top of the three passages at the end of the fiery chamber. You'll be taken to the top map of Part 2, where you'll have to content with fewer laser spitting statues, but more precision jumping.
7: At the end of the middle of the three passages on the far-right side of the fiery chamber, you can pick up a much needed power-up. Use the Donut Lift to drop to the passage below.
8: Bowser's Castle is full of crafty traps. Spring this Thwomp, then jump over him onto the Donut Lift. Fall down with the lift, and jump off at the last moment to reach the door which will take you to the lower of the two maps in Part 2.
9: You will reach this map if you took the door to the right of point 6. You'll have to dodge the lasers from four Bowser statues, until you reach the Donut Lifts. Bowser breathes fire at you while you try to cross the lava. The fireballs move slowly, making them hard to jump over. What's worse, you can't stand on the Donut Lifts for long before they begin to sink into the lava. No matter what, you must keep moving.
10: You'll reach this map instead if you dropped down with the Donut Lift at point 8, and made your way to the door below. This route has 5 laser shooting Bowser statues to contend with, but it offers a small reward in the form of a power-up in the ? Block. Rather than dealing with Donut Lifts, you can strategically time your jumps over Bowser's breath on the solid brick platforms, but leap carefully, as they are quite small and difficult to land on.
The King of the Koopas has barricaded himself in the bowels of his grand castle. Innumerable traps guard every approach to Bowser's throne room—use every technique you've mastered to reach the final confrontation.
From the top map of Part 2
From the bottom map of Part 2
When Bowser unleashes his horrendous breath, either jump or crouch to avoid the fireballs. Stay in position until Bowser leaps into the air, then scurry away to a safe spot.
After breathing fire at you, Bowser will jump high into the air and crash down on the place you were standing just before he jumped. When he lands, he'll bust through a layer of blocks beneath him.
When Bowser jumps again, move into the depression he just landed in and wait there, dodging fireballs, until he leaps into the air. Hop out of the way at the last instant. Bowser will pound the weakened area of the floor you just scrambled out of. If he crashes down onto the same section three times, Bowser will fall into a bottomless pit!
You score 100 points if you defeat Bowser with fireballs.
And finally, Mario will rescue Princess Toadstool from Bowser.