(Improved article) |
(Improved flow) |
||
| (29 intermediate revisions by 9 users not shown) | |||
| Line 1: | Line 1: | ||
{{Header Nav|game=Super Mario Bros. 3}} | {{Header Nav|game=Super Mario Bros. 3}} | ||
== | [[File:SMB3-Level5 labeled.png|frame|right|White House: World 5-5, 28 coins, [[File:SMB3 item PWing.png|18px]]]] | ||
{| {{prettytable|float=right}} | |||
| <font color="blue">'''B'''</font> | |||
| [[File:SMB3 item Tanooki.png|18px]] | |||
|- | |||
| <font color="red">'''C'''</font> | |||
| [[File:SMB3 item Star.png|18px]] | |||
|- | |||
| <font color="red">'''D'''</font> | |||
| [[File:SMB3 item PWing.png|18px]] | |||
|- | |||
| <font color="blue">'''F'''</font> | |||
| [[File:SMB3 item Flower.png|18px]] [[File:SMB3 item Leaf.png|18px]] [[File:SMB3 item Tanooki.png|18px]] | |||
|- | |||
| <font color="blue">'''G'''</font> | |||
| [[File:SMB3 item Mushroom.png|18px]] [[File:SMB3 item Flower.png|18px]] [[File:SMB3 item Leaf.png|18px]] | |||
|- | |||
| <font color="red">'''H'''</font> | |||
| [[File:SMB3 item Music.png|18px]] | |||
|} | |||
After proving the old adage, "the bigger they are, the harder they fall," you're off to conquer the high-flying challenges of the Sky. Good thing Mario's not afraid of heights. | |||
{{floatingtoc|float=left|limit=2}}{{-}} | |||
If you | ==World 5-1== | ||
Find your way to the center of a hill-climbing expedition for a 1-Up Mushroom reward. Once again, Raccoon or Tanooki Mario are the preferred Suits. If you can fly to the Sky Pipe, you'll go to the island in the center of the arch and get four 1-Ups!{{-}} | |||
{{Scrolling map|SMB3 W5 S1 a.png}} | |||
{{sidebar|float=right|width=250px|title=Taking off on a short runway|contents=By running back and forth while holding down {{nes|B}}, you can get up the speed to lift off in a smaller area than you normally need. Start flying as soon as you hear the whistle.}} | |||
* '''1''': Bump the Wood Block from the side to collect a power-up. If you're Super Mario, you'll find a Super Leaf. | |||
* '''2''': In order to reach this pipe, a little planning is required. First, you must skip the '''?''' Block on the way up to the top of the arch. Second, you must reach the top of the arch at point 5. Collect the Starman found in the middle '''?''' Block, and run back to the left. Hit the '''?''' Block you skipped for another Starman. If you're still invincible when you return to the starting point, you can kill the Chain Chomp at the bottom of the world. With the Chain Chomp out of the way, you'll have enough of a runway to fly up to this pipe and reach a secret room. Look below the next map for more details. | |||
{{Scrolling map|SMB3 W5 S1 b.png}} | |||
* '''3''': Two 1-Up mushrooms may not occupy the screen at one time, so you must be patient. Collect each of the four 1-Ups one at a time to ensure that none of these precious mushrooms disappear. | |||
* '''4''': Fly up to the three blocks on the ceiling of the arch and hit the Switch Block that's hidden in a normal block to reveal two giant "3"s made of 38 silver coins. Collect these and then fly up and break the right column of bricks with your head to escape the arch. | |||
* '''5''': This is where you must run to in order to collect the first Starman, and then run back to the starting point to take out the Chain Chomp that prevents you from flying up to the pipe at point 2. | |||
=== Secret Room === | |||
{{Scrolling map|SMB3 W5 S1 c.png}} | |||
In this secret area access through the sky pipe, you'll be faced with a choice of two ways to go. If you choose to take the upper path, run to build up to flying speed and duck right before taking off. You'll be flying while crouched, which will allow you to squeeze through the passageway to the right. Follow it to the end to pick up a Music Box and end the stage. However, be aware that this route will prevent you from collecting the four 1-Ups in the area on the other side of the pipe below. If you choose to grab the four 1-ups, you can still go back and grab the Music Box.{{-}} | |||
==5-2== | ==World 5-2== | ||
Don't look down, or the view may make you dizzy. This world gives you a choice of paths to take, but you'll have to move quickly to take the easier one. If you're Raccoon Mario, use your tail to slow your descent and take the upper path. If you're not, you can still make it up there, but it's more difficult! | |||
{{Scrolling map|SMB3 W5 S2 a.png}} | |||
{| | |||
| [[File:SMB3 W5 S2 b.png]] | |||
| style="vertical-align: top;" | [[File:SMB3 W5 S2 f.png|right]] | |||
* '''1''': As you fall after entering the pipe, don't touch the Control Pad. You should fall straight down and land on a Jump Block. | |||
* '''2''': As soon as you start falling, flap your tail to slow your fall. Land on the Jump Block and use them to make your way upwards. Be careful when you jump; one false move and you'll be taking the long way out of here! Without a P-Wing, there's no turning back once you fall. | |||
** If you do fall, you will drop to the bottom of the left map, and then continue to drop through the far right map until you reach the bottom. Take the middle pipe to the sections below. If you are playing the NES version, this particular area will be a cool green color that is seen nowhere else in the game. | |||
* '''3''': For those of you who make it to the upper route, you can enter this pipe for a bonus stage (shown right) that contains a giant '''?''' block with three 1-Ups! Don't miss the power-up hidden in the left block. Then return to the top path and take the last pipe up to reach the exit. | |||
| [[File:SMB3 W5 S2 c.png]] | |||
|} | |||
{{Scrolling map|SMB3 W5 S2 d.png}} | |||
* '''4''': Buzzy's cousin Buster Beetle will throw Ice Blocks at you. Return the favor by throwing Ice Blocks back at him. You'll have to be fast though, or they'll use them all up before you can grab one. | |||
* '''5''': Grab an Ice Block and jump towards one of the trouble Piranha Plants. If you hit them with the Ice Block before they hit you, you'll remove them from the pipes. | |||
{{Scrolling map|SMB3 W5 S2 e.png}} | |||
Run to the very end and the last pipe will take you to the exit. | |||
==World 5-3== | |||
Hijack a green shoe from an unlucky Goomba and enjoy a wild ride through the countryside. Among the coolest items found in Super Mario Bros. 3 is the Kuribo's Shoe which, unfortunately, is only found in this stage. Try it on for incredible stomping power!{{-}} | |||
{{Scrolling map|SMB3 W5 S3 a.png}} | |||
* '''1''': Snag the Super Leaf if you want the Raccoon Suit, but if you're already Fiery Mario, it may be better to stay that way. | |||
* '''2''': '''Kuribo Shoe!''' Eject the Kuribo's Goomba from its shoe by bumping its block from below. Nestle into the shoe as soon as it lands to take control over the green footwear. Armed with Kuribo's Shoe, you'll be able to jump higher and stomp enemies that you couldn't think of touching before. If you've ever wanted to stomp Spinys, now you can! | |||
{{Scrolling map|SMB3 W5 S3 b.png}} | |||
* '''3''': The shoe will protect you from just about anything, but it won't save you from a Spiny attack from above. Avoid the prickly enemies at all costs. | |||
* '''4''': Shielded in Kuribo's Shoe, you can cross areas that would normally injure Mario. It'll help you easily collect the 1-Up found in one of these bricks above the Muncher Plants. | |||
* '''5''': The shoe allows you to stomp Piranha Plans. However, be careful not to touch them from the side—you'll get hurt. | |||
{{Scrolling map|SMB3 W5 S3 c.png}} | |||
* '''6''': Mario can wear Kuribo's Shoe no matter what size he is. If you become Fiery Mario while in the shoe, you'll add fireball-shooting to the list of powerful abilities it provides. | |||
{{Scrolling map|SMB3 W5 S3 d.png}} | |||
* '''7''': You may be able to traverse chomping plants effortlessly, but you're not immune to falling down gaps. It would be a shame to fall down such a small hole this close to the end of the stage.{{-}} | |||
==5 | ==World 5 1st Fortress== | ||
Ready yourself for a sprint through a diabolically difficult fortress lined with traps. You can skip this Fortress and still be able to move up in the world, but you might want to get the three 1-Ups that are inside if you are Raccoon Mario. If you can't fly, skip it!{{-}} | |||
{{Scrolling map|SMB3 W5 F1 a.png}} | |||
[[File:SMB3 W5 F1 c.png|right]] | |||
* '''1''': Be extremely cautious while crossing this location. You'll need to dodge a jumping fireball and a spinning flame trap in addition to leaping over a pool of bubbling lava. The perfect timing of your jump is a must here. | |||
* '''2''': To reach the fortress' secret area, you'll need the Raccoon Suit. Start at the edge of the lava pit and jump to avoid the swinging fire trap. The run underneath the Thwomp Trap to build enough speed to lift into the air. | |||
* '''3''': Once inside the pipe (shown right), follow the advice of the upward pointing arrow and fly to the ceiling to bump and reveal three Invisible Blocks containing 1-Up Mushrooms. | |||
{{Scrolling map|SMB3 W5 F1 b.png}} | |||
* '''4''': Trick the Thwomp Trap at this point into falling prematurely by staying on the left platform and jumping close to the trap. When the trap falls, jump over it and onto the safety of the platform on the other side. | |||
{{Scrolling map|SMB3 W5 F1 d.png}} | |||
* '''B''': BOOM-BOOM is hardly a challenge after such a difficult fortress. Pound him into the ground like a nail. | |||
{{Footer Nav|game=Super Mario Bros. 3|prevpage=World 4 Part 2|nextpage=World 5 Part 2}} | |||
{{Footer Nav|game=Super Mario Bros. 3|prevpage=World 4|nextpage=World | |||
Latest revision as of 08:31, 6 June 2022

| B | |
| C | |
| D | |
| F | |
| G | |
| H |
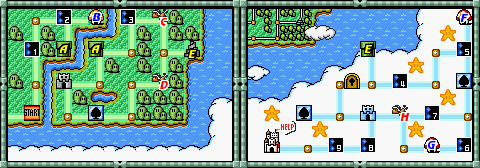
After proving the old adage, "the bigger they are, the harder they fall," you're off to conquer the high-flying challenges of the Sky. Good thing Mario's not afraid of heights.
World 5-1[edit]
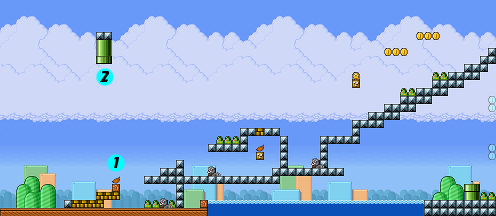
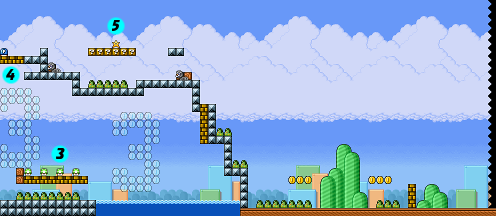
Find your way to the center of a hill-climbing expedition for a 1-Up Mushroom reward. Once again, Raccoon or Tanooki Mario are the preferred Suits. If you can fly to the Sky Pipe, you'll go to the island in the center of the arch and get four 1-Ups!
- 1: Bump the Wood Block from the side to collect a power-up. If you're Super Mario, you'll find a Super Leaf.
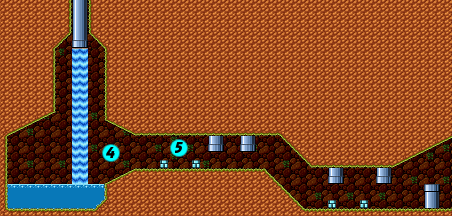
- 2: In order to reach this pipe, a little planning is required. First, you must skip the ? Block on the way up to the top of the arch. Second, you must reach the top of the arch at point 5. Collect the Starman found in the middle ? Block, and run back to the left. Hit the ? Block you skipped for another Starman. If you're still invincible when you return to the starting point, you can kill the Chain Chomp at the bottom of the world. With the Chain Chomp out of the way, you'll have enough of a runway to fly up to this pipe and reach a secret room. Look below the next map for more details.
- 3: Two 1-Up mushrooms may not occupy the screen at one time, so you must be patient. Collect each of the four 1-Ups one at a time to ensure that none of these precious mushrooms disappear.
- 4: Fly up to the three blocks on the ceiling of the arch and hit the Switch Block that's hidden in a normal block to reveal two giant "3"s made of 38 silver coins. Collect these and then fly up and break the right column of bricks with your head to escape the arch.
- 5: This is where you must run to in order to collect the first Starman, and then run back to the starting point to take out the Chain Chomp that prevents you from flying up to the pipe at point 2.
Secret Room[edit]
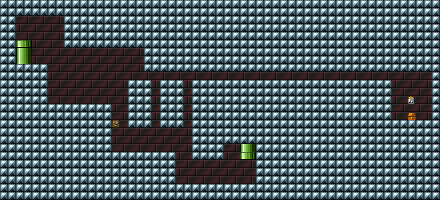
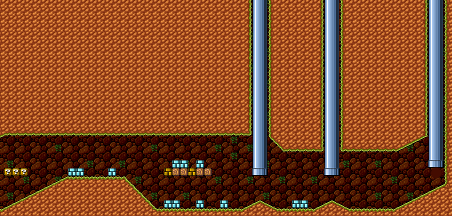
In this secret area access through the sky pipe, you'll be faced with a choice of two ways to go. If you choose to take the upper path, run to build up to flying speed and duck right before taking off. You'll be flying while crouched, which will allow you to squeeze through the passageway to the right. Follow it to the end to pick up a Music Box and end the stage. However, be aware that this route will prevent you from collecting the four 1-Ups in the area on the other side of the pipe below. If you choose to grab the four 1-ups, you can still go back and grab the Music Box.
World 5-2[edit]
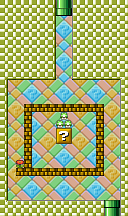
Don't look down, or the view may make you dizzy. This world gives you a choice of paths to take, but you'll have to move quickly to take the easier one. If you're Raccoon Mario, use your tail to slow your descent and take the upper path. If you're not, you can still make it up there, but it's more difficult!
- 4: Buzzy's cousin Buster Beetle will throw Ice Blocks at you. Return the favor by throwing Ice Blocks back at him. You'll have to be fast though, or they'll use them all up before you can grab one.
- 5: Grab an Ice Block and jump towards one of the trouble Piranha Plants. If you hit them with the Ice Block before they hit you, you'll remove them from the pipes.
Run to the very end and the last pipe will take you to the exit.
World 5-3[edit]
Hijack a green shoe from an unlucky Goomba and enjoy a wild ride through the countryside. Among the coolest items found in Super Mario Bros. 3 is the Kuribo's Shoe which, unfortunately, is only found in this stage. Try it on for incredible stomping power!
- 1: Snag the Super Leaf if you want the Raccoon Suit, but if you're already Fiery Mario, it may be better to stay that way.
- 2: Kuribo Shoe! Eject the Kuribo's Goomba from its shoe by bumping its block from below. Nestle into the shoe as soon as it lands to take control over the green footwear. Armed with Kuribo's Shoe, you'll be able to jump higher and stomp enemies that you couldn't think of touching before. If you've ever wanted to stomp Spinys, now you can!
- 3: The shoe will protect you from just about anything, but it won't save you from a Spiny attack from above. Avoid the prickly enemies at all costs.
- 4: Shielded in Kuribo's Shoe, you can cross areas that would normally injure Mario. It'll help you easily collect the 1-Up found in one of these bricks above the Muncher Plants.
- 5: The shoe allows you to stomp Piranha Plans. However, be careful not to touch them from the side—you'll get hurt.
- 6: Mario can wear Kuribo's Shoe no matter what size he is. If you become Fiery Mario while in the shoe, you'll add fireball-shooting to the list of powerful abilities it provides.
- 7: You may be able to traverse chomping plants effortlessly, but you're not immune to falling down gaps. It would be a shame to fall down such a small hole this close to the end of the stage.
World 5 1st Fortress[edit]
Ready yourself for a sprint through a diabolically difficult fortress lined with traps. You can skip this Fortress and still be able to move up in the world, but you might want to get the three 1-Ups that are inside if you are Raccoon Mario. If you can't fly, skip it!
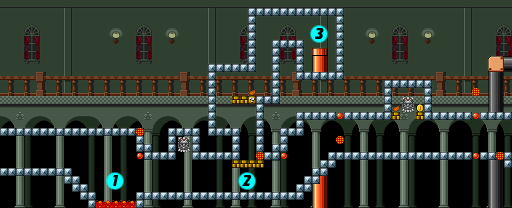
- 1: Be extremely cautious while crossing this location. You'll need to dodge a jumping fireball and a spinning flame trap in addition to leaping over a pool of bubbling lava. The perfect timing of your jump is a must here.
- 2: To reach the fortress' secret area, you'll need the Raccoon Suit. Start at the edge of the lava pit and jump to avoid the swinging fire trap. The run underneath the Thwomp Trap to build enough speed to lift into the air.
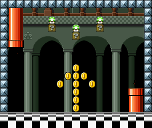
- 3: Once inside the pipe (shown right), follow the advice of the upward pointing arrow and fly to the ceiling to bump and reveal three Invisible Blocks containing 1-Up Mushrooms.
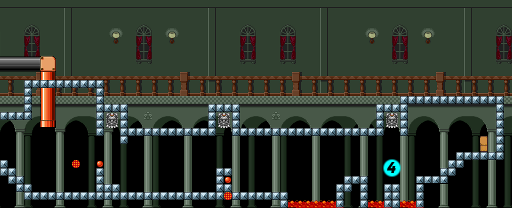
- 4: Trick the Thwomp Trap at this point into falling prematurely by staying on the left platform and jumping close to the trap. When the trap falls, jump over it and onto the safety of the platform on the other side.
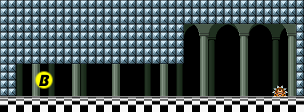
- B: BOOM-BOOM is hardly a challenge after such a difficult fortress. Pound him into the ground like a nail.
