No edit summary Tag: Reverted |
|||
| Line 1: | Line 1: | ||
{{cleanup|reduce amount of unnecessary images}} | {{cleanup|reduce amount of unnecessary images}} | ||
{{Header Nav|game=The Legend of Zelda: Ocarina of Time}} | {{Header Nav|game=The Legend of Zelda: Ocarina of Time}} | ||
[[File: | {{Control selector|Nintendo 64, GameCube, Virtual Console, 3DS, Switch}} | ||
__TOC__ | |||
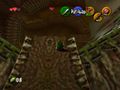
[[File:oot_inside.jpg|thumb|right|The first dungeon, the Deku Tree.]] | |||
The entrance to the game’s first dungeon lies in the far east of the Kokiri Forest, in the very mouth of the Deku Tree. | |||
Eliminate the parasites that are destroying the tree from within, and you’ll walk away with Link’s slingshot, the Kokiri’s Emerald, and a destiny to pursue. Fail, and you’ll end your quest as little more than Gohma food. | |||
{| class="wikitable" | |||
| {{im/oot|Upgrades|Piece of Heart|display=Pieces of Heart}} 0 || '''Current Total:''' 0 | |||
| | |||
|- | |- | ||
| {{im/oot|Enemies|Gold Skulltula|display=Gold Skulltulas}} 3 || '''Current Total:''' 3 | |||
| | |||
| | |||
| | |||
|} | |} | ||
{{-}} | {{-}} | ||
== The Dungeon Begins == | |||
A few things change when you enter a dungeon. For one, if you die or save the game, you will continue from the beginning of the dungeon, not from Link’s house, as normal. Also, your world map has been replaced by a dungeon map that records the shapes only of the rooms you’ve visited (until you pick up a completed Dungeon Map somewhere in the dungeon). | |||
You’ll face constant combat here, so it’s important to keep a steady supply of {{im/oot|Consumables|Recovery Heart|display=recovery hearts}} coming. Fortunately, the grass around the sides of the main room and elsewhere in the dungeon grows back after it’s been cut, granting unlimited hearts to anyone with the patience to wait for them. These same weeds will also provide a steady supply of enemy-stunning {{im/oot|Items|Deku Nut|display=Deku Nuts}}. | |||
{{-}} | {{-}} | ||
== | {| {{prettytable|float=right|style=max-width:425px}} | ||
!{{im/oot|Items|Deku Stick|display=Deku Sticks}} | |||
|- | |||
| Another item you’ll find in abundance in the Deku Tree is Deku Sticks. These can be used for combat, but whenever you hit an enemy, one will break. They have long range, but don’t do any more damage than your sword, so we recommend them only for their secondary use, as torches to move fire from place to place. | |||
|} | |||
{| {{prettytable|left|style=max-width:440px}} | |||
! {{im/oot|Items|Deku Nut|display=Deku Nuts}} | |||
|- | |||
| Among the items you’ll find beneath cut grass and defeated enemies are Deku Nuts. These handy items can be equipped to your C button and used in battle to temporarily stun foes (they’ll turn a bluish hue if it worked). That’s your opportunity to loop around ‘em or attack with a double damage-dealing jump attack without fear of your opponent knocking you out of it. | |||
|} | |||
== 1F & 2F == | |||
[[File:LOZ_OOT_Dekutreefloor1.jpg|thumb|left]] | |||
Once you’ve vanquished the Babas, head for the ivy (or the ladder) and pull yourself up to the next level. You’ll have to run around the second-floor catwalk, trusting the game’s auto-jump feature to make it over the gaps. Before you even make it to the first door, you’ll come across the chest containing the {{im/oot|Items|Dungeon Map}}. Hit your Quest Status Subscreen to check out where you are in relation to the rest of the dungeon. So far, so good. | |||
In the hallway that leads to the next area, you’ll encounter a projectile-firing Deku Scrub. Use your shield to block the shot and reflect it back at the Scrub (it may take practice aiming your shield, so be persistent). | |||
When he gets hit, he’ll run, and you can chase him down. But before you can deliver the killing blow, the Scrub will break down and talk, giving you a hot tip before he runs away. | |||
You can enter the room at the end of the hallway, but you won’t be able to get out until you open the chest, and use your prize, the {{im/oot|Items|Fairy Slingshot}}, to shoot the ladder over the entranceway (you can {{Control|{{N64|Z}}|{{gc|L}}|{{wii-cc|L}}|{{3ds|L}}|{{Switch|ZL}}}}-target it when Navi turns green). It will fall to the ground, giving you an opportunity to return to the trunk of the tree. | |||
Before you go, cut down some of the grass in the lower pit of this room. You’ll reveal {{im/oot|Consumables|Deku Seeds}} (the ammo Link uses in his slingshot) to replace the ones you spent shooting down the ladder. ''And'' they grow back! | |||
{{-}} | {{-}} | ||
== | == 3F == | ||
[[File:LOZ_OOT_Dekutreefloor23.jpg|thumb|right]] | |||
Onward and upward, to the top of the tree... Except that a pack of Skullwalltulas are blocking the ivy leading up. You could try to dodge them, but if you cross the line of vision for any of these little buggers, you’ll take some damage and be knocked back to the beginning. Best to use your slingshot to clear a path. You can {{Control|{{N64|Z}}|{{gc|L}}|{{wii-cc|L}}|{{3ds|L}}|{{Switch|ZL}}}}-target the first couple, but after that, you may need to switch to manual targeting to pick off the last one. | |||
When you drop from the ivy at level 3F, you’ll be ambushed by a Big Skulltula that doesn’t seem to care much for the way you slaughtered its children. | |||
Don’t do anything or you’ll provoke its deadly spin attack. Just stand medium close, {{Control|{{N64|Z}}|{{gc|L}}|{{wii-cc|L}}|{{3ds|L}}|{{Switch|ZL}}}}-target it, wait for it to turn its back on you, and then go for the kill. One jumping slash will do the trick, or you can use two regular slashes or slingshot shots (you’ll need to wait for it to turn its back twice, in that case). | |||
A Big Skulltula awaits at each of this room’s four platforms. If they have you worried, just kill ‘em now, from behind, with a few manually-aimed slingshot seeds. | |||
If you take the door to the west, you’ll find a room with a switch, three pillars, and a chest at the end. Hit the switch to make the three pillars rise, jump across, and grab the {{im/oot|Items|Compass}}. But don’t be so hasty you miss the alcove in the southern wall! In addition to a recovery heart, your first {{im/oot|Enemies|Gold Skulltula}} is standing right here. Kill it, grab the token it leaves behind, and revel in the fact that you’re only 99 Gold Skulltulas away from having killed them all. | |||
To get out again, you’ll have to use a Deku Stick (if you don’t have any, jump down and kill a Deku Baba for one). Hit the button that it’s equipped to, and then let the tip catch on fire from the lit torch. Transfer that flame to the unlit brazier on the other side, then hit {{Control|{{N64|A}}|{{gc|A}}|{{wii-cc|A}}|{{3ds|A}}|{{Switch|A}}}} to put it away before it burns all the way through and you lose a stick. | |||
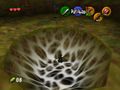
You’ll have to make your own path to level B1, the Deku Tree’s largest area. Just slowly, carefully step (don’t jump) off any of the four platforms on the Deku Tree’s top level, aiming for the spider web lining on the hole below. If you nail it right in the middle, it will stretch and break, and Link will fall to the relatively expansive basement area below. | |||
<gallery> | <gallery> | ||
File:oot_floating heart.jpg|Jump towards the floating heart. | File:oot_floating heart.jpg|Jump towards the floating heart. | ||
File:oot_spiderweb.jpg|You'll fall through the spiderweb... | File:oot_spiderweb.jpg|You'll fall through the spiderweb... | ||
File:Oot deku fall.jpg|...and land in a new room. | File:Oot deku fall.jpg|...and land in a new room. | ||
</gallery> | </gallery> | ||
{{-}} | |||
== | == B1 == | ||
[[File:LOZ_OOT_DekutreefloorB1.jpg|thumb|right]] | |||
The large, half water-filled room where you land contains two more {{im/oot|Enemies|Gold Skulltula|display=Gold Skulltulas}}. The first is located on the water gate on the north wall. It’s easy to see and easy to kill, but you’ll have to do a carefully timed jump off the ledge to the right if you want to pick up the token it leaves behind — it’s too high off the ground to simply be taken. | |||
The second {{im/oot|Enemies|Gold Skulltula}} is on the giant wall of ivy to the east, and you can get the token easily by just climbing after it. | |||
[[File:LOZ_OOT_Stick-torch.jpg|thumb|left|Run with a lit stick to burn the web.]] | [[File:LOZ_OOT_Stick-torch.jpg|thumb|left|Run with a lit stick to burn the web.]] | ||
This part’s a bit tricky. You have to use a Deku Stick, lit by the nearby torch, to burn away the web blocking the door. If your flame hits the water, it will be put out, so make sure you carefully plan your course so you’re running over the shallow water (you’ll automatically jump over the last part). | |||
Another Deku Scrub awaits you in this small room. Use the same Deku Shield trick to bounce his bullets back at him, and then listen carefully as he betrays his friends elsewhere in the dungeon. When he goes, you’ll have to use your slingshot to hit the eye above the sealed door, opening that door permanently. | |||
There’s a switch located underwater, just past the spiked log. Swim down and push it to lower the water level slightly, then head back to the east ledge and jump on the platform when it gets close. If you’re quick enough, the water level should be low enough that you can cruise right under the log and jump onto the ledge on the other side. | |||
Once there, you’ll have to kill a Big Skulltula (watch for his shadow) and then push a block (stand near it and press {{Control|{{N64|A}}|{{gc|A}}|{{wii-cc|A}}|{{3ds|A}}|{{Switch|A}}}}) to create a step up to the door. | |||
<gallery> | <gallery> | ||
| Line 125: | Line 89: | ||
</gallery> | </gallery> | ||
Another simple torch-lighting puzzle here that shouldn’t give you too much trouble. Also note the grass in this area; cut it down for hearts if you need ‘em, and they’ll grow back with more. | |||
If you look up as soon as you enter, you’ll see three Gohma Larvae hanging from the ceiling. They’ll only drop down to attack if you cross through the center of the room, making it possible to avoid confrontation altogether if you carefully circle around the outside of the room, or snipe them with your slingshot. If you do provoke a confrontation, try to keep a safe distance away from them, stepping back whenever their eyes turn red (indicating they’re about to pounce). Use jump attacks to kill them quickly and without risking getting too close. | |||
[[File:LOZ_OOT_Web-roll.jpg|thumb|right|Swipe the stick, or roll over the web to set it ablaze.]] | |||
The suspicious wall at the northwest end of this room can be blown up... as soon as you get your hands on some bombs a bit later in the game. Behind it is a small room with a single Gold Skulltula, but you won’t be able to get its token until you get the boomerang much, much, much later. | |||
Yet again, you’ll need to use your Deku Stick to bring an open flame to the webbing at the east end of the room, opening a path back to the half-submerged room that you originally landed in. | |||
First, push the block over the edge to create a stairway so you can get back up here without having to go all the way around. Then run down to the lit brazier to grab some fire one last time, and use it to burn up the web at your feet (you’ll need to swing it to hit that low, or roll with torch in hand), and you’ll plummet to the final room before the boss. | |||
{{-}} | {{-}} | ||
== | == B2 == | ||
This is where that “twenty-three is number one” thing comes into play, as you have to hit the Scrubs in middle (2), right (3), left (1) order to open the boss door. They might get a couple of cheap shots off on you, so save some of the underwater hearts for after combat. | |||
{{-}} | {{-}} | ||
{{boss|name=<small><small>Parasitic Armored Arachnid</small></small><br><big><big>GOHMA</big></big> | |||
{{boss|name=Parasitic Armored Arachnid | |||
|image=LoZ OoT Queen Gohma art.jpg | |image=LoZ OoT Queen Gohma art.jpg | ||
|imagesize=300px | |imagesize=300px | ||
|text= | |text=Look up towards the ceiling, into the burning red eye, to start the battle. Gohma will saunter towards you, and you should keep her targeted with your slingshot, but hold your fire until you can see the red of her open eye. Blast her, then run in and swing your sword as fast as you can. | ||
Next she’ll scurry up to the ceiling, but you can still keep her targeted if you stay close. Try to keep it so that you’re still facing her eye, and seize the opportunity to go for the kill if she opens it again. Since she’ll fall from the ceiling, she’ll be stunned for longer [[File:oot_gohma_stunned.jpg|250px|thumb|right|Attack while Gohma is stunned!]] and you can get the kill this time. | |||
[[File:oot_gohma_stunned.jpg|250px|thumb|right|Attack | |||
If she ''doesn’t'' open her eye, or you can’t get the shot, then she’ll start pumping out kids for Link to deal with. It’s a big room, so you should circle around and avoid them while you wait for your chance to hit mom again. | |||
If you | If you get really lucky, you’ll be able to kill Gohma before she can fill the battlefield with her annoying Gohma spawn. If you don’t, you could have a real fight on your hands. | ||
As her body disintegrates, you will see a {{im/oot|Upgrades|Heart Container}} appear in its place.}} | |||
{{-}} | {{-}} | ||
[[File:oot_link_leaves.jpg|250px|thumb|left|Saria bids farewell.]]{{-|right}} | [[File:oot_link_leaves.jpg|250px|thumb|left|Saria bids farewell.]]{{-|right}} | ||
Don’t waste time hunting for Saria, since you’ll find her patiently waiting for you on the western bridge that links Kokiri Forest and Hyrule Field. Grab your {{im/oot|Items|Fairy Ocarina}} and head into the gigantic field ahead; your true adventure is just beginning. | |||
{{Footer_Nav|game=The Legend of Zelda: Ocarina of Time|prevpage=The Beginning|nextpage=Hyrule Field}} | |||
{{Footer_Nav|game=The Legend of Zelda: Ocarina of Time|prevpage=The Beginning|nextpage=Hyrule | |||
Revision as of 19:16, 15 April 2023


The entrance to the game’s first dungeon lies in the far east of the Kokiri Forest, in the very mouth of the Deku Tree. Eliminate the parasites that are destroying the tree from within, and you’ll walk away with Link’s slingshot, the Kokiri’s Emerald, and a destiny to pursue. Fail, and you’ll end your quest as little more than Gohma food.
| Pieces of Heart |
Current Total: 0 |
| Gold Skulltulas |
Current Total: 3 |
The Dungeon Begins
A few things change when you enter a dungeon. For one, if you die or save the game, you will continue from the beginning of the dungeon, not from Link’s house, as normal. Also, your world map has been replaced by a dungeon map that records the shapes only of the rooms you’ve visited (until you pick up a completed Dungeon Map somewhere in the dungeon).
You’ll face constant combat here, so it’s important to keep a steady supply of recovery hearts ![]() coming. Fortunately, the grass around the sides of the main room and elsewhere in the dungeon grows back after it’s been cut, granting unlimited hearts to anyone with the patience to wait for them. These same weeds will also provide a steady supply of enemy-stunning Deku Nuts
coming. Fortunately, the grass around the sides of the main room and elsewhere in the dungeon grows back after it’s been cut, granting unlimited hearts to anyone with the patience to wait for them. These same weeds will also provide a steady supply of enemy-stunning Deku Nuts ![]() .
.
| Deku Sticks |
|---|
| Another item you’ll find in abundance in the Deku Tree is Deku Sticks. These can be used for combat, but whenever you hit an enemy, one will break. They have long range, but don’t do any more damage than your sword, so we recommend them only for their secondary use, as torches to move fire from place to place. |
| Deku Nuts |
|---|
| Among the items you’ll find beneath cut grass and defeated enemies are Deku Nuts. These handy items can be equipped to your C button and used in battle to temporarily stun foes (they’ll turn a bluish hue if it worked). That’s your opportunity to loop around ‘em or attack with a double damage-dealing jump attack without fear of your opponent knocking you out of it. |
1F & 2F

Once you’ve vanquished the Babas, head for the ivy (or the ladder) and pull yourself up to the next level. You’ll have to run around the second-floor catwalk, trusting the game’s auto-jump feature to make it over the gaps. Before you even make it to the first door, you’ll come across the chest containing the Dungeon Map ![]() . Hit your Quest Status Subscreen to check out where you are in relation to the rest of the dungeon. So far, so good.
. Hit your Quest Status Subscreen to check out where you are in relation to the rest of the dungeon. So far, so good.
In the hallway that leads to the next area, you’ll encounter a projectile-firing Deku Scrub. Use your shield to block the shot and reflect it back at the Scrub (it may take practice aiming your shield, so be persistent).
When he gets hit, he’ll run, and you can chase him down. But before you can deliver the killing blow, the Scrub will break down and talk, giving you a hot tip before he runs away.
You can enter the room at the end of the hallway, but you won’t be able to get out until you open the chest, and use your prize, the Fairy Slingshot ![]() , to shoot the ladder over the entranceway (you can
, to shoot the ladder over the entranceway (you can ![]() -target it when Navi turns green). It will fall to the ground, giving you an opportunity to return to the trunk of the tree.
-target it when Navi turns green). It will fall to the ground, giving you an opportunity to return to the trunk of the tree.
Before you go, cut down some of the grass in the lower pit of this room. You’ll reveal Deku Seeds ![]() (the ammo Link uses in his slingshot) to replace the ones you spent shooting down the ladder. And they grow back!
(the ammo Link uses in his slingshot) to replace the ones you spent shooting down the ladder. And they grow back!
3F

Onward and upward, to the top of the tree... Except that a pack of Skullwalltulas are blocking the ivy leading up. You could try to dodge them, but if you cross the line of vision for any of these little buggers, you’ll take some damage and be knocked back to the beginning. Best to use your slingshot to clear a path. You can ![]() -target the first couple, but after that, you may need to switch to manual targeting to pick off the last one.
-target the first couple, but after that, you may need to switch to manual targeting to pick off the last one.
When you drop from the ivy at level 3F, you’ll be ambushed by a Big Skulltula that doesn’t seem to care much for the way you slaughtered its children.
Don’t do anything or you’ll provoke its deadly spin attack. Just stand medium close, ![]() -target it, wait for it to turn its back on you, and then go for the kill. One jumping slash will do the trick, or you can use two regular slashes or slingshot shots (you’ll need to wait for it to turn its back twice, in that case).
-target it, wait for it to turn its back on you, and then go for the kill. One jumping slash will do the trick, or you can use two regular slashes or slingshot shots (you’ll need to wait for it to turn its back twice, in that case).
A Big Skulltula awaits at each of this room’s four platforms. If they have you worried, just kill ‘em now, from behind, with a few manually-aimed slingshot seeds.
If you take the door to the west, you’ll find a room with a switch, three pillars, and a chest at the end. Hit the switch to make the three pillars rise, jump across, and grab the Compass ![]() . But don’t be so hasty you miss the alcove in the southern wall! In addition to a recovery heart, your first Gold Skulltula
. But don’t be so hasty you miss the alcove in the southern wall! In addition to a recovery heart, your first Gold Skulltula ![]() is standing right here. Kill it, grab the token it leaves behind, and revel in the fact that you’re only 99 Gold Skulltulas away from having killed them all.
is standing right here. Kill it, grab the token it leaves behind, and revel in the fact that you’re only 99 Gold Skulltulas away from having killed them all.
To get out again, you’ll have to use a Deku Stick (if you don’t have any, jump down and kill a Deku Baba for one). Hit the button that it’s equipped to, and then let the tip catch on fire from the lit torch. Transfer that flame to the unlit brazier on the other side, then hit ![]() to put it away before it burns all the way through and you lose a stick.
to put it away before it burns all the way through and you lose a stick.
You’ll have to make your own path to level B1, the Deku Tree’s largest area. Just slowly, carefully step (don’t jump) off any of the four platforms on the Deku Tree’s top level, aiming for the spider web lining on the hole below. If you nail it right in the middle, it will stretch and break, and Link will fall to the relatively expansive basement area below.
-
Jump towards the floating heart.
-
You'll fall through the spiderweb...
-
...and land in a new room.


B1

The large, half water-filled room where you land contains two more Gold Skulltulas ![]() . The first is located on the water gate on the north wall. It’s easy to see and easy to kill, but you’ll have to do a carefully timed jump off the ledge to the right if you want to pick up the token it leaves behind — it’s too high off the ground to simply be taken.
. The first is located on the water gate on the north wall. It’s easy to see and easy to kill, but you’ll have to do a carefully timed jump off the ledge to the right if you want to pick up the token it leaves behind — it’s too high off the ground to simply be taken.
The second Gold Skulltula ![]() is on the giant wall of ivy to the east, and you can get the token easily by just climbing after it.
is on the giant wall of ivy to the east, and you can get the token easily by just climbing after it.

This part’s a bit tricky. You have to use a Deku Stick, lit by the nearby torch, to burn away the web blocking the door. If your flame hits the water, it will be put out, so make sure you carefully plan your course so you’re running over the shallow water (you’ll automatically jump over the last part).
Another Deku Scrub awaits you in this small room. Use the same Deku Shield trick to bounce his bullets back at him, and then listen carefully as he betrays his friends elsewhere in the dungeon. When he goes, you’ll have to use your slingshot to hit the eye above the sealed door, opening that door permanently.
There’s a switch located underwater, just past the spiked log. Swim down and push it to lower the water level slightly, then head back to the east ledge and jump on the platform when it gets close. If you’re quick enough, the water level should be low enough that you can cruise right under the log and jump onto the ledge on the other side.
Once there, you’ll have to kill a Big Skulltula (watch for his shadow) and then push a block (stand near it and press ![]() ) to create a step up to the door.
) to create a step up to the door.
-

Don't run into the spikes!
-
Find the button and dive towards it!
-
Push the block, then climb it!


Another simple torch-lighting puzzle here that shouldn’t give you too much trouble. Also note the grass in this area; cut it down for hearts if you need ‘em, and they’ll grow back with more.
If you look up as soon as you enter, you’ll see three Gohma Larvae hanging from the ceiling. They’ll only drop down to attack if you cross through the center of the room, making it possible to avoid confrontation altogether if you carefully circle around the outside of the room, or snipe them with your slingshot. If you do provoke a confrontation, try to keep a safe distance away from them, stepping back whenever their eyes turn red (indicating they’re about to pounce). Use jump attacks to kill them quickly and without risking getting too close.

The suspicious wall at the northwest end of this room can be blown up... as soon as you get your hands on some bombs a bit later in the game. Behind it is a small room with a single Gold Skulltula, but you won’t be able to get its token until you get the boomerang much, much, much later.
Yet again, you’ll need to use your Deku Stick to bring an open flame to the webbing at the east end of the room, opening a path back to the half-submerged room that you originally landed in.
First, push the block over the edge to create a stairway so you can get back up here without having to go all the way around. Then run down to the lit brazier to grab some fire one last time, and use it to burn up the web at your feet (you’ll need to swing it to hit that low, or roll with torch in hand), and you’ll plummet to the final room before the boss.
B2
This is where that “twenty-three is number one” thing comes into play, as you have to hit the Scrubs in middle (2), right (3), left (1) order to open the boss door. They might get a couple of cheap shots off on you, so save some of the underwater hearts for after combat.
GOHMA

Look up towards the ceiling, into the burning red eye, to start the battle. Gohma will saunter towards you, and you should keep her targeted with your slingshot, but hold your fire until you can see the red of her open eye. Blast her, then run in and swing your sword as fast as you can.
Next she’ll scurry up to the ceiling, but you can still keep her targeted if you stay close. Try to keep it so that you’re still facing her eye, and seize the opportunity to go for the kill if she opens it again. Since she’ll fall from the ceiling, she’ll be stunned for longer
If she doesn’t open her eye, or you can’t get the shot, then she’ll start pumping out kids for Link to deal with. It’s a big room, so you should circle around and avoid them while you wait for your chance to hit mom again.
If you get really lucky, you’ll be able to kill Gohma before she can fill the battlefield with her annoying Gohma spawn. If you don’t, you could have a real fight on your hands.
As her body disintegrates, you will see a Heart Container ![]() appear in its place.
appear in its place.

Don’t waste time hunting for Saria, since you’ll find her patiently waiting for you on the western bridge that links Kokiri Forest and Hyrule Field. Grab your Fairy Ocarina ![]() and head into the gigantic field ahead; your true adventure is just beginning.
and head into the gigantic field ahead; your true adventure is just beginning.