(Page started) |
(More text) |
||
| Line 4: | Line 4: | ||
With most of the land accessible destinations explored, it's time to hop in your ship and explore the eastern regions of Alefgard. Your first stop will be the village of Kol, which is nestled into a crown of mountains near the north. Some of its occupants are, like you, originally from the world above. One particular man has the power to craft a treasured weapon if you can provide him with the proper materials. On an island to the east of Kol is a tower where the spirit who created this land is said to be trapped. Further to the south is the town of Rimuldar. A tunnel to connect the lands of Kol and Rimuldar is under construction, but it isn't ready yet. You'll learn more information about how to reach Zoma in Rimuldar, and maybe even find an important item. But most important of all is the Holy Shrine found on a small island south of Rimuldar. | With most of the land accessible destinations explored, it's time to hop in your ship and explore the eastern regions of Alefgard. Your first stop will be the village of Kol, which is nestled into a crown of mountains near the north. Some of its occupants are, like you, originally from the world above. One particular man has the power to craft a treasured weapon if you can provide him with the proper materials. On an island to the east of Kol is a tower where the spirit who created this land is said to be trapped. Further to the south is the town of Rimuldar. A tunnel to connect the lands of Kol and Rimuldar is under construction, but it isn't ready yet. You'll learn more information about how to reach Zoma in Rimuldar, and maybe even find an important item. But most important of all is the Holy Shrine found on a small island south of Rimuldar. | ||
== Sailing to Kol == | == Sailing to Kol == | ||
There is no path by land that you can take to reach Kol, so you'll have to board your ship and sail there. Reaching Kol is fairly easy, but powerful monsters of the sea like Kragacles may make it a bit more challenging. Sail up along the west coast of Alefgard until you see Garin's home. Then start sailing east along the north coast. You will pass a chain of islands, one of which has a tower on it. You're not yet ready to take on the tower, so skip it for now. Sail down to the right of the tower until you are well south of the hills that occupy the land to the east. Then anchor your ship along the coast and travel east until Kol appears in the distance. You can park next to the hills if you want to, but remember that walking through hills increases your chances of encountering an enemy. | |||
[[Image:DW3_map_town_Kol.png|left]] | [[Image:DW3_map_town_Kol.png|left]] | ||
{| {{prettytable|notwide=1|style=width:50%; float:right;}} | {| {{prettytable|notwide=1|style=width:50%; float:right;}} | ||
| Line 49: | Line 50: | ||
| 3500G | | 3500G | ||
|} | |} | ||
{{-|left}} | |||
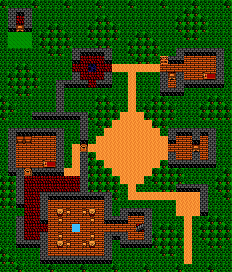
Nestled in the forest, Kol appears to be a very lush and woodsy town. Above the entrance is an equipment shop, but the only unique item that it sells is the Water Flying Cloth, a particular good piece of defensive equipment for Wizards, which specializes in fire protection. In town, one guy tells you that he heard the Sword of Kings was shattered into pieces by Zoma, while another woman tells you that the owner of the item shop is skilled at restoring useless items. Across from the inn, a woman will inform you of the open air baths. Beyond the baths, in the upper left corner of town, is a woman standing behind a counter. She tells you that the Archfiend uses powers of Darkness, and that you should be able to weaken those powers if you have the Sphere of Light. | |||
As you travel down the left side of town, you will reach an apartment where the woman inside says she was from Jipang, and she and her husband fled when she might have become an offering to Orochi. She says her husband used to be a swordsmith. In the building to the right, a man says that the Sword of Kings was rumored to me made of Oricon, and the man in the lower right corner of the room says that the man upstairs is from Jipang. Climb the stairs to meet him. You will see a large room with a man behind the counter. The man will offer to sell you a handful of items, with nothing special. However, if you happened to have found the Oricon from the pasture in Hauksness, he will offer to purchase it from you at the cost of 22,500 gold. Sell it to him, leave the village, return to it, and speak with him again. He will have a new item in his list of wares: The Sword of Kings, which you can purchase from him at a cost of 35,000 gold. Do so at your earliest convenience. | |||
There are two people standing outside of town, one of whom is a little difficult to reach. There is a woman standing below the Inn, but you'll have to walk above and around the Inn to reach her. She informs you that according to rumor, Rubiss is sealed inside the tower you passed. A man standing outside the lower left corner of town informs you that you can free Rubiss from the curse if you have the Fairy Flute. So where is this Fairy Flute? You'll need to think back to the first [[Dragon Warrior]] in order to find it. Read the spoiler below for more information. | |||
{{spoiler|title=Finding the Fairy Flute|content=Finding the Fairy Flute in this game is almost identical to finding it in the first one. It is found here in Kol, and it is found directly below the open air baths. From the bath walk south until you bump into the wall below. Search the ground on that spot, and you will obtain the Fairy Flute. Having been to Cantlin, you know that it won't be used to put any monsters to sleep, but if you ask around in Kol, you will learn the true purpose it serves.}} | |||
{{-}} | {{-}} | ||
=== Tower of Rubiss === | === Tower of Rubiss === | ||
[[Image:DW3_map_tower_Rubiss_F1.png|right]] | [[Image:DW3_map_tower_Rubiss_F1.png|right]] | ||
If you have possession of the Fairy Flute, then it's time to sail back to the tower and investigate. The tower is filled with many powerful enemies, including Leonas and Winged Demons. It also has its share of MagiWyverns and Metal Babbles. When you arrive, you will walk up a set of steps to a door. Unlock the door and step inside. Cast StepGuard to walk on the Barrier tiles before the next door and open that one as well. Immediately above you will be two treasure chests. The one on the left is a Mimic, but the one on the right contains gold. | |||
Below the chests, you must choose between heading to the right or two the left. The truth is that visiting the right is unnecessary, but if you choose to investigate it, you will find a door that leads out to the grass on the east side of the tower. Taking care not to travel too far so as to exit the Tower, you can walk up to a man who is waiting alongside the tower. He tells you that if you have the Fairy Flute, you should proceed to the fifth floor. Beyond that, there is nothing of value to the right. | |||
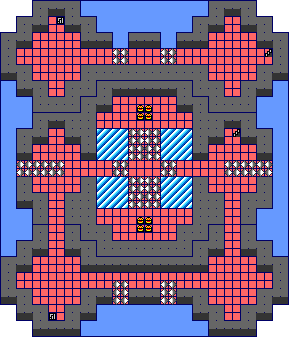
From below the two treasure chests, head to the left. Once again, you can open a door that leads outside the tower. This time, there is a man standing just off screen to the bottom. He gives you a hint about how to traverse on the revolving floors. Walk back inside the tower, and head down the passage on the left side to reach a set of stairs that lead to the second floor. | |||
{{-}} | {{-}} | ||
[[Image:DW3_map_tower_Rubiss_F2.png|left]] | [[Image:DW3_map_tower_Rubiss_F2.png|left]] | ||
Revision as of 00:28, 6 March 2012
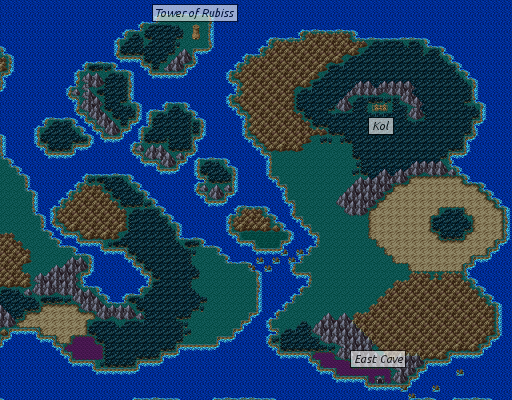
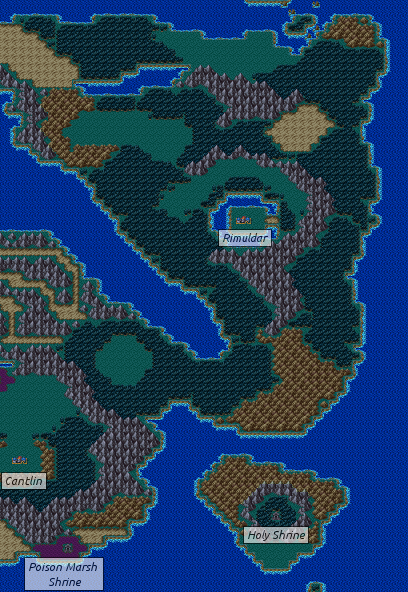
With most of the land accessible destinations explored, it's time to hop in your ship and explore the eastern regions of Alefgard. Your first stop will be the village of Kol, which is nestled into a crown of mountains near the north. Some of its occupants are, like you, originally from the world above. One particular man has the power to craft a treasured weapon if you can provide him with the proper materials. On an island to the east of Kol is a tower where the spirit who created this land is said to be trapped. Further to the south is the town of Rimuldar. A tunnel to connect the lands of Kol and Rimuldar is under construction, but it isn't ready yet. You'll learn more information about how to reach Zoma in Rimuldar, and maybe even find an important item. But most important of all is the Holy Shrine found on a small island south of Rimuldar.
Sailing to Kol
There is no path by land that you can take to reach Kol, so you'll have to board your ship and sail there. Reaching Kol is fairly easy, but powerful monsters of the sea like Kragacles may make it a bit more challenging. Sail up along the west coast of Alefgard until you see Garin's home. Then start sailing east along the north coast. You will pass a chain of islands, one of which has a tower on it. You're not yet ready to take on the tower, so skip it for now. Sail down to the right of the tower until you are well south of the hills that occupy the land to the east. Then anchor your ship along the coast and travel east until Kol appears in the distance. You can park next to the hills if you want to, but remember that walking through hills increases your chances of encountering an enemy.
| Services | |
|---|---|
| Inn | 124 G |
| Healing | No |
| Tool Shop | |
| Medical Herb | 8G |
| Fairy Water | 20G |
| Wing of Wyvern | 25G |
| Full Moon Herb | 30G |
| Equipment Shop | |
| Broad Sword | 1500G |
| Sledge Hammer | 6500G |
| Dragon Mail | 9800G |
| Water Flying Cloth | 12,500G |
| Silver Shield | 8800G |
| Iron Mask | 3500G |
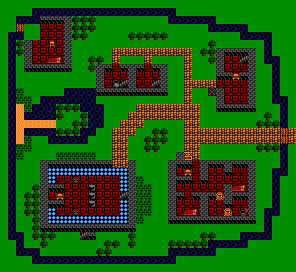
Nestled in the forest, Kol appears to be a very lush and woodsy town. Above the entrance is an equipment shop, but the only unique item that it sells is the Water Flying Cloth, a particular good piece of defensive equipment for Wizards, which specializes in fire protection. In town, one guy tells you that he heard the Sword of Kings was shattered into pieces by Zoma, while another woman tells you that the owner of the item shop is skilled at restoring useless items. Across from the inn, a woman will inform you of the open air baths. Beyond the baths, in the upper left corner of town, is a woman standing behind a counter. She tells you that the Archfiend uses powers of Darkness, and that you should be able to weaken those powers if you have the Sphere of Light.
As you travel down the left side of town, you will reach an apartment where the woman inside says she was from Jipang, and she and her husband fled when she might have become an offering to Orochi. She says her husband used to be a swordsmith. In the building to the right, a man says that the Sword of Kings was rumored to me made of Oricon, and the man in the lower right corner of the room says that the man upstairs is from Jipang. Climb the stairs to meet him. You will see a large room with a man behind the counter. The man will offer to sell you a handful of items, with nothing special. However, if you happened to have found the Oricon from the pasture in Hauksness, he will offer to purchase it from you at the cost of 22,500 gold. Sell it to him, leave the village, return to it, and speak with him again. He will have a new item in his list of wares: The Sword of Kings, which you can purchase from him at a cost of 35,000 gold. Do so at your earliest convenience.
There are two people standing outside of town, one of whom is a little difficult to reach. There is a woman standing below the Inn, but you'll have to walk above and around the Inn to reach her. She informs you that according to rumor, Rubiss is sealed inside the tower you passed. A man standing outside the lower left corner of town informs you that you can free Rubiss from the curse if you have the Fairy Flute. So where is this Fairy Flute? You'll need to think back to the first Dragon Warrior in order to find it. Read the spoiler below for more information.
Finding the Fairy Flute in this game is almost identical to finding it in the first one. It is found here in Kol, and it is found directly below the open air baths. From the bath walk south until you bump into the wall below. Search the ground on that spot, and you will obtain the Fairy Flute. Having been to Cantlin, you know that it won't be used to put any monsters to sleep, but if you ask around in Kol, you will learn the true purpose it serves.
Tower of Rubiss
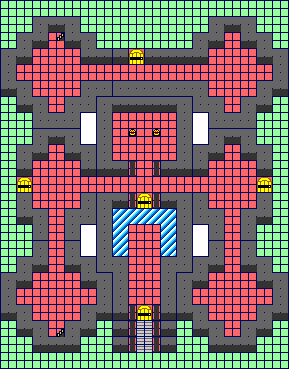
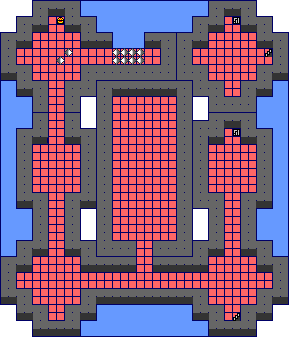
If you have possession of the Fairy Flute, then it's time to sail back to the tower and investigate. The tower is filled with many powerful enemies, including Leonas and Winged Demons. It also has its share of MagiWyverns and Metal Babbles. When you arrive, you will walk up a set of steps to a door. Unlock the door and step inside. Cast StepGuard to walk on the Barrier tiles before the next door and open that one as well. Immediately above you will be two treasure chests. The one on the left is a Mimic, but the one on the right contains gold.
Below the chests, you must choose between heading to the right or two the left. The truth is that visiting the right is unnecessary, but if you choose to investigate it, you will find a door that leads out to the grass on the east side of the tower. Taking care not to travel too far so as to exit the Tower, you can walk up to a man who is waiting alongside the tower. He tells you that if you have the Fairy Flute, you should proceed to the fifth floor. Beyond that, there is nothing of value to the right.
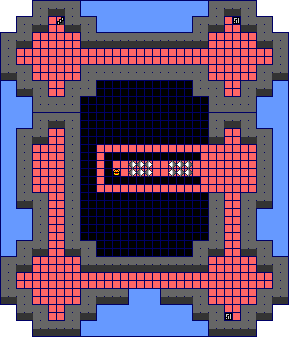
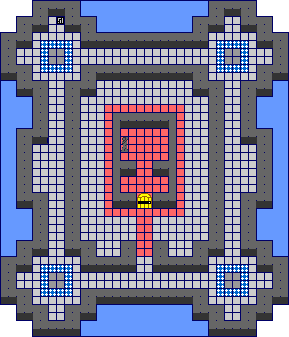
From below the two treasure chests, head to the left. Once again, you can open a door that leads outside the tower. This time, there is a man standing just off screen to the bottom. He gives you a hint about how to traverse on the revolving floors. Walk back inside the tower, and head down the passage on the left side to reach a set of stairs that lead to the second floor.
The tunnel project
Heading further south
Rimuldar
| Services | |
|---|---|
| Inn | 80 G |
| Healing | Yes |
| Equipment Shop | |
| Falcon Sword | 25,000G |
| Sword of Destruction | 45,000G |
| Cloak of Evasion | 2900G |
| Magic Armor | 5800G |
| Silver Shield | 8800G |
| Iron Mask | 3500G |
