Now that you have the Echoing Flute, it's time to explore the world and find as many orbs as you can. There are still various locations that you have yet to visit. The southern regions of this world's Arfican and South American continents have territory that you can explore. You may have visited Lancel before you obtained the Final Key, but now it is time to check out the large shrine to the north. And after seeding a new town with a merchant to get its economy started, you should check in on it and see how it's fairing. The town may be growing, but not all of its citizens are entirely happy.
Back to Tedanki
You can't cast Return to get back to Tedanki, so you'll have to Return to Portoga and sail south again to revisit it. If you come back with the Echoing Flute and use this special item, you will indeed here the echoes which indicate that an orb is nearby. During the day, it seems that a prisoner scrawled his dying wish on the wall, say how he wanted to pass along the orb he had before he died. At night, you have the opportunity to fulfill that wish by visiting him in his cell. Now that you have the Final Key in your possession, you can finally open the door to the jail cell. Ignore the guard and unlock the door. Walk in and speak with the prisoner, and he will simply give you the Green Orb, asking absolutely nothing in return.
The Pirates' Den
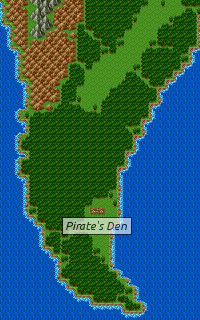
The Pirates' Den lies near the southern tip of the continent south of Soo. In fact, the fastest way to reach it is to Return to Soo, sail down the river, and then down the east coast of the continent. (An alternative to this is to sail due west from Tedanki until you reach land, and sail south a bit more.) You will see a house sitting near the coast. Step on it to investigate.
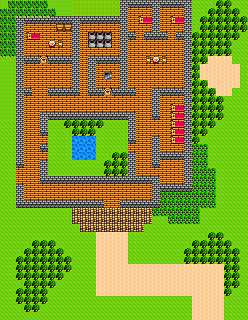
Using the Echoing Flute here, you will hear an echo indicating that an orb is nearby. A man by some trees will inform you that it's a Pirates' Den, and advise you to steer clear. Follow the wide path up to the entrance. If you arrive during the day, you will find that the den is quite empty, much like Tedanki. In fact, a man holed up in a prison tells you that the pirates only return at night. Use the Lamp of Darkness, or wander about the wilderness until night falls.
At night, the den is far more lively. Despite the man's warning, you'll find that the pirates are friendly and even informative. When asked about the orbs, one man will mention that he remembers finding one, but he forgets where it was stored. In the boss' room in the upper left corner of the house, you'll find a woman. She'll ask you if you find it strange that a woman is the boss. You may be inclined to respond no out of politeness, but she won't appreciate your flattery. Answer yes, and she'll tell you about an island known as Luzami, which can be found by sailing a bit to the west and then due south from the den.
A guard will be blocking off entrance to the prisoner you might have spoken to earlier in he day. Some pirates will be doing business, while others will be resting. Among the pirates that are resting, they will tell you about legends such as the Phantom Ship, and the Sailor's Thigh Bone, which was given to an old man in Greenlad. After speaking with everyone, you will receive no more clues as to the whereabouts of the orb.
Remember that the Pirates' Den is a large place, and you can investigate a lot of the surrounding land. You will find that you can walk quite a bit around the den's perimeter. If you investigate the right side of the den, you will find a boulder lying on a patch of sand. If you push the boulder over, you won't notice anything immediately. You'll have to search the ground where the boulder once lay, and you'll discover a flight of stairs. The stairs lead to a storage room containing three treasures, which are a Wing of Wyvern, a Strength Seed, and the Red Orb. Collect them all and prepare for the next part of your journey.
Assuming you have visited Lancel in the past, and that you have the Final Key, the time has come to explore the large shrine located in the top half of the town. Follow the path that leads from the right edge of town, around the trees, and up to the shrine above. You can open the locked gates on either side of the shrine first. The man on the right will inform you that the Yellow Orb has been passed around the world, and he encourages you to use the Echoing Flute to find it. The man on the left predicts that a former companion will help you in the future. What you may not realize is that both men speak of the same subject.
Use the Final Key to open the main gate to the shrine, and talk to the man waiting at the top. He will ask if one of you is courageous enough to attempt a trial on their own. Whoever occupies the leading position in your formation will volunteer. In this way, you may use any character that you like, not necessarily your Hero. However, the Hero is one of the best suited for the trial, especially if they are well equipped and beyond level 24. A Sage will also do quite well, but they must be suitably high level. If the person going can't cast spells that attack multiple enemies, it's a good idea to give them the Staff of Thunder to compensate for the lack of this ability. It's also important to make sure that the lead character has room in his or her inventory to collect any items they might find.
The lead character will separate from the party and follow the man into a tunnel, which ultimately leads out to the west of the town. This will deposit you in a sandy region known simply as the Navel of the Earth. The town is the only entrance and exit to this area, and the only other feature is a cave entrance.
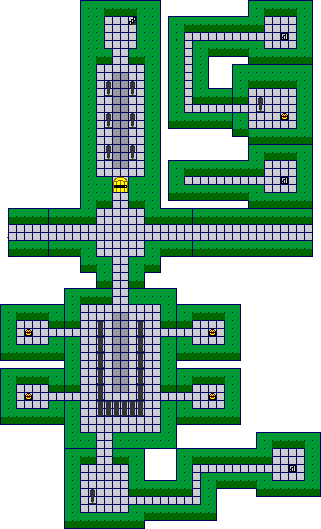
Visit the cave, and you will arrive at the top of a long hallway that extends down. Throughout this dungeon, you will be attacked by mid-level monsters. However, if you happen to die in here, you will not need to visit a House of Healing for resurrection, nor will you lose half of your gold. Use a key on the door below to arrive at an intersection. The tunnels that lead to the left or right from this intersection actually loop around back to the same place. Continue walking down instead.
When you reach the next section, you will see a hallway flanked by columns. If you walk down the center of the hallway, the columns will create a dead-end that you'll have to walk back out of. Walk along either side instead. Each side contains two small passages, which lead to rooms with treasure chests. Be sure to fill your health before you investigate these chests, as two of them are Mimics! Mimics try to cast Defeat to kill you, and steal your magic points by casting RobMagic on you. The Mimics are the chests in the lower left room, and the upper right room. The chests in the upper left room contains gold, and the chest in the lower right room has an Intelligence Seed.
The path continues below the columns, leading to a room with a passage to the right. The passage ends in a small room with a staircase that leads down.
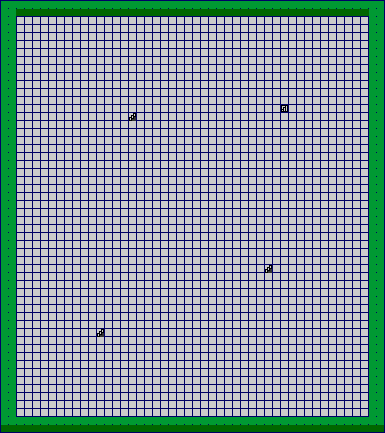
In this basement level, you will find yourself in a huge expansive room with very little detail. The room is so large that you can only see a small portion of it at a time, and it can be quite difficult to navigate in such a way that allows you to learn all of the rooms features. It turns out that you arrive via one of four staircases. This staircase is in the lower left corner, and there is another staircase not very far from each of the other corners.
Heading straight up from the staircase that your arrived from, you'll find the next staircase. This staircase leads back up, but it deposits you in a room that extends to a dead-end passage. Return back down, and proceed right from this staircase. It won't take too long to reach the next staircase that leads down. However, before you visit the floor below, head down from here. You will arrive at the fourth and final staircase.
Climb up the stairs and follow the passage around until you arrive in a room with a treasure chest. Inside the chest, you will find an incredible item, the Armor of Terrafirma. Equip it on your lone explorer, or save it for another party member who can make use of it. Then return to the staircase and drop back down to the second floor. Walk back up to the staircase you skipped and head down to the second basement level.
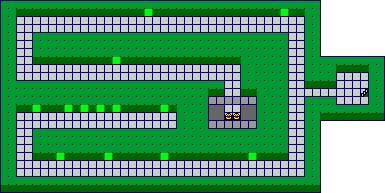
Shortly after you walk to the left, you're presented with a choice: walk up or down. Whichever way you choose, you will see a lot of faces carved into the walls. As you walk past them, they urge you to turn around and go back. If you follow the lower path first, these warnings will be plentiful until you reach a dead-end and are in fact forced to turn around. A face at the end will advise you that force of will does not equate to bravery, and it's important to listen to others.
The upper path is far less populated with faces, although the few that are present will still warn you to turn back. However, following the upper path will prove fruitful, as you will find two treasure chests at the end, which contain a Medical Herb and the Blue Orb. Collect the orb, and make your way out of the dungeon, casting Outside if you're able to shortcut the entire process. Walk back to Lancel to reunite with your party (note that any attempt to cast Return will fail), and rest up to recover from your wounds.
The fate of the new town
| Services | |
|---|---|
| Inn | 8 ~ 60 G |
| Healing | Yes |
| Item Shop | |
| Medical Herb | 8G |
| Fairy Water | 20G |
| Wing of Wyvern | 25G |
| Leather Helmet (early) | 80G |
| Poison Moth Powder (later) | 500G |
| Spider's Web (later) | 35G |
| Invisibility Herb (later) | 300G |
| Equipment Shop (later) | |
| Zombie Slasher | 9800G |
| Dragon Killer | 15000G |
| Staff of Judgment | 2700G |
| Magic Armor | 5800G |
| Sacred Robe | 4400G |
| Dragon Mail | 9800G |
| Silver Shield | 8800G |
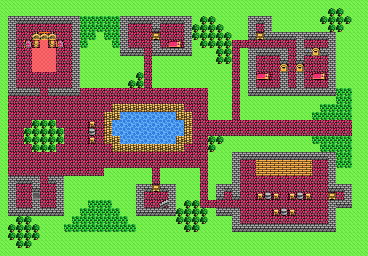
One more curiosity throughout your travels is the new town that you help establish on the east coast of the continent where the Soo live. After enough time passes, the town will grow, and each time you visit it, you will notice many new features. The first time you come back, the merchant that your dropped off will have established a fledgling shop.
In the next evolution of the town, new people will arrive. Someone will take over the shop, and an inn is established. The old man who founded the town will be very grateful, and the merchant you left behind will be hard at work building a theater for the entertainment of the travelers who visit.
Growth will continue until ultimately, the town will be successful, incorporating an incredible equipment shop with the Dragon Killer sword, Dragon Mail, and the Silver Shield. However, there will be some grumblings about decisions made by the merchant concerning the town's governance. Your merchant will become a little full of his or herself, and the citizens of the town will finally revolt against the merchant. They will throw the merchant in jail, where you can visit and speak with him or her.
The merchant will regret the choices that led to his or her imprisonment, and you will get a tip to look around the throne in the merchant's home. If you return to the home, walk behind the throne and search the ground. You will find the Yellow Orb. In addition, the two chests on either side of the throne contain some gold and a Luck Seed.
