(Page started) |
(More text) |
||
| Line 6: | Line 6: | ||
{{-}} | {{-}} | ||
== Hauksness == | == Hauksness == | ||
[[Image:DW3_monster_Wyvern.png|right]] | |||
Making your way down to Hauksness from Tantegel is straightforward. Compared to the first [[Dragon Warrior]], you can no longer walk far to the west and take a bridge to access the southern regions of Alefgard. Instead, the mountain chain south of Tantegel no longer blocks you from accessing the land on the other side. You can cross the hills and slip below the West Cave, and continue on your way. Before you cross a bridge, you will mostly encounter Boss Trolls and Vile Shadows, mixed with a few Slimes and Goopis. Once you cross the bridge, you will be entering Wyvern territory. The fire breathing Wyverns of the past are not terribly strong, but they're not the pushovers they presented themselves to be in the first game either. A group of three or four of them could spell trouble for a lower level party. | |||
[[Image:DW3_map_town_Hauksness.png|left]] | [[Image:DW3_map_town_Hauksness.png|left]] | ||
{| {{prettytable|notwide=1|style=width:50%; float:right;}} | {| {{prettytable|notwide=1|style=width:50%; float:right;}} | ||
| Line 58: | Line 60: | ||
|} | |} | ||
{{-|left}} | {{-|left}} | ||
You now get to witness Hauksness in its former glory, before it gets destroyed and ravaged by the forces of the Dragon Lord. It's quite a bustling town with a few shops. However, one merchant is preoccupied with thinking of a name for his new baby. The equipment shop in the middle of town does sell a useful shield, the Shield of Strength. When used in battle, this shield heals the user. It also has the incredibly expensive and equally useless Revealing Swimsuit. | |||
Other than one man indicating that Oricon may be found nearby, you will learn little of use inside the town walls. However, Hauksness is more than just the well-built section that you arrive in. More activity can be found through a gap in the south wall. In the enclosed building, a man indicates that something called the Sphere of Light can be found in your original world. And a woman standing by the well to the east of town says that she say something glittering in the pasture. | |||
The pasture she is referring to is the small patch of grass found in the corral for the horses in the lower right portion of town outside the walls. After you pass through a small stable, you can step into the corral with the horses. If you search the tile in the middle of the small patch of grass, you will find the Oricon, an important item that you will need to hang on to for later. Once you've found it, prepare for a journey along Alefgard's southern region. | |||
{{-}} | {{-}} | ||
== Along the south == | == Along the south == | ||
[[Image:DW3_map_overworld_Alefgard_South.png|right]] | [[Image:DW3_map_overworld_Alefgard_South.png|right]] | ||
There are two means of accessing the southern region of Alefgard. One is a bridge that lies south east of Hauksness, and the other is through a narrow passage of hills along the southern coast. While taking the bridge may seem easier, it actually bypasses the more interesting features of the region. Instead, it takes you above a mountain chain that separates you from the nearest civilization in Cantlin, and allows you to proceed to the eastern region of Alefgard. | |||
Travel down through the mountain pass along the southern coast. Then follow the coast and the terrain north east. In addition to all of the monsters you've encountered so far, you are likely to run into Voodoo Warlocks, and Magiwyverns will appear their regular cousins. Follow the terrain until you see a bridge leading east. Cross the bridge if you wish to visit the Poison Marsh Shrine first. Otherwise, continue above the bridge until you reach a second bridge. Cross that bridge into a small section of marsh, and then travel south to reach Cantlin. | |||
{{-}} | {{-}} | ||
=== Cantlin === | === Cantlin === | ||
| Line 75: | Line 85: | ||
|} | |} | ||
{{-|right}} | {{-|right}} | ||
If you were expecting a mythical creature to be standing guard in front of Cantlin, you will be disappointed, although one citizen is contemplating the idea. Cantlin of the future is loaded with merchants, selling items of every kind. Cantlin of the past looks deserted by comparison. One guard in town claims that the people of Cantlin have become so dispirited because of the Archfiend that they've closed their shops. The inn is open, and it turns out that Galin is staying there. He mentions that he left his Silver Harp at home, despite claims to the contrary by his father. | |||
You'll find a staircase up to a set of apartments above one of the shops on the left side of town. Everyone has decided to stay in their rooms out of fear of the Archfiend. One gentleman is inspired by these events to construct a monster that will defend the town, and decides to name it Golem. The large building in the center is actually a roof over a tranquil park. Inside is a man who advises you to visit an old man at a shrine. Walk through the bottom of the park to reach an enclosed section. Two doors block the way to a man surrounded by Barrier tiles. Open the door and cast StepGuard before speaking with him. He tells you the three items you need to reach the Archfiend: the Stones of Sunlight, the Staff of Rain, and the Sacred Amulet. | |||
There is very little else to see or do in Cantlin, but it does have one more feature: a Gambling Hall. Just like the ones found in your world, these halls allow you to place bets on who will win in a battle between various monsters. You'll find this hall no different than any other, except for the fact that you may see different monsters and the bets are more expensive. | |||
{{-}} | {{-}} | ||
=== The Poison Marsh Shrine === | === The Poison Marsh Shrine === | ||
Revision as of 20:57, 2 March 2012
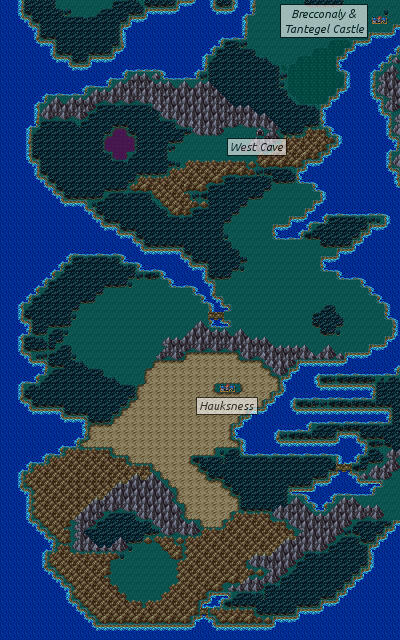
In the future, a lone warrior is far more likely to visit the towns to the east of Tantegel before they ever make their way down to Hauksness. However, in this day and age, the land bridge connecting the east to the rest of Alefgard is missing. You can certainly hop on your ship and sail around to it, but before you consider that route, it may just be easier to travel down the west side of Alefgard instead. When you reach the southern desert, you will get to see a town as it existed before a terrible calamity destroyed the town and turned it into a wasteland. Beyond this thriving desert town is another town nestled in a pocket of mountains. Whereas this town is a bustling economy in the future, hope has dwindled to a minimum and all of the merchants spend their time gambling instead of working. Even with fortified walls, the citizens don't feel that they have enough protection from the powerful monsters that roam the wilderness outside. Someone has begun researching a way to boost the town's security. Finally, a cave can be explored for any treasures it might hold, but you may find that the battle experience you gain is worth more than any of the items it contains.
Hauksness
Making your way down to Hauksness from Tantegel is straightforward. Compared to the first Dragon Warrior, you can no longer walk far to the west and take a bridge to access the southern regions of Alefgard. Instead, the mountain chain south of Tantegel no longer blocks you from accessing the land on the other side. You can cross the hills and slip below the West Cave, and continue on your way. Before you cross a bridge, you will mostly encounter Boss Trolls and Vile Shadows, mixed with a few Slimes and Goopis. Once you cross the bridge, you will be entering Wyvern territory. The fire breathing Wyverns of the past are not terribly strong, but they're not the pushovers they presented themselves to be in the first game either. A group of three or four of them could spell trouble for a lower level party.
| Services | |
|---|---|
| Inn | 100 G/person |
| Healing | No |
| Tool Shop | |
| Medical Herb | 8G |
| Antidote Herb | 10G |
| Fairy Water | 20G |
| Wing of Wyvern | 25G |
| Full Moon Herb | 30G |
| Poison Moth Powder | 500G |
| Equipment Shop | |
| Zombie Slasher | 9800G |
| Staff of Judgment | 2700G |
| Sacred Robe | 4400G |
| Dragon Mail | 9800G |
| Shield of Strength | 15,000G |
| Revealing Swimsuit | 78,000G |
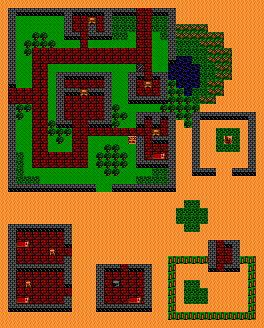
You now get to witness Hauksness in its former glory, before it gets destroyed and ravaged by the forces of the Dragon Lord. It's quite a bustling town with a few shops. However, one merchant is preoccupied with thinking of a name for his new baby. The equipment shop in the middle of town does sell a useful shield, the Shield of Strength. When used in battle, this shield heals the user. It also has the incredibly expensive and equally useless Revealing Swimsuit.
Other than one man indicating that Oricon may be found nearby, you will learn little of use inside the town walls. However, Hauksness is more than just the well-built section that you arrive in. More activity can be found through a gap in the south wall. In the enclosed building, a man indicates that something called the Sphere of Light can be found in your original world. And a woman standing by the well to the east of town says that she say something glittering in the pasture.
The pasture she is referring to is the small patch of grass found in the corral for the horses in the lower right portion of town outside the walls. After you pass through a small stable, you can step into the corral with the horses. If you search the tile in the middle of the small patch of grass, you will find the Oricon, an important item that you will need to hang on to for later. Once you've found it, prepare for a journey along Alefgard's southern region.
Along the south
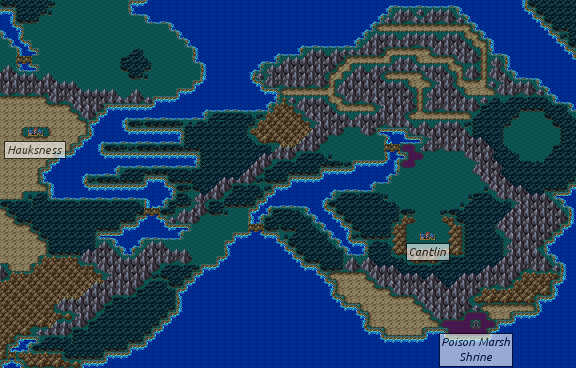
There are two means of accessing the southern region of Alefgard. One is a bridge that lies south east of Hauksness, and the other is through a narrow passage of hills along the southern coast. While taking the bridge may seem easier, it actually bypasses the more interesting features of the region. Instead, it takes you above a mountain chain that separates you from the nearest civilization in Cantlin, and allows you to proceed to the eastern region of Alefgard.
Travel down through the mountain pass along the southern coast. Then follow the coast and the terrain north east. In addition to all of the monsters you've encountered so far, you are likely to run into Voodoo Warlocks, and Magiwyverns will appear their regular cousins. Follow the terrain until you see a bridge leading east. Cross the bridge if you wish to visit the Poison Marsh Shrine first. Otherwise, continue above the bridge until you reach a second bridge. Cross that bridge into a small section of marsh, and then travel south to reach Cantlin.
Cantlin
| Services | |
|---|---|
| Inn | 100 G/person |
| Healing | No |
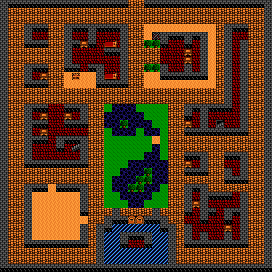
If you were expecting a mythical creature to be standing guard in front of Cantlin, you will be disappointed, although one citizen is contemplating the idea. Cantlin of the future is loaded with merchants, selling items of every kind. Cantlin of the past looks deserted by comparison. One guard in town claims that the people of Cantlin have become so dispirited because of the Archfiend that they've closed their shops. The inn is open, and it turns out that Galin is staying there. He mentions that he left his Silver Harp at home, despite claims to the contrary by his father.
You'll find a staircase up to a set of apartments above one of the shops on the left side of town. Everyone has decided to stay in their rooms out of fear of the Archfiend. One gentleman is inspired by these events to construct a monster that will defend the town, and decides to name it Golem. The large building in the center is actually a roof over a tranquil park. Inside is a man who advises you to visit an old man at a shrine. Walk through the bottom of the park to reach an enclosed section. Two doors block the way to a man surrounded by Barrier tiles. Open the door and cast StepGuard before speaking with him. He tells you the three items you need to reach the Archfiend: the Stones of Sunlight, the Staff of Rain, and the Sacred Amulet.
There is very little else to see or do in Cantlin, but it does have one more feature: a Gambling Hall. Just like the ones found in your world, these halls allow you to place bets on who will win in a battle between various monsters. You'll find this hall no different than any other, except for the fact that you may see different monsters and the bets are more expensive.
The Poison Marsh Shrine
The West Cave
