m (removing break bars) |
m (Remove the NES maps) |
||
| (3 intermediate revisions by 3 users not shown) | |||
| Line 1: | Line 1: | ||
{{Header Nav|game=Super Mario Bros. 3}} | {{Header Nav|game=Super Mario Bros. 3}} | ||
{{floatingtoc|float=left|limit=2}} | {{floatingtoc|float=left|limit=2}} | ||
[[ | [[File:SMB3-Level1.png|right]]{{-}} | ||
{{-}} | |||
==World 1 Fortress== | ==World 1 Fortress== | ||
A meat-headed Koopa boss named BOOM-BOOM defends Grass Land's stony fortress. | A meat-headed Koopa boss named BOOM-BOOM defends Grass Land's stony fortress. He has also hidden a [[Super Mario Bros. 3/Warp Whistles|second whistle]] in this fortress. BOOM-BOOM is a big Koopa bully, and he guards the danger-filled fortress in the middle of this world.{{-}} | ||
{{-}} | |||
===Part 1=== | ===Part 1=== | ||
{{Scrolling map|SMB3 W1 F1 a.png}} | {{Scrolling map|SMB3 W1 F1 a.png}} | ||
* '''1''': '''Fire Flower Power'''. | * '''1''': '''Fire Flower Power'''. You'll find a power-up in the '''?''' Block above the island over the lava. Watch out for the Podoboos that leap out of the lava as you make the jump. If you're already Super Mario, you'll get a Fire Flower that will make short work of BOOM-BOOM the boss. | ||
{{Scrolling map|SMB3 W1 F1 b.png}} | {{Scrolling map|SMB3 W1 F1 b.png}} | ||
* '''2''': '''Find the Second Magic Whistle'''. | * '''2''': '''Find the Second Magic Whistle'''. Hit the '''?''' Block and grab the Super Leaf. Stomp on the Dry Bones, then use the flat area to build up speed. Fly up the side and right, then press {{nes|Up|Dpad}} to enter a hidden door. It will lead to a secret area on top of the roof where a valuable [[Super Mario Bros. 3/Warp Whistles|Magic Whistle]] is hidden. | ||
{{sidebar|float=right|width=250px|title=Secrets of the Warp Whistles|contents=The Whistles let you travel to any world you want to visit. | {{sidebar|float=right|width=250px|title=Secrets of the Warp Whistles|contents=The Whistles let you travel to any world you want to visit. Once you have found a Whistle, use it when you're on the Map Screen, and you'll be transported to a World 9, the Warp Zone.}} | ||
===Part 2=== | ===Part 2=== | ||
{{Scrolling map|SMB3 W1 F1 c.png}} | {{Scrolling map|SMB3 W1 F1 c.png}} | ||
* '''3''': The ceiling is falling, so you'll need to get to a safe spot in a hurry to avoid being ground into Mario meat. | * '''3''': The ceiling is falling, so you'll need to get to a safe spot in a hurry to avoid being ground into Mario meat. You'll be safe in the raised areas when the ceiling crashes down, but be careful not to jump into the spikes when the ceiling rises again. | ||
===Part 3=== | ===Part 3=== | ||
{{Scrolling map|SMB3 W1 F1 d.png}} | {{Scrolling map|SMB3 W1 F1 d.png}} | ||
* '''B''': To defeat the boss, BOOM-BOOM, jump on his head three times, or try using fireballs to charbroil the Koopa. | * '''B''': To defeat the boss, BOOM-BOOM, jump on his head three times, or try using fireballs to charbroil the Koopa. ''If you stomp on him, you score 1000 points for the first hit, 2000 points for the second hit, and 4000 points for the third.'' | ||
{{-}} | {{-}} | ||
==World 1-5== | ==World 1-5== | ||
Delve into a dark cavern and face all kinds of unfriendly cave-dwellers. This odd underground cavern (originally an ice cave in the NES version) offers another chance to go to Coin Heaven. It also gives you a chance to practice your Slide Attack.{{-}} | |||
Delve into a dark cavern and face all kinds of unfriendly cave-dwellers. | |||
{{-}} | |||
{{Scrolling map|SMB3 W1 S5 a.png}} | {{Scrolling map|SMB3 W1 S5 a.png}} | ||
* '''1''': Press {{nes|Down|Dpad}} while standing on the hill to slide down and wipe out all of the Buzzy Beetles climbing up the slope. | * '''1''': Press {{nes|Down|Dpad}} while standing on the hill to slide down and wipe out all of the Buzzy Beetles climbing up the slope. | ||
* '''2''': Whether you do it before or after your trip to coin heaven, don't forget to collect these coins, and the power-up found beyond. | * '''2''': Whether you do it before or after your trip to coin heaven, don't forget to collect these coins, and the power-up found beyond. Every coin counts, so be greedy. | ||
* '''3''': Jump at the left side of the tunnel opening to reveal a Red Jump Block that will rocket you into the clouds. | * '''3''': Jump at the left side of the tunnel opening to reveal a Red Jump Block that will rocket you into the clouds. The Coin Heaven that you arrive at is no different than the one you visited in [[../World 1#World 1-3|World 1-3]]. | ||
{{Scrolling map|SMB3 W1 S5 b.png}} | {{Scrolling map|SMB3 W1 S5 b.png}} | ||
* '''4''': If you have a Fire Flower, shoot fireballs down the hill to eliminate the Piranha Plant lurking in the pipe. | * '''4''': If you have a Fire Flower, shoot fireballs down the hill to eliminate the Piranha Plant lurking in the pipe. Fireballs have a long range, so use them to defeat enemies from a safe distance.{{-}} | ||
{{-}} | |||
==World 1-6== | ==World 1-6== | ||
Expect a wild ride on this stage's dangerously erratic platforms and lifts. Rail Lifts with motors are safe to stay on, but those without will fall off the screen upon reaching the end of the line.{{-}} | |||
Expect a wild ride on this stage's dangerously erratic platforms and lifts. | |||
{{-}} | |||
{{Scrolling map|SMB3 W1 S6 a.png}} | {{Scrolling map|SMB3 W1 S6 a.png}} | ||
* '''1''': Many platform on this stage move on rails. | * '''1''': Many platform on this stage move on rails. Jump on a Rail Lift and ride it until you can jump onto the Jump Blocks. | ||
* '''2''': Get rid of the Koopa Troopa before you attempt to get the 1-Up hidden in the block above. | * '''2''': Get rid of the Koopa Troopa before you attempt to get the 1-Up hidden in the block above. Stomp on the Koopa and kick its shell out of the way, then jump and hit the third block from the left to find a 1-Up. If you squat underneath the two side blocks, you can hop to discover more coins. | ||
{{Scrolling map|SMB3 W1 S6 b.png}} | {{Scrolling map|SMB3 W1 S6 b.png}} | ||
* '''3''': Start running from the left edge of the previous platform, then hop up to this ledge and continue to build your P-Meter. | * '''3''': Start running from the left edge of the previous platform, then hop up to this ledge and continue to build your P-Meter. If you're running fast enough, you do not have to jump over the small gap. Then fly and collect the string of coins floating in the sky. | ||
* '''4''': If you're Super Mario, you'll have to jump over the Red Koopa Paratroopa. | * '''4''': If you're Super Mario, you'll have to jump over the Red Koopa Paratroopa. Crouching won't cut it—the Paratroopa will still take a bite out of you.{{-}} | ||
{{-}} | |||
==World 1 Airship== | ==World 1 Airship== | ||
Board an airship that's bristling with cannons and dodge your way to Larry Koopa. Bowser's seven bratty kids, also known as the Koopalings, have each taken a magic wand from a King of a Mushroom World. Larry, the youngest Koopaling, turned the King of Grasslands into a [[Super_Mario_Bros._2/Enemies|Cobrat]] (originally a dog in the NES version). It's Mario to the rescue!{{-}} | |||
Board an airship that's bristling with cannons and dodge your way to Larry Koopa. | {{sidebar|width=250px|float=right|title=If at first you don't succeed…|contents=If you don't beat Larry the first time, you can try again. However, the airship will flee to another spot on the Map Screen. It will try to take a position beyond unfinished sections of the world. But the Anchor item will prevent the airship from getting away.}} | ||
{{ | |||
{{Scrolling map|SMB3 W1 AS.png}} | {{Scrolling map|SMB3 W1 AS.png}} | ||
* '''1''': The safest way to disarm an upward-pointed cannon temporarily is to stand on it. The cannonball will bounce off your feet, and you'll get 100 points. | |||
* '''1''': The safest way to disarm an upward-pointed cannon temporarily is to stand on it. | * '''2''': Jump directly onto Bullet Bills to knock them out. If you stand right next to a cannon, it won't fire. Just be careful when you step away. | ||
* '''2''': Jump directly onto Bullet Bills to knock them out. | * '''3''': It's a risky maneuver, but getting the Fire Flower is well worth it—it will make the boss battle that much easier.{{-}} | ||
* '''3''': It's a risky maneuver, but getting the Fire Flower is well worth it—it will make the boss battle that much easier. | |||
=== B: Larry Koopa === | === B: Larry Koopa === | ||
[[File:SMB3 W1 Boss.png|right]] | |||
[[ | The youngest of Bowser's Koopalings, Larry Koopa is in charge of defending Grass Land from meddlesome plumbers like you. To save Grass Land's king, you'll have to teach the Koopa brat some manners. | ||
The youngest of Bowser's Koopalings, Larry Koopa is in charge of defending Grass Land from meddlesome plumbers like you. | * Jump and land on Larry's head to avoid the magical loops Larry fires from his wand. The stomping will frighten Larry, causing him to shrink back into his shell. | ||
* Jump and land on Larry's head to avoid the magical loops Larry fires from his wand. | * While he's tucked into his shell, Larry will leap into the air. Sneak underneath him as he flies above you, then pounce on him again as soon as he emerges from his shell. | ||
* While he's tucked into his shell, Larry will leap into the air. | * It takes three jumps to defeat Larry Koopa. He'll drop his wand, which you can use to transform the king back into a human. In return, you'll get a letter from the princess.{{-}} | ||
* It takes three jumps to defeat Larry Koopa. | |||
{{-}} | |||
=== Peace Returns to Grass Land === | === Peace Returns to Grass Land === | ||
Distinguished by his royal turban, the King of Grass Land is relieved to be normal again. | Distinguished by his royal turban, the King of Grass Land is relieved to be normal again. And it looks like the king's Mushroom Retainer has a note for Mario from the Princess, along with a free power-up item, a P-Wing. | ||
{{Footer Nav|game=Super Mario Bros. 3|prevpage=World 1|nextpage=World 2}} | {{Footer Nav|game=Super Mario Bros. 3|prevpage=World 1|nextpage=World 2}} | ||
Latest revision as of 21:30, 14 November 2014
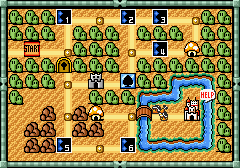
World 1 Fortress[edit]
A meat-headed Koopa boss named BOOM-BOOM defends Grass Land's stony fortress. He has also hidden a second whistle in this fortress. BOOM-BOOM is a big Koopa bully, and he guards the danger-filled fortress in the middle of this world.
Part 1[edit]
- 1: Fire Flower Power. You'll find a power-up in the ? Block above the island over the lava. Watch out for the Podoboos that leap out of the lava as you make the jump. If you're already Super Mario, you'll get a Fire Flower that will make short work of BOOM-BOOM the boss.
- 2: Find the Second Magic Whistle. Hit the ? Block and grab the Super Leaf. Stomp on the Dry Bones, then use the flat area to build up speed. Fly up the side and right, then press
 to enter a hidden door. It will lead to a secret area on top of the roof where a valuable Magic Whistle is hidden.
Part 2[edit]
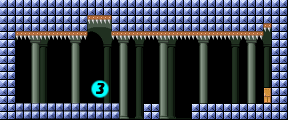
- 3: The ceiling is falling, so you'll need to get to a safe spot in a hurry to avoid being ground into Mario meat. You'll be safe in the raised areas when the ceiling crashes down, but be careful not to jump into the spikes when the ceiling rises again.
Part 3[edit]
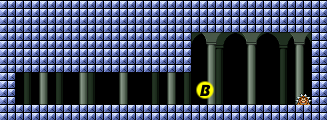
- B: To defeat the boss, BOOM-BOOM, jump on his head three times, or try using fireballs to charbroil the Koopa. If you stomp on him, you score 1000 points for the first hit, 2000 points for the second hit, and 4000 points for the third.
World 1-5[edit]
Delve into a dark cavern and face all kinds of unfriendly cave-dwellers. This odd underground cavern (originally an ice cave in the NES version) offers another chance to go to Coin Heaven. It also gives you a chance to practice your Slide Attack.
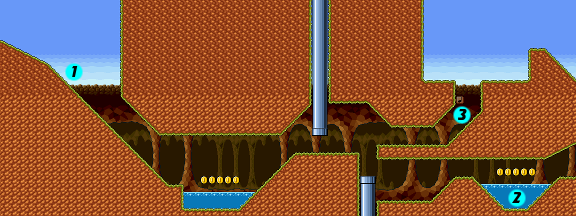
- 1: Press
 while standing on the hill to slide down and wipe out all of the Buzzy Beetles climbing up the slope.
 - 2: Whether you do it before or after your trip to coin heaven, don't forget to collect these coins, and the power-up found beyond. Every coin counts, so be greedy.
- 3: Jump at the left side of the tunnel opening to reveal a Red Jump Block that will rocket you into the clouds. The Coin Heaven that you arrive at is no different than the one you visited in World 1-3.
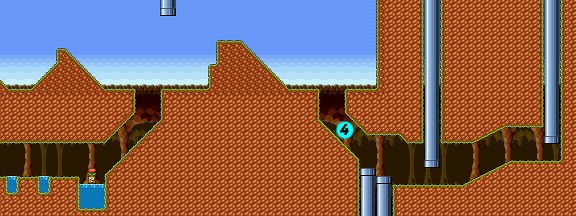
- 4: If you have a Fire Flower, shoot fireballs down the hill to eliminate the Piranha Plant lurking in the pipe. Fireballs have a long range, so use them to defeat enemies from a safe distance.
World 1-6[edit]
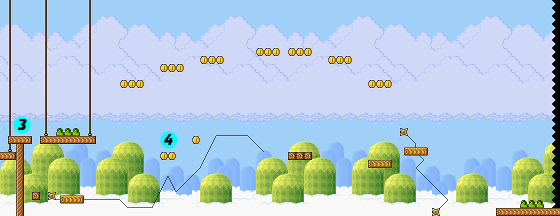
Expect a wild ride on this stage's dangerously erratic platforms and lifts. Rail Lifts with motors are safe to stay on, but those without will fall off the screen upon reaching the end of the line.
- 1: Many platform on this stage move on rails. Jump on a Rail Lift and ride it until you can jump onto the Jump Blocks.
- 2: Get rid of the Koopa Troopa before you attempt to get the 1-Up hidden in the block above. Stomp on the Koopa and kick its shell out of the way, then jump and hit the third block from the left to find a 1-Up. If you squat underneath the two side blocks, you can hop to discover more coins.
- 3: Start running from the left edge of the previous platform, then hop up to this ledge and continue to build your P-Meter. If you're running fast enough, you do not have to jump over the small gap. Then fly and collect the string of coins floating in the sky.
- 4: If you're Super Mario, you'll have to jump over the Red Koopa Paratroopa. Crouching won't cut it—the Paratroopa will still take a bite out of you.
World 1 Airship[edit]
Board an airship that's bristling with cannons and dodge your way to Larry Koopa. Bowser's seven bratty kids, also known as the Koopalings, have each taken a magic wand from a King of a Mushroom World. Larry, the youngest Koopaling, turned the King of Grasslands into a Cobrat (originally a dog in the NES version). It's Mario to the rescue!
- 1: The safest way to disarm an upward-pointed cannon temporarily is to stand on it. The cannonball will bounce off your feet, and you'll get 100 points.
- 2: Jump directly onto Bullet Bills to knock them out. If you stand right next to a cannon, it won't fire. Just be careful when you step away.
- 3: It's a risky maneuver, but getting the Fire Flower is well worth it—it will make the boss battle that much easier.
B: Larry Koopa[edit]
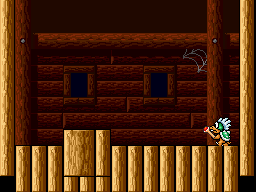
The youngest of Bowser's Koopalings, Larry Koopa is in charge of defending Grass Land from meddlesome plumbers like you. To save Grass Land's king, you'll have to teach the Koopa brat some manners.
- Jump and land on Larry's head to avoid the magical loops Larry fires from his wand. The stomping will frighten Larry, causing him to shrink back into his shell.
- While he's tucked into his shell, Larry will leap into the air. Sneak underneath him as he flies above you, then pounce on him again as soon as he emerges from his shell.
- It takes three jumps to defeat Larry Koopa. He'll drop his wand, which you can use to transform the king back into a human. In return, you'll get a letter from the princess.
Peace Returns to Grass Land[edit]
Distinguished by his royal turban, the King of Grass Land is relieved to be normal again. And it looks like the king's Mushroom Retainer has a note for Mario from the Princess, along with a free power-up item, a P-Wing.


