(Breaking up) |
m (Remove the NES maps) |
||
| (8 intermediate revisions by 3 users not shown) | |||
| Line 1: | Line 1: | ||
{{Header Nav|game=Super Mario Bros. 3}} | {{Header Nav|game=Super Mario Bros. 3}} | ||
{{floatingtoc|float=left| | {{floatingtoc|float=left}} | ||
[[File:SMB3- | [[File:SMB3-Level4_labeled.png|frame|right|White House: World 4-2, 24 coins, [[File:SMB3 item Anchor.png|18px]]]]{{-}} | ||
{| {{prettytable|float=right}} | |||
| <font color="blue">'''C'''</font> | |||
| [[File:SMB3 item Tanooki.png|18px]] | |||
|- | |||
| <font color="blue">'''D'''</font> | |||
| [[File:SMB3 item Mushroom.png|18px]] [[File:SMB3 item Flower.png|18px]] [[File:SMB3 item Leaf.png|18px]] | |||
|- | |||
| <font color="red">'''E'''</font> | |||
| [[File:SMB3 item Cloud.png|18px]] | |||
|- | |||
| <font color="blue">'''F'''</font> | |||
| [[File:SMB3 item Mushroom.png|18px]] [[File:SMB3 item Flower.png|18px]] [[File:SMB3 item Leaf.png|18px]] | |||
|- | |||
| <font color="red">'''G'''</font> | |||
| [[File:SMB3 item PWing.png|18px]] | |||
|- | |||
| <font color="red">'''H'''</font> | |||
| [[File:SMB3 item Star.png|18px]] | |||
|- | |||
| <font color="blue">'''I'''</font> | |||
| [[File:SMB3 item Flower.png|18px]] [[File:SMB3 item Leaf.png|18px]] [[File:SMB3 item Tanooki.png|18px]] | |||
|} | |||
Life couldn't be much better. You've liberated Sea Side, explored the seafloor and enjoyed a sleek swim in the Frog Suit. However, Mario's troubles are about to get bigger. Much bigger. | |||
Using a Hammer on the rock to the left of World 4-1 will give you access to a special Toad House that gives you a free Tanooki suit. You'll have to decide if the suit is worth trading in a rare item. | |||
{{-}} | {{-}} | ||
== | ==World 4-1== | ||
{{Scrolling map|SMB3-4-1- | In the Land of Giants, "bigger is better." Huge is even better than big. Everything in this world is larger than life! Giant Koopas and Goombas are common. Although these characters look fearsome, they can be kicked and carried like their smaller relatives.{{-}} | ||
* | {{Scrolling map|SMB3 W4 S1 a.png}} | ||
* '''1''': A different timing is necessary here. Even if you stand right next to the pipe, Giant Piranha Plants will still go in and out. So make a dash over the pipe when the Piranha Plant is going down. Alternatively, stand on low flying clouds to gain height that will help you make difficult jumps. | |||
* '''2''': Even Giant Koopas duck when Mario's around. Yes, they're big, but they're still the same brainless Koopas you know and love. Even when he's Small, Mario can take them on easily. | |||
[[File:SMB3 W4 S1 c.png|right]] | |||
* '''3''': After you've grabbed the power-up located at point 5, destroy the three stacked blocks with your Raccoon tail, then use the open space to fly to a secret area. You'll need to swim up the waterfall to reach it. Then swim to the pipe at point 4. | |||
* '''4''': '''Double 1-Up in the bonus area'''. Once you've slid down this pipe, you'll end up in an underwater area (shown right) with two fearsome Big Berthas. Hidden in the blocks, you'll find two 1-Ups, but don't let yourself become fish food. | |||
{{Scrolling map|SMB3 W4 S1 b.png}} | |||
* '''5''': Collect the power-up but be careful not to run into the bouncing Koopa Troopa held back by the coin block. Grab the Koopa and ditch him by letting go of him while standing next to a pipe. Next, clear away all the blocks and fly into the upper waterfall at point 3. | |||
* '''6''': Unexpected 1-Ups for Raccoon Mario. Use the repeated stomping method on the three red Giant Koopa Troopas in this area to get 1-Ups. Be careful not to accidentally kick them over the side. It's very tricky to pull this off!{{-}} | |||
==4-2== | ==World 4-2== | ||
{{Scrolling map|SMB3 | Leap from pipe to pipe as you frantically dodge a school of Cheep-Cheeps. The land rises and sinks here, but fortunately Boss Bass isn't around. There are plenty of Cheep-Cheeps to give you a headache though, mainly toward the end of the stage.{{-}} | ||
{{Scrolling map|SMB3 W4 S2 a.png}} | |||
* | {{sidebar|float=right|width=250px|title=Stay close and they won't hurt you, right?|contents=Usually, if you're right next to Bullet Bill or a pipe with a Piranha Plant inside, you can't get hurt by them. But in the Giant World, it doesn't always work that way. Giant Piranha Plants won't notice you and still go in and out.}} | ||
* '''1''': Vicious Cheep-Cheeps will leap out of the water to get at you. The best way to stop them is to let them run into your feet. | |||
* | * '''2''': Pick up the Ice Blocks and kick them at the '''?''' Block to reveal a power-up. Ice Blocks are also useful for attacking a wide variety of enemies that are too dangerous to approach. | ||
* | * '''3''': Cheep-Cheeps are still a danger midway though the stage, but the biggest threat comes from the Piranha Plants. Stand on the cloud while you wait for the Piranha Plants to recede into their pipes, then run past. Be careful not to get caught by a fireball shot from the Venus Fire Trap. | ||
* | {{Scrolling map|SMB3 W4 S2 b.png}} | ||
* '''4''': '''White Mushroom House'''. As the platform begins to rise, stomp the Switch Block and grab the column of coins. Rush forward, take the Starman and run to the coins ahead. Collect 24 coins to gain access to a White Mushroom House. You may even wish to consider collecting the Starman first. | |||
* '''5''': Near the end of the stage, a crazed school of Cheep-Cheeps will swarm out of the water. To minimize the amount of time you're at risk, keep moving. Either jump on the flying fish to knock them out, or run beneath them as they flop through the air.{{-}} | |||
==4-3== | ==World 4-3== | ||
{{Scrolling map|SMB3 | Say hi to the Sledge Brothers; they are big by any standard, but they're still no match for the Mario Bros. These tubby turtles are relatives of the Hammer Bros. They attack by throwing sledge hammers, and are so heavy that when they jump and land, a small earthquake occurs.{{-}} | ||
* | {{Scrolling map|SMB3 W4 S3 a.png}} | ||
* '''1''': The big-bones boys in Stage 4-3 are called the Sledge Bros. Squash them as soon as they pause between throws. If you have a Starman in your inventory, you might consider using it now. Sometimes, you can run underneath the brothers as they jump. | |||
* | {{Scrolling map|SMB3 W4 S3 b.png}} | ||
* '''2''': Wait until Spiny has dropped off the ceiling, stomp Buzzy, and your runway will be clear. As soon as you get your hands on a Super Leaf, fly to the ceiling and collect some bonus coins. | |||
{{Scrolling map|SMB3 W4 S3 c.png}} | |||
* '''3''': Bump the block containing the 1-Up, then chase it down the cramped corridor. Collect it as it falls off the ledge, but be careful not to run into any enemies—Spiny's on the ceiling waiting to get the drop on you. | |||
* | * '''4''': Bouncing block buffet you. There isn't anything in these bouncing Wood Blocks, so just jump over and past them.{{-}} | ||
* | |||
==Fortress | ==World 4 1st Fortress== | ||
Candles come alive in this stout fortress. The bully BOOM-BOOM is on the prowl, and he wants revenge. The Fortresses in Super Mario Bros. 3 contain some of the trickiest areas in the game. They often give you a choice of paths to take, each with its own dangers. It's up to you to choose which way you like best. | |||
{{Scrolling map|SMB3 | {{Scrolling map|SMB3 W4 F1 a.png}} | ||
* | * '''1''': Just like Boo Diddlys, the living candle flames known as Hot Foots will chase you when you turn your back to them, and they'll stop moving towards you as soon as you face them. Move strategically to keep Hot foots at a safe distance. | ||
* | * '''2''': This Fortress seems to have Thwomp Traps placed wherever there is space for them. Some even move horizontally! If you don't like these traps, take the alternate route. | ||
* | * '''3''': A trio of mummified turtles and a ghost make this way dangerous. Slide down the center of the five pipes to reach a secret area containing a power-up. | ||
{{Scrolling map|SMB3 W4 F1 c.png}} | |||
* '''4''': You'll end up in this underground pathway if you take the center pipe at point 3. Be careful when you try to collect the power-up down here—chances are, Boo Diddly will be coming after you. | |||
* '''5''': Invisible Blocks are the only way out. Be sure to face the ghost as you make these blocks appear. And remember, those Dry Bones will come back to life. You will return to Fortress just outside of BOOM-BOOM's room. If you're not fully powered up, you may want to consider heading left when you exit the pipe, but watch out for the Thwomp. | |||
{{Scrolling map|SMB3 W4 F1 b.png}} | |||
* '''B''': BOOM-BOOM is back to normal… Well, at least he isn't flying. But he can display some impressive high jumping skills, and there is a rather awkward ledge in the room that restricts your own freedom to jump. Jump on BOOM-BOOM's head three times as quickly as possible. | |||
== | ==World 4-4== | ||
{{Scrolling map|SMB3 | Submerge to diving depth to dodge Spiny Egg attacks from above. Lakitu has always had a grudge against Mario. He won't even let Mario take a swim without dropping Spinys on him.{{-}} | ||
* | {{Scrolling map|SMB3 W4 S4 a.png}} | ||
* | [[File:SMB3 W4 S4 b.png|right]] | ||
* | * '''1''': As Frog Mario, you can swim against the current and enter a pipe that leads to a secret area (shown right) chock full of coins. | ||
** Only in the original NES version, if you don't have a Frog Suit (or don't want to use one up) there's another way to access this room. If you start on the ledge where the power-up is and drift down left from there, you can make it to this pipe without a Frog Suit. This oversight was corrected in all subsequent releases. | |||
* '''2''': When you exit the bonus stage, Lakitu will be waiting for you. He will plop Spiny Eggs into the ocean, so swim as hard as you can to avoid them, and don't let the current to push you into them. The Frog Suit gives you a huge advantage. | |||
{{Scrolling map|SMB3 W4 S4 c.png}} | |||
* '''3''': When you reach the clearing, you'll be showered with Spiny Eggs from above, so move as quickly as possible to the pipe that leads to the end of the stage. | |||
{{Footer Nav|game=Super Mario Bros. 3|prevpage=World 3 Part 3|nextpage=World 4 Part 2}} | {{Footer Nav|game=Super Mario Bros. 3|prevpage=World 3 Part 3|nextpage=World 4 Part 2}} | ||
Latest revision as of 14:45, 17 November 2014


| C | |
| D | |
| E | |
| F | |
| G | |
| H | |
| I |
Life couldn't be much better. You've liberated Sea Side, explored the seafloor and enjoyed a sleek swim in the Frog Suit. However, Mario's troubles are about to get bigger. Much bigger.
Using a Hammer on the rock to the left of World 4-1 will give you access to a special Toad House that gives you a free Tanooki suit. You'll have to decide if the suit is worth trading in a rare item.
World 4-1[edit]
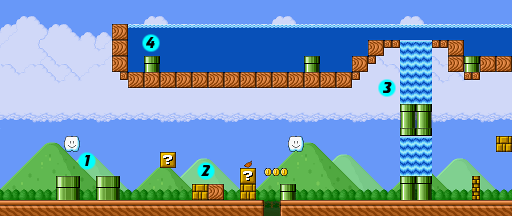
In the Land of Giants, "bigger is better." Huge is even better than big. Everything in this world is larger than life! Giant Koopas and Goombas are common. Although these characters look fearsome, they can be kicked and carried like their smaller relatives.
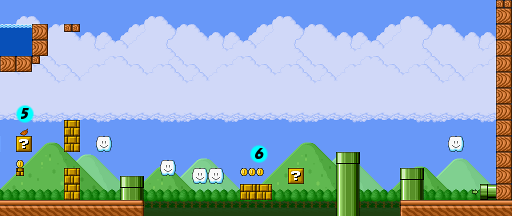
- 1: A different timing is necessary here. Even if you stand right next to the pipe, Giant Piranha Plants will still go in and out. So make a dash over the pipe when the Piranha Plant is going down. Alternatively, stand on low flying clouds to gain height that will help you make difficult jumps.
- 2: Even Giant Koopas duck when Mario's around. Yes, they're big, but they're still the same brainless Koopas you know and love. Even when he's Small, Mario can take them on easily.

- 3: After you've grabbed the power-up located at point 5, destroy the three stacked blocks with your Raccoon tail, then use the open space to fly to a secret area. You'll need to swim up the waterfall to reach it. Then swim to the pipe at point 4.
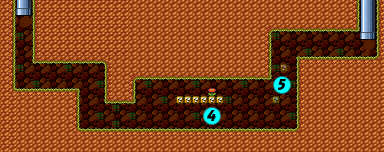
- 4: Double 1-Up in the bonus area. Once you've slid down this pipe, you'll end up in an underwater area (shown right) with two fearsome Big Berthas. Hidden in the blocks, you'll find two 1-Ups, but don't let yourself become fish food.
- 5: Collect the power-up but be careful not to run into the bouncing Koopa Troopa held back by the coin block. Grab the Koopa and ditch him by letting go of him while standing next to a pipe. Next, clear away all the blocks and fly into the upper waterfall at point 3.
- 6: Unexpected 1-Ups for Raccoon Mario. Use the repeated stomping method on the three red Giant Koopa Troopas in this area to get 1-Ups. Be careful not to accidentally kick them over the side. It's very tricky to pull this off!
World 4-2[edit]
Leap from pipe to pipe as you frantically dodge a school of Cheep-Cheeps. The land rises and sinks here, but fortunately Boss Bass isn't around. There are plenty of Cheep-Cheeps to give you a headache though, mainly toward the end of the stage.
- 1: Vicious Cheep-Cheeps will leap out of the water to get at you. The best way to stop them is to let them run into your feet.
- 2: Pick up the Ice Blocks and kick them at the ? Block to reveal a power-up. Ice Blocks are also useful for attacking a wide variety of enemies that are too dangerous to approach.
- 3: Cheep-Cheeps are still a danger midway though the stage, but the biggest threat comes from the Piranha Plants. Stand on the cloud while you wait for the Piranha Plants to recede into their pipes, then run past. Be careful not to get caught by a fireball shot from the Venus Fire Trap.
- 4: White Mushroom House. As the platform begins to rise, stomp the Switch Block and grab the column of coins. Rush forward, take the Starman and run to the coins ahead. Collect 24 coins to gain access to a White Mushroom House. You may even wish to consider collecting the Starman first.
- 5: Near the end of the stage, a crazed school of Cheep-Cheeps will swarm out of the water. To minimize the amount of time you're at risk, keep moving. Either jump on the flying fish to knock them out, or run beneath them as they flop through the air.
World 4-3[edit]
Say hi to the Sledge Brothers; they are big by any standard, but they're still no match for the Mario Bros. These tubby turtles are relatives of the Hammer Bros. They attack by throwing sledge hammers, and are so heavy that when they jump and land, a small earthquake occurs.
- 1: The big-bones boys in Stage 4-3 are called the Sledge Bros. Squash them as soon as they pause between throws. If you have a Starman in your inventory, you might consider using it now. Sometimes, you can run underneath the brothers as they jump.
- 2: Wait until Spiny has dropped off the ceiling, stomp Buzzy, and your runway will be clear. As soon as you get your hands on a Super Leaf, fly to the ceiling and collect some bonus coins.
- 3: Bump the block containing the 1-Up, then chase it down the cramped corridor. Collect it as it falls off the ledge, but be careful not to run into any enemies—Spiny's on the ceiling waiting to get the drop on you.
- 4: Bouncing block buffet you. There isn't anything in these bouncing Wood Blocks, so just jump over and past them.
World 4 1st Fortress[edit]
Candles come alive in this stout fortress. The bully BOOM-BOOM is on the prowl, and he wants revenge. The Fortresses in Super Mario Bros. 3 contain some of the trickiest areas in the game. They often give you a choice of paths to take, each with its own dangers. It's up to you to choose which way you like best.
- 1: Just like Boo Diddlys, the living candle flames known as Hot Foots will chase you when you turn your back to them, and they'll stop moving towards you as soon as you face them. Move strategically to keep Hot foots at a safe distance.
- 2: This Fortress seems to have Thwomp Traps placed wherever there is space for them. Some even move horizontally! If you don't like these traps, take the alternate route.
- 3: A trio of mummified turtles and a ghost make this way dangerous. Slide down the center of the five pipes to reach a secret area containing a power-up.
- 4: You'll end up in this underground pathway if you take the center pipe at point 3. Be careful when you try to collect the power-up down here—chances are, Boo Diddly will be coming after you.
- 5: Invisible Blocks are the only way out. Be sure to face the ghost as you make these blocks appear. And remember, those Dry Bones will come back to life. You will return to Fortress just outside of BOOM-BOOM's room. If you're not fully powered up, you may want to consider heading left when you exit the pipe, but watch out for the Thwomp.
- B: BOOM-BOOM is back to normal… Well, at least he isn't flying. But he can display some impressive high jumping skills, and there is a rather awkward ledge in the room that restricts your own freedom to jump. Jump on BOOM-BOOM's head three times as quickly as possible.
World 4-4[edit]
Submerge to diving depth to dodge Spiny Egg attacks from above. Lakitu has always had a grudge against Mario. He won't even let Mario take a swim without dropping Spinys on him.

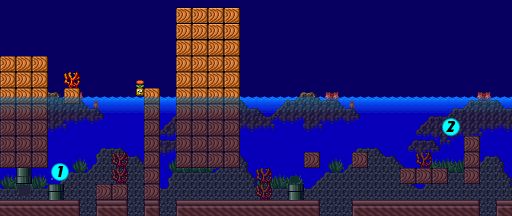
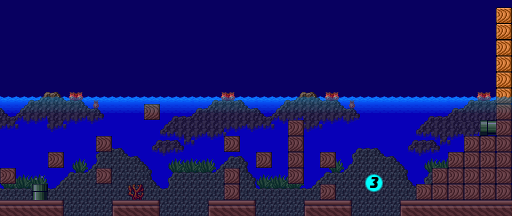
- 1: As Frog Mario, you can swim against the current and enter a pipe that leads to a secret area (shown right) chock full of coins.
- Only in the original NES version, if you don't have a Frog Suit (or don't want to use one up) there's another way to access this room. If you start on the ledge where the power-up is and drift down left from there, you can make it to this pipe without a Frog Suit. This oversight was corrected in all subsequent releases.
- 2: When you exit the bonus stage, Lakitu will be waiting for you. He will plop Spiny Eggs into the ocean, so swim as hard as you can to avoid them, and don't let the current to push you into them. The Frog Suit gives you a huge advantage.
- 3: When you reach the clearing, you'll be showered with Spiny Eggs from above, so move as quickly as possible to the pipe that leads to the end of the stage.
