*There's a bonus area in the lower left corner but normally, it is only accessible to Frog Mario due to a water current. A bug allows it to be accessed by any other Mario as well, though. Swim so you land on top of the ? block, then hold left and you should see Mario soar right through the water current, which allows you to enter the bonus area. (see below)
*The Lakitu here will throw Spinies into the water. You may want to stay at the seabed to avoid them. However, there are no other enemies in this level, which makes it comparably easy.
*The pipe at the end gets you to the ending area. Collect the goal card to end this level.
*''In Super Mario All-Stars, the water level has been changed to be consistent throughout the level. It's lower in the first part, but higher in the second part.''
===Bonus area===
{{Scrolling map|SMB3-4-4-bonus.png{{!}}256px}}
*This bonus area has two secrets. First, swim up to the left cave. Jump at the single brick block here to uncover a P-Switch, step on it to make multiple coins appear in the room you're in.
*After you're done with the silver coins, swim over to the right and hit the bottommost brick block. This reveals a second P-Switch. Collect some of the coins, then step on the P-Switch to transform the brick blocks at the top into coins, allowing you to collect them. Once you're done, take the pipe at the right, it takes you back to the level.
You will need a very precise jump to avoid the giant Green Para-Troopa jumping down the blocks. It is quite hard.
After the stairs, stomp on the giant Green Para-Troopa on the ground and kick its shell against the giant ? block to get a raccoon leaf.
Behind the pit, there's not just Bullet Bills, but also new Missile Bills which try to chase you. Since they can't move vertically they shouldn't be too much of an issue.
You can grab the Fire Flower if you want, but due to all the Bullet Bills, it may not be worth it.
After a small Piranha Plant, you should see a brick block above you. Jump to it to reveal a vine. To get to it, you must bounce off one of the nearby Missile Bills. Climb the vine to get to a bonus area (see below).
At the end, only jump down to go into the pipe if you're absolutely sure no Missile Bill will be following you. It leads into the ending area where you can grab the card.
Bonus area
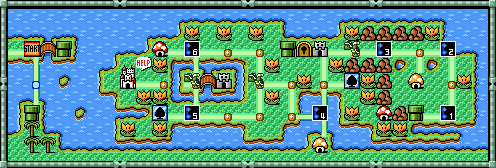
The giant ? block contains a Tanooki Suit for you to collect. After that, jump on the P-Switch, then get out through the pipe to see multiple coins which you can use your newly gained Tanooki Suit to collect.
4-6
This level features an interesting concept. There are two "sides": a giant side (top map) and a normal side (bottom map). You start out on the giant side, but can go through the doors to get to the normal side, and vice versa. You'll want to get to the normal side as soon as possible, not just for the smaller enemies but also because the normal side has a few more goodies.
At the beginning, kick a Koopa shell against the brick block "cage" to allow you to get inside. You can then get a 1-up mushroom from the top-right brick block.
After the pit, jump over the pipe, get down (watch the Giant Goombas) and enter the door to appear on the normal side.
If you're Raccoon or Tanooki Mario, fly straight up from here to land on a cloud platform with another 1-up mushroom as well as some coins.
You can backtrack to the beginning to get a starman from one of the brick blocks if you really want. Another starman is hidden inside one of the wooden blocks to the right of the door, bump into them from the side.
In the area with a single Koopa Troopa between two Piranha Plants, there are some hidden blocks and a third 1-up mushroom at the right side.
When you run to the goal card, watch out for that last green Para-Troopa walking around there.
Fortress 2
Part 1
The first part has donut platforms that you must cross to get over a pit of lava. Since donut blocks fall down when you stand on them for too long, you cannot stand still.
The ? block at the beginning contains a Fire Flower. To deal with the Dry Bones, stomp on it to make it collapse, then stand on the donut block it's lying on and it will fall into the lava.
You'll see a dead end with a brick block. Jump at it to reveal a P-Switch, to reach it, you must jump off one of the Dry Bones.
The P-Switch will reveal some coins and a hidden door. If you just want to beat Boom-Boom, don't enter the door, instead continue forward to get to him. But if you want to get some rewards, by all means enter the door to get to part 2.
As for Boom-Boom, the blocks in his room make jumping a pain. Stomp on him three times or feed him five fireballs to defeat him.
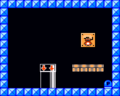
Part 2
This is some sort of pipe maze. You start at the bottom and must make your way to the top.
Jump on the arrow block and it will move you upward. Jump off when you see wooden blocks to your right.
The lightbulb blocks behave differently. Jump on them once and they'll move upward. Jump on them again and they'll start moving to the left. Use this to safely get over the Piranha Plant and to the next arrow block.
Jump on the arrow block and stay at the left side to avoid the Piranha Plant. If you want to get a Fire Flower, take the right pipe, otherwise take the left one. If you got the Fire Flower, jump on top of the ? block, from there to the pipe and go down it.
The middle pipe will take you to the top. Jump on the lightbulb block twice so it moves to the left. When you see the gap overhead, jump again to make it move upward again and stay at the left to avoid the Piranha Plant. After having passed it, jump again and the block will move to the right this time. Once you see a gap again, jump to move it up. Enter the pipe there to get to part 3.
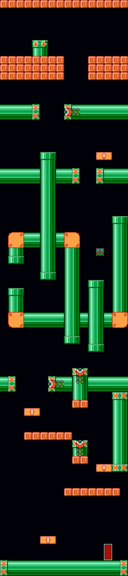
Part 3
You'll fall down into an area with a few coins. Jump around to discover some hidden blocks, which eventually lead to a 1-up mushroom. Once you're done, enter the pipe at the bottom to get to part 4.
Part 4
Jump at the giant ? block for three more 1-up mushrooms! If you're Raccoon or Tanooki Mario, you can also fly up the left side through the brick blocks to collect some coins at the top.
The pipe takes you back to part 1 near Boom-Boom.
Airship
After the cutscene where Mario discovers that the King has been transformed into a dinosaur, Mario jumps on the airship to fight the boss of this world.
This airship is filled with rocket engines which you must make your way around. As always, cross them when the flame is out.
If you're Tanooki Mario, this airship becomes super easy. Tanooki Mario can actually kill the rocket engines with his statue form, which removes most of the obstacles of this level. You just need to watch out for the single Rocky Wrench.
One block in the middle of the level contains a raccoon leaf. There's a second block at the very end of the airship, behind the pipe, with another leaf.
The pipe takes you to Iggy Koopa. As always, stomp on him three times or feed him 10 fireballs to defeat him, collect the wand to be taken to the next world. Princess Toadstool gives you a P-Wing for beating this world.