(establish page) |
m (Remove the NES maps) |
||
| (4 intermediate revisions by 4 users not shown) | |||
| Line 1: | Line 1: | ||
{{Header Nav|game=Super Mario Bros. 3}} | {{Header Nav|game=Super Mario Bros. 3}} | ||
{{floatingtoc|float=left|limit=2}} | {{floatingtoc|float=left|limit=2}} | ||
[[File:SMB3-Level5.png|right]] | [[File:SMB3-Level5.png|right]]{{-}} | ||
{{-}} | |||
==Fortress | ==World 5 2nd Fortress== | ||
Fire spurts from above and below in a bizarre lava-dripping dungeon. All of the Podoboos that you've encountered in the past have bubbled out of lava lakes. In this fortress, they drop out of the ceiling as well! | |||
{{Scrolling map|SMB3 | {{Scrolling map|SMB3 W5 F2 a.png}} | ||
* | |||
{{Scrolling map|SMB3 W5 F2 b.png}} | |||
* '''1''': You'll have to watch out for the Podoboos that jump from below and drip from above. Time your jumps to take advantage of a pause in the fire, but don't get greedy—jump one platform at a time. | |||
* '''2''': Make sure you grab Starman trapped in the '''?''' Block, but first jump on the blocks and walk safely over the Dry Bones. Avoid the leaping fire and walk left unfer the '''?''' Blocks to bump the one containing the Starman. You'll want to make Starman go right here, so hit the bottom left side of the block. | |||
{{Scrolling map|SMB3 W5 F2 c.png}} | |||
* '''3''': Boo Diddly has placed himself in a very awkward and dangerous spot. Either pick up a Starman to breeze by him or turn your back to the apparition on the platform that precedes Boo to draw him out of the way. Then leave him in the dust and you'll be able to rest on the platform beneath two '''?''' Blocks and collect a power-up. | |||
{{Scrolling map|SMB3 W5 F2 d.png}} | |||
* '''B''': Up to his old trick, BOOM-BOOM returns to guard the final chamber of the fiery fortress. Use the same tried and true tactics to defeat him as you have before, but be aware that he'll sprout wings. | |||
== | ==World 5-8== | ||
{{Scrolling map|SMB3 | Lakitu is back, and he's ready to challenge you on his home turf high in the sky. Even if you're Raccoon Mario, you won't have enough room to fly in this world. The key to getting through here alive is holding down {{nes|B}} and dashing past Lakitu. | ||
* | {{Scrolling map|SMB3 W5 S8 a.png}} | ||
* | * '''1''': To stand a chance at surviving Lakitu's aerial bombardment, grab the power-up within the '''?''' Block above. You must collect this item because you're almost certain to take a hit in this world. | ||
* | * '''2''': As soon as you see Lakitu, start sprinting. The long you dawdle, the greater the chance you'll get tagged with a Spiny Egg. If you see an opportunity to take Lakitu out, go for it—it will buy you some time. | ||
* '''3''': Slow down when you near the Koopa Troopa. You don't want to crash into it while you're tearing across the clouds. As soon as you safely pass the Koopa Troopa, run to full speed again. | |||
{{Scrolling map|SMB3 W5 S8 b.png}} | |||
* '''4''': From atop the '''?''' Block, you can take advantage of the high position to kick a Koopa shell or to jump-attack to eliminate Lakitu. Then bump the '''?''' Block to collect a power-up. If you're already Super Mario, you'll receive a handy Super Leaf. | |||
{{Scrolling map|SMB3 W5 S8 c.png}} | |||
* '''5''': Lakitu will be waiting for you at the end of the stage, even if you managed to take him out earlier. Wait for him to drop four Spinys before hitting the panel to earn big points for every enemy on the screen, possibly even a 1-Up. | |||
=== | ==World 5-9== | ||
{{Scrolling map|SMB3 | Keep a brisk pace in this platform-climbing expedition, or you'll fall from the clouds. This is another of the most challenging worlds in Super Mario Bros. 3. You must be in complete control of Mario to master the moving lifts here! You will begin in the bottom left of the following map and work your way to the upper right. | ||
* | {{Scrolling map|SMB3 W5 S9 a.png}} | ||
* '''1''': If you have a P-Wing in your inventory and find this stage too challenging, use it here. You'll be able to fly effortlessly through the entire stage. | |||
* '''2''': Jump from platform to platform as quickly as possible to keep up with the scrolling screen. Some platforms will be moving vertically, while others move horizontally. | |||
* '''3''': Watch out for platforms six and seven. Jump quickly from the sixth platform to the seventh or you'll be shoved off. | |||
* '''4''': The jump from eight to nine is tricky as well. To a certain extent, you can "tweak" Mario's jumping trajectory. This is a case where you will need to curve your jump around the edge of the upper platform in mid-air. | |||
* '''5''': Deflate the flying Fire Chomp as soon as you can. Trying to jump between moving platforms while dodging fireballs can be really hard, so get rid of the Fire Chomp with a well-placed stomp. Use the momentum of your stomp to take you to the next higher platform. | |||
==5 | ==World 5 Airship== | ||
{{Scrolling map|SMB3 | Roy Koopa commands his airship to unleash a hail of lead. Find out if you can dodge bullets. Roy's Airship more than meets the standards for Koopaling design, with lots of cannons and Bullet Bills. | ||
* | {{Scrolling map|SMB3 W5 AS a.png}} | ||
*The | * '''1''': Watch out for the rocket engine. Wait until this combustive contraption has fired, then jump over it. Don't miss the power-up near the front of the airship. It's the only one you'll get, and it could make the difference between glory and defeat. | ||
* | * '''2''': The lead is flying fast and furious. With all these projectiles in the air, you'll be hard pressed to find a safe spot. At this point, don't advance too far, but stay on the left side of the screen. | ||
*The | {{Scrolling map|SMB3 W5 AS b.png}} | ||
* '''3''': Avoid "The Gauntlet" by taking the upper route. To reach the higher area, jump on cannonballs to spring into the air and land on a cannon above. Jump from the cannons to reach the upper platform. Up there, only half of the cannons will be aimed at you. | |||
* '''4''': If you didn't manage to get on top, you'll have to run through "The Gauntlet". Cannon balls will fire at you from all directions, and it's difficult to avoid them. In this case, the right side of the screen is a better place to be. | |||
== | === B: Roy Koopa === | ||
[[File:SMB3 W5 Boss.png|right]] | |||
Roy's a big boy. So big, in fact, that the ground shakes when he walks. He'll try to throw his weight around, but don't be intimidated by the sheer size of the bully—you can defeat him just like any other Koopaling. | |||
* | * Roy is massive—if he stomps, the room will shake and quake, leaving you temporarily paralyzed. | ||
* | * Leap into the air as Roy stomps to avoid getting paralyzed. Otherwise, he'll attack when you're stuck. | ||
* Watch out for Roy's wand attacks and his spinning shell. Stomp him three times to bring him down.{{-}} | |||
== | === A chilly challenge lies ahead === | ||
No more troubled skies, Mario is on the artic Ice World. Entire armies of Koopas and Munchers have been frozen by the sub-zero temperatures there, and every surface is coated with ice. | |||
{{Footer Nav|game=Super Mario Bros. 3|prevpage=World 5 Part 2|nextpage=World 6}} | {{Footer Nav|game=Super Mario Bros. 3|prevpage=World 5 Part 2|nextpage=World 6}} | ||
Latest revision as of 19:25, 17 November 2014

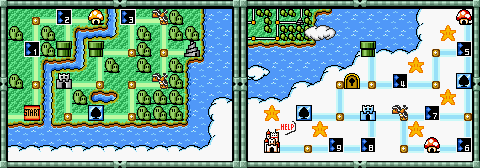
World 5 2nd Fortress[edit]
Fire spurts from above and below in a bizarre lava-dripping dungeon. All of the Podoboos that you've encountered in the past have bubbled out of lava lakes. In this fortress, they drop out of the ceiling as well!
- 1: You'll have to watch out for the Podoboos that jump from below and drip from above. Time your jumps to take advantage of a pause in the fire, but don't get greedy—jump one platform at a time.
- 2: Make sure you grab Starman trapped in the ? Block, but first jump on the blocks and walk safely over the Dry Bones. Avoid the leaping fire and walk left unfer the ? Blocks to bump the one containing the Starman. You'll want to make Starman go right here, so hit the bottom left side of the block.
- 3: Boo Diddly has placed himself in a very awkward and dangerous spot. Either pick up a Starman to breeze by him or turn your back to the apparition on the platform that precedes Boo to draw him out of the way. Then leave him in the dust and you'll be able to rest on the platform beneath two ? Blocks and collect a power-up.
- B: Up to his old trick, BOOM-BOOM returns to guard the final chamber of the fiery fortress. Use the same tried and true tactics to defeat him as you have before, but be aware that he'll sprout wings.
World 5-8[edit]
Lakitu is back, and he's ready to challenge you on his home turf high in the sky. Even if you're Raccoon Mario, you won't have enough room to fly in this world. The key to getting through here alive is holding down ![]() and dashing past Lakitu.
and dashing past Lakitu.
- 1: To stand a chance at surviving Lakitu's aerial bombardment, grab the power-up within the ? Block above. You must collect this item because you're almost certain to take a hit in this world.
- 2: As soon as you see Lakitu, start sprinting. The long you dawdle, the greater the chance you'll get tagged with a Spiny Egg. If you see an opportunity to take Lakitu out, go for it—it will buy you some time.
- 3: Slow down when you near the Koopa Troopa. You don't want to crash into it while you're tearing across the clouds. As soon as you safely pass the Koopa Troopa, run to full speed again.
- 4: From atop the ? Block, you can take advantage of the high position to kick a Koopa shell or to jump-attack to eliminate Lakitu. Then bump the ? Block to collect a power-up. If you're already Super Mario, you'll receive a handy Super Leaf.
- 5: Lakitu will be waiting for you at the end of the stage, even if you managed to take him out earlier. Wait for him to drop four Spinys before hitting the panel to earn big points for every enemy on the screen, possibly even a 1-Up.
World 5-9[edit]
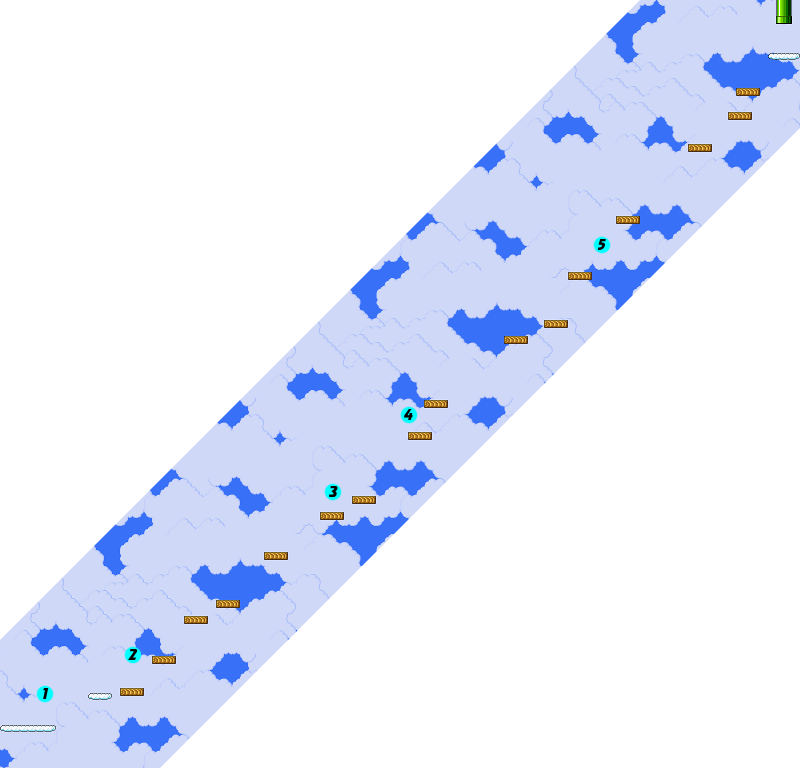
Keep a brisk pace in this platform-climbing expedition, or you'll fall from the clouds. This is another of the most challenging worlds in Super Mario Bros. 3. You must be in complete control of Mario to master the moving lifts here! You will begin in the bottom left of the following map and work your way to the upper right.
- 1: If you have a P-Wing in your inventory and find this stage too challenging, use it here. You'll be able to fly effortlessly through the entire stage.
- 2: Jump from platform to platform as quickly as possible to keep up with the scrolling screen. Some platforms will be moving vertically, while others move horizontally.
- 3: Watch out for platforms six and seven. Jump quickly from the sixth platform to the seventh or you'll be shoved off.
- 4: The jump from eight to nine is tricky as well. To a certain extent, you can "tweak" Mario's jumping trajectory. This is a case where you will need to curve your jump around the edge of the upper platform in mid-air.
- 5: Deflate the flying Fire Chomp as soon as you can. Trying to jump between moving platforms while dodging fireballs can be really hard, so get rid of the Fire Chomp with a well-placed stomp. Use the momentum of your stomp to take you to the next higher platform.
World 5 Airship[edit]
Roy Koopa commands his airship to unleash a hail of lead. Find out if you can dodge bullets. Roy's Airship more than meets the standards for Koopaling design, with lots of cannons and Bullet Bills.
- 1: Watch out for the rocket engine. Wait until this combustive contraption has fired, then jump over it. Don't miss the power-up near the front of the airship. It's the only one you'll get, and it could make the difference between glory and defeat.
- 2: The lead is flying fast and furious. With all these projectiles in the air, you'll be hard pressed to find a safe spot. At this point, don't advance too far, but stay on the left side of the screen.
- 3: Avoid "The Gauntlet" by taking the upper route. To reach the higher area, jump on cannonballs to spring into the air and land on a cannon above. Jump from the cannons to reach the upper platform. Up there, only half of the cannons will be aimed at you.
- 4: If you didn't manage to get on top, you'll have to run through "The Gauntlet". Cannon balls will fire at you from all directions, and it's difficult to avoid them. In this case, the right side of the screen is a better place to be.
B: Roy Koopa[edit]

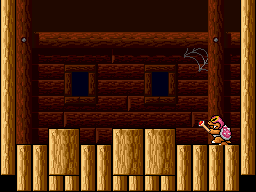
Roy's a big boy. So big, in fact, that the ground shakes when he walks. He'll try to throw his weight around, but don't be intimidated by the sheer size of the bully—you can defeat him just like any other Koopaling.
- Roy is massive—if he stomps, the room will shake and quake, leaving you temporarily paralyzed.
- Leap into the air as Roy stomps to avoid getting paralyzed. Otherwise, he'll attack when you're stuck.
- Watch out for Roy's wand attacks and his spinning shell. Stomp him three times to bring him down.
A chilly challenge lies ahead[edit]
No more troubled skies, Mario is on the artic Ice World. Entire armies of Koopas and Munchers have been frozen by the sub-zero temperatures there, and every surface is coated with ice.


