(establish page) |
(Page revamped) |
||
| Line 3: | Line 3: | ||
[[File:SMB3-Level7.png|right]] | [[File:SMB3-Level7.png|right]] | ||
{{-}} | {{-}} | ||
==Piranha Plant 1== | ==World 7 Piranha Plant 1== | ||
[[Image:SMB3-7-Piranha1.png|thumb|right|Click on the image for the unedited NES map]] | |||
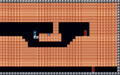
* | Piranha Plants have overgrown the path. The Piranha Plant on the Map Screen represents a mini world which is infested by different types of Piranhas. Use a Starman from your inventory at the start of the stage. | ||
* | {{-}} | ||
* | [[Image:SMB3 W7 P1 b.png|right]] | ||
* | {{Scrolling map|SMB3 W7 P1 a.png}} | ||
* '''1''': Run and jump to the top of the pipe when the Piranha Plant is inside. As long as you're standing on the pipe, it won't come out. | |||
* '''2''': From the top of the left pipe, wait for the Venus Fire Trap to sink back into the right pipe, then quickly jump to the top of it. | |||
* '''3''': Step to the rhythm of the Munchers. As one set of Munchers retreats back to its pipes, another two next to it will emerge. Move forward methodically so that you are always standing on safe pipes and moving before the Munchers emerge beneath your feet. Cover as much ground as possible with each jump by holding {{nes|B}} as you leap. | |||
* '''4''': Dash and jump across the gap when the Piranha Plant pulls back into its pipe. Otherwise, you'll smack into it when you try to leap across. | |||
* '''5''': Take the pipe down to the treasure chamber to collect your P-Wing reward. Not bad for a hard minute's work. P-Wings will prove invaluable in the coming levels. | |||
{{-}} | |||
==Fortress | ==World 7 1st Fortress == | ||
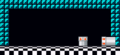
=== | Raid Bowser's royal teasurey and pull off the biggest heist in Mushroom Kingdom history. The only inhabitant of this Abandoned Fortress is BOOM-BOOM. The Tube to his room is in the ceiling of the big deserted chamber with the checkerboard floor. | ||
{{Scrolling map|SMB3 | ===Entrance=== | ||
*This | {{Scrolling map|SMB3 W7 F1 a.png}} | ||
* '''1''': '''Unlimited Coins'''. This room contains a Switch Block inside a mountain of blocks. Stomp the Switch Block and fall off the ledge to snag a king's ransom of coins before the Switch Block times out. When it does, exit using the door at the bottom and make your way back to the Switch Block. The blocks will be reset, and you can repeat the process as many times as you like (until time runs out.) | |||
*'''2''': If you don't dive into the coins when the Switch Block is on, you'll see a door on the platform to the left. This door leads to a secret room. | |||
===Secret Room=== | |||
[[Image:SMB3 W7 F1 e.png|right]] | |||
{{Scrolling map|SMB3 W7 F1 b.png}} | |||
* '''3''': When you stomp the Switch Block, a secret door that leads to this room will appear. From here, go down this pipe and you'll find another giant '''?''' Block which contains a Tanooki Suit! Use it to fly to BOOM-BOOM's room. | |||
===Ballroom=== | |||
{{Scrolling map|SMB3 W7 F1 c.png}} | |||
* '''4''': If you didn't enter the Fortress as Raccoon or Tanooki Mario, you'll need to claim the Tanooki Suit from point 3 to reach this objective. Sprint to build up your P-Meter and fly to the sky pipe high above. It will warp you to BOOM-BOOM's boss chamber. | |||
===Lava=== | |||
{{Scrolling map|SMB3 W7 F1 d.png}} | |||
The door at the bottom connects to the right-most door of the ballroom. The pipe at the top connects to the horizontal pipe in the secret room. | |||
===Boss room=== | |||
{{Scrolling map|SMB3 W7 F1 f.png}} | |||
* '''B''': Avoid BOOM-BOOM's familiar attacks by transforming into Statue Mario with the Tanooki Suit. | |||
<gallery> | |||
Image:SMB3-7-Fortress1_1.png|Click on the image for the first part of the unedited NES map | |||
Image:SMB3-7-Fortress1_2.png|Click on the image for the second part of the unedited NES map | |||
Image:SMB3-7-Fortress1_3.png|Click on the image for the third part of the unedited NES map | |||
Image:SMB3-7-Fortress1_4.png|Click on the image for the fourth part of the unedited NES map | |||
</gallery> | |||
==World 7-6== | |||
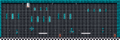
Only a plumber can navigate a tangled mess of pipes, spikes and Piranha Plants. Plot your course on directional lifts. You'll need to fully master the use of the Directional Lifts to make it to the top of this world. Unlike other vertical worlds, a fall in this one might see you landing on spikes! | |||
{| | |||
| [[Image:SMB3 W7 S6 a.png|left]] | |||
| style="vertical-align:top;" | [[Image:SMB3 W7 S6 b.png|right]] | |||
* '''1''': Go left from the start to reach the stairs. Watch out for the Koopa Troopas as you ascend the staircase. Stomp them and send them on their way. | |||
* '''2''': Take a shortcut. Before you hit your head on the pipe above you, jump up and around it. The Directional Lift you were on will continue upwards and you can remount and ride it to the halfway point of the world. | |||
* '''3''': As you ride the Directional Lift up, move from side to side to avoid the spikes. Hit the '''?''' Blocks to earn a few coins. | |||
* '''4''': Hop on the Directional Lift to activate it, wait for the Piranha Plant to sink, then jump on the pipe. Drop back onto the lift as it passes left, then crouch. When you comes around on the right side of the screen, jump to enter the pipe. | |||
* '''5''': Hop on the Directional Lift to change it's direction, but watch out for the spikes above—there's very little headroom. Navigate around the '''?''' Blocks and up through the gap in the ceiling. Be ready to leap onto another Directional Lift as soon as the current one peters out. Note that if your Small Mario, the power-up to the right will always fall down where it can easily be collected. | |||
* '''6''': Make your way up and around the Piranha Plant-infested pipes. Move your Directional Lift so that it climbs out of reach of the carnivorous weeds. Watch out for spikes as you transition onto the next Directional Lift. | |||
|} | |||
<gallery> | |||
Image:SMB3-7-6_1.png|Click on the image for the first part of the unedited NES map | |||
Image:SMB3-7-6_2.png|Click on the image for the second part of the unedited NES map | |||
</gallery> | |||
== | ==World 7-7== | ||
[[Image:SMB3-7-7.png|thumb|right|Click on the image for the unedited NES map]] | |||
Grab hold of a Starman and dash across an acre of man-eating crops. Imagine an unbroken field of hundreds of indestructible Munchers, stretching farther than the eye can see. How would you cross such an obstacle? With Starman's help of course.<br/>''Note: There is an additional 1-Up Mushroom hidden in the GBA version of the game at the top of the starting segment of the world, before you enter the pipe.'' | |||
{{-}} | |||
{{Scrolling map|SMB3 W7 S7 a.png}} | |||
* '''1''': Your only hope of passing Stage 7-7 is to sprint and collect every Starman along the way. Otherwise, you're plant food. | |||
* '''2''': As you dash across the Munchers, duck and hit the '''?''' Block from the bottom right to propel the Starman right. That way you won't have to backtrack to collect it. | |||
* '''3''': Catch Starman at the last second. Follow Starman as he bounces along, but do not collect him until you think your invincibility is about to wear off. Then grab him. | |||
{{Scrolling map|SMB3 W7 S7 a.png}} | |||
* '''4''': Think fast and jump faster while navigating the forest of pipes that block your path. | |||
{{ | * '''5''': Clear the Wood Block wall in one leap, the bump the '''?''' Block and hop onto the block to collect a Starman. Time is desperately short before your invincibility wears off, so keep on running. | ||
* '''6''': Leap onto the safety of the pipe as your invincibility wears off, then hop down to the pipe that leads to the end of the stage. In the GBA version, there is yet another hidden 1-Up Mushroom to be found inside an Invisible Block before the black begins. | |||
{{Scrolling map|SMB3 | |||
* | |||
* | |||
* | |||
{{Scrolling map|SMB3 | |||
* | |||
* | |||
* | |||
==World 7-8== | |||
[[Image:SMB3-7-8.png|thumb|right|Click on the image for the unedited NES map]] | |||
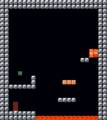
Bloodthirsty foliage of every variety lines the path ahead. Since this world is overgrown by Piranha Plants and Fire Flowers, Fiery Mario is best equipped to handle it. His firepower can easily wilt these wicked weeds. | |||
{{-}} | |||
{{Scrolling map|SMB3 W7 S8 a.png}} | |||
* '''1''': Dash and jump onto the pipe at this first point while its Piranha Plant is down, but watch out for the fireballs coming from behind you. | |||
* '''2''': Time your jump carefully, or you'll leap directly into the jaws of a Piranha Plant. For the final jump, wait until both plants have sunken into their pipes. | |||
* '''3''': While you're passing through, grab the Starman. It'll help with the treacherous section ahead. | |||
* '''4''': Avoid the Ptooie, then jump along the ride side of the sky pipe to reveal a hidden Red Jump Block. Bounce on the Red Jump Block to rocket up to Coin Heaven (see below). The White Block here doesn't really help you accomplish anything neat. | |||
{{Scrolling map|SMB3 W7 S8 b.png}} | |||
[[Image:SMB3 W7 S8 d.png|right]] | |||
* '''5''': When the Ptooie moves out of the way, go down the left hand pipe here to reach a secret room (shown right). You'll find a Hammer Brothers Suit. | |||
* '''6''': These monstrous mutant fire-spitting Piranhas can't be defeated by hitting them from underneath. Use firepower or hammers to defeat them. Remember, Hammer Mario is fireproof when he ducks! | |||
===Coin Heaven=== | ===Coin Heaven=== | ||
{{Scrolling map|SMB3 | {{Scrolling map|SMB3 W7 S8 c.png}} | ||
{{Footer Nav|game=Super Mario Bros. 3|prevpage=World 7|nextpage=World 7 Part 3}} | {{Footer Nav|game=Super Mario Bros. 3|prevpage=World 7|nextpage=World 7 Part 3}} | ||
Revision as of 05:51, 22 January 2011

World 7 Piranha Plant 1

Piranha Plants have overgrown the path. The Piranha Plant on the Map Screen represents a mini world which is infested by different types of Piranhas. Use a Starman from your inventory at the start of the stage.


- 1: Run and jump to the top of the pipe when the Piranha Plant is inside. As long as you're standing on the pipe, it won't come out.
- 2: From the top of the left pipe, wait for the Venus Fire Trap to sink back into the right pipe, then quickly jump to the top of it.
- 3: Step to the rhythm of the Munchers. As one set of Munchers retreats back to its pipes, another two next to it will emerge. Move forward methodically so that you are always standing on safe pipes and moving before the Munchers emerge beneath your feet. Cover as much ground as possible with each jump by holding
 as you leap.
 - 4: Dash and jump across the gap when the Piranha Plant pulls back into its pipe. Otherwise, you'll smack into it when you try to leap across.
- 5: Take the pipe down to the treasure chamber to collect your P-Wing reward. Not bad for a hard minute's work. P-Wings will prove invaluable in the coming levels.
World 7 1st Fortress
Raid Bowser's royal teasurey and pull off the biggest heist in Mushroom Kingdom history. The only inhabitant of this Abandoned Fortress is BOOM-BOOM. The Tube to his room is in the ceiling of the big deserted chamber with the checkerboard floor.
Entrance

- 1: Unlimited Coins. This room contains a Switch Block inside a mountain of blocks. Stomp the Switch Block and fall off the ledge to snag a king's ransom of coins before the Switch Block times out. When it does, exit using the door at the bottom and make your way back to the Switch Block. The blocks will be reset, and you can repeat the process as many times as you like (until time runs out.)
- 2: If you don't dive into the coins when the Switch Block is on, you'll see a door on the platform to the left. This door leads to a secret room.
Secret Room


- 3: When you stomp the Switch Block, a secret door that leads to this room will appear. From here, go down this pipe and you'll find another giant ? Block which contains a Tanooki Suit! Use it to fly to BOOM-BOOM's room.
Ballroom

- 4: If you didn't enter the Fortress as Raccoon or Tanooki Mario, you'll need to claim the Tanooki Suit from point 3 to reach this objective. Sprint to build up your P-Meter and fly to the sky pipe high above. It will warp you to BOOM-BOOM's boss chamber.
Lava

The door at the bottom connects to the right-most door of the ballroom. The pipe at the top connects to the horizontal pipe in the secret room.
Boss room

- B: Avoid BOOM-BOOM's familiar attacks by transforming into Statue Mario with the Tanooki Suit.
-
Click on the image for the first part of the unedited NES map
-
Click on the image for the second part of the unedited NES map
-
Click on the image for the third part of the unedited NES map
-
Click on the image for the fourth part of the unedited NES map


World 7-6
Only a plumber can navigate a tangled mess of pipes, spikes and Piranha Plants. Plot your course on directional lifts. You'll need to fully master the use of the Directional Lifts to make it to the top of this world. Unlike other vertical worlds, a fall in this one might see you landing on spikes!
 |

|
-

Click on the image for the first part of the unedited NES map
-

Click on the image for the second part of the unedited NES map
World 7-7

Grab hold of a Starman and dash across an acre of man-eating crops. Imagine an unbroken field of hundreds of indestructible Munchers, stretching farther than the eye can see. How would you cross such an obstacle? With Starman's help of course.
Note: There is an additional 1-Up Mushroom hidden in the GBA version of the game at the top of the starting segment of the world, before you enter the pipe.

- 1: Your only hope of passing Stage 7-7 is to sprint and collect every Starman along the way. Otherwise, you're plant food.
- 2: As you dash across the Munchers, duck and hit the ? Block from the bottom right to propel the Starman right. That way you won't have to backtrack to collect it.
- 3: Catch Starman at the last second. Follow Starman as he bounces along, but do not collect him until you think your invincibility is about to wear off. Then grab him.
- 4: Think fast and jump faster while navigating the forest of pipes that block your path.
- 5: Clear the Wood Block wall in one leap, the bump the ? Block and hop onto the block to collect a Starman. Time is desperately short before your invincibility wears off, so keep on running.
- 6: Leap onto the safety of the pipe as your invincibility wears off, then hop down to the pipe that leads to the end of the stage. In the GBA version, there is yet another hidden 1-Up Mushroom to be found inside an Invisible Block before the black begins.
World 7-8

Bloodthirsty foliage of every variety lines the path ahead. Since this world is overgrown by Piranha Plants and Fire Flowers, Fiery Mario is best equipped to handle it. His firepower can easily wilt these wicked weeds.

- 1: Dash and jump onto the pipe at this first point while its Piranha Plant is down, but watch out for the fireballs coming from behind you.
- 2: Time your jump carefully, or you'll leap directly into the jaws of a Piranha Plant. For the final jump, wait until both plants have sunken into their pipes.
- 3: While you're passing through, grab the Starman. It'll help with the treacherous section ahead.
- 4: Avoid the Ptooie, then jump along the ride side of the sky pipe to reveal a hidden Red Jump Block. Bounce on the Red Jump Block to rocket up to Coin Heaven (see below). The White Block here doesn't really help you accomplish anything neat.


- 5: When the Ptooie moves out of the way, go down the left hand pipe here to reach a secret room (shown right). You'll find a Hammer Brothers Suit.
- 6: These monstrous mutant fire-spitting Piranhas can't be defeated by hitting them from underneath. Use firepower or hammers to defeat them. Remember, Hammer Mario is fireproof when he ducks!
Coin Heaven
