This level belongs to the hardest levels in the game - the level scrolls by very fast requiring almost instant jumps and then there's the Rocky Wrenches which annoy you. You may want to use a P-Wing for this level.
The basic idea is to jump from aircraft to aircraft. But as already mentioned, they fly very fast, so you have to be very quick. Also, try to avoid the wrenches thrown by the Rocky Wrenches scattered about.
The pipe at the end leads to Boom-Boom yet again. Defeat him like you did last time to end this level.
8-1
If you're Raccoon or Tanooki Mario, fly straight up at the beginning of this level to discover a P-Switch in the sky. Step on it and then drop down to find a horde of coins that have now appeared.
Afterwards, fly forward and land on the tall pipe. Go down to arrive in the bonus area (see below).
On foot, it's a bit harder. You need to jump across all the pipes while avoiding the Piranha Plants. (Just behind the first one there's a Fire Flower if you want it). Between the first two towers of Bullet Bill shooters, there's a starman which helps a lot in this level.
Behind them, watch the Bullet Bill shooter on the ground. The block directly above it contains a 1-up mushroom. Behind it, you need to duck to both avoid a Bullet Bill and to get through the hole - and then there's a Boo Diddley which you need to avoid as well. At least you can grab a raccoon leaf from the brick block just behind.
You'll need to stomp off the red Para-Troopa to get past the Bullet Bill shooters. After that, use the note block to get on top of the pipe, but be sure to not fall down. Get to the other pipe, then jump to the exit area to grab the goal card.
Bonus area
Jump at the giant ? block to get three 1-up mushrooms. Afterwards, slide down the level and enter the pipe at the bottom to arrive just past the Boo Diddley.
8-2
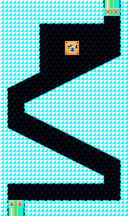
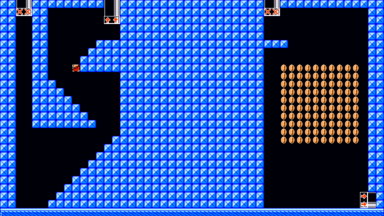
Deliberately sink down the first quicksand pit you see to get to a secret area. Both pipes you see here take you to the bonus area (see below).
Jump over the first three Piranha Plants in the quicksand pit, then jump down the hill, being careful to not run into the Piranha Plants. After that, the Angry Sun from level 2-Quicksand will reappear to annoy you. You'll need to cross the first pit using the note blocks. You can also use the P-Switch hidden in a block on the hill if you want to make it slightly easier.
When you're climbing the second hill, you can try to jump over the Piranha Plants, but it is not exactly trivial to do. On the other side, you can simply slide down the hill.
The end is very hard. You only have two note blocks and the Angry Sun is still there. If you miss, you die. You need lots of patience to make it through this section. After this, just collect the goal card to end the level.
Bonus area
If you went down the left pipe you'll be in the left half. It doesn't really have anything other than a single raccoon leaf, so collect it and then get out.
If you chose the right pipe though, you'll be in an area with some coins. You can try to get some of these, but you'll need to fly if you want to get them all.
No matter which side you are on, when you exit through the pipe you'll end up in the middle of the second hill. The Angry Sun will also be absent, making this level much easier.
Fortress
This level is another contender for "hardest level in the game". Essentially, there are two sides - a blue side and a gray side. You start at the blue side, and going through any door gets you to the corresponding area in the gray side, and vice versa.
The brick block above the second door contains a Fire Flower. You'll need to be big Mario to break some brick blocks at the end to get into the door, which leads into the gray half. Be warned, you end up on a conveyor belt and are pushed into the lava right away.
Go to the right across all the conveyor belts and past a Thwomp until you reach a door on solid blocks, enter it to be back in the blue side. Step on the P-Switch just standing out in the open and quickly run to the right through the coins and past a Thwomp, and enter the door at the very end (it is only there as long as the P-Switch is active) to reappear in the gray half.
Once back in the gray half, run all the way to the end. At the bottom, you'll see a Thwomp. Wait until it has moved to the left, then drop down and jump over it as it moves towards you. Go to the left and jump at both brick blocks - one of them has a P-Switch, the other one breaks allowing you to go up. Step on the switch and run all the way to the end to see a new door that has appeared, immediately enter it.
You're now in Boom-Boom's chamber. Once the P-Switch expires, duck and the conveyor belt will automatically take you past the spikes and to Boom-Boom. This time, the conveyor belt makes the fight a bit harder than usual. As always, stomp on him three times, feed him five fireballs or lob a single hammer at him to defeat him.
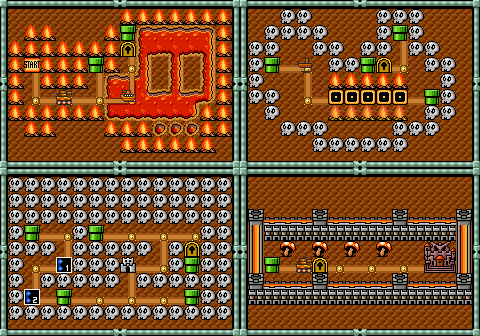
Tanks 2
As Raccoon or Tanooki Mario, you can actually fly on top of the air support in this level. You just need to watch out for cannonballs that shoot upward, and since you can't see yourself, they aren't easy to avoid.
Despite the bombardment from above, this should not be too hard if you've already survived the first Tanks level. Just watch out for the groups of cannonball shooters on the ground and you'll do fine.
Enter the pipe at the end to get to Boom-Boom, for the last time in this game! Defeat him like you did last time to end the level.