The most important thing to realise when starting to play Dead Rising is that it's not possible to do everything in a single playthrough. Thanks to a tight 3-day time limit on your actions, you've got to choose carefully whether you're going to solve all the Cases to find out what happened in Willamette, or try to rescue all the Survivors.
The best goal for your first playthrough is to try for the Zombie Genocider achievement - even if you don't manage to get it, you'll get to familiarise yourself with the mall's layout and get a feel for the weapons. As a bonus your character level will be much higher when you start following objectives than if you'd started from scratch, which will make defeating Psychopaths that bit easier.
Screen Layout[edit]
Frank's Status[edit]

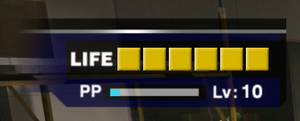
Frank's status is displayed in the top-left corner of the screen. The yellow blocks represent how much health he has, and can be increased by leveling up.
The blue bar represents how much PP Frank has gained towards his next Level Up, and his current level is displayed beside it.
Inventory[edit]

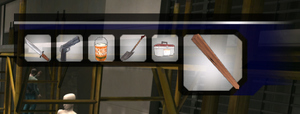
The items currently held by Frank appear in the top right of the screen. Usually only the currently equipped item is displayed, in the right-most box. The others appear when you scroll through the inventory with ![]() and
and ![]() . The number of slots available to carry items can be increased by leveling up.
. The number of slots available to carry items can be increased by leveling up.
Current Tasks[edit]

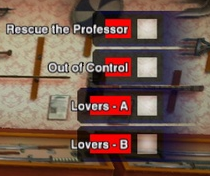
The cases and scoops Frank has undertaken will be displayed down the right-hand side of the screen. The color of the bar behind the mission name will change depending on how much time you have left to complete it; Blue for objectives which have more than six hours remaining, Yellow for missions with between three and six hours left to complete, and Red for goals which will expire in less than three hours. Some objectives will start with Yellow and Red status. Some cases and scoops do not have a time limit, and will not display any colored bar.
Compass (Xbox 360 only)[edit]
The compass points the way to the currently-selected objective. You can change the active objective by pressing ![]() to bring up the wristwatch, then selecting the objective with
to bring up the wristwatch, then selecting the objective with ![]() and pressing
and pressing ![]() .
.
Taking Photographs (Xbox 360 only)[edit]
As a photojournalist, taking photographs is an essential skill for Frank. You can take photographs at any point during gameplay by holding down left trigger to aim and using X to take the photo
The HUD now shows a bar along the right side of the screen indicating your zoom level, while in the bottom right is a ![]() battery icon that shows how many more photos you can take before you have to recharge your batteries. If there's a PP Sticker in the viewfinder, a PP percentage will be displayed along the bottom of the image to show how much of the PP you'll get for that sticker.
battery icon that shows how many more photos you can take before you have to recharge your batteries. If there's a PP Sticker in the viewfinder, a PP percentage will be displayed along the bottom of the image to show how much of the PP you'll get for that sticker.
Frank's camera can only store 30 photos at a time, and the battery will need to be recharged when no more photos can be taken. The 30 most recent pictures are saved by default, although you can manually save images for posterity.
When a photo is taken, a number of target markers appear on the image to display any points of interest within the frame - the more target markers, the more Prestige Points you earn, and the faster you'll level up.
Target Markers[edit]
Target markers are colored depending on the type of image you've taken.
- Grey target markers are worth the least - this area of the photo doesn't show anything of major interest.
- Red target markers show Brutality, for example a zombie attacking a survivor.
- Orange target markers show Drama, for example a photo of two survivors reuniting.
- Green target markers show Outtakes, for example a photo with zombies wearing novelty masks.
- Blue target markers show Horror, for example a dead human being eaten by a zombie.
- Pink target markers show Erotica, for example female zombies wearing lingerie.
PP Stickers[edit]
Scattered around the Mall are 100 ![]() PP Stickers, which will reward you with up to 1,000PP for photographing them. When a PP sticker is in your viewfinder, a percentage marker will appear along the bottom of the image, displaying what percentage of the maximum you'll get for the photo.
PP Stickers, which will reward you with up to 1,000PP for photographing them. When a PP sticker is in your viewfinder, a percentage marker will appear along the bottom of the image, displaying what percentage of the maximum you'll get for the photo.
Stickers you've already photographed have a red line through them. ![]()
Prestige Points[edit]
Prestige Points, usually referred to by the abbreviation "PP", are like experience in an RPG. By collecting enough PP Frank's level will increase, unlocking additional skills, increasing your health and attack power, and increasing the number of items you can carry at any one time.
PP can be gathered in a number of ways, but the most common way is by taking photographs that the game considers "newsworthy". PP points are also awarded for reaching milestone kill counts, or killing zombies with certain weapons (e.g., the sickle, lawnmower and garden shears).
Leveling Up[edit]
By collecting PP, Frank's level will increase. The level increase will be in the form of one of several possible upgrades to Frank's abilities and status. The type of upgrade you receive on each level up is random.
- Attack + - Frank's basic attack power is increased.
- Speed + - Frank's movement speed is increased.
- Life + - Frank's health bar is increased by one block.
- Item + - Frank's item slots have been increased by one.
- Throw + - Frank can throw items farther.
- Skill + - Frank learns an additional skill.
Save points[edit]
Save-wise, this game is noted for having an inadequate system. However, you are able to save in the security room on the sofa, in Carlito's Hideout (later on in the game), and also you may be able to save in the various bathrooms in the mall. Keep in mind that you are only allowed one saved game in Dead Rising, so don't overwrite anything you don't want to.