(just temporarily moved the info over, page to be revamped.) |
(page revamped) |
||
| Line 1: | Line 1: | ||
{{Header Nav|game=Super Mario Bros. 3}} | {{Header Nav|game=Super Mario Bros. 3}} | ||
{{floatingtoc|float=left|limit=2}} | |||
==Quicksand== | ==World 2 Quicksand== | ||
[[Image:SMB3-2-Quicksand.png|thumb|right|Click on the image for the unedited NES map]] | |||
* | Sun-backed sand stretches as far as the eye can see. You'd better wear sunscreen. Natural forces will work to halt Mario's progress through this world—a sinister sun and terrible tornado. | ||
{{-}} | |||
{{Scrolling map|SMB3 W2 QS a.png}} | |||
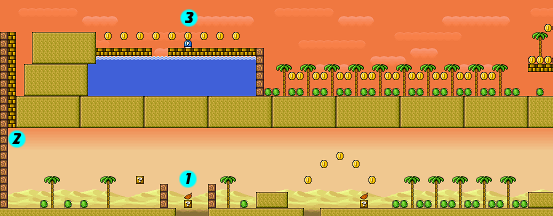
*The | * '''1''': It takes a running jump to clear the Venus Fire Trap-infested quicksand pit. Move fast, or they'll flame you. Once you reach the other side, you may wish to grab the shell of the Koopa and hold on to it as run along. | ||
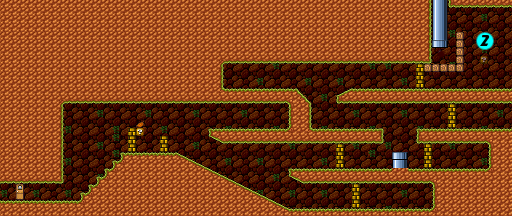
* '''2''': The swirling sand twister will easily lift you up and throw you back. To overcome it, run towards the right and when you get to the tornado, jump directly into its center. If you time your jump correctly, it will carry you a long way. | |||
==2-4== | {{Scrolling map|SMB3 W2 QS b.png}} | ||
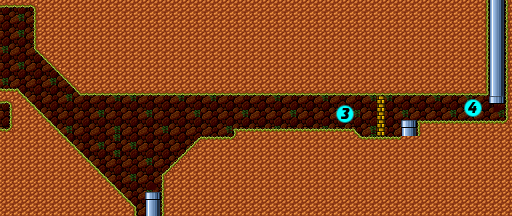
* '''3''': No, it's it a mirage, and you aren't suffering from heat stroke—the sun is actually chasing you! If you aren't holding a Koopa shell when the Angry Sun swoops out of the sky, jump on a Koopa Paratroopa and kick it's shell at your pursuer to force an early sunset. | |||
* | <br/> | ||
{| width="100%" | |||
* | | style="background:gold; height:14px" | | ||
* | |} | ||
* | ==World 2-4== | ||
[[Image:SMB3-2-4.png|thumb|right|Click on the image for the unedited NES map]] | |||
* | Finally, a desert oasis! Unfortunately, you won't have time to relax in paradise. Take the high road for big loot! You have your choice of ways to go here, but the upper path is definitely recommended because it's guarded by fewer enemies and offers chances at many more coins! | ||
{{-}} | |||
{{Scrolling map|SMB3 W2 S4 a.png}} | |||
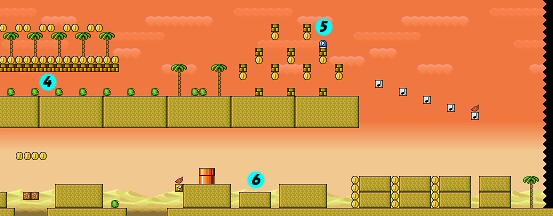
==2-5== | * '''1''': Get the power-up in the floating block. Grab a Koopa and get on the ground to the left of the floating block. Let the Koopa go and jump for the item. | ||
* '''2''': As Raccoon Mario, use the flat stretch as a runway to lift into the air and smash straight up through the blocks and to the oasis above. | |||
* | * '''3''': Gather all of the coins as you cross the blocks that extend over the water before you jump in. Hit the block to expose a Switch Block, then transform all of the blocks into coins. | ||
* | {{Scrolling map|SMB3 W2 S4 b.png}} | ||
* '''4''': Collect the coins on the top of the platform at this point, then get a running start and fly underneath this platform. A veritable shower of wealth will fill Mario's pockets. Beware of the Koopa Paratroopas on the far right side of the platform—if you're not careful, they'll steal your Raccoon Suit powers. | |||
*After the | * '''5''': There are two approaches in this section. Either you can collect as many coins as you can without smashing any blocks, then use the Switch Block to change all of the remaining blocks into coins, or you can leave the coins alone and use them as platforms to get the other coins when you hit the Switch Bloack. | ||
* '''6''': When facing a Boomerang Brother, use terrain and cover to your advantage. Hide in the crevice while the boomerangs whoosh overhead, then jump onto him when he pauses between throws. | |||
* | <br/> | ||
{| width="100%" | |||
| style="background:gold; height:14px" | | |||
=== | |} | ||
[[ | ==World 2-5== | ||
[[Image:SMB3-2-5.png|thumb|right|Click on the image for the unedited NES map]] | |||
Danger: do not feed the Chain Chomps. They will make a meal out of you. Climb a vine to a secret room. Just like in the original [[Super Mario Bros.]], some blocks have vines inside of them. The vine in this world leads to a path of clouds that will take Mario to a sky pipe and to a bonus coin room. | |||
{{-}} | |||
{{Scrolling map|SMB3 W2 S5 a.png}} | |||
[[Image:SMB3 W2 S5 c.png|right]] | |||
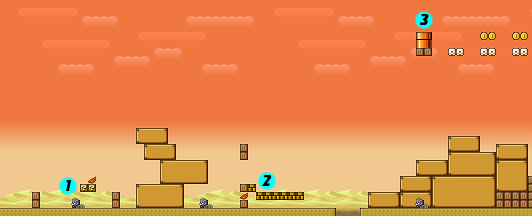
{{Scrolling map|SMB3 | * '''1''': Chain Chomps are vicious, but they're held back by sturdy leashes. Stay out of range and take them out with Koopa shells. Because of their chain, these Chain Chomps can't get at Mario—or can they? If you stand there and watch one for 160 ticks on the timer, his chain will break and he'll have one chance to get you! | ||
* | * '''2''': Yet again, a Koopa Troopa can unwittingly help Mario retrieve a power-up item by clearing away the blocks from around the Wood Block it's hidden in. Bump the Wood Block from the side to reveal a power-up. | ||
* '''3''': After having climbed the vine from point 4, this pipe in the clouds leads to a chamber (shown right) containing a power-up and a Switch Block. Collect the power-up on the right. If you're Super Mario, you'll get a Super Leaf. Then reveal the Switch Block, break just enough blocks to clear you way to hit it, and collect all of the coins that appear. | |||
{{Scrolling map|SMB3 W2 S5 b.png}} | |||
* | * '''4''': To activate a vine that grows to a secret area in the sky, kick a Koopa shell down the small tunnel. It will break the block so a vine can sprout. Climb into the clouds, and follow them to the left to reach a pipe at point 3. | ||
<br/> | |||
{| width="100%" | |||
* | | style="background:gold; height:14px" | | ||
* | |} | ||
==World 2 Pyramid== | |||
[[Image:SMB3-2-Pyramid.png|thumb|right|Click on the image for the unedited NES map]] | |||
The great pyramid is a winding labyrinth of beetle infested tunnels. Walls seal off portions of the pyramid. You must either use Buzzy Beetle to break these down, or your Raccoon Tail. Since you can reset the '''?''' Blocks near the entrance door, you should be able to fully power up. Can you discover a way out? | |||
{{-}} | |||
{{Scrolling map|SMB3 W2 PY a.png}} | |||
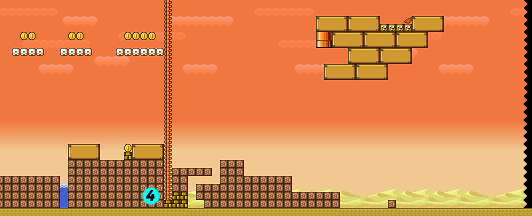
* '''1''': Leaving and reentering the front door of the pyramid will reset all of the blocks. This trick allows you to go back and collect power-ups in '''?''' Blocks as many times as you want. | |||
{{Scrolling map|SMB3 W2 PY b.png}} | |||
[[Image:SMB3 W2 PY d.png|right]] | |||
* '''2''': Either fly or jump to reveal an Invisible Block that lets you reach a pipe leading to a coin vault (shown right). Break as few blocks as possible before you hit the Switch Block and change all of the blocks to coins. | |||
{{Scrolling map|SMB3 W2 PY c.png}} | |||
* '''3''': Watch out for the Buzzy Beetles crawling along the ceiling. These gravity-defying insects will try to fall on top of you, so stay on your toes and leap backward or forward to avoid them. | |||
* '''4''': '''GBA Advancement'''. When you exit the pyramid in '''Super Mario Advance 4''', the back end of the pyramid will be redesigned to actually resemble a pyramid. Before charging to the finish, go back up the side of the pyramid and hit the Switch Block at the top to reveal a Pharaoh's treasure of secret silver coins. | |||
<br/> | |||
{| width="100%" | |||
| style="background:gold; height:14px" | | |||
|} | |||
==Airship== | ==Airship== | ||
[[Image:SMB3-2-Airship.png|thumb|right|Click on the image for the unedited NES map]] | |||
In an airship floating high above the desert dunes, a showdown with Morton Koopa Jr. looms ahead. Mean old Morton has turned the King of the Koopahari Desert into a [[Super_Mario_Bros._2/Enemies|Hoopster]] (originally a spider in the NES version). Being one of the older Koopalings, Morton's ship is more advanced than Larry's and more dangerous! There are a couple of places to use extra caution. | |||
* | {{-}} | ||
{{Scrolling map|SMB3 W2 AS a.png}} | |||
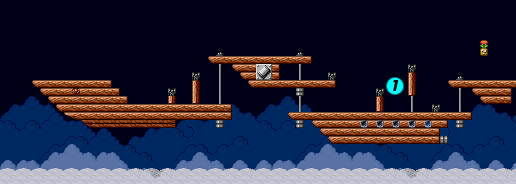
* '''1''': Although the Airship's layout seems chaotic, the last cannon at this point is placed to be particularly menacing to intruders. If you can slip by the cannons while maintaining Super Mario size, you'll be rewarded with a Fire Flower near the middle of the stage. It's your only chance to power up, and it'll be helpful against the big boss. | |||
* | {{Scrolling map|SMB3 W2 AS b.png}} | ||
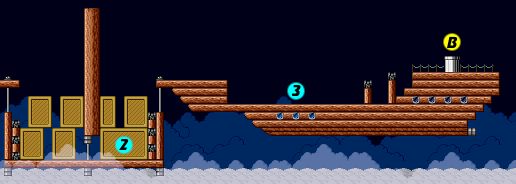
*The | * '''2''': This is the most hazardous part of the Airship. Once you see the floor of the ship scroll into view, drop from the crates, avoid bullets as you run right, and jump up to clumb the crates to safety. | ||
* '''3''': Say hello to Rocky Wrench, the wrench tossing Airship mechanics. The best way to eliminate a Rocky Wrench is with a fireball courtesy of Fiery Mario. | |||
=== B: Morton Koopa Jr. === | |||
{{-}} | |||
[[Image:SMB3 W1 Boss.png|right]] | |||
Larry Koopa may have been a brat, but Morton Koopa Jr. is a grouch; he'll defend his airship ferociously. He's bigger and slower than Larry, but he's much better at wielding his wand, so stay light on your feet and jump to attack. | |||
* Morton behaves much like his younger brother Larry, except he fires his wand much more frequently. | |||
* Dodge the beams and watch out for his spinning shell attack. | |||
* Stomp on Morton's head three times to end his tyrannical rule over the desert forever. | |||
{{-}} | |||
=== Morton's show is canceled! === | |||
Mario has done it again and the King of Koopahari is back to his usual self. The Princess has also left Jugem's Cloud behind for Mario to use, a magical item that lets him skip an action scene. | |||
{{Footer Nav|game=Super Mario Bros. 3|prevpage=World 2|nextpage=World 3}} | {{Footer Nav|game=Super Mario Bros. 3|prevpage=World 2|nextpage=World 3}} | ||
Revision as of 01:30, 4 January 2011
World 2 Quicksand

Sun-backed sand stretches as far as the eye can see. You'd better wear sunscreen. Natural forces will work to halt Mario's progress through this world—a sinister sun and terrible tornado.
- 1: It takes a running jump to clear the Venus Fire Trap-infested quicksand pit. Move fast, or they'll flame you. Once you reach the other side, you may wish to grab the shell of the Koopa and hold on to it as run along.
- 2: The swirling sand twister will easily lift you up and throw you back. To overcome it, run towards the right and when you get to the tornado, jump directly into its center. If you time your jump correctly, it will carry you a long way.
- 3: No, it's it a mirage, and you aren't suffering from heat stroke—the sun is actually chasing you! If you aren't holding a Koopa shell when the Angry Sun swoops out of the sky, jump on a Koopa Paratroopa and kick it's shell at your pursuer to force an early sunset.
World 2-4

Finally, a desert oasis! Unfortunately, you won't have time to relax in paradise. Take the high road for big loot! You have your choice of ways to go here, but the upper path is definitely recommended because it's guarded by fewer enemies and offers chances at many more coins!
- 1: Get the power-up in the floating block. Grab a Koopa and get on the ground to the left of the floating block. Let the Koopa go and jump for the item.
- 2: As Raccoon Mario, use the flat stretch as a runway to lift into the air and smash straight up through the blocks and to the oasis above.
- 3: Gather all of the coins as you cross the blocks that extend over the water before you jump in. Hit the block to expose a Switch Block, then transform all of the blocks into coins.
- 4: Collect the coins on the top of the platform at this point, then get a running start and fly underneath this platform. A veritable shower of wealth will fill Mario's pockets. Beware of the Koopa Paratroopas on the far right side of the platform—if you're not careful, they'll steal your Raccoon Suit powers.
- 5: There are two approaches in this section. Either you can collect as many coins as you can without smashing any blocks, then use the Switch Block to change all of the remaining blocks into coins, or you can leave the coins alone and use them as platforms to get the other coins when you hit the Switch Bloack.
- 6: When facing a Boomerang Brother, use terrain and cover to your advantage. Hide in the crevice while the boomerangs whoosh overhead, then jump onto him when he pauses between throws.
World 2-5

Danger: do not feed the Chain Chomps. They will make a meal out of you. Climb a vine to a secret room. Just like in the original Super Mario Bros., some blocks have vines inside of them. The vine in this world leads to a path of clouds that will take Mario to a sky pipe and to a bonus coin room.

- 1: Chain Chomps are vicious, but they're held back by sturdy leashes. Stay out of range and take them out with Koopa shells. Because of their chain, these Chain Chomps can't get at Mario—or can they? If you stand there and watch one for 160 ticks on the timer, his chain will break and he'll have one chance to get you!
- 2: Yet again, a Koopa Troopa can unwittingly help Mario retrieve a power-up item by clearing away the blocks from around the Wood Block it's hidden in. Bump the Wood Block from the side to reveal a power-up.
- 3: After having climbed the vine from point 4, this pipe in the clouds leads to a chamber (shown right) containing a power-up and a Switch Block. Collect the power-up on the right. If you're Super Mario, you'll get a Super Leaf. Then reveal the Switch Block, break just enough blocks to clear you way to hit it, and collect all of the coins that appear.
- 4: To activate a vine that grows to a secret area in the sky, kick a Koopa shell down the small tunnel. It will break the block so a vine can sprout. Climb into the clouds, and follow them to the left to reach a pipe at point 3.
World 2 Pyramid

The great pyramid is a winding labyrinth of beetle infested tunnels. Walls seal off portions of the pyramid. You must either use Buzzy Beetle to break these down, or your Raccoon Tail. Since you can reset the ? Blocks near the entrance door, you should be able to fully power up. Can you discover a way out?
- 1: Leaving and reentering the front door of the pyramid will reset all of the blocks. This trick allows you to go back and collect power-ups in ? Blocks as many times as you want.
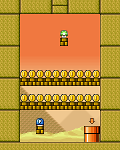
- 2: Either fly or jump to reveal an Invisible Block that lets you reach a pipe leading to a coin vault (shown right). Break as few blocks as possible before you hit the Switch Block and change all of the blocks to coins.
- 3: Watch out for the Buzzy Beetles crawling along the ceiling. These gravity-defying insects will try to fall on top of you, so stay on your toes and leap backward or forward to avoid them.
- 4: GBA Advancement. When you exit the pyramid in Super Mario Advance 4, the back end of the pyramid will be redesigned to actually resemble a pyramid. Before charging to the finish, go back up the side of the pyramid and hit the Switch Block at the top to reveal a Pharaoh's treasure of secret silver coins.
Airship

In an airship floating high above the desert dunes, a showdown with Morton Koopa Jr. looms ahead. Mean old Morton has turned the King of the Koopahari Desert into a Hoopster (originally a spider in the NES version). Being one of the older Koopalings, Morton's ship is more advanced than Larry's and more dangerous! There are a couple of places to use extra caution.
- 1: Although the Airship's layout seems chaotic, the last cannon at this point is placed to be particularly menacing to intruders. If you can slip by the cannons while maintaining Super Mario size, you'll be rewarded with a Fire Flower near the middle of the stage. It's your only chance to power up, and it'll be helpful against the big boss.
- 2: This is the most hazardous part of the Airship. Once you see the floor of the ship scroll into view, drop from the crates, avoid bullets as you run right, and jump up to clumb the crates to safety.
- 3: Say hello to Rocky Wrench, the wrench tossing Airship mechanics. The best way to eliminate a Rocky Wrench is with a fireball courtesy of Fiery Mario.
B: Morton Koopa Jr.
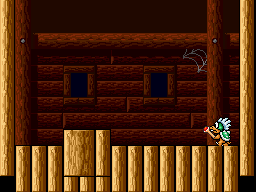
Larry Koopa may have been a brat, but Morton Koopa Jr. is a grouch; he'll defend his airship ferociously. He's bigger and slower than Larry, but he's much better at wielding his wand, so stay light on your feet and jump to attack.
- Morton behaves much like his younger brother Larry, except he fires his wand much more frequently.
- Dodge the beams and watch out for his spinning shell attack.
- Stomp on Morton's head three times to end his tyrannical rule over the desert forever.
Morton's show is canceled!
Mario has done it again and the King of Koopahari is back to his usual self. The Princess has also left Jugem's Cloud behind for Mario to use, a magical item that lets him skip an action scene.


