Jump to navigation
Jump to search
(imagemap by User:Echelon and User:DrBob) |
(none of these links work, removing imagemap) |
||
| Line 4: | Line 4: | ||
These maps are of the dungeon layouts. Click on each image to enlarge | These maps are of the dungeon layouts. Click on each image to enlarge | ||
[[Image:OoT_Overworld.jpg|Overworld.]] | |||
Image:OoT_Overworld.jpg|Overworld. | |||
==Great Deku Tree== | ==Great Deku Tree== | ||
Revision as of 09:27, 17 February 2011

These maps are of the dungeon layouts. Click on each image to enlarge

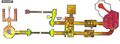
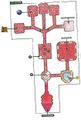
Great Deku Tree
-
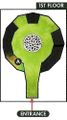
First floor
-
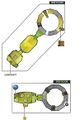
Second and third floors
-
Basement


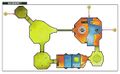
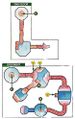
Dodongo's Cavern
-
First floor
-
Second floor

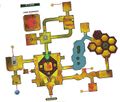
Jabu Jabu's Belly
-
First floor
-
Second floor and basement

