(formatting, rmv Leather hat, fix colspan, etc.) |
(cleanup) |
||
| (12 intermediate revisions by 8 users not shown) | |||
| Line 1: | Line 1: | ||
{{Header Nav|game=Dragon Warrior III}} | {{Header Nav|game=Dragon Warrior III}} | ||
{{floatingtoc|left}} | {{floatingtoc|left}} | ||
[[File:DW3 map overworld East Asia.png|right]] | [[File:DW3 map overworld East Asia.png|right]] | ||
| Line 7: | Line 6: | ||
|- | |- | ||
| | | | ||
*{{ | * {{s|Enemies|King Froggore}}/{{s|Enemies|King Toad}} | ||
*{{ | * {{s|Enemies|Fierce Bear}}/{{s|Enemies|Bruin}} | ||
*{{ | * {{s|Enemies|Demonite}} | ||
*{{ | * {{s|Enemies|Hork}} | ||
*{{ | * {{s|Enemies|Slime Snaii}}/{{s|Enemies|Snaily}} | ||
*{{ | * {{s|Enemies|Sky Dragon}} | ||
*{{ | * {{s|Enemies|Garuda}} | ||
|} | |} | ||
;<span style="color:green">Green text on this page indicates that it is exclusive to the GBC and SNES versions.</span> | ;<span style="color:green">Green text on this page indicates that it is exclusive to the GBC and SNES versions.</span> | ||
Of the many places that you've been hearing about since you got your ship, you may be hearing about Jipang <span style="color:green">(Zipangu)</span> the most. Jipang (clearly representing Japan) is located on some islands along the east side of the giant continent you've been primarily exploring. It appears that they are going through a considerable crisis, with daughters being chosen through a lottery for ritual sacrifice to a demonic beast that has the entire country living in fear. The citizens revere their leader, Himiko, even though she seems unable or unwilling to do anything about the problem. Perhaps you will be | Of the many places that you've been hearing about since you got your ship, you may be hearing about Jipang <span style="color:green">(Zipangu)</span> the most. Jipang (clearly representing Japan) is located on some islands along the east side of the giant continent you've been primarily exploring. It appears that they are going through a considerable crisis, with daughters being chosen through a lottery for ritual sacrifice to a demonic beast that has the entire country living in fear. The citizens revere their leader, Himiko, even though she seems unable or unwilling to do anything about the problem. Perhaps you will be rewarded if you can solve their crisis. | ||
== Sailing East == | == Sailing East == | ||
Reaching Jipang <span style="color:green">(Zipangu)</span> is relatively easy, and once you visit it, you can cast Return and instantly arrive just outside of town. You can either Return to Baharata and sail east along the southern coast, or Return to Dhama and sail down along the river until it opens up into the sea, and continue east. Jipang appears to be located right alongside a cave. Northwest of | Reaching Jipang <span style="color:green">(Zipangu)</span> is relatively easy, and once you visit it, you can cast Return and instantly arrive just outside of town. You can either Return to Baharata and sail east along the southern coast, or Return to Dhama and sail down along the river until it opens up into the sea, and continue east. Jipang appears to be located right alongside a cave. Northwest of Jipang, there's a shrine on the mainland. The shrine contains an inn that will allow you to stay for 60 gold. A girl occupying one of the rooms tells you that the demon named Orochi is terrifying the village that she is from. <span style="color:green">Get the '''[[File:Dragon Warrior 3 GBC Staff.png]] Stick [[File:DW3 stick.png]] / [[File:Dragon Warrior 3 SNES Staff.png]] Cypress Stick''' from the cupboard in Girl's Room and '''[[File:Dragon Warrior 3 TinyMedal.png]] TinyMedal / [[File:Dragon Warrior 3 SNES Small Medal.png]] Small Medal''' in the other Room.</span> If you open the prison door on the right with the Final Key, you'll discover a Travel Gate, which transports you to a shrine containing a House of Healing that is located south of Isis along a west coast. | ||
{{-}} | {{-}} | ||
== Jipang <span style="color:green">(Zipangu)</span> == | == Jipang <span style="color:green">(Zipangu)</span> == | ||
[[File:DW3 map town Jipang.png|left]] | [[File:DW3 map town Jipang.png|left]] | ||
You've reach Jipang <span style="color:green">(Zipangu)</span>. A cursory examination of the town will reveal that it has no inns and no shops of any kind. What's more, by talking to the people, you will learn a whole lot about Jipang, and incredibly little about anywhere else in the world. What you will learn is that a demonic beast called Orochi has been terrorizing the land for a while, demanding young female inhabitants of town as sacrifices. Families are frightened of the prospect of losing their daughters, and some are going to great lengths to protect their children. | You've reach Jipang <span style="color:green">(Zipangu)</span>. A cursory examination of the town will reveal that it has no inns and no shops of any kind. What's more, by talking to the people, you will learn a whole lot about Jipang, and incredibly little about anywhere else in the world. What you will learn is that a demonic beast called Orochi has been terrorizing the land for a while, demanding young female inhabitants of town as sacrifices. Families are frightened of the prospect of losing their daughters, and some are going to great lengths to protect their children. | ||
Just to show you how desperate the situation has become, if you visit the small shack in the lower left corner of town, you'll find a staircase that leads down to a basement. In the basement is a collection of large jars. Search the right most jar, and you will discover the woman who has been chosen as the next to be sacrificed. She is hiding in the jar and begs you for one last opportunity to say goodbye to her homeland. <span style="color:green">Search 2 pots to find '''[[File:Dragon Warrior 3 GBC Seed.png]] STRseed / [[File:Dragon Warrior 3 SNES Seed.png]] Strength Seed''' and '''[[File:Dragon Warrior 3 TinyMedal.png]] TinyMedal / [[File:Dragon Warrior 3 SNES Small Medal.png]] Small Medal'''.</span> | Just to show you how desperate the situation has become, if you visit the small shack in the lower left corner of town, you'll find a staircase that leads down to a basement. In the basement is a collection of large jars. Search the right most jar, and you will discover the woman who has been chosen as the next to be sacrificed. She is hiding in the jar and begs you for one last opportunity to say goodbye to her homeland. <span style="color:green">Search 2 pots to find '''[[File:Dragon Warrior 3 GBC Seed.png]] STRseed / [[File:Dragon Warrior 3 SNES Seed.png]] Strength Seed''' and '''[[File:Dragon Warrior 3 TinyMedal.png]] TinyMedal / [[File:Dragon Warrior 3 SNES Small Medal.png]] Small Medal'''.</span> | ||
| Line 34: | Line 32: | ||
<span style="color:green">Go in west house and check the bag on the north wall for a '''[[File:Dragon Warrior 3 GBC Sack.png]] BugPowder / [[File:Dragon Warrior 3 SNES Sack.png]] Moth Powder''' and the pot for a '''[[File:Dragon Warrior 3 GBC Seed.png]] MysticNut / [[File:Dragon Warrior 3 SNES Seed.png]] Mystic Nut'''. In the south house is a '''[[File:Dragon Warrior 3 GBC Skirt green.png]] Cloth [[File:DW3 shirt.png]] / [[File:Dragon Warrior 3 SNES Skirt White.png]] Clothes''' and in east house is a '''[[File:Dragon Warrior 3 GBC Brown Hat.png]] Wooden [[File:DW3 hat.png]] / [[File:Dragon Warrior 3 SNES Brown Hat.png]] Wooden Helmet'''.</span> | <span style="color:green">Go in west house and check the bag on the north wall for a '''[[File:Dragon Warrior 3 GBC Sack.png]] BugPowder / [[File:Dragon Warrior 3 SNES Sack.png]] Moth Powder''' and the pot for a '''[[File:Dragon Warrior 3 GBC Seed.png]] MysticNut / [[File:Dragon Warrior 3 SNES Seed.png]] Mystic Nut'''. In the south house is a '''[[File:Dragon Warrior 3 GBC Skirt green.png]] Cloth [[File:DW3 shirt.png]] / [[File:Dragon Warrior 3 SNES Skirt White.png]] Clothes''' and in east house is a '''[[File:Dragon Warrior 3 GBC Brown Hat.png]] Wooden [[File:DW3 hat.png]] / [[File:Dragon Warrior 3 SNES Brown Hat.png]] Wooden Helmet'''.</span> | ||
{{-}} | {{-}} | ||
== Orochi's Cave == | == Orochi's Cave == | ||
{| {{prettytable|float=left|notwide=1}} | {| {{prettytable|float=left|notwide=1}} | ||
| Line 40: | Line 37: | ||
|- | |- | ||
| | | | ||
*{{ | * {{s|Enemies|Deranger}} | ||
*{{ | * {{s|Enemies|King Froggore}}/{{s|Enemies|King Toad}} | ||
*{{ | * {{s|Enemies|Fierce Bear}}/{{s|Enemies|Bruin}} | ||
*{{ | * {{s|Enemies|Lava Basher}}/{{s|Enemies|Lava Man}} | ||
*{{ | * {{s|Enemies|Hork}} | ||
*{{ | * {{s|Enemies|Orochi}} (BOSS) | ||
|} | |} | ||
[[File:DW3 map cave Orochi F1.png|right]] | [[File:DW3 map cave Orochi F1.png|right]] | ||
You may be preparing for a long slog through a large cavern, but the cave next to Jipang is actually quite small. However, flows of magma cross sections of the cave, making it impossible to travel through certain passages. You'll encounter | You may be preparing for a long slog through a large cavern, but the cave next to Jipang is actually quite small. However, flows of magma cross sections of the cave, making it impossible to travel through certain passages. You'll encounter [[../Enemies#Lava Basher|Lava Bashers]]/[[../Enemies#Lava Man|Lava Men]] here. These, along with [[../Enemies#Fierce Bear|Fierce Bears]]/[[../Enemies#Bruin|Bruins]], are powerful creatures capable of doing a lot of damage to you with each strike. However, the greatest danger of the [[../Enemies#Deranger|Derangers]], who have the ability to cast Chaos and turn members of your own party against you. | ||
When you enter, you will have to option to explore left or down. However, the passage below is cut off by a lava flow, so head to the left. After it bends and starts heading down, you'll see two doors on either side. The one on the left leads to a small empty room. The one on the right leads to a larger room with an exit on the opposite corner. That exit will take you to the main room, but lava has swept across the room, preventing you from exploring any of it from this direction. Instead, continue south along the original path. | When you enter, you will have to option to explore left or down. However, the passage below is cut off by a lava flow, so head to the left. After it bends and starts heading down, you'll see two doors on either side. The one on the left leads to a small empty room. The one on the right leads to a larger room with an exit on the opposite corner. That exit will take you to the main room, but lava has swept across the room, preventing you from exploring any of it from this direction. Instead, continue south along the original path. | ||
| Line 54: | Line 51: | ||
After the main room becomes visible on the right, the path branches to the right and the left. If you head to the right into the main room, you will find that lava flows still prevent you from accessing the majority of the room where a staircase can be seen. Take the left branch and follow the path down and around until you reach the southern entrance to the main room. If you like, you can follow the path to the right, but it leads to another empty room. | After the main room becomes visible on the right, the path branches to the right and the left. If you head to the right into the main room, you will find that lava flows still prevent you from accessing the majority of the room where a staircase can be seen. Take the left branch and follow the path down and around until you reach the southern entrance to the main room. If you like, you can follow the path to the right, but it leads to another empty room. | ||
You can now reach the staircase that goes down to the next floor. However, before you do this, you can continue to investigate the room to the right. | You can now reach the staircase that goes down to the next floor. However, before you do this, you can continue to investigate the room to the right. There, you will finally discover a treasure chest. In this chest is an item called the '''Noh Mask''' <span style="color:green">('''[[File:Dragon Warrior 3 GBC Noh Mask.png]] NohMask / [[File:Dragon Warrior 3 SNES Sack.png]] All-knowing Mask''')</span>. It is actually defensive head gear, like a helmet, but it is ''cursed''! Do not let any of your party members equip it. Head back to the stairs and climb down to the floor below. | ||
{{-}} | {{-}} | ||
[[File:DW3 map cave Orochi F2.png|left]] | [[File:DW3 map cave Orochi F2.png|left]] | ||
| Line 64: | Line 61: | ||
When you finally defeat Orochi, you will earn a lot of experience points, and you will receive the '''[[File:Dragon Warrior 3 SNES Sword.png]] Orochi Sword <span style="color:green">([[File:Dragon Warrior 3 GBC Sword.png]] Orochi [[File:DW3 sword.png]])</span>''' and some gold. The Orochi Sword makes a great weapon upgrade for your Hero. Then you will see a kind of gate appear on the right, which Orochi will jump into. Follow Orochi through the gate, and you will find yourself in Himiko's chambers! | When you finally defeat Orochi, you will earn a lot of experience points, and you will receive the '''[[File:Dragon Warrior 3 SNES Sword.png]] Orochi Sword <span style="color:green">([[File:Dragon Warrior 3 GBC Sword.png]] Orochi [[File:DW3 sword.png]])</span>''' and some gold. The Orochi Sword makes a great weapon upgrade for your Hero. Then you will see a kind of gate appear on the right, which Orochi will jump into. Follow Orochi through the gate, and you will find yourself in Himiko's chambers! | ||
If you don't follow Orochi through the gate you will have to come back and fight Orochi again, but you will gain the EXP and GOLD just like the fight with Orochi in Jipang. | |||
{{-}} | {{-}} | ||
== Back in Jipang <span style="color:green">(Zipangu)</span> == | == Back in Jipang <span style="color:green">(Zipangu)</span> == | ||
[[File:DW3 screenshot Jipang Himiko.jpg|thumb|left|Defying Himiko.]] | [[File:DW3 screenshot Jipang Himiko.jpg|thumb|left|Defying Himiko.]] | ||
Himiko appears to be severely injured and one of | Himiko appears to be severely injured and one of her attendants is trying to tend to her wounds. You may feel incredibly compelled to talk with Himiko, but if your party sustained a tremendous amount of damage in the battle with Orochi, it is recommended that you first leave Jipang <span style="color:green">(Zipangu)</span>, and heal at an inn before returning to speak with Himiko. She will remain wounded when you return. | ||
[[File:DW3 screenshot Orb Purple. | [[File:DW3 screenshot Orb Purple.png|thumb|right|Finding the Purple Orb.]] | ||
When you are ready, speak with Himiko. She will assume that you now know her secret identity as the Orochi. She will promise not to eliminate you if you keep | When you are ready, speak with Himiko. She will assume that you now know her secret identity as the Orochi. She will promise not to eliminate you if you keep her secret. You can agree, and nothing will happen. If you don't promise to keep her secret, she will transform back into Orochi and challenge you one more time! | ||
Despite her bravado, this battle will be a near duplicate of the previous battle <span style="color:green">(This is not so in the Remakes. She will be stronger, but in return you will receive more Exp and 1000 gold.)</span>. She will use all the same strategies, so you should continue to use whichever strategies worked best for you the last time. Orochi will tend to attack directly more often, and breathe fire a little less. Equipping the Orochi Sword should help you cause a little more damage to Orochi than last time. After you defeat | Despite her bravado, this battle will be a near duplicate of the previous battle <span style="color:green">(This is not so in the Remakes. She will be stronger, but in return, you will receive more Exp and 1000 gold.)</span>. She will use all the same strategies, so you should continue to use whichever strategies worked best for you the last time. Orochi will tend to attack directly more often, and breathe fire a little less. Equipping the Orochi Sword should help you cause a little more damage to Orochi than last time. After you defeat her, you'll find another treasure chest, but this one will only contain gold. | ||
The real treasure chest is the one that is left in | The real treasure chest is the one that is left in her place in Jipang <span style="color:green">(Zipangu)</span>. Open it, and you will find the '''[[File:Dragon Warrior 3 GBC Purple Orb.png]][[File:Dragon Warrior 3 SNES Purple Orb.png]] Purple Orb'''. This is likely to be the first of six orbs that you have collected. News about Himiko and the Orochi will spread throughout town. Many of the citizens will thank you for your brave deeds. Some will surmise that the original Himiko was killed by Orochi, who then took her place. One occupant will suggest that you can find the Invisibility Herb in a town far to the south of Baharata, a clue that might help you if you have not been inside of Castle Eginbear yet. | ||
== The middle of nowhere == | == The middle of nowhere == | ||
| Line 81: | Line 80: | ||
|- | |- | ||
| | | | ||
*{{ | * {{s|Enemies|Stingwing}}/{{s|Enemies|StingMoth}} | ||
*{{ | * {{s|Enemies|Garuda}} | ||
*{{ | * {{s|Enemies|Demonite}} | ||
*{{ | * {{s|Enemies|Slime Snaii}}/{{s|Enemies|Snaily}} | ||
*{{ | * {{s|Enemies|Avenger Beak}}/{{s|Enemies|Mad Pecker}} | ||
*{{ | * {{s|Enemies|Barnabas}} | ||
*{{ | * {{s|Enemies|Hork}} | ||
*{{ | * {{s|Enemies|Sky Dragon}} | ||
|} | |} | ||
Before you leave | Before you leave too quickly for your next destination, it's worth taking your time to explore the remainder of the east coast north of Jipang <span style="color:green">(Zipangu)</span>. After sailing for a short while, you'll come across a town in the north east corner of the continent, just below some ice. This is the town of Muor. IceBolt casting [[../Enemies#Slime Snaii|Slime Snaiis]]/[[../Enemies#Snaily|Snailys]] and [[../Enemies#Demonite|Demonites]] are common around this area. | ||
{{-}} | {{-}} | ||
=== Muor === | === Muor === | ||
[[File:DW3 map town Muor.png|left]] | [[File:DW3 map town Muor.png|left]] | ||
| Line 117: | Line 115: | ||
|3500G <span style="color:green">2000G</span> | |3500G <span style="color:green">2000G</span> | ||
|} | |} | ||
{| {{prettytable|notwide=1|float=right}} | {| {{prettytable|notwide=1|float=right}} | ||
!colspan="6"|Tool shop | !colspan="6"|Tool shop | ||
| Line 125: | Line 122: | ||
|8G||10G||25G||20G||30G||500G <span style="color:green">310G</span> | |8G||10G||25G||20G||30G||500G <span style="color:green">310G</span> | ||
|} | |} | ||
{| {{prettytable|notwide=1|float=right}} | {| {{prettytable|notwide=1|float=right}} | ||
!colspan="2"|Services | !colspan="2"|Services | ||
| Line 133: | Line 129: | ||
|48G/person||{{yes}} | |48G/person||{{yes}} | ||
|} | |} | ||
{{-|left}} | {{-|left}} | ||
In this remote location, you will actually find a fairly happy and thriving town. You can walk to this town from Dhama, but the trip is fairly arduous. A man in town will be surprised if you tell him that you didn't arrive by ship. Note that you can't cast Return or use a Wing of Wyvern to bring you back to Muor; Jipang <span style="color:green">(Zipangu)</span> is the closest destination you can warp to. Other people around town seem to be mistaking you for a man named Papagatero (an anagram for "Papa Ortega"). You'll also hear a bit about a boy named Popota, and how he's so great with a Water Pistol. | In this remote location, you will actually find a fairly happy and thriving town. You can walk to this town from Dhama, but the trip is fairly arduous. A man in town will be surprised if you tell him that you didn't arrive by ship. Note that you can't cast Return or use a Wing of Wyvern to bring you back to Muor; Jipang <span style="color:green">(Zipangu)</span> is the closest destination you can warp to. Other people around town seem to be mistaking you for a man named Papagatero (an anagram for "Papa Ortega"). You'll also hear a bit about a boy named Popota, and how he's so great with a Water Pistol. | ||
| Line 138: | Line 135: | ||
The covered building in the upper right is a market. From the equipment shop, the Staff of Judgement is a good weapon for Pilgrims <span style="color:green">(Clerics)</span> and Sages. It casts Infernos when used in battle. Full Plate Armor is of course an upgrade for any member wearing Half Plate Armor <span style="color:green">(Full Plate Armor among some other equipments are not sold in the remakes, so other equipments replaced it instead like Magic Shield and such.)</span>. Another shop keeper will mistake you for Papagatero as well. There is a prison door which you can open with the Final Key. If you do, you will be given a clue about the presence of a man in a room in the upper right corner of the building. <span style="color:green">Check the topright corner behind the Jail Door for a '''[[File:Dragon Warrior 3 TinyMedal.png]] TinyMedal / [[File:Dragon Warrior 3 SNES Small Medal.png]] Small Medal'''.</span> | The covered building in the upper right is a market. From the equipment shop, the Staff of Judgement is a good weapon for Pilgrims <span style="color:green">(Clerics)</span> and Sages. It casts Infernos when used in battle. Full Plate Armor is of course an upgrade for any member wearing Half Plate Armor <span style="color:green">(Full Plate Armor among some other equipments are not sold in the remakes, so other equipments replaced it instead like Magic Shield and such.)</span>. Another shop keeper will mistake you for Papagatero as well. There is a prison door which you can open with the Final Key. If you do, you will be given a clue about the presence of a man in a room in the upper right corner of the building. <span style="color:green">Check the topright corner behind the Jail Door for a '''[[File:Dragon Warrior 3 TinyMedal.png]] TinyMedal / [[File:Dragon Warrior 3 SNES Small Medal.png]] Small Medal'''.</span> | ||
It turns out that you can exit the shop, walk around the left side, and along the top. Walk to the right side of the building and drop down into the wall, and you will access the room that you could see. The man inside will welcome you as Papagatero. From there, you can access a stairwell in the back of the shop below. Upstairs, you will find a family resting by a fire behind a locked door. You can speak to the family members. One of the little boys is Popota. He was given a Water Blaster by Papagatero, and he will give the '''Water Blaster''' <span style="color:green">(In Remakes he won't give the Water Blaster to you, but instead want you to have the Ortega's Helmet. Go downstairs and the man by the counter will give '''[[File:Dragon Warrior 3 Ortega Helmet.png]] Ortega [[File:DW3 helmet.png]] / [[File:Dragon Warrior 3 SNES Helmet.png]] Ortega's Helmet''' to you. This Helmet can only be | It turns out that you can exit the shop, walk around the left side, and along the top. Walk to the right side of the building and drop down into the wall, and you will access the room that you could see. The man inside will welcome you as Papagatero. From there, you can access a stairwell in the back of the shop below. Upstairs, you will find a family resting by a fire behind a locked door. You can speak to the family members. One of the little boys is Popota. He was given a Water Blaster by Papagatero, and he will give the '''Water Blaster''' <span style="color:green">(In Remakes he won't give the Water Blaster to you, but instead want you to have the Ortega's Helmet. Go downstairs and the man by the counter will give '''[[File:Dragon Warrior 3 Ortega Helmet.png]] Ortega [[File:DW3 helmet.png]] / [[File:Dragon Warrior 3 SNES Helmet.png]] Ortega's Helmet''' to you. This Helmet can only be worn by the Hero and is the third strongest Helmet in the game.)</span> to you because you remind him so much of Papagatero. The man by the fire will confirm that Papagatero was indeed your father Ortega, and he mentions that Ortega regretted leaving his/her son/daughter behind. <span style="color:green">Check both pots for '''[[File:Dragon Warrior 3 TinyMedal.png]] TinyMedal / [[File:Dragon Warrior 3 SNES Small Medal.png]] Small Medal''' and '''[[File:Dragon Warrior 3 GBC Token.png]] Token / [[File:Dragon Warrior 3 SNES Pachisi Ticket.png]] Pachisi Ticket'''.</span> | ||
The Water Blaster can't actually be used as equipment, it's simply an item that you can hold for sentimental reasons because it belonged to your father. You can walk up to people and use the Water Blaster on them, and squirt innocent victims for comedic effect, but it has no other purpose beyond that, and is best kept in the vault. You'll learn nothing else about the world or your father, even at night, <span style="color:green">but you can grab some more Treasure in the town. Check the cross in the Church for a '''[[File:Dragon Warrior 3 GBC Seed.png]] LifeAcorn / [[File:Dragon Warrior 3 SNES Seed.png]] Life Nut'''. The dresser by the Inn have a '''[[File:Dragon Warrior 3 GBC Brown Pants.png]] Kilt [[File:DW3 pants.png]] / [[File:Dragon Warrior 3 SNES Sack.png]] Leather Kilt'''.</span> | The Water Blaster can't actually be used as equipment, it's simply an item that you can hold for sentimental reasons because it belonged to your father. You can walk up to people and use the Water Blaster on them, and squirt innocent victims for comedic effect, but it has no other purpose beyond that, and is best kept in the vault. You'll learn nothing else about the world or your father, even at night, <span style="color:green">but you can grab some more Treasure in the town. Check the cross in the Church for a '''[[File:Dragon Warrior 3 GBC Seed.png]] LifeAcorn / [[File:Dragon Warrior 3 SNES Seed.png]] Life Nut'''. The dresser by the Inn have a '''[[File:Dragon Warrior 3 GBC Brown Pants.png]] Kilt [[File:DW3 pants.png]] / [[File:Dragon Warrior 3 SNES Sack.png]] Leather Kilt'''.</span> | ||
{{Footer Nav|game=Dragon Warrior III|prevpage=The Final Key|nextpage=Soo}} | {{Footer Nav|game=Dragon Warrior III|prevpage=The Final Key|nextpage=Soo}} | ||
Latest revision as of 23:00, 10 October 2022
| Monsters in Jipang Area |
|---|
- Green text on this page indicates that it is exclusive to the GBC and SNES versions.
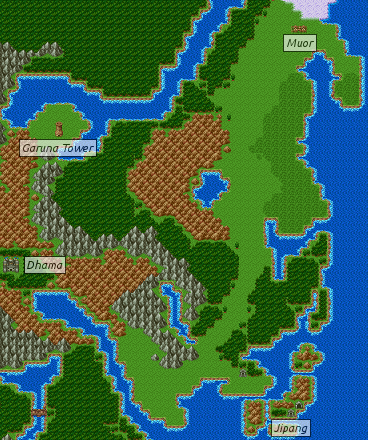
Of the many places that you've been hearing about since you got your ship, you may be hearing about Jipang (Zipangu) the most. Jipang (clearly representing Japan) is located on some islands along the east side of the giant continent you've been primarily exploring. It appears that they are going through a considerable crisis, with daughters being chosen through a lottery for ritual sacrifice to a demonic beast that has the entire country living in fear. The citizens revere their leader, Himiko, even though she seems unable or unwilling to do anything about the problem. Perhaps you will be rewarded if you can solve their crisis.
Sailing East[edit]
Reaching Jipang (Zipangu) is relatively easy, and once you visit it, you can cast Return and instantly arrive just outside of town. You can either Return to Baharata and sail east along the southern coast, or Return to Dhama and sail down along the river until it opens up into the sea, and continue east. Jipang appears to be located right alongside a cave. Northwest of Jipang, there's a shrine on the mainland. The shrine contains an inn that will allow you to stay for 60 gold. A girl occupying one of the rooms tells you that the demon named Orochi is terrifying the village that she is from. Get the ![]() Stick
Stick ![]() /
/ ![]() Cypress Stick from the cupboard in Girl's Room and
Cypress Stick from the cupboard in Girl's Room and ![]() TinyMedal /
TinyMedal / ![]() Small Medal in the other Room. If you open the prison door on the right with the Final Key, you'll discover a Travel Gate, which transports you to a shrine containing a House of Healing that is located south of Isis along a west coast.
Small Medal in the other Room. If you open the prison door on the right with the Final Key, you'll discover a Travel Gate, which transports you to a shrine containing a House of Healing that is located south of Isis along a west coast.
Jipang (Zipangu)[edit]
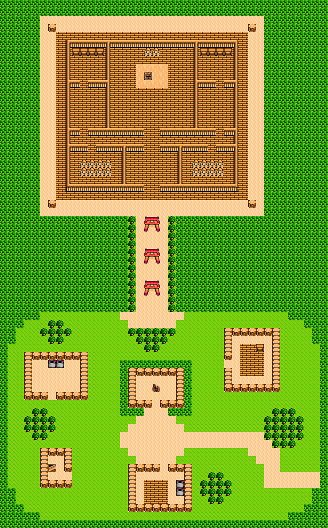
You've reach Jipang (Zipangu). A cursory examination of the town will reveal that it has no inns and no shops of any kind. What's more, by talking to the people, you will learn a whole lot about Jipang, and incredibly little about anywhere else in the world. What you will learn is that a demonic beast called Orochi has been terrorizing the land for a while, demanding young female inhabitants of town as sacrifices. Families are frightened of the prospect of losing their daughters, and some are going to great lengths to protect their children.
Just to show you how desperate the situation has become, if you visit the small shack in the lower left corner of town, you'll find a staircase that leads down to a basement. In the basement is a collection of large jars. Search the right most jar, and you will discover the woman who has been chosen as the next to be sacrificed. She is hiding in the jar and begs you for one last opportunity to say goodbye to her homeland. Search 2 pots to find ![]() STRseed /
STRseed / ![]() Strength Seed and
Strength Seed and ![]() TinyMedal /
TinyMedal / ![]() Small Medal.
Small Medal.
There appears to be only one other visitor to Jipang, a missionary who is trying to spread his faith, but finding it difficult because of how devoted everyone is to their leader, Himiko. You can pay Himiko a visit by heading to her palace in the north half of town. However, after speaking with her, it appears that she will be less than receptive to any offers of help from outlanders like you. Other occupants in the palace claim that even though Himiko authorizes the sacrifices, she might be pleased if someone were to eliminate Orochi. Go in the left room west from Himiko and check the topright pot for a ![]() MysticNut /
MysticNut / ![]() Mystic Nut. In the Rooms east of Himiko are
Mystic Nut. In the Rooms east of Himiko are ![]() Training
Training ![]() /
/ ![]() Training Suit,
Training Suit, ![]() Scale
Scale ![]() /
/ ![]() Scale Shield,
Scale Shield, ![]() STRseed /
STRseed / ![]() Strength Seed and
Strength Seed and ![]() TinyMedal /
TinyMedal / ![]() Small Medal to find.
Small Medal to find.
Due to the lack of an inn or shops in town, there's not much preparation you can do before you decide to tackle Orochi by visiting the nearby cave. If you feel that resting at an inn is necessary, use the one in the nearby shrine before setting foot inside the cave.
Go in west house and check the bag on the north wall for a ![]() BugPowder /
BugPowder / ![]() Moth Powder and the pot for a
Moth Powder and the pot for a ![]() MysticNut /
MysticNut / ![]() Mystic Nut. In the south house is a
Mystic Nut. In the south house is a ![]() Cloth
Cloth ![]() /
/ ![]() Clothes and in east house is a
Clothes and in east house is a ![]() Wooden
Wooden ![]() /
/ ![]() Wooden Helmet.
Wooden Helmet.
Orochi's Cave[edit]
| Monsters in Cave near Jipang |
|---|
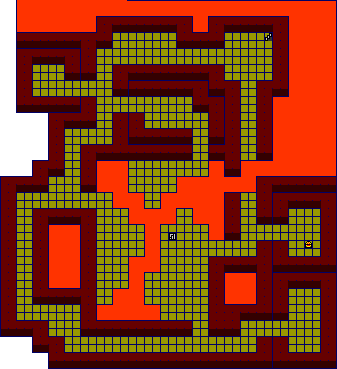
You may be preparing for a long slog through a large cavern, but the cave next to Jipang is actually quite small. However, flows of magma cross sections of the cave, making it impossible to travel through certain passages. You'll encounter Lava Bashers/Lava Men here. These, along with Fierce Bears/Bruins, are powerful creatures capable of doing a lot of damage to you with each strike. However, the greatest danger of the Derangers, who have the ability to cast Chaos and turn members of your own party against you.
When you enter, you will have to option to explore left or down. However, the passage below is cut off by a lava flow, so head to the left. After it bends and starts heading down, you'll see two doors on either side. The one on the left leads to a small empty room. The one on the right leads to a larger room with an exit on the opposite corner. That exit will take you to the main room, but lava has swept across the room, preventing you from exploring any of it from this direction. Instead, continue south along the original path.
After the main room becomes visible on the right, the path branches to the right and the left. If you head to the right into the main room, you will find that lava flows still prevent you from accessing the majority of the room where a staircase can be seen. Take the left branch and follow the path down and around until you reach the southern entrance to the main room. If you like, you can follow the path to the right, but it leads to another empty room.
You can now reach the staircase that goes down to the next floor. However, before you do this, you can continue to investigate the room to the right. There, you will finally discover a treasure chest. In this chest is an item called the Noh Mask (![]() NohMask /
NohMask / ![]() All-knowing Mask). It is actually defensive head gear, like a helmet, but it is cursed! Do not let any of your party members equip it. Head back to the stairs and climb down to the floor below.
All-knowing Mask). It is actually defensive head gear, like a helmet, but it is cursed! Do not let any of your party members equip it. Head back to the stairs and climb down to the floor below.
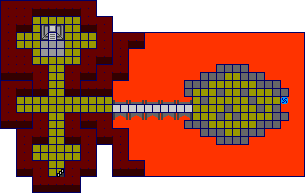
Shortly after you arrive on this floor, you'll reach a four way intersection. The path to the left leads to a quick dead-end. The path heading up leads to an alter. Presumably, this is where the sacrifices to Orochi are left. That only leaves the path to the right.
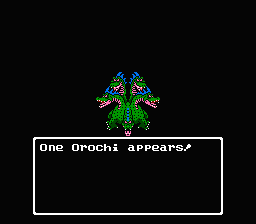
When you set foot beyond the darkness of the right path, you will find a bridge which crosses a long span of magma. Cross the bridge to reach a rocky island. On the right side of that island is a red serpentine beast that awaits you. Before you approach it, be sure to heal up all of your members in preparation for the battle to come. As soon as you set foot in front of the beast, you will begin your battle with Orochi.
Like the battles you had with Kandar, this is a significant battle. Unlike the battles with Kandar, careful strategy is recommended over mindless attacking. Orochi can attack twice, and his flaming breath weapon can have a devastating impact on your party. Have Pilgrims (Clerics) cast SpeedUp and Sap. Wizards (Mages) should cast Increase and Slow. If you learned the spell of Bikill, Wizards should also cast that on your Hero and any other warriors. Pilgrims (Clerics) should obviously monitor hit points and heal anyone in need. Orochi can be put to sleep, but he won't stay asleep for very long. When he wakes up, he still gets to have his second attack, which is usually his breath weapon.
When you finally defeat Orochi, you will earn a lot of experience points, and you will receive the ![]() Orochi Sword (
Orochi Sword (![]() Orochi
Orochi ![]() ) and some gold. The Orochi Sword makes a great weapon upgrade for your Hero. Then you will see a kind of gate appear on the right, which Orochi will jump into. Follow Orochi through the gate, and you will find yourself in Himiko's chambers!
) and some gold. The Orochi Sword makes a great weapon upgrade for your Hero. Then you will see a kind of gate appear on the right, which Orochi will jump into. Follow Orochi through the gate, and you will find yourself in Himiko's chambers!
If you don't follow Orochi through the gate you will have to come back and fight Orochi again, but you will gain the EXP and GOLD just like the fight with Orochi in Jipang.
Back in Jipang (Zipangu)[edit]
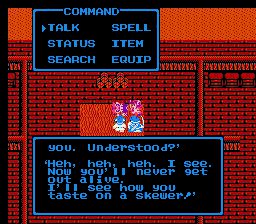
Himiko appears to be severely injured and one of her attendants is trying to tend to her wounds. You may feel incredibly compelled to talk with Himiko, but if your party sustained a tremendous amount of damage in the battle with Orochi, it is recommended that you first leave Jipang (Zipangu), and heal at an inn before returning to speak with Himiko. She will remain wounded when you return.
When you are ready, speak with Himiko. She will assume that you now know her secret identity as the Orochi. She will promise not to eliminate you if you keep her secret. You can agree, and nothing will happen. If you don't promise to keep her secret, she will transform back into Orochi and challenge you one more time!
Despite her bravado, this battle will be a near duplicate of the previous battle (This is not so in the Remakes. She will be stronger, but in return, you will receive more Exp and 1000 gold.). She will use all the same strategies, so you should continue to use whichever strategies worked best for you the last time. Orochi will tend to attack directly more often, and breathe fire a little less. Equipping the Orochi Sword should help you cause a little more damage to Orochi than last time. After you defeat her, you'll find another treasure chest, but this one will only contain gold.
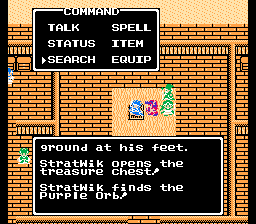
The real treasure chest is the one that is left in her place in Jipang (Zipangu). Open it, and you will find the ![]()
![]() Purple Orb. This is likely to be the first of six orbs that you have collected. News about Himiko and the Orochi will spread throughout town. Many of the citizens will thank you for your brave deeds. Some will surmise that the original Himiko was killed by Orochi, who then took her place. One occupant will suggest that you can find the Invisibility Herb in a town far to the south of Baharata, a clue that might help you if you have not been inside of Castle Eginbear yet.
Purple Orb. This is likely to be the first of six orbs that you have collected. News about Himiko and the Orochi will spread throughout town. Many of the citizens will thank you for your brave deeds. Some will surmise that the original Himiko was killed by Orochi, who then took her place. One occupant will suggest that you can find the Invisibility Herb in a town far to the south of Baharata, a clue that might help you if you have not been inside of Castle Eginbear yet.
The middle of nowhere[edit]
| Monsters in Muor Area |
|---|
Before you leave too quickly for your next destination, it's worth taking your time to explore the remainder of the east coast north of Jipang (Zipangu). After sailing for a short while, you'll come across a town in the north east corner of the continent, just below some ice. This is the town of Muor. IceBolt casting Slime Snaiis/Snailys and Demonites are common around this area.
Muor[edit]
| Tool shop | |||||
|---|---|---|---|---|---|
| Medical Herb Herb |
Antidote Herb Antidote |
Wing of Wyvern WarpWing |
Fairy Water Repellent Holy Water |
Full Moon Herb MoonHerb |
Poison Moth Powder BugPowder Moth Powder |
| 8G | 10G | 25G | 20G | 30G | 500G 310G |
| Services | |
|---|---|
| Inn | Healing |
| 48G/person | Yes |
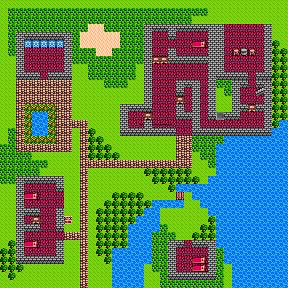
In this remote location, you will actually find a fairly happy and thriving town. You can walk to this town from Dhama, but the trip is fairly arduous. A man in town will be surprised if you tell him that you didn't arrive by ship. Note that you can't cast Return or use a Wing of Wyvern to bring you back to Muor; Jipang (Zipangu) is the closest destination you can warp to. Other people around town seem to be mistaking you for a man named Papagatero (an anagram for "Papa Ortega"). You'll also hear a bit about a boy named Popota, and how he's so great with a Water Pistol.
The covered building in the upper right is a market. From the equipment shop, the Staff of Judgement is a good weapon for Pilgrims (Clerics) and Sages. It casts Infernos when used in battle. Full Plate Armor is of course an upgrade for any member wearing Half Plate Armor (Full Plate Armor among some other equipments are not sold in the remakes, so other equipments replaced it instead like Magic Shield and such.). Another shop keeper will mistake you for Papagatero as well. There is a prison door which you can open with the Final Key. If you do, you will be given a clue about the presence of a man in a room in the upper right corner of the building. Check the topright corner behind the Jail Door for a ![]() TinyMedal /
TinyMedal / ![]() Small Medal.
Small Medal.
It turns out that you can exit the shop, walk around the left side, and along the top. Walk to the right side of the building and drop down into the wall, and you will access the room that you could see. The man inside will welcome you as Papagatero. From there, you can access a stairwell in the back of the shop below. Upstairs, you will find a family resting by a fire behind a locked door. You can speak to the family members. One of the little boys is Popota. He was given a Water Blaster by Papagatero, and he will give the Water Blaster (In Remakes he won't give the Water Blaster to you, but instead want you to have the Ortega's Helmet. Go downstairs and the man by the counter will give ![]() Ortega
Ortega ![]() /
/ ![]() Ortega's Helmet to you. This Helmet can only be worn by the Hero and is the third strongest Helmet in the game.) to you because you remind him so much of Papagatero. The man by the fire will confirm that Papagatero was indeed your father Ortega, and he mentions that Ortega regretted leaving his/her son/daughter behind. Check both pots for
Ortega's Helmet to you. This Helmet can only be worn by the Hero and is the third strongest Helmet in the game.) to you because you remind him so much of Papagatero. The man by the fire will confirm that Papagatero was indeed your father Ortega, and he mentions that Ortega regretted leaving his/her son/daughter behind. Check both pots for ![]() TinyMedal /
TinyMedal / ![]() Small Medal and
Small Medal and ![]() Token /
Token / ![]() Pachisi Ticket.
Pachisi Ticket.
The Water Blaster can't actually be used as equipment, it's simply an item that you can hold for sentimental reasons because it belonged to your father. You can walk up to people and use the Water Blaster on them, and squirt innocent victims for comedic effect, but it has no other purpose beyond that, and is best kept in the vault. You'll learn nothing else about the world or your father, even at night, but you can grab some more Treasure in the town. Check the cross in the Church for a ![]() LifeAcorn /
LifeAcorn / ![]() Life Nut. The dresser by the Inn have a
Life Nut. The dresser by the Inn have a ![]() Kilt
Kilt ![]() /
/ ![]() Leather Kilt.
Leather Kilt.
