From StrategyWiki, the video game walkthrough and strategy guide wiki
Jump to navigation Jump to search
m (& further reading links externally. are we cool with that?)
 
(18 intermediate revisions by 16 users not shown)
Line 1: Line 1:
{{Header Nav|game=Mount&Blade}}
The dislike chart would seem to suggest the following combinations are possible without any dislikes and that it's possible to mix and match the tops with the bottoms without any dislikes.
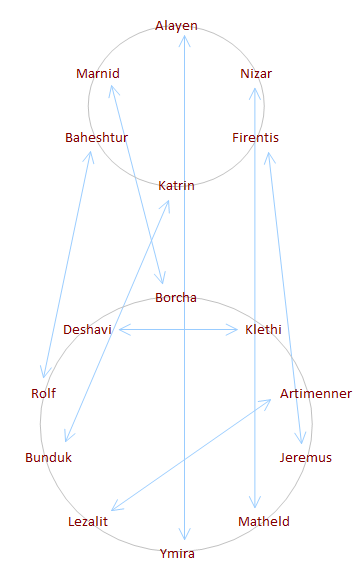

[[Image:MB_Companions.gif|frame|Each companion dislikes the companions on either side of them (Example: Borcha dislikes Deshavi and Klethi). If you wish to maximize your number of companions, you can choose 2-3 from the top circle and 4-5 from the bottom circle that are not touching.]]
[[File:MB Companions.png|frame|Each companion dislikes the companions on either side of them (Example: Borcha dislikes Deshavi and Klethi). If you wish to maximize your number of companions, you can choose 3 from the top circle and 5 from the bottom circle that are not touching.]]
 
This chart is more concise than [[Mount&Blade/Companion_Comparison|Companion Comparison]] and is meant to better show only the relevant information for making a companion build
 
{|{{prettytable}}
! colspan="4" | Companion !! colspan="3" | Attributes !! colspan="1" | Personal skills !! colspan="10" | Party skills
|-
!Companion!!Likes!!Dislikes!!Level!!Agility!!Intelligence!!Charisma!!Trainer!!Looting!!Tracking!!Tactics!!Path-finding!!Spotting!!Wound Treatment!!Surgery!!First Aid!!Engineer!!Trade
|-
|colspan="7" | ||Int||Agi||Int||Int||Int||Int||Int||Int||Int||Int||Cha
|-
|[[Mount&Blade/Alayen|Alayen]]||[[Mount&Blade/Ymira|Ymira]]||[[Mount&Blade/Marnid|Marnid]], [[Mount&Blade/Nizar|Nizar]], failing quests||2
||8||7||8
||0
||0||0||1||0||0||0||0||0||0||0
|-
|[[Mount&Blade/Nizar|Nizar]]||[[Mount&Blade/Matheld|Matheld]], winning against tough odds||[[Mount&Blade/Alayen|Alayen]], [[Mount&Blade/Firentis|Firentis]]||2
||7||12||8
||0
||0||0||0||0||0||0||0||0||0||0
|-
|[[Mount&Blade/Firentis|Firentis]]||[[Mount&Blade/Jeremus|Jeremus]]||[[Mount&Blade/Nizar|Nizar]], [[Mount&Blade/Katrin|Katrin]], robbing villages, failing quests, too much fighting||6
||12||10||5
||1
||0||0||0||0||0||0||0||0||0||0
|-
|[[Mount&Blade/Katrin|Katrin]]||[[Mount&Blade/Bunduk|Bunduk]]||[[Mount&Blade/Firentis|Firentis]], [[Mount&Blade/Baheshtur|Baheshtur]], hunger, not being paid||8
||11||10||10
||0
||0||0||0||0||0||2||0||1||0||3
|-
|[[Mount&Blade/Baheshtur|Baheshtur]]||[[Mount&Blade/Rolf|Rolf]]||[[Mount&Blade/Katrin|Katrin]], [[Mount&Blade/Marnid|Marnid]], hunger, not being paid, fleeing battle, heavy casualties||5
||9||12||7
||0
||0||0||0||0||0||0||0||0||0||0
|-
|[[Mount&Blade/Marnid|Marnid]]||[[Mount&Blade/Borcha|Borcha]]||[[Mount&Blade/Baheshtur|Baheshtur]], [[Mount&Blade/Alayen|Alayen]], failing quests, robbing villages, raiding caravans, returning unwilling serfs to their village||1
||7||11||6
||0
||0||0||0||0||0||1||0||1||0||3
|}
 
 
{|{{prettytable}}
! colspan="4" | Companion !! colspan="3" | Attributes !! colspan="1" | Personal skills !! colspan="10" | Party skills
|-
!Companion!!Likes!!Dislikes!!Level!!Agility!!Intelligence!!Charisma!!Trainer!!Looting!!Tracking!!Tactics!!Path-finding!!Spotting!!Wound Treatment!!Surgery!!First Aid!!Engineer!!Trade
|-
|colspan="7" | ||Int||Agi||Int||Int||Int||Int||Int||Int||Int||Int||Cha
|-
|[[Mount&Blade/Borcha|Borcha]]||[[Mount&Blade/Marnid|Marnid]]||[[Mount&Blade/Deshavi|Deshavi]], [[Mount&Blade/Klethi|Klethi]], heavy losses||3
||7||12||7
||0
||0||3||0||3||2||0||0||0||0||0
|-
|[[Mount&Blade/Klethi|Klethi]]||[[Mount&Blade/Deshavi|Deshavi]], looting villages||[[Mount&Blade/Borcha|Borcha]], [[Mount&Blade/Artimenner|Artimenner]], fleeing battle||2
||11||8||7
||0
||0||2||0||2||2||0||0||0||0||0
|-
|[[Mount&Blade/Artimenner|Artimenner]]||[[Mount&Blade/Lezalit|Lezalit]]||[[Mount&Blade/Klethi|Klethi]], [[Mount&Blade/Jeremus|Jeremus]], hunger, failing quests, heavy casualties||7
||9||12||8
||0
||0||1||2||0||1||0||0||0||4||3
|-
|[[Mount&Blade/Jeremus|Jeremus]]||[[Mount&Blade/Firentis|Firentis]]||[[Mount&Blade/Artimenner|Artimenner]], [[Mount&Blade/Matheld|Matheld]], robbing villages, too much fighting, returning unwilling serfs to their village||4
||7||13||7
||0
||0||0||0||0||0||3||4||3||0||3
|-
|[[Mount&Blade/Matheld|Matheld]]||[[Mount&Blade/Nizar|Nizar]]||[[Mount&Blade/Jeremus|Jeremus]], [[Mount&Blade/Ymira|Ymira]], fleeing battle||7
||10||9||10
||0
||0||0||1||0||0||0||0||0||0||0
|-
|[[Mount&Blade/Ymira|Ymira]]||[[Mount&Blade/Alayen|Alayen]]||[[Mount&Blade/Matheld|Matheld]], [[Mount&Blade/Lezalit|Lezalit]], robbing villages, leaving troops to cover retreat||1
||9||11||6
||0
||0||0||0||0||0||1||1||3||0||3
|-
|[[Mount&Blade/Lezalit|Lezalit]]||[[Mount&Blade/Artimenner|Artimenner]]||[[Mount&Blade/Ymira|Ymira]], [[Mount&Blade/Bunduk|Bunduk]], hunger||5
||8||11||8
||4
||0||0||0||0||0||0||0||0||0||0
|-
|[[Mount&Blade/Bunduk|Bunduk]]||[[Mount&Blade/Katrin|Katrin]]||[[Mount&Blade/Lezalit|Lezalit]], [[Mount&Blade/Rolf|Rolf]], robbing villages, heavy casualties||9
||8||9||11
||2
||0||0||1||0||0||0||0||2||0||0
|-
|[[Mount&Blade/Rolf|Rolf]]||[[Mount&Blade/Baheshtur|Baheshtur]], failing quests||[[Mount&Blade/Bunduk|Bunduk]], [[Mount&Blade/Deshavi|Deshavi]], fleeing battle||10
||9||13||10
||0
||0||0||2||0||0||0||1||1||0||0
|-
|[[Mount&Blade/Deshavi|Deshavi]]||[[Mount&Blade/Klethi|Klethi]]||[[Mount&Blade/Rolf|Rolf]], [[Mount&Blade/Borcha|Borcha]], hunger, heavy casualties||2
||9||10||6
||0
||0||2||0||3||3||0||0||0||0||0
|}
 
== Builds ==
The dislike chart would seem to suggest the following combinations are possible without any dislikes. and that it's possible to mix and match the tops with the bottoms without any dislikes.


Top 1:
Top 1:
*Alayen
*[[Mount&Blade/Alayen|Alayen]]
*Firentis
*[[Mount&Blade/Firentis|Firentis]]
*Baheshtur
*[[Mount&Blade/Baheshtur|Baheshtur]]


Top 2:
Top 2:
*Nizar
*[[Mount&Blade/Nizar|Nizar]]
*Katrin
*[[Mount&Blade/Katrin|Katrin]]
*Marnid
*[[Mount&Blade/Marnid|Marnid]]


Bottom 1:
Bottom 1:
*Borcha
*[[Mount&Blade/Borcha|Borcha]]
*Artimenner
*[[Mount&Blade/Artimenner|Artimenner]]
*Matheld
*[[Mount&Blade/Matheld|Matheld]]
*Lezalit
*[[Mount&Blade/Lezalit|Lezalit]]
*Rolf
*[[Mount&Blade/Rolf|Rolf]]


Bottom 2:
Bottom 2:
*Klethi
*[[Mount&Blade/Klethi|Klethi]]
*Jeremus
*[[Mount&Blade/Jeremus|Jeremus]]
*Ymira
*[[Mount&Blade/Ymira|Ymira]]
*Bunduk
*[[Mount&Blade/Bunduk|Bunduk]]
*Dashavi
*[[Mount&Blade/Deshavi|Deshavi]]


It is possible to keep two people who dislike each other and not have them leave. Balance the dislike out with someone they like and keep morale high.


Some forum posts seem to suggest that it's possible to even keep all 16 if one manages morale. Keep the morale around 80-99, don't lose and keep them stuffed with food. don't raid villages and raid caravans only when marrid isn't around.
Some forum posts seem to suggest that it's possible to even keep all 16 if one manages morale. Keep the morale around 80-99, don't lose, and keep them stuffed with food. Do not rob villages. Raid caravans only when Marnid isn't around.


http://forums.taleworlds.net/index.php/topic,36781.0.html
There is an idea of having two 8 members companions. One traveling for a battle, when the other is healing in castle.


http://forums.taleworlds.net/index.php/topic,39689.15.html
It is possible to have a 10 heroes party with everyone getting 1 "like" and 1 "dislike" or none of each, so it should be easier to maintain them all in the party:


http://forums.taleworlds.net/index.php/topic,52760.0.html
Alayen, Artimenner, Baheshtur, Borcha, Bunduk, Katrin, Matheld, Nizar, Rolf, Ymira.


==See also==
For a comparison of the different companions' skills and abilities see [[Mount&Blade/Companion Comparison|Here]]
[[Mount&Blade/Companions|Companions]]


[[Mount&Blade/Companion_Comparison|Companion Comparison]]
Further reading:
* [http://forums.taleworlds.com/index.php/topic,36781.0.html NPC Interaction guide]
* [http://forums.taleworlds.com/index.php/topic,39689.15.html Game Characters (Manrid, Borcha etc..) are too whiny and want to leave too often]
* [http://forums.taleworlds.com/index.php/topic,52760.0.html Topic: Best companions for battle?]


{{Footer Nav|game=Mount&Blade}}

Latest revision as of 17:16, 8 July 2022

The dislike chart would seem to suggest the following combinations are possible without any dislikes and that it's possible to mix and match the tops with the bottoms without any dislikes.

Each companion dislikes the companions on either side of them (Example: Borcha dislikes Deshavi and Klethi). If you wish to maximize your number of companions, you can choose 3 from the top circle and 5 from the bottom circle that are not touching.

Top 1:

Top 2:

Bottom 1:

Bottom 2:

It is possible to keep two people who dislike each other and not have them leave. Balance the dislike out with someone they like and keep morale high.

Some forum posts seem to suggest that it's possible to even keep all 16 if one manages morale. Keep the morale around 80-99, don't lose, and keep them stuffed with food. Do not rob villages. Raid caravans only when Marnid isn't around.

There is an idea of having two 8 members companions. One traveling for a battle, when the other is healing in castle.

It is possible to have a 10 heroes party with everyone getting 1 "like" and 1 "dislike" or none of each, so it should be easier to maintain them all in the party:

Alayen, Artimenner, Baheshtur, Borcha, Bunduk, Katrin, Matheld, Nizar, Rolf, Ymira.

For a comparison of the different companions' skills and abilities see Here

Further reading: