m (added siege tower screenshot) |
(significant improvements and corrections) |
||
| Line 1: | Line 1: | ||
{{Header Nav|game=Mount&Blade}} | {{Header Nav|game=Mount&Blade}} | ||
[[Image:Mount&Blade siege tower.jpg|thumb|A siege tower in use.]] | [[Image:Mount&Blade siege tower.jpg|thumb|A siege tower in use.]] | ||
When you | When you visit a castle belonging to an enemy of your faction you have the option of besieging it; note that you cannot besiege castles owned by factions that your faction is not at war with, even if you reduce your personal reputation with that faction to the point where they are at war with your party. | ||
When you choose to besiege a castle you will see how much food they have left (and how many days the food can last for), and also what sort of equipment you need to besiege it. Ladders take only a few hours to build, but a siege tower may take several days. Increasing your [[Mount&Blade/Skills#Engineer|Engineer]] skill will lower the construction time of both types of equipment. On the battle map itself there will also be some trebuchets, but these are merely decorative and cannot be fired. | |||
If | If some NPC leaders are waiting at the castle when you besiege it there is a chance that one or more of them will decide to leave, in which case you will be attacked; unlike the castle siege itself, this will be a traditional plains battle. If you attack the castle while enemy heroes are still inside their forces will be added to the castle's already sizeable garrison, so you may like to wait until some of the heroes have left before attacking the castle itself. | ||
== | ==Starving them out== | ||
As well as attacking directly you also have the option of waiting to starve them out. Before attempting this, completely fill your inventory with food items, ideally picking ones that have quantity values of 50/50. Depending on the size of your army your food supplies may still run down quicker than those of the defenders. When this happens you will need to go get some food, but if you spend too long away from the castle the defenders will dismantle your siege equipment and you will have to build them again. Even if this happens their food supplies will still be depleted until they get a chance to replenish them, but you should still try to keep the attack as uninterrupted as possible to prevent their supplies increasing. | |||
When the defenders are all defeated you will take the castle (any enemy heroes present will escape) | ==Attacking the castle== | ||
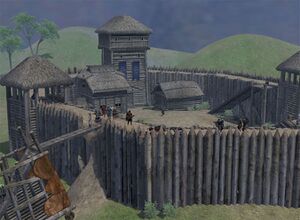
Before actually leading the attack you will want to rearrange your forces (see [[Mount&Blade/Party management|Party management]]); generally speaking you should arrange your men in order of how effective they are as ground troops (mounted troops will spawn without their horses). When you attack the castle you will have to make your way up the ladder or siege tower while braving the enemy's shafts. At the top will be a group of four or more defenders (generally archers); if you just lead your infantry straight up you may take some losses, so if you have archers of your own you should get them to kill or weaken these defenders before you let your infantry go up the ramp. | |||
There will also be one or more archers in each of the side tower areas, but since they are secluded and can't be aided by newly-spawned enemies they shouldn't be too much trouble. The remainder of the defenders will be in the castle compound. It may take your troops some time to work their way up the ramp and down the stairs, especially if they are newly spawned. New enemies will always spawn just in front of the keep's door, so you will probably want to set that as a gathering point (with {{kbd|F1}}). There will usually be a few archers on the far wall (the one you didn't climb up on) so you will want to head up there after the initial group in the courtyard is under control. Unlike normal battles (where the "round" will eventually end depending on the enemy's forces and your battle size setting) enemies will keep spawning in front of the doorway until all of the defenders' combined forces are defeated. | |||
==Aftermath== | |||
When the defenders surrender or are all defeated you will take the castle (any enemy heroes present will escape) along with the usual payment of gold and experience, and you will be given a menu with the usual exploration options. After you take the castle it will become the property of your faction along with its nearby village (if there is one). After a few hours or days the king will assign the castle and its village to his vassals, possibly giving one to you (see [[Mount&Blade/Fiefs|Fiefs]]). From the castle menu you can also specifically ask to be given this property, although you may not be successful. | |||
Revision as of 22:17, 14 October 2007

When you visit a castle belonging to an enemy of your faction you have the option of besieging it; note that you cannot besiege castles owned by factions that your faction is not at war with, even if you reduce your personal reputation with that faction to the point where they are at war with your party.
When you choose to besiege a castle you will see how much food they have left (and how many days the food can last for), and also what sort of equipment you need to besiege it. Ladders take only a few hours to build, but a siege tower may take several days. Increasing your Engineer skill will lower the construction time of both types of equipment. On the battle map itself there will also be some trebuchets, but these are merely decorative and cannot be fired.
If some NPC leaders are waiting at the castle when you besiege it there is a chance that one or more of them will decide to leave, in which case you will be attacked; unlike the castle siege itself, this will be a traditional plains battle. If you attack the castle while enemy heroes are still inside their forces will be added to the castle's already sizeable garrison, so you may like to wait until some of the heroes have left before attacking the castle itself.
Starving them out
As well as attacking directly you also have the option of waiting to starve them out. Before attempting this, completely fill your inventory with food items, ideally picking ones that have quantity values of 50/50. Depending on the size of your army your food supplies may still run down quicker than those of the defenders. When this happens you will need to go get some food, but if you spend too long away from the castle the defenders will dismantle your siege equipment and you will have to build them again. Even if this happens their food supplies will still be depleted until they get a chance to replenish them, but you should still try to keep the attack as uninterrupted as possible to prevent their supplies increasing.
Attacking the castle
Before actually leading the attack you will want to rearrange your forces (see Party management); generally speaking you should arrange your men in order of how effective they are as ground troops (mounted troops will spawn without their horses). When you attack the castle you will have to make your way up the ladder or siege tower while braving the enemy's shafts. At the top will be a group of four or more defenders (generally archers); if you just lead your infantry straight up you may take some losses, so if you have archers of your own you should get them to kill or weaken these defenders before you let your infantry go up the ramp.
There will also be one or more archers in each of the side tower areas, but since they are secluded and can't be aided by newly-spawned enemies they shouldn't be too much trouble. The remainder of the defenders will be in the castle compound. It may take your troops some time to work their way up the ramp and down the stairs, especially if they are newly spawned. New enemies will always spawn just in front of the keep's door, so you will probably want to set that as a gathering point (with ). There will usually be a few archers on the far wall (the one you didn't climb up on) so you will want to head up there after the initial group in the courtyard is under control. Unlike normal battles (where the "round" will eventually end depending on the enemy's forces and your battle size setting) enemies will keep spawning in front of the doorway until all of the defenders' combined forces are defeated.
Aftermath
When the defenders surrender or are all defeated you will take the castle (any enemy heroes present will escape) along with the usual payment of gold and experience, and you will be given a menu with the usual exploration options. After you take the castle it will become the property of your faction along with its nearby village (if there is one). After a few hours or days the king will assign the castle and its village to his vassals, possibly giving one to you (see Fiefs). From the castle menu you can also specifically ask to be given this property, although you may not be successful.
