(This took much less time.) |
|||
| (30 intermediate revisions by 22 users not shown) | |||
| Line 1: | Line 1: | ||
{{ | {{Header Nav|game=Pokémon Red and Blue}} | ||
{| {{ | |||
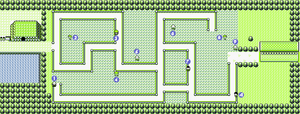
| | After you pull the plug on Lt. Surge, the next place to go is Lavender Town. The quickest way is through Routes 11 and 12. Unfortunately, a Snorlax blocks Route 11, but you should still go as far as the lookout station, where you'll meet up with one of Professor Oak's aides. After you've talked with him, turn around and head toward Diglett's Cave. | ||
[[File:Pokemon RBY Route 11.png|left|thumb|300px|Route 11]] | |||
{{-}} | |||
| | |||
| | == A Snorlax in the way == | ||
This area is entirely optional, since you can just use Diglett's Cave to cross back to Route 2 to get '''HM05''' which contains '''Flash''', a move you would need for [[Pokémon Red and Blue/Rock Tunnel|Rock Tunnel]] to light up the cave there so it helps you to navigate in there. But you might want to stop by to get yourself a {{bp|Drowzee}}. Probably not the best Psychic-type Pokémon around but its still pretty good to pick up if you need a Psychic type on your team. There are about ten trainers here, so you can also maybe take down some of the Gamblers for the massive amounts of cash they keep on hand. It's also a good place to catch up on your Pokémon's levels. | |||
Checking the lone bush that a Youngster (marked on the map as Trainer #8) is facing will yield an '''Escape Rope'''. | |||
The guard house to the east is open, but a sleeping {{bp|Snorlax}} is blocking the path. You can go upstairs where you can get the '''Itemfinder''' from one of Professor Oak's aides if you have 30 or more Pokémon. That does mean individual species - check the "owned" number on your pokedex. You can also trade a {{bp|Nidorino}} for a {{bp|Nidorina}} in Red/Blue or a {{bp|Lickitung}} for a {{bp|Dugtrio}} in Yellow. | |||
==Trainers== | |||
{{ContentBoxContainer}} | |||
{{Pokemon/Trainer|RB}} | |||
{{Pokemon/Trainer row|RB|Gambler||1260}} | |||
{{Pokemon/Trainer mon|RB|060|18}} | |||
{{Pokemon/Trainer mon|RB|116|18}} | |||
{{Pokemon/Trainer row|RB|Youngster||315}} | |||
{{Pokemon/Trainer mon|RB|023|21}} | |||
{{Pokemon/Trainer row|RB|Youngster||285}} | |||
{{Pokemon/Trainer mon|RB|027|19}} | |||
{{Pokemon/Trainer mon|RB|041|19}} | |||
{{Pokemon/Trainer row|RB|Youngster||270}} | |||
{{Pokemon/Trainer mon|RB|032|18}} | |||
{{Pokemon/Trainer mon|RB|033|18}} | |||
{{Pokemon/Trainer row|RB|Gambler||1260}} | |||
{{Pokemon/Trainer mon|RB|069|18}} | |||
{{Pokemon/Trainer mon|RB|043|18}} | |||
{{Pokemon/Trainer row|RB|Gambler||1260}} | |||
{{Pokemon/Trainer mon|RB|058|18}} | |||
{{Pokemon/Trainer mon|RB|037|18}} | |||
{{Pokemon/Trainer row|RB|Engineer||1050}} | |||
{{Pokemon/Trainer mon|RB|081|21}} | |||
{{Pokemon/Trainer row|RB|Youngster||255}} | |||
{{Pokemon/Trainer mon|RB|019|17}} | |||
{{Pokemon/Trainer mon|RB|019|17}} | |||
{{Pokemon/Trainer mon|RB|020|17}} | |||
{{Pokemon/Trainer row|RB|Gambler||1260}} | |||
{{Pokemon/Trainer mon|RB|100|18}} | |||
{{Pokemon/Trainer mon|RB|081|18}} | |||
{{Pokemon/Trainer row|RB|Engineer||900}} | |||
{{Pokemon/Trainer mon|RB|081|18}} | |||
{{Pokemon/Trainer mon|RB|081|18}} | |||
{{Pokemon/Trainer mon|RB|082|18}} | |||
|} | |} | ||
{{Pokemon/Trainer|YEL}} | |||
{{Pokemon/Trainer row|YEL|Gambler||1260}} | |||
{| {{ | {{Pokemon/Trainer mon|YEL|060|18}} | ||
| | {{Pokemon/Trainer mon|YEL|116|18}} | ||
| | {{Pokemon/Trainer row|YEL|Youngster||315}} | ||
| | {{Pokemon/Trainer mon|YEL|023|21}} | ||
| | {{Pokemon/Trainer row|YEL|Youngster||285}} | ||
| | {{Pokemon/Trainer mon|YEL|027|19}} | ||
| | {{Pokemon/Trainer mon|YEL|041|19}} | ||
| | {{Pokemon/Trainer row|YEL|Youngster||270}} | ||
| | {{Pokemon/Trainer mon|YEL|032|18}} | ||
| | {{Pokemon/Trainer mon|YEL|033|18}} | ||
| | {{Pokemon/Trainer row|YEL|Gambler||1260}} | ||
| | {{Pokemon/Trainer mon|YEL|069|18}} | ||
| | {{Pokemon/Trainer mon|YEL|043|18}} | ||
| | {{Pokemon/Trainer row|YEL|Gambler||1260}} | ||
| | {{Pokemon/Trainer mon|YEL|058|18}} | ||
| | {{Pokemon/Trainer mon|YEL|037|18}} | ||
| | {{Pokemon/Trainer row|YEL|Engineer||1050}} | ||
| | {{Pokemon/Trainer mon|YEL|081|21}} | ||
| | {{Pokemon/Trainer row|YEL|Youngster||255}} | ||
| | {{Pokemon/Trainer mon|YEL|019|17}} | ||
| | {{Pokemon/Trainer mon|YEL|019|17}} | ||
| | {{Pokemon/Trainer mon|YEL|020|17}} | ||
| | {{Pokemon/Trainer row|YEL|Gambler||1260}} | ||
| | {{Pokemon/Trainer mon|YEL|100|18}} | ||
| | {{Pokemon/Trainer mon|YEL|081|18}} | ||
| | {{Pokemon/Trainer row|YEL|Engineer||900}} | ||
| | {{Pokemon/Trainer mon|YEL|081|18}} | ||
| | {{Pokemon/Trainer mon|YEL|081|18}} | ||
| | {{Pokemon/Trainer mon|YEL|082|18}} | ||
| | |||
| | |||
| | |||
| | |||
| | |||
| | |||
| | |||
| | |||
| | |||
| | |||
| | |||
| | |||
|} | |} | ||
</div> | |||
==Pokémon found== | |||
{{ContentBoxContainer}} | |||
{{Pokemon/Wild|RED}} | |||
{{Pokemon/Wild row|RB||021|13,15,17|35|bp=1}} | |||
{{Pokemon/Wild row|RB||023|12,14,15|40|bp=1}} | |||
{{Pokemon/Wild row|RB||096|9,11,13,15|25|bp=1}} | |||
| | {{Pokemon/Wild row}} | ||
| | |||
| | |||
| | |||
| | |||
| | |||
|} | |} | ||
{ | {{Pokemon/Wild|BLU}} | ||
| | {{Pokemon/Wild row|RB||021|13,15,17|35|bp=1}} | ||
{{Pokemon/Wild row|RB||027|12,14,15|40|bp=1}} | |||
| | {{Pokemon/Wild row|RB||096|9,11,13,15|25|bp=1}} | ||
| | {{Pokemon/Wild row}} | ||
| | |||
| | |||
| | |||
|} | |} | ||
{{ | {{Pokemon/Wild|YEL}} | ||
== | {{Pokemon/Wild row|YEL||016|16,18|40|bp=1}} | ||
{| {{ | {{Pokemon/Wild row|YEL||017|18,20|10|bp=1}} | ||
{{Pokemon/Wild row|YEL||019|15,17|25|bp=1}} | |||
| | {{Pokemon/Wild row|YEL||020|17|1|bp=1}} | ||
| | {{Pokemon/Wild row|YEL||096|15,17|24}} | ||
|} | |} | ||
< | </div> | ||
==New Pokémon== | |||
{{ContentBoxContainer}} | |||
{{Footer Nav|game=Pokémon Red and Blue| | {{Pokemon/New|title=#96 Drowzee|contents={{PokePic|Drowzee|left}} | ||
Drowzees are great. They're reasonably sturdy and their Special is high. Like many Psychic-type Pokémon, they can learn Psychic (a very powerful Psychic-type move especially with STAB that also has a 30% chance of lowering a target's special stat), along with a couple of status moves, and they really don't need much else despite their decent movepool. The problem is that the Abra evolution family such as Kadabra and Alakazam has even better Special and has much better Speed but with a drawback of poor defenses. The choice is yours - a fast glass cannon or a sturdy support Pokémon? | |||
}} | |||
</div> | |||
{{Footer Nav|game=Pokémon Red and Blue|prevpage=S.S. Anne|nextpage=Diglett's Cave}} | |||
Revision as of 01:11, 18 April 2024
After you pull the plug on Lt. Surge, the next place to go is Lavender Town. The quickest way is through Routes 11 and 12. Unfortunately, a Snorlax blocks Route 11, but you should still go as far as the lookout station, where you'll meet up with one of Professor Oak's aides. After you've talked with him, turn around and head toward Diglett's Cave.

A Snorlax in the way
This area is entirely optional, since you can just use Diglett's Cave to cross back to Route 2 to get HM05 which contains Flash, a move you would need for Rock Tunnel to light up the cave there so it helps you to navigate in there. But you might want to stop by to get yourself a Drowzee. Probably not the best Psychic-type Pokémon around but its still pretty good to pick up if you need a Psychic type on your team. There are about ten trainers here, so you can also maybe take down some of the Gamblers for the massive amounts of cash they keep on hand. It's also a good place to catch up on your Pokémon's levels.
Checking the lone bush that a Youngster (marked on the map as Trainer #8) is facing will yield an Escape Rope.
The guard house to the east is open, but a sleeping Snorlax is blocking the path. You can go upstairs where you can get the Itemfinder from one of Professor Oak's aides if you have 30 or more Pokémon. That does mean individual species - check the "owned" number on your pokedex. You can also trade a Nidorino for a Nidorina in Red/Blue or a Lickitung for a Dugtrio in Yellow.
Trainers
Pokémon found
| Red | |||||||||||
|---|---|---|---|---|---|---|---|---|---|---|---|
| Pokémon | Level | Rate | |||||||||
| Spearow | 13,15,17 | 35% | |||||||||
| Ekans | 12,14,15 | 40% | |||||||||
| Drowzee | 9,11,13,15 | 25% | |||||||||
| Blue | |||||||||||
|---|---|---|---|---|---|---|---|---|---|---|---|
| Pokémon | Level | Rate | |||||||||
| Spearow | 13,15,17 | 35% | |||||||||
| Sandshrew | 12,14,15 | 40% | |||||||||
| Drowzee | 9,11,13,15 | 25% | |||||||||
| Yellow | |||
|---|---|---|---|
| Pokémon | Level | Rate | |
| Pidgey | 16,18 | 40% | |
| Pidgeotto | 18,20 | 10% | |
| Rattata | 15,17 | 25% | |
| Raticate | 17 | 1% | |
| Drowzee | 15,17 | 24% | |
New Pokémon

Drowzees are great. They're reasonably sturdy and their Special is high. Like many Psychic-type Pokémon, they can learn Psychic (a very powerful Psychic-type move especially with STAB that also has a 30% chance of lowering a target's special stat), along with a couple of status moves, and they really don't need much else despite their decent movepool. The problem is that the Abra evolution family such as Kadabra and Alakazam has even better Special and has much better Speed but with a drawback of poor defenses. The choice is yours - a fast glass cannon or a sturdy support Pokémon?


