Andrewm1234 (talk | contribs) (Correctly color-coded info boxes to correspond to their applicable game versions.) |
|||
| (10 intermediate revisions by 8 users not shown) | |||
| Line 1: | Line 1: | ||
{{Header Nav|game=Pokémon Red and Blue}} | {{Header Nav|game=Pokémon Red and Blue}} | ||
Using Cut, chop your way to Route 9 from Cerulean City. Check into the Pokémon Center near the entrance to the Rock Tunnel in the North end of Route #10, then plunge into the underground passage. It emerges on the South end of Route 10, a very short route to your next destination, Lavender Town. This might seem like a roundabout way to get there — but it's the only way at this point of the game. | |||
==Route 9== | |||
[[File:Pokemon RBY Route 9.png|thumb|400px|Route 9]] | |||
{| {{prettytable|float=right|style=font-size:smaller}} | |||
|+Trainers | |||
|style="background:#c080ff"|'''1'''||style="background:#c080ff"|Jr. Trainer♀ | |||
[[ | |||
{|{{prettytable| | |||
| | |||
|style="background:#c080ff"|'''1'''||style="background:#c080ff"|Jr. Trainer♀ | |||
|- | |- | ||
|style=" | |style="background:#c080ff"|'''2'''||style="background:#c080ff"|Hiker | ||
|- | |- | ||
|style="background:# | |style="background:#8000ff"|'''3'''||style="background:#8000ff"|Jr. Trainer♂ | ||
|- | |- | ||
|style="background: | |style="background:yellow"|'''3'''||style="background:yellow"|Youngster | ||
|- | |- | ||
|style=" | |style="background:#c080ff"|'''4'''||style="background:#c080ff"|Bug Catcher | ||
|- | |- | ||
|style="background:#c080ff"|A | |style="background:#c080ff"|A | ||
|TM 30 | |||
|- | |- | ||
|style="background:#c080ff"|''' | |style="background:#c080ff"|'''5'''||style="background:#c080ff"|Bug Catcher | ||
|- | |- | ||
|style="background:#c080ff"| || | |style="background:#c080ff"|'''6'''||style="background:#c080ff"|Jr. Trainer♂ | ||
|- | |- | ||
|style=" | |style="background:#c080ff"|'''7'''||style="background:#c080ff"|Hiker | ||
|- | |- | ||
|style="background:#c080ff"|'''8'''||style="background:#c080ff"|Hiker | |style="background:#c080ff"|'''8'''||style="background:#c080ff"|Hiker | ||
|- | |- | ||
|style="background:#c080ff"|'''9'''||style="background:#c080ff"|Jr. Trainer♀ | |||
|style="background:#c080ff"|'''9'''||style="background:#c080ff"|Jr. Trainer♀ | |||
|} | |} | ||
The trainers here are abundant, but many of them can be avoided (only need to battle two) | |||
Above Trainer #1 on Route 9 is a ledge with a tree on the right side. You'll have to go around to reach the tree, but examining it will net you an '''Ether'''. | |||
To the left of Trainer #2, there is '''TM30'''. The TM contains '''Teleport''', which allows you to escape from wild Pokémon battles; the move always fails to work in trainer battles. It can also be used outside of battle, where you can warp to the last place you healed (which can be a Pokémon Center or the player's house). | |||
{{-}} | {{-}} | ||
{| {{ | |||
| | ===Trainers=== | ||
| | {{ContentBoxContainer}} | ||
| | {{Pokemon/Trainer|RB}} | ||
| | {{Pokemon/Trainer row|RB|Jr. Trainer♀||360}} | ||
| | {{Pokemon/Trainer mon|RB|043|18}} | ||
| | {{Pokemon/Trainer mon|RB|069|18}} | ||
| | {{Pokemon/Trainer mon|RB|043|18}} | ||
| | {{Pokemon/Trainer mon|RB|069|18}} | ||
| | {{Pokemon/Trainer row|RB|Hiker||700}} | ||
| | {{Pokemon/Trainer mon|RB|066|20}} | ||
| | {{Pokemon/Trainer mon|RB|095|20}} | ||
| | {{Pokemon/Trainer row|RB|Jr. Trainer♂||420}} | ||
| | {{Pokemon/Trainer mon|RB|058|21}} | ||
| | {{Pokemon/Trainer mon|RB|004|21}} | ||
| | {{Pokemon/Trainer row|RB|Bug Catcher||190}} | ||
| | {{Pokemon/Trainer mon|RB|015|19}} | ||
| | {{Pokemon/Trainer mon|RB|015|19}} | ||
| | {{Pokemon/Trainer row|RB|Hiker||735}} | ||
| | {{Pokemon/Trainer mon|RB|074|21}} | ||
| | {{Pokemon/Trainer mon|RB|095|21}} | ||
| | {{Pokemon/Trainer row|RB|Bug Catcher||200}} | ||
| | {{Pokemon/Trainer mon|RB|010|20}} | ||
| | {{Pokemon/Trainer mon|RB|013|20}} | ||
| | {{Pokemon/Trainer mon|RB|048|20}} | ||
| | {{Pokemon/Trainer row|RB|Jr. Trainer♂||380}} | ||
| | {{Pokemon/Trainer mon|RB|019|19}} | ||
| | {{Pokemon/Trainer mon|RB|050|19}} | ||
| | {{Pokemon/Trainer mon|RB|023|19}} | ||
| | {{Pokemon/Trainer mon|RB|027|19}} | ||
| | {{Pokemon/Trainer row|RB|Hiker||700}} | ||
| | {{Pokemon/Trainer mon|RB|074|20}} | ||
| | {{Pokemon/Trainer mon|RB|066|20}} | ||
| | {{Pokemon/Trainer mon|RB|074|20}} | ||
| | {{Pokemon/Trainer row|RB|Jr. Trainer♀||460}} | ||
| | {{Pokemon/Trainer mon|RB|052|23}} | ||
| | |} | ||
| | {{Pokemon/Trainer|YEL}} | ||
| | {{Pokemon/Trainer row|YEL|Jr. Trainer♀||360}} | ||
| | {{Pokemon/Trainer mon|YEL|043|18}} | ||
| | {{Pokemon/Trainer mon|YEL|069|18}} | ||
| | {{Pokemon/Trainer mon|YEL|043|18}} | ||
| | {{Pokemon/Trainer mon|YEL|069|18}} | ||
| | {{Pokemon/Trainer row|YEL|Hiker||700}} | ||
| | {{Pokemon/Trainer mon|YEL|066|20}} | ||
| | {{Pokemon/Trainer mon|YEL|095|20}} | ||
| | {{Pokemon/Trainer row|YEL|Youngster||360}} | ||
| | {{Pokemon/Trainer mon|YEL|027|24}} | ||
| | {{Pokemon/Trainer row|YEL|Bug Catcher||190}} | ||
| | {{Pokemon/Trainer mon|YEL|015|19}} | ||
| | {{Pokemon/Trainer mon|YEL|015|19}} | ||
{{Pokemon/Trainer row|YEL|Hiker||735}} | |||
{{Pokemon/Trainer mon|YEL|074|21}} | |||
{{Pokemon/Trainer mon|YEL|095|21}} | |||
{{Pokemon/Trainer row|YEL|Bug Catcher||200}} | |||
{{Pokemon/Trainer mon|YEL|010|20}} | |||
{{Pokemon/Trainer mon|YEL|013|20}} | |||
{{Pokemon/Trainer mon|YEL|048|20}} | |||
{{Pokemon/Trainer row|YEL|Jr. Trainer♂||380}} | |||
{{Pokemon/Trainer mon|YEL|019|19}} | |||
{{Pokemon/Trainer mon|YEL|050|19}} | |||
{{Pokemon/Trainer mon|YEL|023|19}} | |||
{{Pokemon/Trainer mon|YEL|027|19}} | |||
{{Pokemon/Trainer row|YEL|Hiker||700}} | |||
{{Pokemon/Trainer mon|YEL|074|20}} | |||
{{Pokemon/Trainer mon|YEL|066|20}} | |||
{{Pokemon/Trainer mon|YEL|074|20}} | |||
{{Pokemon/Trainer row|YEL|Jr. Trainer♀||460}} | |||
{{Pokemon/Trainer mon|YEL|052|23}} | |||
|} | |||
</div> | |||
===Pokémon found=== | |||
{{ContentBoxContainer}} | |||
{{Pokemon/Wild|RED}} | |||
{{Pokemon/Wild row|RB||019|14,16,17|40|bp=1}} | |||
{{Pokemon/Wild row|RB||021|13,16,17|35|bp=1}} | |||
{{Pokemon/Wild row|RB||023|11,13,15,17|25|bp=1}} | |||
{{Pokemon/Wild row}} | |||
|} | |||
{{Pokemon/Wild|BLU}} | |||
{{Pokemon/Wild row|RB||019|14,16,17|40}} | |||
{{Pokemon/Wild row|RB||021|13,16,17|35}} | |||
{{Pokemon/Wild row|RB||027|11,13,15,17|25|bp=1}} | |||
{{Pokemon/Wild row}} | |||
|} | |||
{{Pokemon/Wild|YEL}} | |||
{{Pokemon/Wild row|YEL||019|18|15}} | |||
{{Pokemon/Wild row|YEL||020|20|4|bp=1}} | |||
{{Pokemon/Wild row|YEL||021|17|10}} | |||
{{Pokemon/Wild row|YEL||022|19|1|bp=1}} | |||
{{Pokemon/Wild row|YEL||029|16,18|35|bp=1}} | |||
{{Pokemon/Wild row|YEL||030|18|5|bp=1}} | |||
{{Pokemon/Wild row|YEL||032|16,18|25|bp=1}} | |||
{{Pokemon/Wild row|YEL||033|18|5|bp=1}} | |||
|} | |} | ||
</div> | |||
== Route 10 == | |||
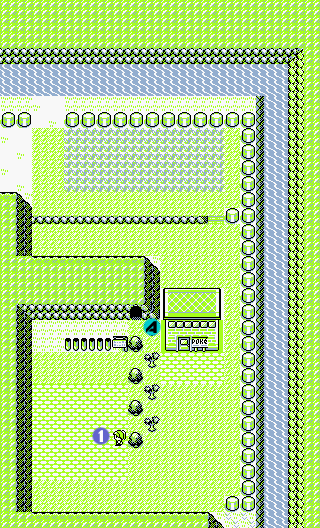
| style= | Before you enter the tunnel, hack aside the top bush and search the rock face above it for a '''Super Potion'''. There is also a Pokémon Center right before the tunnel. | ||
| style=" | |||
| style=" | [[File:Pokemon RBY Route 10 North.png|right|frame|Route 10 (North end)]] | ||
{| {{prettytable|float=right|style=font-size:smaller}} | |||
|+Trainers | |||
|style="background:#c080ff"|'''1'''||style="background:#c080ff"|Jr. Trainer♀ | |||
|- | |- | ||
| style="background: | |style="background:#c080ff"|A | ||
||Super Potion | |||
| | |||
|} | |} | ||
{{-}} | {{-}} | ||
===Trainers=== | |||
{{ContentBoxContainer}} | |||
{{Pokemon/Trainer|RB}} | |||
{{Pokemon/Trainer row|RB|Jr. Trainer♀||400}} | |||
{{Pokemon/Trainer mon|RB|025|20}} | |||
{{Pokemon/Trainer mon|RB|035|20}} | |||
|} | |||
{{Pokemon/Trainer|YEL}} | |||
{{Pokemon/Trainer row|YEL|Jr. Trainer♀||400}} | |||
{{Pokemon/Trainer mon|YEL|039|20}} | |||
{{Pokemon/Trainer mon|YEL|035|20}} | |||
|} | |||
</div> | |||
===Pokémon found=== | |||
{{ | {{ContentBoxContainer}} | ||
{{Pokemon/Wild|RED}} | |||
{| {{ | {{Pokemon/Wild row|RB||021|13,16,17|30|bp=1}} | ||
{{Pokemon/Wild row|RB||023|11,13,15,17|25|bp=1}} | |||
{{Pokemon/Wild row|RB||100|14,16,17|45|bp=1}} | |||
| | {{Pokemon/Wild row}} | ||
| | |} | ||
| | {{Pokemon/Wild|BLU}} | ||
{{Pokemon/Wild row|RB||021|13,16,17|30}} | |||
{{Pokemon/Wild row|RB||027|11,13,15,17|25|bp=1}} | |||
{{Pokemon/Wild row|RB||100|14,16,17|45}} | |||
{{Pokemon/Wild row}} | |||
|} | |||
{{Pokemon/Wild|YEL}} | |||
{{Pokemon/Wild row|YEL||019|18|15|bp=1}} | |||
{{Pokemon/Wild row|YEL||020|20|5|bp=1}} | |||
{{Pokemon/Wild row|YEL||029|17|10|bp=1}} | |||
{{Pokemon/Wild row|YEL||032|17|10|bp=1}} | |||
{{Pokemon/Wild row|YEL||066|16,18|5|bp=1}} | |||
{{Pokemon/Wild row|YEL||081|16, 18, 20, 22|55|bp=1}} | |||
|} | |} | ||
</div> | |||
Return here later with a Good Rod or Super Rod to catch some new Pokémon. | |||
{{ | {{ContentBoxContainer}} | ||
{ | {{Pokemon/Fishing|RB|1|1|1}} | ||
| | {{Pokemon/Fishing row|RB|129|5|100|0|0|bp=1}} | ||
| | {{Pokemon/Fishing row|RB|060|10|0|50|0|bp=1}} | ||
| | {{Pokemon/Fishing row|RB|118|10|0|50|0|bp=1}} | ||
| | {{Pokemon/Fishing row|RB|061|23|0|0|50|bp=1}} | ||
{{Pokemon/Fishing row|RB|079|15|0|0|50|bp=1}} | |||
{{Pokemon/Fishing row}} | |||
| | |||
| | |||
| | |||
| | |||
| | |||
| | |||
| | |||
| | |||
| | |||
| | |||
| | |||
| | |||
| | |||
| | |||
| | |||
|} | |} | ||
{| | {{Pokemon/Fishing|YEL|1|1|1}} | ||
| | {{Pokemon/Fishing row|YEL|129|5|100|0|0}} | ||
| | {{Pokemon/Fishing row|YEL|060|10|0|50|0}} | ||
| | {{Pokemon/Fishing row|YEL|118|10|0|50|0}} | ||
| | {{Pokemon/Fishing row|YEL|098|15,20|0|0|70|bp=1}} | ||
| | {{Pokemon/Fishing row|YEL|099|25|0|0|10|bp=1}} | ||
| | {{Pokemon/Fishing row|YEL|116|10|0|0|20|bp=1}} | ||
| | |||
| | |||
| | |||
| | |||
| | |||
|} | |} | ||
{{Footer Nav|game=Pokémon Red and Blue|prevpage=Diglett's Cave | </div> | ||
==Power Plant== | |||
The [[../Power Plant/]] is visible from Route 10, but you can't reach it just yet. Sometime later, you'll obtain a Hidden Machine that will enable you to use the Surf technique. You'll then be able to travel along the stream that flows past both Route 10 and the Power Plant. Until then, you'll just have to keep your curiosity in check. | |||
==New Pokémon== | |||
{{ContentBoxContainer}} | |||
{{Pokemon/New|title=#100 Voltorb|contents={{PokePic|Voltorb|left}} | |||
Voltorb look bizarrely similar to Poké Balls. Despite being Electric-type Pokémon, they learn no Electric attacks without the aid of TMs. Instead, they learn Normal attacks naturally, including the self-sacrificing Selfdestruct, which does a ton of damage. Once learned, this move should be used in an emergency or if you want to get rid of a opposing Pokémon that's giving you trouble. Probably the worst Electric-type in the game with their mediocre to poor stats other than their amazing speed stat, although its evolved form is the fastest of any Pokémon. | |||
}} | |||
{{Pokemon/New|title=#81 Magnemite|contents={{PokePic|Magnemite|right}} | |||
The Magnemites available in Yellow aren't as fast as their {{bp|Voltorb}} cousins in Red/Blue, but their mix of strong Electric moves and Normal attacks is more versatile than Voltorb's Normal ones, plus with better stats with a high Special and has a good defense. They would be a good option, but you've already got Pikachu. If, however, you wish to not use Pikachu for some reason (probably due to its bad stats), then this is a good second choice. | |||
}} | |||
</div> | |||
{{Footer Nav|game=Pokémon Red and Blue|prevpage=Diglett's Cave|nextpage=Rock Tunnel}} | |||
Latest revision as of 01:47, 18 April 2024
Using Cut, chop your way to Route 9 from Cerulean City. Check into the Pokémon Center near the entrance to the Rock Tunnel in the North end of Route #10, then plunge into the underground passage. It emerges on the South end of Route 10, a very short route to your next destination, Lavender Town. This might seem like a roundabout way to get there — but it's the only way at this point of the game.
Route 9[edit]

| 1 | Jr. Trainer♀ |
| 2 | Hiker |
| 3 | Jr. Trainer♂ |
| 3 | Youngster |
| 4 | Bug Catcher |
| A | TM 30 |
| 5 | Bug Catcher |
| 6 | Jr. Trainer♂ |
| 7 | Hiker |
| 8 | Hiker |
| 9 | Jr. Trainer♀ |
The trainers here are abundant, but many of them can be avoided (only need to battle two)
Above Trainer #1 on Route 9 is a ledge with a tree on the right side. You'll have to go around to reach the tree, but examining it will net you an Ether.
To the left of Trainer #2, there is TM30. The TM contains Teleport, which allows you to escape from wild Pokémon battles; the move always fails to work in trainer battles. It can also be used outside of battle, where you can warp to the last place you healed (which can be a Pokémon Center or the player's house).
Trainers[edit]
Pokémon found[edit]
| Red | |||||||||||
|---|---|---|---|---|---|---|---|---|---|---|---|
| Pokémon | Level | Rate | |||||||||
| Rattata | 14,16,17 | 40% | |||||||||
| Spearow | 13,16,17 | 35% | |||||||||
| Ekans | 11,13,15,17 | 25% | |||||||||
| Blue | |||||||||||
|---|---|---|---|---|---|---|---|---|---|---|---|
| Pokémon | Level | Rate | |||||||||
| Rattata | 14,16,17 | 40% | |||||||||
| Spearow | 13,16,17 | 35% | |||||||||
| Sandshrew | 11,13,15,17 | 25% | |||||||||
| Yellow | |||
|---|---|---|---|
| Pokémon | Level | Rate | |
| Rattata | 18 | 15% | |
| Raticate | 20 | 4% | |
| Spearow | 17 | 10% | |
| Fearow | 19 | 1% | |
| Nidoran♀ | 16,18 | 35% | |
| Nidorina | 18 | 5% | |
| Nidoran♂ | 16,18 | 25% | |
| Nidorino | 18 | 5% | |
Route 10[edit]
Before you enter the tunnel, hack aside the top bush and search the rock face above it for a Super Potion. There is also a Pokémon Center right before the tunnel.

| 1 | Jr. Trainer♀ |
| A | Super Potion |
Trainers[edit]
| Red and Blue | |
|---|---|
| Trainer | Pokemon |
 Jr. Trainer♀ Reward: |
|
| Yellow | |
|---|---|
| Trainer | Pokemon |
 Jr. Trainer♀ Reward: |
|
Pokémon found[edit]
| Red | |||||||||||
|---|---|---|---|---|---|---|---|---|---|---|---|
| Pokémon | Level | Rate | |||||||||
| Spearow | 13,16,17 | 30% | |||||||||
| Ekans | 11,13,15,17 | 25% | |||||||||
| Voltorb | 14,16,17 | 45% | |||||||||
| Blue | |||||||||||
|---|---|---|---|---|---|---|---|---|---|---|---|
| Pokémon | Level | Rate | |||||||||
| Spearow | 13,16,17 | 30% | |||||||||
| Sandshrew | 11,13,15,17 | 25% | |||||||||
| Voltorb | 14,16,17 | 45% | |||||||||
| Yellow | |||
|---|---|---|---|
| Pokémon | Level | Rate | |
| Rattata | 18 | 15% | |
| Raticate | 20 | 5% | |
| Nidoran♀ | 17 | 10% | |
| Nidoran♂ | 17 | 10% | |
| Machop | 16,18 | 5% | |
| Magnemite | 16, 18, 20, 22 | 55% | |
Return here later with a Good Rod or Super Rod to catch some new Pokémon.
| Red and Blue | |||||
|---|---|---|---|---|---|
| Pokémon | Level | Old Rod | Good Rod | Super Rod | |
| Magikarp | 5 | 100% | - | - | |
| Poliwag | 10 | - | 50% | - | |
| Goldeen | 10 | - | 50% | - | |
| Poliwhirl | 23 | - | - | 50% | |
| Slowpoke | 15 | - | - | 50% | |
| Yellow | |||||
|---|---|---|---|---|---|
| Pokémon | Level | Old Rod | Good Rod | Super Rod | |
| Magikarp | 5 | 100% | - | - | |
| Poliwag | 10 | - | 50% | - | |
| Goldeen | 10 | - | 50% | - | |
| Krabby | 15,20 | - | - | 70% | |
| Kingler | 25 | - | - | 10% | |
| Horsea | 10 | - | - | 20% | |
Power Plant[edit]
The Power Plant is visible from Route 10, but you can't reach it just yet. Sometime later, you'll obtain a Hidden Machine that will enable you to use the Surf technique. You'll then be able to travel along the stream that flows past both Route 10 and the Power Plant. Until then, you'll just have to keep your curiosity in check.
New Pokémon[edit]

Voltorb look bizarrely similar to Poké Balls. Despite being Electric-type Pokémon, they learn no Electric attacks without the aid of TMs. Instead, they learn Normal attacks naturally, including the self-sacrificing Selfdestruct, which does a ton of damage. Once learned, this move should be used in an emergency or if you want to get rid of a opposing Pokémon that's giving you trouble. Probably the worst Electric-type in the game with their mediocre to poor stats other than their amazing speed stat, although its evolved form is the fastest of any Pokémon.

The Magnemites available in Yellow aren't as fast as their Voltorb cousins in Red/Blue, but their mix of strong Electric moves and Normal attacks is more versatile than Voltorb's Normal ones, plus with better stats with a high Special and has a good defense. They would be a good option, but you've already got Pikachu. If, however, you wish to not use Pikachu for some reason (probably due to its bad stats), then this is a good second choice.


