SupremeUmanu (talk | contribs) m (Typo fix) |
m (cleanup) |
||
| Line 1: | Line 1: | ||
{{Header Nav|game=Pokémon Red and Blue}} | {{Header Nav|game=Pokémon Red and Blue}} | ||
It turns out that Silph Co. is being forced to produce advanced technology for Team Rocket. You must reach the top floor and free the company President from Giovanni's clutches. If you roust Giovanni, you won't have to defeat the rest of Team Rocket's agents individually. When you need to heal your Pokémon, look for a woman at the bottom-left corner of the ninth floor. | |||
==Silph Co.== | |||
This 11-level building, with 31 trainer battles, only seems difficult. If you know where to go, you can make it to the top and save the president quickly and easily. Then, after scaring Team Rocket away, you can get the items without opposition. | This 11-level building, with 31 trainer battles, only seems difficult. If you know where to go, you can make it to the top and save the president quickly and easily. Then, after scaring Team Rocket away, you can get the items without opposition. | ||
| Line 13: | Line 14: | ||
If you need the experience then fight all the Rockets before heading to Giovanni on the 11th floor as they will disappear after you beat him. | If you need the experience then fight all the Rockets before heading to Giovanni on the 11th floor as they will disappear after you beat him. | ||
==1F== | ===1F=== | ||
[[File:Pokemon RBY Silph Co 1F.png|thumb|Silph Co 1F]] | |||
[[File: | |||
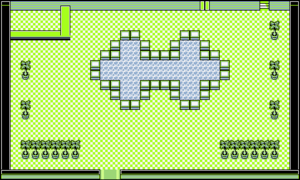
The first floor lobby is eerily empty, so just advance to the stairs in the back. Note that the guard blocking the entrance to the building won't stand aside to let you in until you've cleared Pokémon Tower. | The first floor lobby is eerily empty, so just advance to the stairs in the back. Note that the guard blocking the entrance to the building won't stand aside to let you in until you've cleared Pokémon Tower. | ||
{{-}} | {{-}} | ||
[[File: | ===2F=== | ||
[[File:Pokemon RBY Silph Co 2F.png|thumb|Silph Co 2F]] | |||
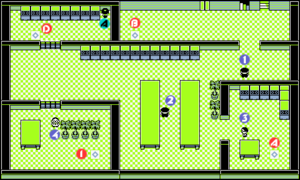
{| {{prettytable|float= | {| {{prettytable|float=right|style=font-size:smaller}} | ||
|style="background:#c080ff"|'''1'''||style="background:#c080ff"|Rocket | |style="background:#c080ff"|'''1'''||style="background:#c080ff"|Rocket | ||
|- | |- | ||
| Line 41: | Line 34: | ||
|style="background:#c080ff"|'''A'''||TM 36 | |style="background:#c080ff"|'''A'''||TM 36 | ||
|} | |} | ||
The red circles on this map indicate the warp points that connect two teleportation tiles with the same letter to one another. | |||
{{-}} | {{-}} | ||
===Trainers=== | ====Trainers==== | ||
{{ContentBoxContainer}} | {{ContentBoxContainer}} | ||
{{Pokemon/Trainer|RB}} | {{Pokemon/Trainer|RB}} | ||
| Line 89: | Line 81: | ||
</div> | </div> | ||
==3F== | ===3F=== | ||
[[File:Pokemon RBY Silph Co 3F.png|thumb|Silph Co 3F]] | |||
[[File: | |||
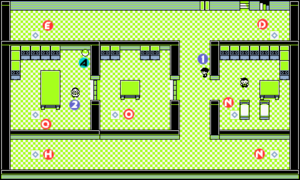
{| {{prettytable|float= | {| {{prettytable|float=right|style=font-size:smaller}} | ||
|style="background:#c080ff"|'''1'''||style="background:#c080ff"|Rocket | |style="background:#c080ff"|'''1'''||style="background:#c080ff"|Rocket | ||
|- | |- | ||
| Line 101: | Line 91: | ||
|style="background:#c080ff"|'''A'''||Hyper Potion | |style="background:#c080ff"|'''A'''||Hyper Potion | ||
|} | |} | ||
{{-}} | {{-}} | ||
===Trainers=== | ====Trainers==== | ||
{{ContentBoxContainer}} | {{ContentBoxContainer}} | ||
{{Pokemon/Trainer|RB}} | {{Pokemon/Trainer|RB}} | ||
| Line 127: | Line 115: | ||
</div> | </div> | ||
==4F== | ===4F=== | ||
[[File:Pokemon RBY Silph Co 4F.png|thumb|Silph Co 4F]] | |||
[[File: | |||
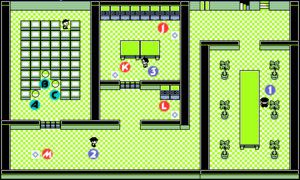
{| {{prettytable|float= | {| {{prettytable|float=right|style=font-size:smaller}} | ||
|style="background:#c080ff"|'''1'''||style="background:#c080ff"|Rocket | |style="background:#c080ff"|'''1'''||style="background:#c080ff"|Rocket | ||
|- | |- | ||
| Line 145: | Line 131: | ||
|style="background:#c080ff"|'''C'''||Escape Rope | |style="background:#c080ff"|'''C'''||Escape Rope | ||
|} | |} | ||
{{-}} | {{-}} | ||
===Trainers=== | ====Trainers==== | ||
{{ContentBoxContainer}} | {{ContentBoxContainer}} | ||
{{Pokemon/Trainer|RB}} | {{Pokemon/Trainer|RB}} | ||
| Line 175: | Line 159: | ||
</div> | </div> | ||
==5F== | ===5F=== | ||
[[File:Pokemon RBY Silph Co 5F.png|thumb|Silph Co 5F]] | |||
{| {{prettytable|float=right|style=font-size:smaller}} | |||
{| {{prettytable|float= | |||
|style="background:#c080ff"|'''1'''||style="background:#c080ff"|Rocket | |style="background:#c080ff"|'''1'''||style="background:#c080ff"|Rocket | ||
|- | |- | ||
| Line 195: | Line 177: | ||
|style="background:#c080ff"|'''C'''||TM 09 | |style="background:#c080ff"|'''C'''||TM 09 | ||
|} | |} | ||
{{-}} | {{-}} | ||
===Trainers=== | ====Trainers==== | ||
{{ContentBoxContainer}} | {{ContentBoxContainer}} | ||
{{Pokemon/Trainer|RB}} | {{Pokemon/Trainer|RB}} | ||
| Line 231: | Line 211: | ||
</div> | </div> | ||
==6F== | ===6F=== | ||
[[File:Pokemon RBY Silph Co 6F.png|thumb|Silph Co 6F]] | |||
[[File: | |||
{| {{prettytable|float= | {| {{prettytable|float=right|style=font-size:smaller}} | ||
|style="background:#c080ff"|'''1'''||style="background:#c080ff"|Rocket | |style="background:#c080ff"|'''1'''||style="background:#c080ff"|Rocket | ||
|- | |- | ||
| Line 247: | Line 225: | ||
|style="background:#c080ff"|'''B'''||X Accuracy | |style="background:#c080ff"|'''B'''||X Accuracy | ||
|} | |} | ||
{{-}} | {{-}} | ||
===Trainers=== | ====Trainers==== | ||
{{ContentBoxContainer}} | {{ContentBoxContainer}} | ||
{{Pokemon/Trainer|RB}} | {{Pokemon/Trainer|RB}} | ||
| Line 285: | Line 261: | ||
</div> | </div> | ||
==7F== | ===7F=== | ||
[[File:Pokemon RBY Silph Co 7F.png|thumb|Silph Co 7F]] | |||
{| {{prettytable|float=right|style=font-size:smaller}} | |||
{| {{prettytable|float= | |||
|style="background:#c080ff"|'''1'''||style="background:#c080ff"|Rocket | |style="background:#c080ff"|'''1'''||style="background:#c080ff"|Rocket | ||
|- | |- | ||
| Line 303: | Line 277: | ||
|style="background:#c080ff"|'''B'''||Calcium | |style="background:#c080ff"|'''B'''||Calcium | ||
|} | |} | ||
{{-}} | {{-}} | ||
===Trainers=== | ====Trainers==== | ||
{{ContentBoxContainer}} | {{ContentBoxContainer}} | ||
{{Pokemon/Trainer|RB}} | {{Pokemon/Trainer|RB}} | ||
| Line 343: | Line 315: | ||
</div> | </div> | ||
===Rival battle #6=== | ====Rival battle #6==== | ||
Your rival will be waiting for you before you approach Giovanni. | Your rival will be waiting for you before you approach Giovanni. | ||
| Line 375: | Line 346: | ||
{{Pokemon/Trainer mon|RB|003|40}} | {{Pokemon/Trainer mon|RB|003|40}} | ||
|} | |} | ||
</div> | |||
{{ContentBoxContainer}} | |||
{{Pokemon/Trainer|YEL}} | {{Pokemon/Trainer|YEL}} | ||
|+'''If rival has Vaporeon''' | |+'''If rival has Vaporeon''' | ||
| Line 408: | Line 381: | ||
The teleporter right past your rival (P) takes you directly to the 11th floor, but you may want to heal up on the 9th floor before you face Giovanni. | The teleporter right past your rival (P) takes you directly to the 11th floor, but you may want to heal up on the 9th floor before you face Giovanni. | ||
==8F== | ===8F=== | ||
[[File:Pokemon RBY Silph Co 8F.png|thumb|Silph Co 8F]] | |||
{| {{prettytable|float=right|style=font-size:smaller}} | |||
{| {{prettytable|float= | |||
|style="background:#c080ff"|'''1'''||style="background:#c080ff"|Rocket | |style="background:#c080ff"|'''1'''||style="background:#c080ff"|Rocket | ||
|- | |- | ||
| Line 420: | Line 391: | ||
|style="background:#c080ff"|'''3'''||style="background:#c080ff"|Scientist | |style="background:#c080ff"|'''3'''||style="background:#c080ff"|Scientist | ||
|} | |} | ||
{{-}} | {{-}} | ||
===Trainers=== | ====Trainers==== | ||
{{ContentBoxContainer}} | {{ContentBoxContainer}} | ||
{{Pokemon/Trainer|RB}} | {{Pokemon/Trainer|RB}} | ||
| Line 456: | Line 425: | ||
</div> | </div> | ||
==9F== | ===9F=== | ||
[[File:Pokemon RBY Silph Co 9F.png|thumb|Silph Co 9F]] | |||
[[File: | |||
{| {{prettytable|float= | {| {{prettytable|float=right|style=font-size:smaller}} | ||
|style="background:#c080ff"|'''1'''||style="background:#c080ff"|Scientist | |style="background:#c080ff"|'''1'''||style="background:#c080ff"|Scientist | ||
|- | |- | ||
| Line 469: | Line 436: | ||
|} | |} | ||
By the time you reach the 9th floor, your team is bound to be a bit worse for the wear. Visit the woman in the lower-left corner of the floor to fully recover your Pokémon's HP and PP. Also, check the foot of the bed to the left of the nurse to find a hidden '''Max Potion'''. | |||
{{-}} | {{-}} | ||
====Trainers==== | |||
===Trainers=== | |||
{{ContentBoxContainer}} | {{ContentBoxContainer}} | ||
{{Pokemon/Trainer|RB}} | {{Pokemon/Trainer|RB}} | ||
| Line 506: | Line 471: | ||
</div> | </div> | ||
==10F== | ===10F=== | ||
[[File:Pokemon RBY Silph Co 10F.png|thumb|Silph Co 10F]] | |||
{| {{prettytable|float=right|style=font-size:smaller}} | |||
{| {{prettytable|float= | |||
|style="background:#c080ff"|'''1'''||style="background:#c080ff"|Scientist | |style="background:#c080ff"|'''1'''||style="background:#c080ff"|Scientist | ||
|- | |- | ||
| Line 522: | Line 485: | ||
|style="background:#c080ff"|'''C'''||TM 26 | |style="background:#c080ff"|'''C'''||TM 26 | ||
|} | |} | ||
{{-}} | {{-}} | ||
===Trainers=== | ====Trainers==== | ||
{{ContentBoxContainer}} | {{ContentBoxContainer}} | ||
{{Pokemon/Trainer|RB}} | {{Pokemon/Trainer|RB}} | ||
| Line 544: | Line 505: | ||
</div> | </div> | ||
==11F== | ===11F=== | ||
[[File:Pokemon RBY Silph Co 11F.png|thumb|Silph Co 11F]] | |||
{| {{prettytable|float=right|style=font-size:smaller}} | |||
{| {{prettytable|float= | |||
|style="background:#ffff00"|'''1'''||style="background:#ffff00"|Jessie & James | |style="background:#ffff00"|'''1'''||style="background:#ffff00"|Jessie & James | ||
|- | |- | ||
|style="background:#8000ff"|'''2'''||style="background:#8000ff"|Rocket | |style="background:#8000ff"|'''2'''||style="background:#8000ff"|Rocket | ||
|- | |- | ||
|style="background:#c080ff"|'''3'''||style="background:#c080ff"|Giovanni | |style="background:#c080ff"|'''3'''||style="background:#c080ff"|Giovanni | ||
|- | |- | ||
| Line 561: | Line 520: | ||
|} | |} | ||
On the 11th floor, Yellow players will have a skirmish with the laughably weak Jessie and James, and Red/Blue players will have to deal with one more Rocket. Then there's Giovanni... After you busted up his racket in [[../Celadon City/]], Giovanni moved his base to [[../Saffron City/]]. It's too bad for him you arrived in time to short-circuit his new scheme. Defeat Giovanni's {{bp|Nidorino}}, {{bp|Rhyhorn}}, {{bp|Nidoqueen}}, and {{bp|Kangaskhan}} (or {{bp|Persian}}, in the Yellow version) to rescue the Silph Co. President. Once again, a single level 43+ Kadabra can take care of them all. | |||
On the 11th floor, Yellow players will have a skirmish with the laughably weak Jessie and James, and Red/Blue players will have to deal with one more Rocket. Then there's Giovanni... After you busted up his racket in [[ | |||
He's not any tougher than your rival, but you'll definitely need to be in peak condition to stand a chance. Use Dig to warp back to the Pokémon Center, or retrace your steps and take the elevator up to Floor 9, where the girl will heal you. Once you've sent Giovanni running, the President of Silph Co. will be ecstatic that you interrupted his "meeting" with Giovanni. To reward you for breaking Team Rocket's hold on his company, he'll hook you up with the incredible '''Master Ball'''. This technological wonder will catch any Pokémon without fail, so be sure to save it for a special occasion (such as {{bp|Mewtwo}}). If your current box in Bill's PC was full when offered the Lapras, or your Bag was full for the Master Ball, the computer desk in this room can be used like a PC in a Pokémon Center to make some room. When you're finished, you can collect the items in the now Rocket-free lower floors. | He's not any tougher than your rival, but you'll definitely need to be in peak condition to stand a chance. Use Dig to warp back to the Pokémon Center, or retrace your steps and take the elevator up to Floor 9, where the girl will heal you. Once you've sent Giovanni running, the President of Silph Co. will be ecstatic that you interrupted his "meeting" with Giovanni. To reward you for breaking Team Rocket's hold on his company, he'll hook you up with the incredible '''Master Ball'''. This technological wonder will catch any Pokémon without fail, so be sure to save it for a special occasion (such as {{bp|Mewtwo}}). If your current box in Bill's PC was full when offered the Lapras, or your Bag was full for the Master Ball, the computer desk in this room can be used like a PC in a Pokémon Center to make some room. When you're finished, you can collect the items in the now Rocket-free lower floors. | ||
===Trainers=== | ====Trainers==== | ||
{{ContentBoxContainer}} | {{ContentBoxContainer}} | ||
{{Pokemon/Trainer|RB}} | {{Pokemon/Trainer|RB}} | ||
| Line 596: | Line 552: | ||
</div> | </div> | ||
===Giovanni=== | ====Giovanni==== | ||
{{ContentBoxContainer}} | {{ContentBoxContainer}} | ||
{{Pokemon/Trainer|RB}} | {{Pokemon/Trainer|RB}} | ||
| Line 616: | Line 571: | ||
== All roads lead to Fuchsia City == | == All roads lead to Fuchsia City == | ||
The next destination is [[../Fuchsia City/]], where you can finally get HM 03 (Surf) and HM 04 (Strength), the last items needed on your quest. There are two major routes you can take: [[../Route 12-13|Routes 12 through 15]], which is south of [[../Lavender Town/]], and [[../Route 16-18|Routes 16 through 18]], west of [[../Celadon City/]]. The latter path is quicker (and you can pick up HM 02, Fly, on the way!), so it is covered first. But you'll need to take [[../Route 12-13|Route 12]] to get the Super Rod at some point. | |||
The next destination is [[ | |||
==New Pokémon== | ==New Pokémon== | ||
{{ContentBoxContainer}} | {{ContentBoxContainer}} | ||
{{Pokemon/New|title=#131 Lapras|contents={{PokePic|Lapras|left}} | {{Pokemon/New|title=#131 Lapras|contents={{PokePic|Lapras|left}} | ||
Revision as of 20:31, 21 March 2024
It turns out that Silph Co. is being forced to produce advanced technology for Team Rocket. You must reach the top floor and free the company President from Giovanni's clutches. If you roust Giovanni, you won't have to defeat the rest of Team Rocket's agents individually. When you need to heal your Pokémon, look for a woman at the bottom-left corner of the ninth floor.
Silph Co.
This 11-level building, with 31 trainer battles, only seems difficult. If you know where to go, you can make it to the top and save the president quickly and easily. Then, after scaring Team Rocket away, you can get the items without opposition.
Don't be confused by all the teleporters: the elevator will take you to any floor you want, and you only need to use one series of teleporters to get to the right part of Floor 11.
First go to Floor 5 and get item A, the Card Key. With that, you can open any of the locked doors. Also, one of the potted plants on this floor hides an Elixir. Be wary of the bald guy on this floor--he's the only one to use Psychic-types Kadabra and Mr. Mime. If there's a Pokémon on your front line with low HP, it'll be knocked out pretty quick, so be sure to put a strong Pokémon on top before entering battle.
Then head down to level 3, unlock the door in front of the teleporter marked O, and then take that to the 7th floor, where your rival awaits.
If you need the experience then fight all the Rockets before heading to Giovanni on the 11th floor as they will disappear after you beat him.
1F
The first floor lobby is eerily empty, so just advance to the stairs in the back. Note that the guard blocking the entrance to the building won't stand aside to let you in until you've cleared Pokémon Tower.
2F
| 1 | Rocket |
| 3 | Scientist |
| 2 | Rocket |
| 4 | Scientist |
| A | TM 36 |
The red circles on this map indicate the warp points that connect two teleportation tiles with the same letter to one another.
Trainers
| Red and Blue | |
|---|---|
| Trainer | Pokemon |
 Rocket Reward: |
|
 Scientist Reward: |
|
 Rocket Reward: |
|
 Scientist Reward: |
|
| Yellow | |
|---|---|
| Trainer | Pokemon |
 Rocket Reward: |
|
 Scientist Reward: |
|
 Rocket Reward: |
|
 Scientist Reward: |
|
3F
| 1 | Rocket |
| 2 | Scientist |
| A | Hyper Potion |
Trainers
| Red and Blue | |
|---|---|
| Trainer | Pokemon |
 Rocket Reward: |
|
 Scientist Reward: |
|
| Yellow | |
|---|---|
| Trainer | Pokemon |
 Rocket Reward: |
|
 Scientist Reward: |
|
4F
| 1 | Rocket |
| 2 | Rocket |
| 3 | Scientist |
| A | Full Heal |
| B | Max Revive |
| C | Escape Rope |
Trainers
| Red and Blue | |
|---|---|
| Trainer | Pokemon |
 Rocket Reward: |
|
 Rocket Reward: |
|
 Scientist Reward: |
|
| Yellow | |
|---|---|
| Trainer | Pokemon |
 Rocket Reward: |
|
 Rocket Reward: |
|
 Scientist Reward: |
|
5F
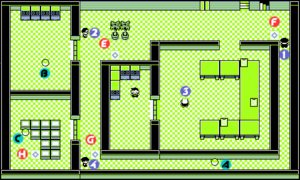
| 1 | Rocket |
| 3 | Juggler |
| 2 | Scientist |
| 4 | Rocket |
| A | Card Key |
| B | Protein |
| C | TM 09 |
Trainers
| Red and Blue | |
|---|---|
| Trainer | Pokemon |
 Rocket Reward: |
|
 Juggler Reward: |
|
 Scientist Reward: |
|
 Rocket Reward: |
|
| Yellow | |
|---|---|
| Trainer | Pokemon |
 Rocket Reward: |
|
 Juggler Reward: |
|
 Scientist Reward: |
|
 Rocket Reward: |
|
6F
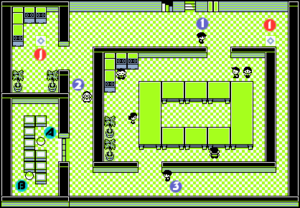
| 1 | Rocket |
| 2 | Scientist |
| 3 | Rocket |
| A | HP Up |
| B | X Accuracy |
Trainers
| Red and Blue | |
|---|---|
| Trainer | Pokemon |
 Rocket Reward: |
|
 Scientist Reward: |
|
 Rocket Reward: |
|
| Yellow | |
|---|---|
| Trainer | Pokemon |
 Rocket Reward: |
|
 Scientist Reward: |
|
 Rocket Reward: |
|
7F
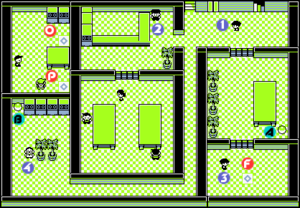
| 1 | Rocket |
| 2 | Rocket |
| 3 | Rocket |
| 4 | Scientist |
| A | TM 03 |
| B | Calcium |
Trainers
| Red and Blue | |
|---|---|
| Trainer | Pokemon |
 Rocket Reward: |
|
 Rocket Reward: |
|
 Rocket Reward: |
|
 Scientist Reward: |
|
| Yellow | |
|---|---|
| Trainer | Pokemon |
 Rocket Reward: |
|
 Rocket Reward: |
|
 Rocket Reward: |
|
 Scientist Reward: |
|
Rival battle #6
Your rival will be waiting for you before you approach Giovanni.
| Red and Blue | |
|---|---|
| Trainer | Pokemon |
 Rival Blue Reward: |
|
| Red and Blue | |
|---|---|
| Trainer | Pokemon |
 Rival Blue Reward: |
|
| Red and Blue | |
|---|---|
| Trainer | Pokemon |
 Rival Blue Reward: |
|
| Yellow | |
|---|---|
| Trainer | Pokemon |
 Rival Blue Reward: |
|
| Yellow | |
|---|---|
| Trainer | Pokemon |
 Rival Blue Reward: |
|
| Yellow | |
|---|---|
| Trainer | Pokemon |
 Rival Blue Reward: |
|
The person next to your rival will give you a Lapras if you have an open spot in your party.
The teleporter right past your rival (P) takes you directly to the 11th floor, but you may want to heal up on the 9th floor before you face Giovanni.
8F
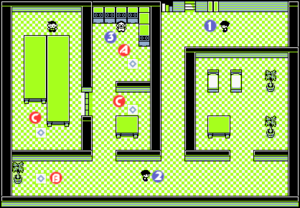
| 1 | Rocket |
| 2 | Rocket |
| 3 | Scientist |
Trainers
| Red and Blue | |
|---|---|
| Trainer | Pokemon |
 Rocket Reward: |
|
 Rocket Reward: |
|
 Scientist Reward: |
|
| Yellow | |
|---|---|
| Trainer | Pokemon |
 Rocket Reward: |
|
 Rocket Reward: |
|
 Scientist Reward: |
|
9F
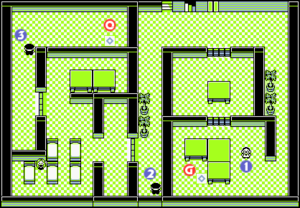
| 1 | Scientist |
| 2 | Rocket |
| 3 | Rocket |
By the time you reach the 9th floor, your team is bound to be a bit worse for the wear. Visit the woman in the lower-left corner of the floor to fully recover your Pokémon's HP and PP. Also, check the foot of the bed to the left of the nurse to find a hidden Max Potion.
Trainers
| Red and Blue | |
|---|---|
| Trainer | Pokemon |
 Scientist Reward: |
|
 Rocket Reward: |
|
 Rocket Reward: |
|
| Yellow | |
|---|---|
| Trainer | Pokemon |
 Scientist Reward: |
|
 Rocket Reward: |
|
 Rocket Reward: |
|
10F
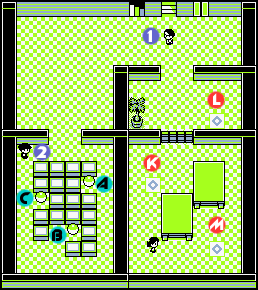
| 1 | Scientist |
| 2 | Rocket |
| A | Carbos |
| B | Rare Candy |
| C | TM 26 |
Trainers
| Red and Blue | |
|---|---|
| Trainer | Pokemon |
 Scientist Reward: |
|
 Rocket Reward: |
|
| Yellow | |
|---|---|
| Trainer | Pokemon |
 Scientist Reward: |
|
 Rocket Reward: |
|
11F

| 1 | Jessie & James |
| 2 | Rocket |
| 3 | Giovanni |
| - | Guard on Right |
| A | Master Ball |
On the 11th floor, Yellow players will have a skirmish with the laughably weak Jessie and James, and Red/Blue players will have to deal with one more Rocket. Then there's Giovanni... After you busted up his racket in Celadon City, Giovanni moved his base to Saffron City. It's too bad for him you arrived in time to short-circuit his new scheme. Defeat Giovanni's Nidorino, Rhyhorn, Nidoqueen, and Kangaskhan (or Persian, in the Yellow version) to rescue the Silph Co. President. Once again, a single level 43+ Kadabra can take care of them all.
He's not any tougher than your rival, but you'll definitely need to be in peak condition to stand a chance. Use Dig to warp back to the Pokémon Center, or retrace your steps and take the elevator up to Floor 9, where the girl will heal you. Once you've sent Giovanni running, the President of Silph Co. will be ecstatic that you interrupted his "meeting" with Giovanni. To reward you for breaking Team Rocket's hold on his company, he'll hook you up with the incredible Master Ball. This technological wonder will catch any Pokémon without fail, so be sure to save it for a special occasion (such as Mewtwo). If your current box in Bill's PC was full when offered the Lapras, or your Bag was full for the Master Ball, the computer desk in this room can be used like a PC in a Pokémon Center to make some room. When you're finished, you can collect the items in the now Rocket-free lower floors.
Trainers
| Red and Blue | |
|---|---|
| Trainer | Pokemon |
 Rocket Reward: |
|
 Rocket Reward: |
|
| Yellow | |
|---|---|
| Trainer | Pokemon |
 Rocket Reward: |
|
 Rocket Reward: |
|
Giovanni
All roads lead to Fuchsia City
The next destination is Fuchsia City, where you can finally get HM 03 (Surf) and HM 04 (Strength), the last items needed on your quest. There are two major routes you can take: Routes 12 through 15, which is south of Lavender Town, and Routes 16 through 18, west of Celadon City. The latter path is quicker (and you can pick up HM 02, Fly, on the way!), so it is covered first. But you'll need to take Route 12 to get the Super Rod at some point.
New Pokémon
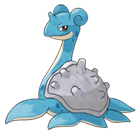
Talk to the Silph Co. employee next to your rival after your fight for a well-deserved reward: a Water/Ice-type Lapras. This is the only place you can get one in the game.
Lapras comes at a very low level of 15, making it very impractical to incorporate into your main team. In-game, you will be better served by picking up a Dewgong from Cinnabar or Cloyster from the Seafoam Islands. However, competitively, Lapras's excellent offensive power, ability to learn Thunderbolt, and absolutely incredible overall bulk put it in a class all its own above its fellow Ice/Water brethren. Even if you do not put it in your line up, carefully stash this gem in your box.

