Super Mario Bros. 3/World 7: Difference between revisions
(7-Airship) |
|||
| (11 intermediate revisions by 5 users not shown) | |||
| Line 1: | Line 1: | ||
{{Header Nav|game=Super Mario Bros. 3}} | {{Header Nav|game=Super Mario Bros. 3}} | ||
[[File:SMB3-Level7_labeled.png|frame|right|White House: World 7-2, 46 coins, [[File:SMB3 item PWing.png|18px]]]] | |||
The icy slopes of Iced Land were a true test for your nimble feet, but the diabolical, labyrinthine world of the Pipe Maze will challenge your memory and wit. | |||
Immobile Piranha Plants replace roaming Hammer Bros. in this world. This is also the last world where Anchors have any effect, so use them up to free space in your inventory for more useful power-ups. | |||
This | |||
{{floatingtoc|float=left|limit=2}} | {{floatingtoc|float=left|limit=2}} | ||
{| {{prettytable|float=right}} | |||
| <font color="blue">'''D'''</font> | |||
| [[File:SMB3 item Mushroom.png|18px]] [[File:SMB3 item Flower.png|18px]] [[File:SMB3 item Leaf.png|18px]] | |||
|- | |||
| <font color="blue">'''H'''</font> | |||
| [[File:SMB3 item Frog.png|18px]] [[File:SMB3 item Tanooki.png|18px]] [[File:SMB3 item HBS.png|18px]] | |||
|- | |||
| <font color="green">'''I'''</font> | |||
| [[File:SMB3 item PWing.png|18px]] | |||
|- | |||
| <font color="blue">'''L'''</font> | |||
| [[File:SMB3 item Frog.png|18px]] [[File:SMB3 item Tanooki.png|18px]] [[File:SMB3 item HBS.png|18px]] | |||
|- | |||
| <font color="green">'''M'''</font> | |||
| [[File:SMB3 item Mushroom.png|18px]] | |||
|} | |||
{{-}} | {{-}} | ||
==7-1== | ==World 7-1== | ||
When a plunger won't cut it, call a Mario Brother to unclog any pipe. A couple of the stages in Tube City scroll upwards and involve difficult climbs through a maze of pipes. | |||
{| | |||
| [[File:SMB3 W7 S1 a.png|left]] | |||
| style="vertical-align:top;" | [[File:SMB3 W7 S1 b.png|right]] | |||
* '''1''': Carefully time your jumps to avoid the Piranha Plants. You'll have to get into this pipe quick, because the Piranha will only stay in its pipe for a second. If you're Fiery Mario, the pesky plants are easy to slash and burn. | |||
* '''2''': Standing atop the pipe, jump up and around the blocks overhead to reach the platform they create. It can be tricky, so don't feel bad if you need several attempts to succeed. You'll find a valuable 1-Up in an Invisible Block above the platform. | |||
* '''3''': To get the Super Leaf power-up, stomp on the Koopa Troopa, pick him up and get on top of the left '''?''' Block. Kick its shell between the two '''?''' Blocks. It'll ricochet between them, and you will snatch the power-up as soon as it escapes the block you're standing on. | |||
* '''4''': Once you make this 1-Up appear, it will probably fall right. Follow it and you should land on a pipe and not lose any height. Continue climbing! | |||
* '''5''': Stomp the Koopa Troopa on the clearing and kick its shell down the gap. If you're Raccoon or Tanooki Mario, run to fill your P-Meter and fly to the pipe above. You'll end up in a room stacked to the ceiling with coins. | |||
* '''6''': Wait for the Red Koopa Paratroopa to reach its highest point, then jump on top of it while holding {{nes|A}} to hit an Invisible Block that provides a 1-Up. | |||
|} | |||
= | |||
* | |||
* | |||
* | |||
* | |||
* | |||
* | |||
{{ | |||
== | ==World 7-2== | ||
Escape the heat and enjoy a plunge in an underground reservoir. Pipes in this desert join upper and lower area. Piranha Plants infest the upper; the lower is loaded with power-ups and coins! Only Frog Mario can collect more than 46 coins and get a White Mushroom House to appear. | |||
{{Scrolling map|SMB3 | {{Scrolling map|SMB3 W7 S2 a.png}} | ||
* | * '''1''': Hurl an Ice Block at the '''?''' Block below. If you're Super Mario, a Fire Flower will sprout out of the block. | ||
* | * '''2''': To avoid danger and collect coins, take a pipe ride to the reservoir below. | ||
* | * '''3''': '''White Mushroom House'''. To collect the 46 coins needed to make a White Mushroom House appear on the map, you'll need to be Frog Mario. Hit the Switch Block and swim hard to the coins to your right. You'll only have a few seconds to collect the coins that it creates and only the Frog Suit will enable you to swim through the water fast enough to get them all. | ||
* | {{Scrolling map|SMB3 W7 S2 b.png}} | ||
* '''4''': Don't panic when the Note Blocks seal you in here with the Koopa. In order to make it over the gaps between the pipes, you'll have to hit all of the Jump Blocks to create a bridge. Take the power-up that's down the pipe to the right. To cross the newly created bridge, go back through the tube to the left, swim left to enter the next tube, and move to the right to reach the Jump Block bridge. You can simply bounce across. Don't forget the 1-Up hidden in an Invisible Block above the bridge! | |||
* '''5''': Cross carefully! Venus Fire Traps are everywhere, and they'll spit a hail of fire at you. Firepower is probably the best weapon to have in this world. If you want to be Fiery, grab the out-of-the-way power-up from below. If you aren't Fiery Mario, take your time to avoid each enemy you see.{{-}} | |||
== | ==World 7-3== | ||
{{Scrolling map|SMB3 | String along you Starman superpower to cash in on a 1-Up jackpot. You can be invincible through this entire stage if you hurry! As you've seen before, some blocks will have Starmen inside, but only if you hit them while you're still invincible. | ||
* | {{Scrolling map|SMB3 W7 S3 a.png}} | ||
* | * '''1''': Attempt to complete the entire stage while invincible by picking up a string of Starmen. To start the process, get the first Starman and then use {{nes|B}} to run and make it to the other '''?''' Blocks before your invincibility wears off. If you're not invincible when you hit them, they will contain only coins. | ||
* | * '''2''': Dash down the hill and slide through the convoy of Koopa Troopas along the way. You'll accumulate an exponentially increasing number of points for each successive enemy you dispatch. | ||
* '''3''': Hurry! Bump the left '''?''' Block containing a Starman, collect it, then vault from the upper '''?''' Blocks across the gap. | |||
* '''4''': As you run down the grassy slope, don't be unnerved by the gap—you'll glide right over it if you simply sprint across it. If you're invicible, ram into as many Spinys as you can; they'll be worth a 1-Up each if you've hit enough enemies. | |||
{{Scrolling map|SMB3 W7 S3 b.png}} | |||
* '''5''': If you're still invincible, forget the '''?''' Block that hangs above the regular block. It holds a power-up, but you don't have time to collect it if you're trying to catch all of the Starman power-ups in a row. Instead, bump the bottom block to grab a Starman, and sprint forward. | |||
* '''6''': Tempted by the Switch Block? Don't stop to stomp it! Unless your Starman has worn off, you don't have time. Run to the next Starman instead. If your invincibility wears off now, you'll have to face Lakitu. | |||
* '''7''': Starman power-ups are sealed in blocks on both sides of the short pipe. Collect the Starman on the left side, ram into as many of Lakitu's Spiny Eggs as you can, then collect the Starman in the block on the right side before you invincibility wears off. You should be earning a 1-Up for each enemy you beat! | |||
* '''8''': Even if you've collected all the Starman power-ups, your invincibility will soon be wearing off—act fast to plow into any of Bowser's underlings foolish enough to cross your path. By holding down {{nes|B}} as you run, you can make it over all of these pits, but you may want to jump over the final gap if you're not confident in your speed.{{-}} | |||
== | ==World 7-4== | ||
{{Scrolling map|SMB3- | Swift currents threaten to dash Mario against jagged rocks and nasty creatures. You've seen some troubled water stages on this adventure, but this is probably the most difficult one. It features an automatic scroll that will push you through a mine field of Jelectros! If you're having trouble, put on a Frog Suit. | ||
* | {{Scrolling map|SMB3 W7 S4 a.png}} | ||
* | * '''1''': Use a P-Wing or Raccoon Suit to fly over the block barrier and into a secret area with two 1-Ups ripe for plucking. But don't think you've found a shortcut to the end of the stage—this is as far as you go. | ||
* | {{Scrolling map|SMB3 W7 S4 b.png}} | ||
* '''2''': The ocean currents will scroll the screen quickly to the right. To avoid being pushed up against walls or enemies, you'll have to plan your route well in advance. | |||
* '''3''': The Frog Suit's fast and accurate swimming works well in Stage 7-4, but Fiery Mario can cook annoying enemies. | |||
* '''4''': Big Bertha has chosen an awkward place to rear her young, so you'll have to swim around her when she's not looking. Swim up against the short wall beneath where Bertha patrols. Wait until she swims away, then paddle furiously through the gap. | |||
* '''5''': Blooper Nannies will attack you with babies just as you enter and exit the Jelectro mine field. When a Nanny flashes, immediately move so you're diagonal to it to avoid babies flung in every direction. | |||
* '''6''': Don't be pressured to move quickly! To navigate the minefield of Jelectros, tap {{nes|A}} gently to make small movements—if you move too fast or drift up or down, you'll end up Jelectro-food. As the screen scrolls, stay in the middle. That way, you'll see obstacles ahead. | |||
{{Scrolling map|SMB3 W7 S4 c.png}} | |||
* '''7''': Expect to find another fearsome Big Bertha near the end of the swarm of Jelectros. It's easiest to make it past Big Bertha when her back is turned. Swim above her diagonally to escape. | |||
* '''8''': If you decide to risk grabbing the power-up at point 8, make sure the upcoming walls don't bos you in. Grab the power-up in a hurry, then sink to the ocean floor in preparation for the tricky donut-obstacle that scrolls into view. If you don't look ahead, you'll get squashed. | |||
* '''9''': Swim past the Lava Lotus as fast as you can, but be watchful for the Cheep-Cheeps in your path. | |||
* '''10''': Swim near the top of the final obstacle wall so you'll be ready to swim to safety as soon as the opening appears.{{-}} | |||
== | ==World 7-5== | ||
{{Scrolling map|SMB3 | Take it easy, or you're sure to develop a serious case of pipe rage. To make it through this maze, you must make invisible blocks appear and create walkways over gaps that you can't jump over. Some back-tracking is also required. | ||
* | {{Scrolling map|SMB3 W7 S5 a.png}} | ||
* | * '''1''': Bring a Koopa Troopa shell with you through the pipe from the room above to clear out the two naughty Bob-ombs below. | ||
* '''2''': Fall through the gap and jump along the right wall to reveal a 1-Up that is sealed inside a hidden block. The 1-Up will slide left and fall into the next chamber. Go down the pipe and up the one to the left. The 1-Up will be waiting there for you. | |||
{{Scrolling map|SMB3 W7 S5 b.png}} | |||
* | * '''3''': Break the lowest block in the wall and slide through to the next area. If you have the Raccoon Suit, simply swing your tail to bust the block. | ||
* | * '''4''': If you go gown to the right of this pipe, you'll be trapped here by invisible blocks with a Bob-omb coming down the corridor! It's tough to escape without being hit. | ||
* | * '''5''': Jump to reveal the hidden blocks that bridge the gap in the floor, then walk across to the next area. | ||
* '''6''': To make another bridge and reach the last pipe, jump from below to activate all of the Invisible Blocks. Then work your way back and walk across. | |||
{{Footer Nav|game=Super Mario Bros. 3|prevpage=World 6|nextpage=World | {{Footer Nav|game=Super Mario Bros. 3|prevpage=World 6 Part 3|nextpage=World 7 Part 2}} | ||
Latest revision as of 05:08, 20 December 2015


The icy slopes of Iced Land were a true test for your nimble feet, but the diabolical, labyrinthine world of the Pipe Maze will challenge your memory and wit.
Immobile Piranha Plants replace roaming Hammer Bros. in this world. This is also the last world where Anchors have any effect, so use them up to free space in your inventory for more useful power-ups.
| D | |
| H | |
| I | |
| L | |
| M |
World 7-1[edit]
When a plunger won't cut it, call a Mario Brother to unclog any pipe. A couple of the stages in Tube City scroll upwards and involve difficult climbs through a maze of pipes.
World 7-2[edit]
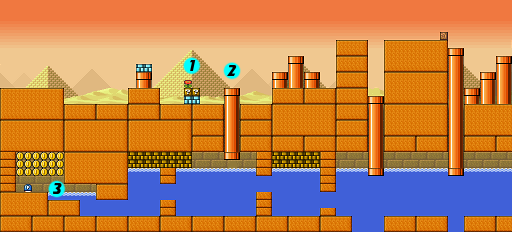
Escape the heat and enjoy a plunge in an underground reservoir. Pipes in this desert join upper and lower area. Piranha Plants infest the upper; the lower is loaded with power-ups and coins! Only Frog Mario can collect more than 46 coins and get a White Mushroom House to appear.
- 1: Hurl an Ice Block at the ? Block below. If you're Super Mario, a Fire Flower will sprout out of the block.
- 2: To avoid danger and collect coins, take a pipe ride to the reservoir below.
- 3: White Mushroom House. To collect the 46 coins needed to make a White Mushroom House appear on the map, you'll need to be Frog Mario. Hit the Switch Block and swim hard to the coins to your right. You'll only have a few seconds to collect the coins that it creates and only the Frog Suit will enable you to swim through the water fast enough to get them all.
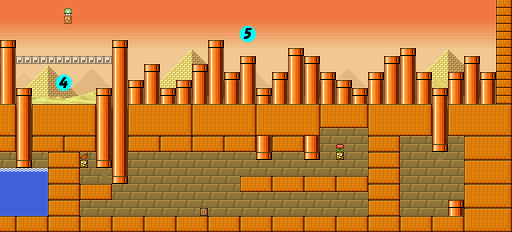
- 4: Don't panic when the Note Blocks seal you in here with the Koopa. In order to make it over the gaps between the pipes, you'll have to hit all of the Jump Blocks to create a bridge. Take the power-up that's down the pipe to the right. To cross the newly created bridge, go back through the tube to the left, swim left to enter the next tube, and move to the right to reach the Jump Block bridge. You can simply bounce across. Don't forget the 1-Up hidden in an Invisible Block above the bridge!
- 5: Cross carefully! Venus Fire Traps are everywhere, and they'll spit a hail of fire at you. Firepower is probably the best weapon to have in this world. If you want to be Fiery, grab the out-of-the-way power-up from below. If you aren't Fiery Mario, take your time to avoid each enemy you see.
World 7-3[edit]
String along you Starman superpower to cash in on a 1-Up jackpot. You can be invincible through this entire stage if you hurry! As you've seen before, some blocks will have Starmen inside, but only if you hit them while you're still invincible.
- 1: Attempt to complete the entire stage while invincible by picking up a string of Starmen. To start the process, get the first Starman and then use
 to run and make it to the other ? Blocks before your invincibility wears off. If you're not invincible when you hit them, they will contain only coins.
 - 2: Dash down the hill and slide through the convoy of Koopa Troopas along the way. You'll accumulate an exponentially increasing number of points for each successive enemy you dispatch.
- 3: Hurry! Bump the left ? Block containing a Starman, collect it, then vault from the upper ? Blocks across the gap.
- 4: As you run down the grassy slope, don't be unnerved by the gap—you'll glide right over it if you simply sprint across it. If you're invicible, ram into as many Spinys as you can; they'll be worth a 1-Up each if you've hit enough enemies.
- 5: If you're still invincible, forget the ? Block that hangs above the regular block. It holds a power-up, but you don't have time to collect it if you're trying to catch all of the Starman power-ups in a row. Instead, bump the bottom block to grab a Starman, and sprint forward.
- 6: Tempted by the Switch Block? Don't stop to stomp it! Unless your Starman has worn off, you don't have time. Run to the next Starman instead. If your invincibility wears off now, you'll have to face Lakitu.
- 7: Starman power-ups are sealed in blocks on both sides of the short pipe. Collect the Starman on the left side, ram into as many of Lakitu's Spiny Eggs as you can, then collect the Starman in the block on the right side before you invincibility wears off. You should be earning a 1-Up for each enemy you beat!
- 8: Even if you've collected all the Starman power-ups, your invincibility will soon be wearing off—act fast to plow into any of Bowser's underlings foolish enough to cross your path. By holding down
 as you run, you can make it over all of these pits, but you may want to jump over the final gap if you're not confident in your speed.
World 7-4[edit]
Swift currents threaten to dash Mario against jagged rocks and nasty creatures. You've seen some troubled water stages on this adventure, but this is probably the most difficult one. It features an automatic scroll that will push you through a mine field of Jelectros! If you're having trouble, put on a Frog Suit.
- 1: Use a P-Wing or Raccoon Suit to fly over the block barrier and into a secret area with two 1-Ups ripe for plucking. But don't think you've found a shortcut to the end of the stage—this is as far as you go.
- 2: The ocean currents will scroll the screen quickly to the right. To avoid being pushed up against walls or enemies, you'll have to plan your route well in advance.
- 3: The Frog Suit's fast and accurate swimming works well in Stage 7-4, but Fiery Mario can cook annoying enemies.
- 4: Big Bertha has chosen an awkward place to rear her young, so you'll have to swim around her when she's not looking. Swim up against the short wall beneath where Bertha patrols. Wait until she swims away, then paddle furiously through the gap.
- 5: Blooper Nannies will attack you with babies just as you enter and exit the Jelectro mine field. When a Nanny flashes, immediately move so you're diagonal to it to avoid babies flung in every direction.
- 6: Don't be pressured to move quickly! To navigate the minefield of Jelectros, tap
 gently to make small movements—if you move too fast or drift up or down, you'll end up Jelectro-food. As the screen scrolls, stay in the middle. That way, you'll see obstacles ahead.
- 7: Expect to find another fearsome Big Bertha near the end of the swarm of Jelectros. It's easiest to make it past Big Bertha when her back is turned. Swim above her diagonally to escape.
- 8: If you decide to risk grabbing the power-up at point 8, make sure the upcoming walls don't bos you in. Grab the power-up in a hurry, then sink to the ocean floor in preparation for the tricky donut-obstacle that scrolls into view. If you don't look ahead, you'll get squashed.
- 9: Swim past the Lava Lotus as fast as you can, but be watchful for the Cheep-Cheeps in your path.
- 10: Swim near the top of the final obstacle wall so you'll be ready to swim to safety as soon as the opening appears.
World 7-5[edit]
Take it easy, or you're sure to develop a serious case of pipe rage. To make it through this maze, you must make invisible blocks appear and create walkways over gaps that you can't jump over. Some back-tracking is also required.
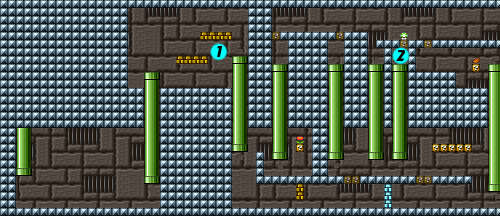
- 1: Bring a Koopa Troopa shell with you through the pipe from the room above to clear out the two naughty Bob-ombs below.
- 2: Fall through the gap and jump along the right wall to reveal a 1-Up that is sealed inside a hidden block. The 1-Up will slide left and fall into the next chamber. Go down the pipe and up the one to the left. The 1-Up will be waiting there for you.
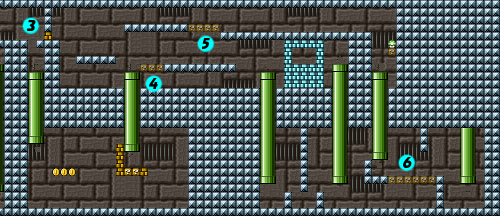
- 3: Break the lowest block in the wall and slide through to the next area. If you have the Raccoon Suit, simply swing your tail to bust the block.
- 4: If you go gown to the right of this pipe, you'll be trapped here by invisible blocks with a Bob-omb coming down the corridor! It's tough to escape without being hit.
- 5: Jump to reveal the hidden blocks that bridge the gap in the floor, then walk across to the next area.
- 6: To make another bridge and reach the last pipe, jump from below to activate all of the Invisible Blocks. Then work your way back and walk across.


