Use a gem to find the secret passage and the stairs down.
W2
Both fountains fully refresh any character's health. Take the north ladder down.
W3
Coming from the west stair, the party will be in a featureless area that continues to the next floor. From the north stair they will be in a half-floor with a magic orb and two further stairs down; the first ladder on your way leads to a corridor with 7 chests (14 in the Master System port).
W4
The ladder down is surrounded by four rooms. The north and south ones are probably the easiest ones; the west one has a magic sleep field, the east one has many sleep-inducing enemies.
W5
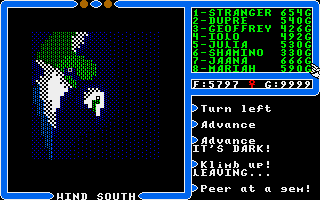
This floor is immersed in darkening winds. Use a gem for orientation. Take four steps in any direction, then four steps perpendicularly, and descend (in the Master System port, take twice the number of steps).
W6
Use a gem to see the four secret passage, and prepare to cast "Dispel" up to ten times (in the Master System port, twice that many); actually, you can get through all magic fields except the energy ones, then heal at a fountain on the same floor. The eastmost ladder leads to a corridor with 7 chests (14 in the Master System port). Both fountains fully refresh any character's health, after he or she touched a magic ball. Continue through the westmost ladder down.
W7
On this floor, the fourth Magic Ball can be found, at the end of a long corridor. The fountain cures poison. The easily accessible stairs down lead to the Altar Room of Love (but you still have to find the Stone of this dungeon). In order to access the main part of level 8, there is an invisible trigger in the south-east tile in the room.
W8
In order to reach the altar of the Green Stone, the trigger in ther room is under the magic energy field in the north-west corner. If you want to backtrack through the three rocky rooms, the trigger in the westmost one is in the south-east corner.
A
From dungeon Wrong, you access the Altar Room of Truth from the west. You still need the Blue Stone of Honesty to use the altar. Leave the room to the north and enter dungeon Deceit.
D8
There are several falling rocks traps, that damage all the Companions. In the second room (coming from the altar room) there is a puzzle-trap; when a character crosses the northern bridge, part of it will collapse. Step on a tile near the chests to make a secret door appear. Both stairs upwards lead to the same area.
D7
Coming from the 8th floor, there is a fork: the north room is easier, and it has 6 chests; the south room has just one chest, and it is trapped. When a Companion steps on that chest, three magic fire fields will appear. Past the ladder to the south there is a series of traps and magic fields that protect the altar with the Blue Stone of Honesty. After you retrieve the stone, walk back to the Altar Room of Love and obtain the first part of the key. Use the following stones on the altar of Truth: Blue-Honesty, Green-Justice, Purple-Honor and White-Spirituality.
D6-b
Coming from below, you are in the larger, eastern portion of the floor. The first Magic Ball of this dungeon (omitted in the Master System port)! It raises intelligence and deals 200 damage. Give it to any Companion with low intelligence, except Geoffrey and Katrina. The other stairs down lead to a single-tile pit.
D5-b
Coming from below, you are in the smaller, north-eastern portion of the floor. The purple fields in the room inflict sleep, but they are otherwise harmless.
D6-a
Coming from below, you are in the smaller, south-western portion of the floor. Use the halberd to weaken the hydras across the magic energy fields. The trigger to remove all fields is under the chest beyond the campfire.
D5-a
Coming from below, you are in the larger portion of the floor. The fountain on this floor fully refreshes health. The second Magic Orb is protected by three traps: a darkening wind and two falling rocks. There are seven chests in most versions, but they are eleven in the Master System port.
D4
This floor is optional, and can be quickly skipped. The north room has five chests; when the bridges fall, a Companion can walk through the north wall. The south room has eleven chests (including two mimics) protected by energy and poison fields: dispel just the energy field, have a single Companion cross the poison and then cast Cure on him or her.
D3
The third and fourth magic orbs are on this floor. The downwards stairs to the west lead to a corridor with fifteen chests (thirty in the Master Syetm port).
D2
Coming from level 3, there are three rooms in a row. Several invisible triggers in the third one (the westmost one) close down the way out; the trigger to open again is in the north-east corner.
D1
The two fountains cure poison. In the room, the chests near the reaper can be accessed after stepping on the mimic tile beyond the slimes.
The area surrounding the entrance to Dungeon Deceit. If you cast a "Blink" spell, the party will teleport to another island, and from there you could even land in the middle of poisonous swamps.
When you emerge from the entrance of dungeon Deceit, [P]eer at a gem: the party is on an islet near a larger island. You will need the "Gate" spell to get back to the mainland. Alternatively, you can cast a blink to the north to reach the bigger island that it's next to the mainland (which can be reached with a second blink).