(added a fairly thorough description of the world map features (location icons are still missing) and a very basic start on describing the various stages of combat) |
(made significant improvements to existing text, added sections about parties and Renown; this page is probably complete now) |
||
| Line 1: | Line 1: | ||
{{Header Nav|game=Mount&Blade}} | {{Header Nav|game=Mount&Blade}} | ||
==The world map== | ==The world map== | ||
[[Image:Mount&Blade map example.jpg|left]] | [[Image:Mount&Blade map example.jpg|left|The world map]] | ||
Mount&Blade's gameplay centers around a [[Mount&Blade/Maps|world map]]. The map shows the entirety of the game world, and features visual representations of different structures and terrain features. Parties are represented by single figures, and move around the map in real time (not unlike [[Star Fox 2]]). Time pauses whenever your party is not moving, but you can progress time by holding {{kbd|Space}}. Time is also paused in towns and during combat. | Mount&Blade's gameplay centers around a [[Mount&Blade/Maps|world map]]. The map shows the entirety of the game world, and features visual representations of different structures and terrain features. Parties are represented by single figures, and move around the map in real time (not unlike [[Star Fox 2]]). Time pauses whenever your party is not moving, but you can progress time by holding {{kbd|Space}}. Time is also paused in towns and during combat. | ||
The primary control for the map is {{mouse|l}} and the direction keys ({{kbd|W}}{{kbd|A}}{{kbd|S}}{{kbd|D}}). Structures and parties on the world map can be interacted with by travelling to them using {{mouse|l}}. If the party is friendly or neutral you can talk to them, but if they are hostile they will try to fight you. Hostile parties smaller than your own will run from you, while hostile parties larger than yours will hunt you down. | The primary control for the map is {{mouse|l}} and the direction keys ({{kbd|W}}{{kbd|A}}{{kbd|S}}{{kbd|D}}). Structures and parties on the world map can be interacted with by travelling to them using {{mouse|l}}. If the party is friendly or neutral you can talk to them, but if they are hostile they will try to fight you. Hostile parties smaller than your own will run from you, while hostile parties larger than yours will hunt you down. | ||
{{-}} | {{-}} | ||
[[Image:Mount&Blade tracking example.jpg| | ===Party details=== | ||
[[Image:Mount&Blade faction colors.png|left|The faction colors]] | |||
[[Image:Mount&Blade party pop-up.jpg|right|An example pop-up]] | |||
Each party has a label showing how many troops are in that party (numbers shown after a "+" are prisoners). Each faction has a distinctive color that is used for the labels of all their parties and properties. Parties that have no faction have white labels, as does yours (even after you have joined a faction). | |||
Hovering the mouse cursor over a party or location will show you the forces it has, as well as the faction it belongs to (if any). Hero names are listed with their health as a percentage in parentheses. Troop names are also listed in parentheses, but wounded troops are counted separately after a forward slash (/) to indicate that they are present but unfit for combat. | |||
At the very bottom of the pop-up is a list of prisoners they have captured alive (if they have no prisoners this part and its heading will be omitted). | |||
{{-}} | |||
===Tracking and visibility=== | |||
[[Image:Mount&Blade tracking example.jpg|left|Tracks on the world map]] | |||
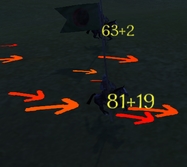
If you have a character who knows [[Mount&Blade/Skills#Tracking|Tracking]] you will see arrows appear on the world map to represent tracks left by parties (including your own). The direction they point indicates the direction parties have taken on the map, and, at higher skill levels, the approximate party size. At higher skill levels the arrows will also be colored to represent the strength of the party. | If you have a character who knows [[Mount&Blade/Skills#Tracking|Tracking]] you will see arrows appear on the world map to represent tracks left by parties (including your own). The direction they point indicates the direction parties have taken on the map, and, at higher skill levels, the approximate party size. At higher skill levels the arrows will also be colored to represent the strength of the party. | ||
Your visibility on the map is limited; while locations are always visible, parties disappear after they go a certain distance away from you. You can increase the distance at which you can see other parties by increasing your [[Mount&Blade/Skills#Spotting|Spotting]] skill. Visibility is lower at night than it is during the day, and parties also move slower. | Your visibility on the map is limited; while locations are always visible, parties disappear after they go a certain distance away from you. You can increase the distance at which you can see other parties by increasing your [[Mount&Blade/Skills#Spotting|Spotting]] skill. Visibility is lower at night than it is during the day, and parties also move slower. | ||
{{-}} | {{-}} | ||
[[Image:Mount&Blade battle example.jpg| | ===AI battles=== | ||
[[Image:Mount&Blade battle example.jpg|right|Two AI parties engaged in battle]] | |||
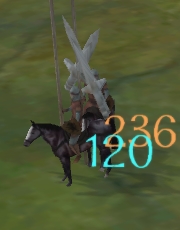
When two or more hostile parties clash with each other they will stand adjacent with a recognisable "crossed swords" symbol over their heads. You will also hear the sound of battle as you draw near. | When two or more hostile parties clash with each other they will stand adjacent with a recognisable "crossed swords" symbol over their heads. You will also hear the sound of battle as you draw near. | ||
| Line 19: | Line 30: | ||
{{-}} | {{-}} | ||
==Combat== | ==Combat== | ||
[[Image:Mount&Blade enemy dialog.jpg|thumb|left|200px|A typical confrontation]] | |||
Once you have encountered a hostile force you will be faced with a menu showing the party sizes and giving you the combat options "Charge the enemy" and "Order your men to engage the enemy while you stay back". If you were the one chasing the hostile party you will see a "Leave" option at the bottom, which lets you flee the battle without any negative consequences. If they were chasing you you will instead see a "Surrender" option, which makes you lose all your men and some of your gold and equipment. By fighting well you can earn the "Leave" option regardless of which party was the aggressor. | Once you have encountered a hostile force you will be faced with a menu showing the party sizes and giving you the combat options "Charge the enemy" and "Order your men to engage the enemy while you stay back". If you were the one chasing the hostile party you will see a "Leave" option at the bottom, which lets you flee the battle without any negative consequences. If they were chasing you you will instead see a "Surrender" option, which makes you lose all your men and some of your gold and equipment. By fighting well you can earn the "Leave" option regardless of which party was the aggressor. | ||
{{-}} | |||
[[Image:Mount&Blade aftermath.jpg|right|The aftermath of a battle]] | |||
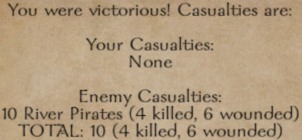
At the end of each round of the battle you will see a screen detailing what men were killed or wounded on each side, and you will be presented with appropriate menu options. If it is the last round of battle the next screen will let you take prisoners and rescue the enemy's prisoners, and the screen after that will let you select loot from the fallen to place in your own inventory. You and your men will also earn some experience and gold, and if the force you defeated was larger than your own you will earn some Renown. | |||
==Renown== | |||
Central to your relations with various factions is Renown. Renown points are earned by displaying valor in combat. The more Renown you have the bigger your party can be, and once you have 160 Renown you can join a faction. Increasing your Renown also makes your king more likely to grant you a [[Mount&Blade/Fiefs|fief]] after a successful castle siege. You can view your current Renown by clicking on Reports and then choosing Character report. | |||
Revision as of 21:56, 2 December 2007
The world map
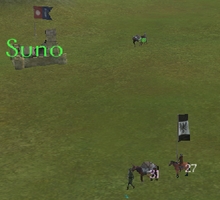
Mount&Blade's gameplay centers around a world map. The map shows the entirety of the game world, and features visual representations of different structures and terrain features. Parties are represented by single figures, and move around the map in real time (not unlike Star Fox 2). Time pauses whenever your party is not moving, but you can progress time by holding Space . Time is also paused in towns and during combat.
The primary control for the map is ![]() and the direction keys ( W A S D ). Structures and parties on the world map can be interacted with by travelling to them using
and the direction keys ( W A S D ). Structures and parties on the world map can be interacted with by travelling to them using ![]() . If the party is friendly or neutral you can talk to them, but if they are hostile they will try to fight you. Hostile parties smaller than your own will run from you, while hostile parties larger than yours will hunt you down.
. If the party is friendly or neutral you can talk to them, but if they are hostile they will try to fight you. Hostile parties smaller than your own will run from you, while hostile parties larger than yours will hunt you down.
Party details
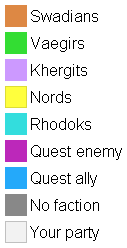
Each party has a label showing how many troops are in that party (numbers shown after a "+" are prisoners). Each faction has a distinctive color that is used for the labels of all their parties and properties. Parties that have no faction have white labels, as does yours (even after you have joined a faction).
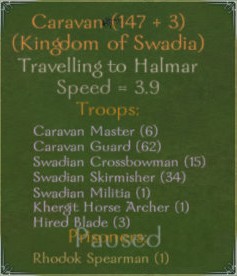
Hovering the mouse cursor over a party or location will show you the forces it has, as well as the faction it belongs to (if any). Hero names are listed with their health as a percentage in parentheses. Troop names are also listed in parentheses, but wounded troops are counted separately after a forward slash (/) to indicate that they are present but unfit for combat.
At the very bottom of the pop-up is a list of prisoners they have captured alive (if they have no prisoners this part and its heading will be omitted).
Tracking and visibility
If you have a character who knows Tracking you will see arrows appear on the world map to represent tracks left by parties (including your own). The direction they point indicates the direction parties have taken on the map, and, at higher skill levels, the approximate party size. At higher skill levels the arrows will also be colored to represent the strength of the party.
Your visibility on the map is limited; while locations are always visible, parties disappear after they go a certain distance away from you. You can increase the distance at which you can see other parties by increasing your Spotting skill. Visibility is lower at night than it is during the day, and parties also move slower.
AI battles
When two or more hostile parties clash with each other they will stand adjacent with a recognisable "crossed swords" symbol over their heads. You will also hear the sound of battle as you draw near.
If one of the parties is a friend and the other an enemy you can jump into the battle to help your allies. If you are neutral to both factions you cannot join the battle.
As time goes by the parties' forces will be wounded or killed, and then the one that is losing will either flee from their attackers or else they will be utterly destroyed and the survivors will be taken prisoner. If you attack a hostile force that has prisoners you can rescue them and add them to your own party (see Party for more information).
Combat

Once you have encountered a hostile force you will be faced with a menu showing the party sizes and giving you the combat options "Charge the enemy" and "Order your men to engage the enemy while you stay back". If you were the one chasing the hostile party you will see a "Leave" option at the bottom, which lets you flee the battle without any negative consequences. If they were chasing you you will instead see a "Surrender" option, which makes you lose all your men and some of your gold and equipment. By fighting well you can earn the "Leave" option regardless of which party was the aggressor.
At the end of each round of the battle you will see a screen detailing what men were killed or wounded on each side, and you will be presented with appropriate menu options. If it is the last round of battle the next screen will let you take prisoners and rescue the enemy's prisoners, and the screen after that will let you select loot from the fallen to place in your own inventory. You and your men will also earn some experience and gold, and if the force you defeated was larger than your own you will earn some Renown.
Renown
Central to your relations with various factions is Renown. Renown points are earned by displaying valor in combat. The more Renown you have the bigger your party can be, and once you have 160 Renown you can join a faction. Increasing your Renown also makes your king more likely to grant you a fief after a successful castle siege. You can view your current Renown by clicking on Reports and then choosing Character report.
