m (Stubbed) |
(Grammar edits) |
||
| (8 intermediate revisions by 4 users not shown) | |||
| Line 1: | Line 1: | ||
{{Header Nav|game=Professor Layton and the Curious Village}} | {{Header Nav|game=Professor Layton and the Curious Village}} | ||
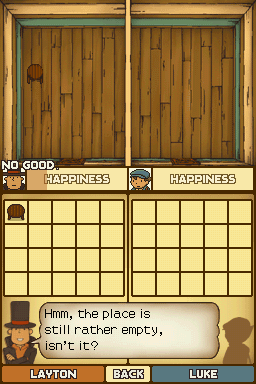
[[File:PLatCV_Inn_Room.png|thumb|After visiting the Inn and receiving the first furniture.]] | |||
Upon securing accommodations at the Inn, Layton and Luke will begin to receive furniture for their bare rooms. This section helps you arrange the furniture in a way that will make Luke and Layton both happy. To furnish these rooms, Luke and Layton begin receiving items as rewards for solving puzzles. | |||
Layton and Luke have different tastes. It is your task to give each gentleman the items he needs to feel most comfortable in his room. When both Layton and Luke are satisfied, something good will happen! | |||
To switch furniture between Luke and Layton, tap the furniture with the stylus and drag it across the screen to an empty square above Luke or Layton's heads. Whenever you receive a new piece of furniture, be sure to try it out in both Luke and Layton's rooms to see who will enjoy it more. | |||
{{-}} | |||
==Where to Find== | |||
{| {{prettytable|text center=1}} | |||
!Inn Item||Person Who Needs It||Puzzle||Location | |||
|- | |||
|[[File:PLatCV_Lacquered_Stool.png]] Lacquered Stool | |||
|[[File:PLatCV_Professor_Layton.png]] Layton | |||
|Automatic | |||
|Inn<br />Beatrice | |||
|- | |||
|[[File:PLatCV_Handmade_Rug.png]] Handmade Rug | |||
|[[File:PLatCV_Professor_Layton.png]] Layton | |||
|[[../Puzzles 1-25#Puzzle 018|Puzzle 018]] | |||
|Inn<br />Beatrice | |||
|- | |||
|[[File:PLatCV_Pine_Bed.png]] Pine Bed | |||
|[[File:PLatCV_Professor_Layton.png]] Layton | |||
|[[../Puzzles 26-50#Puzzle 033|Puzzle 033]] | |||
|General Store<br />Candle | |||
|- | |||
|[[File:PLatCV_Blue_Bed.png]] Blue Bed | |||
|[[File:PLatCV_Luke.png]] Luke | |||
|[[../Puzzles 26-50#Puzzle 043|Puzzle 043]] | |||
|Clock Tower<br />Lucy | |||
|- | |||
|[[File:PLatCV_Stuffed_Bear.png]] Stuffed Bear | |||
|[[File:PLatCV_Luke.png]] Luke | |||
|[[../Puzzles 26-50#Puzzle 046|Puzzle 046]] | |||
|Park Gate<br />Deke | |||
|- | |||
|[[File:PLatCV_Cream_Rug.png]] Cream Rug | |||
|[[File:PLatCV_Luke.png]] Luke | |||
|[[../Puzzles 26-50#Puzzle 047|Puzzle 047]] | |||
|Plaza<br />Gerard | |||
|- | |||
|[[File:PLatCV_Bookcase.png]] Bookcase | |||
|[[File:PLatCV_Luke.png]] Luke | |||
|[[../Puzzles 26-50#Puzzle 049|Puzzle 049]] | |||
|Clock Tower<br />Lucy | |||
|- | |||
|[[File:PLatCV_Teak_Bureau.png]] Teak Bureau | |||
|[[File:PLatCV_Professor_Layton.png]] Layton | |||
|[[../Puzzles 26-50#Puzzle 050|Puzzle 050]] | |||
|Fork in the Road<br />Marco | |||
|- | |||
|[[File:PLatCV_Television.png]] Television | |||
|[[File:PLatCV_Luke.png]] Luke | |||
|[[../Puzzles 51-75#Puzzle 053|Puzzle 053]] | |||
|Market<br />Agnes | |||
|- | |||
|[[File:PLatCV_Simple_Chair.png]] Simple Chair | |||
|[[File:PLatCV_Luke.png]] Luke | |||
|[[../Puzzles 51-75#Puzzle 055|Puzzle 055]] | |||
|Inn<br />Beatrice | |||
|- | |||
|[[File:PLatCV_Desk.png]] Desk | |||
|[[File:PLatCV_Luke.png]] Luke | |||
|[[../Puzzles 51-75#Puzzle 056|Puzzle 056]] | |||
|Entrance<br />Stachen | |||
|- | |||
|[[File:PLatCV_Pile_of_Books.png]] Pile of Books | |||
|[[File:PLatCV_Luke.png]] Luke | |||
|[[../Puzzles 51-75#Puzzle 057|Puzzle 057]] | |||
|Plaza<br />Deke | |||
|- | |||
|[[File:PLatCV_Wall_Clock.png]] Wall Clock | |||
|[[File:PLatCV_Professor_Layton.png]] Layton | |||
|[[../Puzzles 51-75#Puzzle 061|Puzzle 061]] | |||
|Manor Parlor<br />Gordon | |||
|- | |||
|[[File:PLatCV_Splendid_Painting.png]] Splendid Painting | |||
|[[File:PLatCV_Professor_Layton.png]] Layton | |||
|[[../Puzzles 51-75#Puzzle 063|Puzzle 063]] | |||
|Manor Parlor<br />Lady Dahlia | |||
|- | |||
|[[File:PLatCV_World_Map.png]] World Map | |||
|[[File:PLatCV_Luke.png]] Luke | |||
|[[../Puzzles 51-75#Puzzle 069|Puzzle 069]] | |||
|Prosciutto's<br />Prosciutto | |||
|- | |||
|[[File:PLatCV_Flower_Vase.png]] Flower Vase | |||
|[[File:PLatCV_Professor_Layton.png]] Layton | |||
|[[../Puzzles 51-75#Puzzle 071|Puzzle 071]] | |||
|Market<br />Giuseppe | |||
|- | |||
|[[File:PLatCV_Reading_Lamp.png]] Reading Lamp | |||
|[[File:PLatCV_Luke.png]] Luke | |||
|[[../Puzzles 51-75#Puzzle 072|Puzzle 072]] | |||
|Plaza<br />Percy | |||
|- | |||
|[[File:PLatCV_Gramophone.png]] Gramophone | |||
|[[File:PLatCV_Professor_Layton.png]] Layton | |||
|[[../Puzzles 51-75#Puzzle 073|Puzzle 073]] | |||
|Town Hall<br />Rodney | |||
|- | |||
|[[File:PLatCV_Globe.png]] Globe | |||
|[[File:PLatCV_Luke.png]] Luke | |||
|[[../Puzzles 51-75#Puzzle 075|Puzzle 075]] | |||
|Market<br />Agnes | |||
|- | |||
|[[File:PLatCV_Houseplant.png]] Houseplant | |||
|[[File:PLatCV_Professor_Layton.png]] Layton | |||
|[[../Puzzles 76-100#Puzzle 077|Puzzle 077]] | |||
|Park Road<br />Adrea | |||
|- | |||
|[[File:PLatCV_Flower_Bouquet.png]] Flower Bouquet | |||
|[[File:PLatCV_Professor_Layton.png]] Layton | |||
|[[../Puzzles 76-100#Puzzle 078|Puzzle 078]] | |||
|Restaurant<br />Crouton | |||
|- | |||
|[[File:PLatCV_Stuffed_Chair.png]] Stuffed Chair | |||
|[[File:PLatCV_Professor_Layton.png]] Layton | |||
|[[../Puzzles 76-100#Puzzle 080|Puzzle 080]] | |||
|Restaurant<br />Flick/Nick | |||
|- | |||
|[[File:PLatCV_Hat_Rack.png]] Hat Rack | |||
|[[File:PLatCV_Professor_Layton.png]] Layton | |||
|[[../Puzzles 76-100#Puzzle 082|Puzzle 082]] | |||
|Restaurant<br />Flick/Nick | |||
|- | |||
|[[File:PLatCV_Fossil.png]] Fossil | |||
|[[File:PLatCV_Professor_Layton.png]] Layton | |||
|[[../Puzzles 76-100#Puzzle 085|Puzzle 085]] | |||
|Outside the Sewer<br />Laytonmobile | |||
|- | |||
|[[File:PLatCV_Violin.png]] Violin | |||
|[[File:PLatCV_Luke.png]] Luke | |||
|[[../Puzzles 76-100#Puzzle 088|Puzzle 088]] | |||
|Shack Path<br />Sylvain | |||
|- | |||
|[[File:PLatCV_Artisans Teapot.png]] Artisan's Teapot | |||
|[[File:PLatCV_Professor_Layton.png]] Layton | |||
|[[../Puzzles 76-100#Puzzle 089|Puzzle 089]] | |||
|Under the Shack<br />Stone Tablet | |||
|- | |||
|[[File:PLatCV_Bone_China_Teacup.png]] Bone China Teacup | |||
|[[File:PLatCV_Professor_Layton.png]] Layton | |||
|[[../Puzzles 76-100#Puzzle 091|Puzzle 091]] | |||
|Underground Area<br />Painting | |||
|- | |||
|[[File:PLatCV_Mysterious_Bottle.png]] Mysterious Bottle | |||
|[[File:PLatCV_Professor_Layton.png]] Layton | |||
|[[../Puzzles 101-120#Puzzle 103|Puzzle 103]] | |||
|Manor Parlor<br />Gordon | |||
|- | |||
|[[File:PLatCV_Baron_Statue.png]] Baron Statue | |||
|[[File:PLatCV_Professor_Layton.png]] Layton | |||
|[[../Puzzles 101-120#Puzzle 104|Puzzle 104]] | |||
|Prosciutto's<br />Prosciutto | |||
|- | |||
|[[File:PLatCV_Teak_Table.png]] Teak Table | |||
|[[File:PLatCV_Professor_Layton.png]] Layton | |||
|[[../Puzzles 101-120#Puzzle 109|Puzzle 109]] | |||
|Archibald's<br />Archibald | |||
|} | |||
==Decorating== | |||
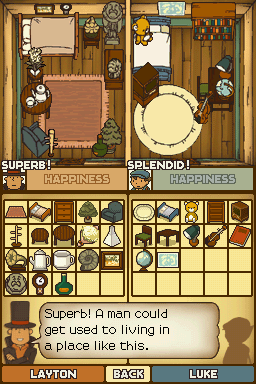
[[File:PLatCV_Rooms_complete.png|thumb|left|Arrange the rooms like this.]] | |||
Once you've gotten all 30 furniture pieces, check out the Inn Rooms in the Main menu to see if you have sorted the furniture properly. If not, then you can arrange the furniture manually by checking the Pic to the left to see which furniture goes in which room. | |||
If all the furniture pieces are sorted properly (in other words; they are happy), then you will gain access to the [[../Layton's Challenges|The Decorator's House]] which will have 3 new Puzzles ready for you. If by accident you missed one furniture, then look up the table to see where you can get it. | |||
{{Footer Nav|game=Professor Layton and the Curious Village|prevpage=Painting Scraps|nextpage=Puzzles 1-25}} | {{Footer Nav|game=Professor Layton and the Curious Village|prevpage=Painting Scraps|nextpage=Puzzles 1-25}} | ||
Latest revision as of 14:01, 30 October 2019

Upon securing accommodations at the Inn, Layton and Luke will begin to receive furniture for their bare rooms. This section helps you arrange the furniture in a way that will make Luke and Layton both happy. To furnish these rooms, Luke and Layton begin receiving items as rewards for solving puzzles.
Layton and Luke have different tastes. It is your task to give each gentleman the items he needs to feel most comfortable in his room. When both Layton and Luke are satisfied, something good will happen!
To switch furniture between Luke and Layton, tap the furniture with the stylus and drag it across the screen to an empty square above Luke or Layton's heads. Whenever you receive a new piece of furniture, be sure to try it out in both Luke and Layton's rooms to see who will enjoy it more.
Where to Find[edit]
| Inn Item | Person Who Needs It | Puzzle | Location |
|---|---|---|---|
| Automatic | Inn Beatrice | ||
| Puzzle 018 | Inn Beatrice | ||
| Puzzle 033 | General Store Candle | ||
| Puzzle 043 | Clock Tower Lucy | ||
| Puzzle 046 | Park Gate Deke | ||
| Puzzle 047 | Plaza Gerard | ||
| Puzzle 049 | Clock Tower Lucy | ||
| Puzzle 050 | Fork in the Road Marco | ||
| Puzzle 053 | Market Agnes | ||
| Puzzle 055 | Inn Beatrice | ||
| Puzzle 056 | Entrance Stachen | ||
| Puzzle 057 | Plaza Deke | ||
| Puzzle 061 | Manor Parlor Gordon | ||
| Puzzle 063 | Manor Parlor Lady Dahlia | ||
| Puzzle 069 | Prosciutto's Prosciutto | ||
| Puzzle 071 | Market Giuseppe | ||
| Puzzle 072 | Plaza Percy | ||
| Puzzle 073 | Town Hall Rodney | ||
| Puzzle 075 | Market Agnes | ||
| Puzzle 077 | Park Road Adrea | ||
| Puzzle 078 | Restaurant Crouton | ||
| Puzzle 080 | Restaurant Flick/Nick | ||
| Puzzle 082 | Restaurant Flick/Nick | ||
| Puzzle 085 | Outside the Sewer Laytonmobile | ||
| Puzzle 088 | Shack Path Sylvain | ||
| Puzzle 089 | Under the Shack Stone Tablet | ||
| Puzzle 091 | Underground Area Painting | ||
| Puzzle 103 | Manor Parlor Gordon | ||
| Puzzle 104 | Prosciutto's Prosciutto | ||
| Puzzle 109 | Archibald's Archibald |
Decorating[edit]

Once you've gotten all 30 furniture pieces, check out the Inn Rooms in the Main menu to see if you have sorted the furniture properly. If not, then you can arrange the furniture manually by checking the Pic to the left to see which furniture goes in which room.
If all the furniture pieces are sorted properly (in other words; they are happy), then you will gain access to the The Decorator's House which will have 3 new Puzzles ready for you. If by accident you missed one furniture, then look up the table to see where you can get it.