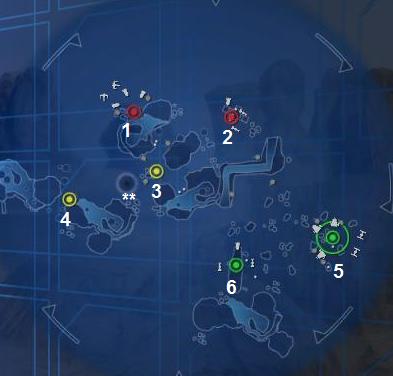
- Several turrets guard this command post, let the battle develop before rushing in here.
- This CP is underground, in a house. It can be tough to capture, but it gives immense security to your starting command posts.
- This command post is controlled by the Tusken Raiders at the start of the game. Don't underestimate the Sand People: their guns pack a punch and they're wicked accurate.
- Don't even bother taking this one. Tuskens have no effect on your reinforcements, nor that of your opponents. To top it all off, they have no reinforcement limit of their own!
- Here's where the big guns are. Three AT-STs and two TIE fighters (don't use) make this an excellent starting point for anyone who wants to feel powerful.
- Not quite as much firepower here as at your other command post. Don't worry about defending these last two CPs, no one will make it past the AT-STs.
** WARNING: the circle on the map denoted by two asterisks is the Sarlacc Pit. If you've seen Episode VI, you'll know what it does; therefore, you would do well to stay away from it. It doesn't care who you fight for, it'll eat anybody!
Overview
- Your faction: Empire
- Easy reinforcements: 250
- Opposing army: Rebels
- Easy reinforcements: 250
- Third party: Tusken Raiders
- Vehicles on map: Empire: AT-ST, TIE fighter, speeder bike, skiff; Rebels: X-Wing, speeder bike, skiff
- Jedi hero: none
Walkthrough
Like most of the levels in this game, there is more than one way to win the battle. Here you will find the two best/quickest.
Winning strategy #1: Start the game as a pilot and jump into an AT-ST (5). Walk directly north and angle towards CP 2. The only way for the Rebels to beat you is if they swarm you, so don't let them get on all sides. Once you've totalled a couple AT-STs, show them you mean business: spawn as a grunt soldier at either command post and take "the homestead" (2). Move on to CP 1, being careful to take out anyone in a turret. After this, you should have nothing but remnants of any Rebel opposition. Show them no mercy.
Winning Strategy #2: Spawn as a sniper (Scout Trooper) (6). The walkway you see on the map, about two-thirds of the way from CP 6 to CP 2, is elevated. Walk to the top of that bridge and start sniping enemy units who spawn at the command post below. Try to aim for their heads, and remember: most of the time you can find somebody who's not moving, giving you an easier shot. With this method, you can continue for as long as you can find ammo, because your troops aren't smart enough to take the command post mentioned above. At any time, feel free to pick up somewhere in Winning Strategy #1. Or experiment and come up with your own way to beat the level. Just be careful; the area under the bridge can get nasty if all the turrets are manned.
