(Corrected the order of pokemon in a battle.) |
(Put Wild/New Pokémon and trainers into new templates) Tags: Mobile edit Mobile web edit |
||
| Line 1: | Line 1: | ||
{{Header Nav|game=Pokémon Red and Blue}} | {{Header Nav|game=Pokémon Red and Blue}} | ||
== | '''Buried somewhere in the rubble of Pokémon Mansion is the Secret Key that opens the Cinnabar Island Gym. There are plenty of salvageable items amongst the wreckage, as well as clues regarding the dangerous experimental Pokémon that escaped. Hunt carefully, as there are lots of powerful Pokémon here as well!''' | ||
==How to get Gym key== | |||
The door to the Gym is locked, and rumors suggest the key is lost in the abandoned mansion. You can get through the mansion fairly quickly, but the random Pokémon that lurk here, especially a wild {{bp|Muk}}, can be fierce. | The door to the Gym is locked, and rumors suggest the key is lost in the abandoned mansion. You can get through the mansion fairly quickly, but the random Pokémon that lurk here, especially a wild {{bp|Muk}}, can be fierce. | ||
| Line 31: | Line 12: | ||
The items include a number of stat-enhancing supplements, and two TMs. '''TM 22''' is the most powerful Grass attack, Solarbeam, and '''TM 14''' is the super-powerful Ice attack Blizzard, which you'll definitely need for the Elite Four. There is also a hidden '''Moon Stone''' in one of the pillars on Floor 1, right after you enter the mansion. There is a hidden '''Max Revive''' on Floor 3, at the top of the narrow path above marker A. There is a '''Rare Candy''' in the basement, in the room with the Secret Key near the top-left corner (above the plants). Also fight all the Burglars that you can — they'll give you good EXP and a ton of cash. | The items include a number of stat-enhancing supplements, and two TMs. '''TM 22''' is the most powerful Grass attack, Solarbeam, and '''TM 14''' is the super-powerful Ice attack Blizzard, which you'll definitely need for the Elite Four. There is also a hidden '''Moon Stone''' in one of the pillars on Floor 1, right after you enter the mansion. There is a hidden '''Max Revive''' on Floor 3, at the top of the narrow path above marker A. There is a '''Rare Candy''' in the basement, in the room with the Secret Key near the top-left corner (above the plants). Also fight all the Burglars that you can — they'll give you good EXP and a ton of cash. | ||
[[ | |||
{| {{prettytable|float= | ==1F== | ||
[[File:Pokemon RBY Pokemon Mansion 1F.png|thumb|1F]] | |||
{| {{prettytable|float=right|style=font-size:smaller}} | |||
|- | |- | ||
|style="background:#c080ff"|'''1'''||style="background:#c080ff"|Scientist | |style="background:#c080ff"|'''1'''||style="background:#c080ff"|Scientist | ||
|- | |- | ||
|style="background-color:#c080ff"|'''A''' | |style="background-color:#c080ff"|'''A''' | ||
| | ||Escape Rope | ||
|- | |- | ||
|style="background-color:#c080ff"|'''B''' | |style="background-color:#c080ff"|'''B''' | ||
| | ||Carbos | ||
|} | |} | ||
{{sidebar|float=right|width=200px|title=Statues|contents=Unlocking the many doors throughout Pokémon Mansion is no more difficult than pressing the buttons on the statues on each floor. The maps show you the doors in their default positions, so you can predict which ones will disappear when you press the buttons. Push them as needed to make your way through the level and collect all the items.}} | {{sidebar|float=right|width=200px|title=Statues|contents=Unlocking the many doors throughout Pokémon Mansion is no more difficult than pressing the buttons on the statues on each floor. The maps show you the doors in their default positions, so you can predict which ones will disappear when you press the buttons. Push them as needed to make your way through the level and collect all the items.}} | ||
{{ | |||
[[ | ===Trainers=== | ||
{{ContentBoxContainer}} | |||
{{Pokemon/Trainer|RB}} | |||
{{Pokemon/Trainer row|RB|Scientist||1450}} | |||
{{Pokemon/Trainer mon|RB|101|29}} | |||
{{Pokemon/Trainer mon|RB|110|29}} | |||
|} | |||
{{Pokemon/Trainer|YEL}} | |||
{{Pokemon/Trainer row|YEL|Scientist||1450}} | |||
{{Pokemon/Trainer mon|YEL|101|29}} | |||
{{Pokemon/Trainer mon|YEL|110|29}} | |||
|} | |||
</div> | |||
===Pokémon found=== | |||
{{ContentBoxContainer}} | |||
{{Pokemon/Wild|RED}} | |||
{{Pokemon/Wild row|RB||058|34|10|bp=1}} | |||
{{Pokemon/Wild row|RB||077|28,30,32,34|40|bp=1}} | |||
{{Pokemon/Wild row|RB||088|30|5|bp=1}} | |||
{{Pokemon/Wild row|RB||089|39|1|bp=1}} | |||
{{Pokemon/Wild row|RB||109|30,32|40|bp=1}} | |||
{{Pokemon/Wild row|RB||110|37|4|bp=1}} | |||
|} | |||
{{Pokemon/Wild|BLU}} | |||
{{Pokemon/Wild row|RB||037|34|10|bp=1}} | |||
{{Pokemon/Wild row|RB||077|28,30,32,34|40}} | |||
{{Pokemon/Wild row|RB||088|30,32|40}} | |||
{{Pokemon/Wild row|RB||089|37|4}} | |||
{{Pokemon/Wild row|RB||109|30|5}} | |||
{{Pokemon/Wild row|RB||110|39|1}} | |||
|} | |||
{{Pokemon/Wild|YEL}} | |||
{{Pokemon/Wild row|YEL||019|34,37|35|bp=1}} | |||
{{Pokemon/Wild row|YEL||020|34,37|25|bp=1}} | |||
{{Pokemon/Wild row|YEL||037|26,30,34,38|20}} | |||
{{Pokemon/Wild row|YEL||088|23,26|20}} | |||
|} | |||
</div> | |||
==2F== | |||
[[File:Pokemon RBY Pokemon Mansion 2F.png|thumb|2F]] | |||
{| {{prettytable|float=left|style=font-size:smaller}} | {| {{prettytable|float=left|style=font-size:smaller}} | ||
|- | |- | ||
|style="background:#c080ff"|'''1'''||style="background:#c080ff"|Burglar | |style="background:#c080ff"|'''1'''||style="background:#c080ff"|Burglar | ||
|- | |- | ||
|style="background-color:#c080ff"|'''A''' | |style="background-color:#c080ff"|'''A''' | ||
| | ||Calcium | ||
|} | |} | ||
{{ | |||
[[ | ===Trainers=== | ||
{{ContentBoxContainer}} | |||
{{Pokemon/Trainer|RB}} | |||
{{Pokemon/Trainer row|RB|Burglar||3060}} | |||
{{Pokemon/Trainer mon|RB|004|34}} | |||
{{Pokemon/Trainer mon|RB|005|34}} | |||
|} | |||
{{Pokemon/Trainer|YEL}} | |||
{{Pokemon/Trainer row|YEL|Burglar||3060}} | |||
{{Pokemon/Trainer mon|YEL|004|34}} | |||
{{Pokemon/Trainer mon|YEL|005|34}} | |||
|} | |||
</div> | |||
===Pokémon found=== | |||
{{ContentBoxContainer}} | |||
{{Pokemon/Wild|RED}} | |||
{{Pokemon/Wild row|RB||058|32|25|bp=1}} | |||
{{Pokemon/Wild row|RB||077|28,30,32|25|bp=1}} | |||
{{Pokemon/Wild row|RB||088|30|5|bp=1}} | |||
{{Pokemon/Wild row|RB||089|37|1|bp=1}} | |||
{{Pokemon/Wild row|RB||109|30,34|40|bp=1}} | |||
{{Pokemon/Wild row|RB||110|39|4|bp=1}} | |||
|} | |||
{{Pokemon/Wild|BLU}} | |||
{{Pokemon/Wild row|RB||037|32|25|bp=1}} | |||
{{Pokemon/Wild row|RB||077|28,30,32|25}} | |||
{{Pokemon/Wild row|RB||088|30,34|40}} | |||
{{Pokemon/Wild row|RB||089|39|4}} | |||
{{Pokemon/Wild row|RB||109|30|5}} | |||
{{Pokemon/Wild row|RB||110|37|1}} | |||
|} | |||
{{Pokemon/Wild|YEL}} | |||
{{Pokemon/Wild row|YEL||019|34,37|35|bp=1}} | |||
{{Pokemon/Wild row|YEL||020|34,37|25|bp=1}} | |||
{{Pokemon/Wild row|YEL||088|26,29,32,35|35}} | |||
{{Pokemon/Wild row|YEL||089|35,38|5}} | |||
|} | |||
</div> | |||
==3F== | |||
[[File:Pokemon RBY Pokemon Mansion 3F.png|thumb|3F]] | |||
{| {{prettytable|float=left|style=font-size:smaller}} | {| {{prettytable|float=left|style=font-size:smaller}} | ||
|- | |- | ||
|style="background:#c080ff"|'''1'''||style="background:#c080ff"|Burglar | |style="background:#c080ff"|'''1'''||style="background:#c080ff"|Burglar | ||
|- | |- | ||
|style="background:#c080ff"|'''2'''||style="background:#c080ff"|Scientist | |style="background:#c080ff"|'''2'''||style="background:#c080ff"|Scientist | ||
|- | |- | ||
|style="background-color:#c080ff"|'''A''' | |style="background-color:#c080ff"|'''A''' | ||
| | ||Max Potion | ||
|- | |- | ||
|style="background-color:#c080ff"|'''B''' | |style="background-color:#c080ff"|'''B''' | ||
| | ||Iron | ||
|} | |} | ||
{{sidebar|float=right|width=200px|title=Leap of Faith|contents=The Secret Key to the local Gym is in the basement, but you must go upstairs first. As you explore, flip the switches on the statues to open the electronic doors. Make your way up to the third floor and leap off the ledge in the bottom-middle of the screen, the largest gap that you see. You'll land in the basement. Defeat a nearby trainer to open another door. Follow the hall to find the key.}} | {{sidebar|float=right|width=200px|title=Leap of Faith|contents=The Secret Key to the local Gym is in the basement, but you must go upstairs first. As you explore, flip the switches on the statues to open the electronic doors. Make your way up to the third floor and leap off the ledge in the bottom-middle of the screen, the largest gap that you see. You'll land in the basement. Defeat a nearby trainer to open another door. Follow the hall to find the key.}} | ||
{{ | |||
[[ | ===Trainers=== | ||
{{ContentBoxContainer}} | |||
{{Pokemon/Trainer|RB}} | |||
{{Pokemon/Trainer row|RB|Burglar||3420}} | |||
{{Pokemon/Trainer mon|RB|038|38}} | |||
{{Pokemon/Trainer row|RB|Scientist||1650}} | |||
{{Pokemon/Trainer mon|RB|081|33}} | |||
{{Pokemon/Trainer mon|RB|082|33}} | |||
{{Pokemon/Trainer mon|RB|100|33}} | |||
|} | |||
{{Pokemon/Trainer|YEL}} | |||
{{Pokemon/Trainer row|YEL|Burglar||3420}} | |||
{{Pokemon/Trainer mon|YEL|038|38}} | |||
{{Pokemon/Trainer row|RB|Scientist||1650}} | |||
{{Pokemon/Trainer mon|YEL|081|33}} | |||
{{Pokemon/Trainer mon|YEL|082|33}} | |||
{{Pokemon/Trainer mon|YEL|100|33}} | |||
|} | |||
</div> | |||
===Pokémon found=== | |||
{{ContentBoxContainer}} | |||
{{Pokemon/Wild|RED}} | |||
{{Pokemon/Wild row|RB||058|33|15|bp=1}} | |||
{{Pokemon/Wild row|RB||077|32,34,36|24|bp=1}} | |||
{{Pokemon/Wild row|RB||088|34|5|bp=1}} | |||
{{Pokemon/Wild row|RB||089|42|1|bp=1}} | |||
{{Pokemon/Wild row|RB||109|31,35|40|bp=1}} | |||
{{Pokemon/Wild row|RB||110|38,40|15|bp=1}} | |||
|} | |||
{{Pokemon/Wild|BLU}} | |||
{{Pokemon/Wild row|RB||037|33|15|bp=1}} | |||
{{Pokemon/Wild row|RB||077|32,36|14}} | |||
{{Pokemon/Wild row|RB||088|31,35|40}} | |||
{{Pokemon/Wild row|RB||089|38,40|15}} | |||
{{Pokemon/Wild row|RB||109|34|5}} | |||
{{Pokemon/Wild row|RB||110|42|1}} | |||
{{Pokemon/Wild row|RB||126|34|10|bp=1}} | |||
|} | |||
{{Pokemon/Wild|YEL}} | |||
{{Pokemon/Wild row|YEL||019|40,43|35|bp=1}} | |||
{{Pokemon/Wild row|YEL||020|40,43|25|bp=1}} | |||
{{Pokemon/Wild row|YEL||088|32,35,38|35}} | |||
{{Pokemon/Wild row|YEL||089|38,41|5}} | |||
|} | |||
</div> | |||
==B1F== | |||
[[File:Pokemon RBY Pokemon Mansion B1F.png|thumb||B1F]] | |||
{| {{prettytable|float=left|style=font-size:smaller}} | {| {{prettytable|float=left|style=font-size:smaller}} | ||
|- | |- | ||
|style="background:#c080ff"|'''1'''||style="background:#c080ff"|Burglar | |style="background:#c080ff"|'''1'''||style="background:#c080ff"|Burglar | ||
|- | |- | ||
|style="background:#c080ff"|'''2'''||style="background:#c080ff"|Scientist | |||
|style="background:#c080ff"|'''2'''||style="background:#c080ff"|Scientist | |||
|- | |- | ||
|style="background-color:#c080ff"|'''A''' | |style="background-color:#c080ff"|'''A''' | ||
| | ||TM 14 | ||
|- | |- | ||
|style="background-color:#c080ff"|'''B''' | |style="background-color:#c080ff"|'''B''' | ||
| | ||Full Restore | ||
|- | |- | ||
|style="background-color:#c080ff"|'''C''' | |style="background-color:#c080ff"|'''C''' | ||
| | ||Rare Candy | ||
|- | |- | ||
|style="background-color:#c080ff"|'''D''' | |style="background-color:#c080ff"|'''D''' | ||
| | ||TM 22 | ||
|- | |- | ||
|style="background-color:#c080ff"|'''E''' | |style="background-color:#c080ff"|'''E''' | ||
| | ||Secret Key | ||
|} | |} | ||
{{sidebar|float=right|width=150px|title=Ditto that|contents=The mansion's basement is the one and only chance for Yellow players to catch a shape-shifting {{bp|Ditto}} before the Elite Four.}} | {{sidebar|float=right|width=150px|title=Ditto that|contents=The mansion's basement is the one and only chance for Yellow players to catch a shape-shifting {{bp|Ditto}} before the Elite Four.}} | ||
| Line 122: | Line 224: | ||
*In the basement, next to a Burglar and a Pokémon statue | *In the basement, next to a Burglar and a Pokémon statue | ||
}} | }} | ||
{{ | |||
{ | ===Trainers=== | ||
| | |||
{{ContentBoxContainer}} | |||
{{Pokemon/Trainer|RB}} | |||
{{Pokemon/Trainer row|RB|Burglar||3060}} | |||
{{Pokemon/Trainer mon|RB|058|34}} | |||
{{Pokemon/Trainer mon|RB|077|34}} | |||
| | {{Pokemon/Trainer row|RB|Scientist||1700}} | ||
| | {{Pokemon/Trainer mon|RB|081|34}} | ||
{{Pokemon/Trainer mon|RB|101|34}} | |||
|} | |||
{{Pokemon/Trainer|YEL}} | |||
| | {{Pokemon/Trainer row|YEL|Burglar||3060}} | ||
| | {{Pokemon/Trainer mon|YEL|058|34}} | ||
{{Pokemon/Trainer mon|YEL|077|34}} | |||
| | {{Pokemon/Trainer row|RB|Scientist||1700}} | ||
| | {{Pokemon/Trainer mon|YEL|081|34}} | ||
{{Pokemon/Trainer mon|YEL|101|34}} | |||
| | |} | ||
| | </div> | ||
| | ===Pokémon found=== | ||
| | |||
| | {{ContentBoxContainer}} | ||
| | {{Pokemon/Wild|RED}} | ||
{{Pokemon/Wild row|RB||058|35|15|bp=1}} | |||
| | {{Pokemon/Wild row|RB||077|32,34|15|bp=1}} | ||
| | {{Pokemon/Wild row|RB||088|35|5|bp=1}} | ||
{{Pokemon/Wild row|RB||089|42|1|bp=1}} | |||
| | {{Pokemon/Wild row|RB||109|31,33|50|bp=1}} | ||
| | {{Pokemon/Wild row|RB||110|40,42|14|bp=1}} | ||
|} | |||
| | {{Pokemon/Wild|BLU}} | ||
| | {{Pokemon/Wild row|RB||037|35|15|bp=1}} | ||
{{Pokemon/Wild row|RB||077|32,34|15}} | |||
| | {{Pokemon/Wild row|RB||088|31,33|50}} | ||
| | {{Pokemon/Wild row|RB||089|40|10}} | ||
| | {{Pokemon/Wild row|RB||109|35|5}} | ||
| | {{Pokemon/Wild row|RB||110|42|1}} | ||
| | {{Pokemon/Wild row|RB||126|38|4|bp=1}} | ||
| | |} | ||
| | {{Pokemon/Wild|YEL}} | ||
{{Pokemon/Wild row|YEL||020|37,40,43,46|40|bp=1}} | |||
{{Pokemon/Wild row|YEL||088|35,38|40}} | |||
{{Pokemon/Wild row|YEL||089|41|10}} | |||
{{Pokemon/Wild row|YEL||132|12,18,24|10|bp=1}} | |||
| | |||
| | |||
| | |||
| | |||
| | |||
| | |||
| | |||
| | |||
| | |||
| | |||
| | |||
| | |||
| | |||
| | |||
| | |||
| | |||
| | |||
| | |||
| | |||
| | |||
| | |||
| | |||
| | |||
| | |||
| | |||
| | |||
| | |||
| | |||
| | |||
| | |||
| | |||
| | |||
| | |||
| | |||
| | |||
| | |||
| | |||
| | |||
| | |||
| | |||
| | |||
| | |||
| | |||
| | |||
| | |||
| | |||
| | |||
| | |||
| | |||
| | |||
| | |||
| | |||
| | |||
| | |||
| | |||
| | |||
| | |||
| | |||
| | |||
| | |||
|} | |} | ||
</div> | |||
| | |||
==New Pokémon== | |||
| | {{ContentBoxContainer}} | ||
{{Pokemon/New|title=#88 Grimer|contents={{PokePic|Grimer|left}} | |||
You've been fighting these guys for ages, but you've never had an opportunity to catch one until now. No big loss: Grimers (and the evolved {{bp|Muk}}) are literally garbage. Well, maybe that's a bit harsh. It's just that Poison-types are the worst in the game, in that no Poison skill (except for maybe Toxic, which you have to use a TM to teach him) is good against the quickly-defeated computer opponents. But at least Muks get a high Attack score and decent HP. | You've been fighting these guys for ages, but you've never had an opportunity to catch one until now. No big loss: Grimers (and the evolved {{bp|Muk}}) are literally garbage. Well, maybe that's a bit harsh. It's just that Poison-types are the worst in the game, in that no Poison skill (except for maybe Toxic, which you have to use a TM to teach him) is good against the quickly-defeated computer opponents. But at least Muks get a high Attack score and decent HP. | ||
| | }} | ||
{{Pokemon/New|title=#109 Koffing|contents={{PokePic|Koffing|right}} | |||
Team Rocket's bizarre affinity for these gaseous blobs is probably one of the reasons they lose so much. To be fair, evolved {{bp|Weezing}} is probably the best of the Poison Pokémon, but that still doesn't make them particularly useful. At higher levels, fear their Selfdestruct and Explosion skills... Too bad their most powerful attacks knock themselves out too! | Team Rocket's bizarre affinity for these gaseous blobs is probably one of the reasons they lose so much. To be fair, evolved {{bp|Weezing}} is probably the best of the Poison Pokémon, but that still doesn't make them particularly useful. At higher levels, fear their Selfdestruct and Explosion skills... Too bad their most powerful attacks knock themselves out too! | ||
| | }} | ||
{{Pokemon/New|title=#126 Magmar|contents={{PokePic|Magmar|left}} | |||
| | Magmar is both hard to catch and exclusive to Blue, but that doesn't necessarily mean it's any good. {{bp|Arcanine}} is probably the best of the Fire Pokémon (although Blue players would need to trade for one), but {{bp|Charizard}}, {{bp|Ninetales}} (if you didn't evolve it until after learning Flamethrower as {{bp|Vulpix}}) and possibly even {{bp|Flareon}} are all better picks than Magmar in Blue. | ||
| | }} | ||
Magmar is both hard to catch and exclusive to Blue, but that doesn't necessarily mean it's any good. {{bp|Arcanine}} is probably the best of the Fire Pokémon (although Blue players would need to trade for one), but {{bp|Charizard}}, {{bp|Ninetales}} (if you didn't evolve | </div> | ||
{{Footer Nav|game=Pokémon Red and Blue|prevpage=Cinnabar Island|nextpage=Power Plant}} | {{Footer Nav|game=Pokémon Red and Blue|prevpage=Cinnabar Island|nextpage=Power Plant}} | ||
Revision as of 21:27, 1 March 2024
Buried somewhere in the rubble of Pokémon Mansion is the Secret Key that opens the Cinnabar Island Gym. There are plenty of salvageable items amongst the wreckage, as well as clues regarding the dangerous experimental Pokémon that escaped. Hunt carefully, as there are lots of powerful Pokémon here as well!
How to get Gym key
The door to the Gym is locked, and rumors suggest the key is lost in the abandoned mansion. You can get through the mansion fairly quickly, but the random Pokémon that lurk here, especially a wild Muk, can be fierce.
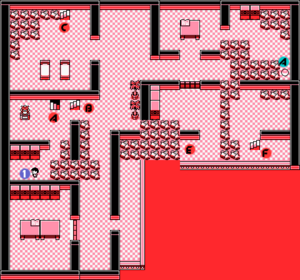
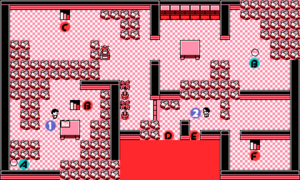
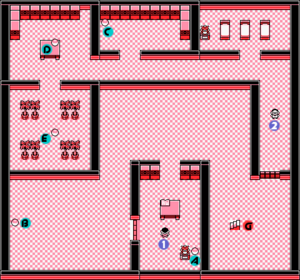
To get the key, take the stairs to the main part of Floor 3 (A to C), search the statue for a hidden switch (every statue here has one), then jump down the first balcony near a scientist marked point D. The stairs here will take you to the basement where the Secret Key lies. Flip all of the switches you pass and you'll find it without much trouble.
There are a number of valuable items and Pokémon here. Yellow players can pick up a Growlithe and a Ditto. Red and Blue can get a Ponyta, and Blue can also get an ultra-rare, Blue-exclusive Magmar.
The items include a number of stat-enhancing supplements, and two TMs. TM 22 is the most powerful Grass attack, Solarbeam, and TM 14 is the super-powerful Ice attack Blizzard, which you'll definitely need for the Elite Four. There is also a hidden Moon Stone in one of the pillars on Floor 1, right after you enter the mansion. There is a hidden Max Revive on Floor 3, at the top of the narrow path above marker A. There is a Rare Candy in the basement, in the room with the Secret Key near the top-left corner (above the plants). Also fight all the Burglars that you can — they'll give you good EXP and a ton of cash.
1F

| 1 | Scientist |
| A | Escape Rope |
| B | Carbos |
Trainers
Pokémon found
| Red | |||
|---|---|---|---|
| Pokémon | Level | Rate | |
| Growlithe | 34 | 10% | |
| Ponyta | 28,30,32,34 | 40% | |
| Grimer | 30 | 5% | |
| Muk | 39 | 1% | |
| Koffing | 30,32 | 40% | |
| Weezing | 37 | 4% | |
| Blue | |||
|---|---|---|---|
| Pokémon | Level | Rate | |
| Vulpix | 34 | 10% | |
| Ponyta | 28,30,32,34 | 40% | |
| Grimer | 30,32 | 40% | |
| Muk | 37 | 4% | |
| Koffing | 30 | 5% | |
| Weezing | 39 | 1% | |
| Yellow | |||
|---|---|---|---|
| Pokémon | Level | Rate | |
| Rattata | 34,37 | 35% | |
| Raticate | 34,37 | 25% | |
| Vulpix | 26,30,34,38 | 20% | |
| Grimer | 23,26 | 20% | |
2F
| 1 | Burglar |
| A | Calcium |
Trainers
Pokémon found
| Red | |||
|---|---|---|---|
| Pokémon | Level | Rate | |
| Growlithe | 32 | 25% | |
| Ponyta | 28,30,32 | 25% | |
| Grimer | 30 | 5% | |
| Muk | 37 | 1% | |
| Koffing | 30,34 | 40% | |
| Weezing | 39 | 4% | |
| Blue | |||
|---|---|---|---|
| Pokémon | Level | Rate | |
| Vulpix | 32 | 25% | |
| Ponyta | 28,30,32 | 25% | |
| Grimer | 30,34 | 40% | |
| Muk | 39 | 4% | |
| Koffing | 30 | 5% | |
| Weezing | 37 | 1% | |
| Yellow | |||
|---|---|---|---|
| Pokémon | Level | Rate | |
| Rattata | 34,37 | 35% | |
| Raticate | 34,37 | 25% | |
| Grimer | 26,29,32,35 | 35% | |
| Muk | 35,38 | 5% | |
3F
| 1 | Burglar |
| 2 | Scientist |
| A | Max Potion |
| B | Iron |
Trainers
| Red and Blue | |
|---|---|
| Trainer | Pokemon |
 Burglar Reward: |
|
 Scientist Reward: |
|
| Yellow | |
|---|---|
| Trainer | Pokemon |
 Burglar Reward: |
|
 Scientist Reward: |
|
Pokémon found
| Red | |||
|---|---|---|---|
| Pokémon | Level | Rate | |
| Growlithe | 33 | 15% | |
| Ponyta | 32,34,36 | 24% | |
| Grimer | 34 | 5% | |
| Muk | 42 | 1% | |
| Koffing | 31,35 | 40% | |
| Weezing | 38,40 | 15% | |
| Blue | |||
|---|---|---|---|
| Pokémon | Level | Rate | |
| Vulpix | 33 | 15% | |
| Ponyta | 32,36 | 14% | |
| Grimer | 31,35 | 40% | |
| Muk | 38,40 | 15% | |
| Koffing | 34 | 5% | |
| Weezing | 42 | 1% | |
| Magmar | 34 | 10% | |
| Yellow | |||
|---|---|---|---|
| Pokémon | Level | Rate | |
| Rattata | 40,43 | 35% | |
| Raticate | 40,43 | 25% | |
| Grimer | 32,35,38 | 35% | |
| Muk | 38,41 | 5% | |
B1F
| 1 | Burglar |
| 2 | Scientist |
| A | TM 14 |
| B | Full Restore |
| C | Rare Candy |
| D | TM 22 |
| E | Secret Key |
Trainers
| Red and Blue | |
|---|---|
| Trainer | Pokemon |
 Burglar Reward: |
|
 Scientist Reward: |
|
| Yellow | |
|---|---|
| Trainer | Pokemon |
 Burglar Reward: |
|
 Scientist Reward: |
|
Pokémon found
| Red | |||
|---|---|---|---|
| Pokémon | Level | Rate | |
| Growlithe | 35 | 15% | |
| Ponyta | 32,34 | 15% | |
| Grimer | 35 | 5% | |
| Muk | 42 | 1% | |
| Koffing | 31,33 | 50% | |
| Weezing | 40,42 | 14% | |
| Blue | |||
|---|---|---|---|
| Pokémon | Level | Rate | |
| Vulpix | 35 | 15% | |
| Ponyta | 32,34 | 15% | |
| Grimer | 31,33 | 50% | |
| Muk | 40 | 10% | |
| Koffing | 35 | 5% | |
| Weezing | 42 | 1% | |
| Magmar | 38 | 4% | |
| Yellow | |||
|---|---|---|---|
| Pokémon | Level | Rate | |
| Raticate | 37,40,43,46 | 40% | |
| Grimer | 35,38 | 40% | |
| Muk | 41 | 10% | |
| Ditto | 12,18,24 | 10% | |
New Pokémon
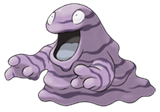
You've been fighting these guys for ages, but you've never had an opportunity to catch one until now. No big loss: Grimers (and the evolved Muk) are literally garbage. Well, maybe that's a bit harsh. It's just that Poison-types are the worst in the game, in that no Poison skill (except for maybe Toxic, which you have to use a TM to teach him) is good against the quickly-defeated computer opponents. But at least Muks get a high Attack score and decent HP.
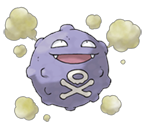
Team Rocket's bizarre affinity for these gaseous blobs is probably one of the reasons they lose so much. To be fair, evolved Weezing is probably the best of the Poison Pokémon, but that still doesn't make them particularly useful. At higher levels, fear their Selfdestruct and Explosion skills... Too bad their most powerful attacks knock themselves out too!
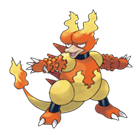
Magmar is both hard to catch and exclusive to Blue, but that doesn't necessarily mean it's any good. Arcanine is probably the best of the Fire Pokémon (although Blue players would need to trade for one), but Charizard, Ninetales (if you didn't evolve it until after learning Flamethrower as Vulpix) and possibly even Flareon are all better picks than Magmar in Blue.
