(Put Wild/New Pokémon into new templates) Tags: Mobile edit Mobile web edit |
(cleanup) |
||
| Line 1: | Line 1: | ||
{{Header Nav|game=Pokémon Red and Blue}} | {{Header Nav|game=Pokémon Red and Blue}} | ||
The way through the Seafoam Island caves is full of twists and turns, and you'll have to puzzle your way through to reach the south side of the island. Use the maps on this page to negotiate your way through the treacherous underground pathway. If you leave the cave before you find the southern exit, all of the puzzles will reset. | |||
== Only the strong may enter == | == Only the strong may enter == | ||
[[File:Pokemon RBY Seafoam Island 1F.png|thumb|Seafoam Island 1F]] | [[File:Pokemon RBY Seafoam Island 1F.png|thumb|Seafoam Island 1F]] | ||
Don't even enter the Seafoam Islands unless you have a Pokémon who knows the Strength technique. | Don't even enter the Seafoam Islands unless you have a Pokémon who knows the Strength technique. You'll need his might to knock the two sets of boulders on the first floor and the third basement into the lower floors, blocking the current so you can swim safely. | ||
The two boulders on the first floor block the current on the third basement level, which makes it easier to get around, but is not necessary for catching {{bp|Articuno}}, the only actual prize in this dungeon. | The two boulders on the first floor block the current on the third basement level, which makes it easier to get around, but is not necessary for catching {{bp|Articuno}}, the only actual prize in this dungeon. It's the two in the third basement that are important: knock the other boulders out of the way so you can get to the ones in line with the holes (if you mess up, leave this floor and they'll reset), then jump in after them, swim to the island in the northwest, and save the game before you fight Articuno. You should bring a lot of Ultra Balls, but this fight will be much easier than the last one, thanks to Zapdos' ability to knock Articuno near the red zone with just two Thundershocks. | ||
==Rock & Roll== | ==Rock & Roll== | ||
As you descend, use your Strength to roll the loose boulders into the dark pits. | As you descend, use your Strength to roll the loose boulders into the dark pits. The idea is to use the boulders to block the river in B3 — if you don't block the river first, the current will sweep you down to B4. Once the current is blocked, cross over to the right side of level three and climb up the ladder marked '''H''' on the map. Keep climbing up the ladders until you reach Floor 1 again and the southeastern exit. Also, there is a hidden '''Nugget''' by the boulder you cannot move in Basement 2. | ||
==Plan carefully== | ==Plan carefully== | ||
Strength alone is not enough to solve the mystery of the boulders in the lower-left corner. You must also use your brain. Push the right-most boulder all the way up, and push the boulder directly under the ladder marked '''F''' to the left. Push the boulder above the left pit down. Return to the first boulder, and stand above the one that was next to it. Push it down one square, then push it two spaces to the left, and push it down once more into the pit. When you're done, jump into the pit yourself. The current should be blocked, and you'll be able to reach Articuno. | |||
There is a hidden '''Max Elixer''' on the rock below the right-most boulder. | |||
<gallery> | |||
File:Pokemon RBY Seafoam Island B1F.png|Seafoam Island B1F | |||
File:Pokemon RBY Seafoam Island B2F.png|Seafoam Island B2F | |||
File:Pokemon RBY Seafoam Island B3F.png|Seafoam Island B3F | |||
</gallery> | |||
==Blockade runner== | ==Blockade runner== | ||
[[File:Pokemon RBY Seafoam Island B4F.png|thumb|Seafoam Island B4F]] | [[File:Pokemon RBY Seafoam Island B4F.png|thumb|Seafoam Island B4F]] | ||
To reach Articuno, first climb down to the third level and roll a boulder into each of the two pits in the lower-left corner. | To reach Articuno, first climb down to the third level and roll a boulder into each of the two pits in the lower-left corner. This will block the river on the level below and keep you from being swept away. Take the ladder marked '''G''' on the map to the next level down. Use the Surf ability to enter the river on the left. Paddle north until you come to a stone platform. If you want to capture Articuno, it is recommended that you use Ultra Balls and Sleep-inducing attacks. | ||
There is a hidden '''Ultra ball''' on the lone piece of land in the bottom-right of B4F. | There is a hidden '''Ultra ball''' on the lone piece of land in the bottom-right of B4F. | ||
{{-}} | {{-}} | ||
==Pokémon found== | ==Pokémon found== | ||
===1F=== | ===1F=== | ||
| Line 57: | Line 58: | ||
{{Pokemon/Wild row|YEL||079|28,30|15}} | {{Pokemon/Wild row|YEL||079|28,30|15}} | ||
{{Pokemon/Wild row|YEL||098|25,27|30}} | {{Pokemon/Wild row|YEL||098|25,27|30}} | ||
{{Pokemon/Wild row}} | {{Pokemon/Wild row}} | ||
|} | |} | ||
| Line 135: | Line 133: | ||
{{Pokemon/Wild row|RB||116|29,31|15|bp=1}} | {{Pokemon/Wild row|RB||116|29,31|15|bp=1}} | ||
{{Pokemon/Wild row|RB||117|39|4|bp=1}} | {{Pokemon/Wild row|RB||117|39|4|bp=1}} | ||
{{Pokemon/Wild row}} | {{Pokemon/Wild row}} | ||
|} | |} | ||
| Line 146: | Line 142: | ||
{{Pokemon/Wild row|RB||099|39|4|bp=1}} | {{Pokemon/Wild row|RB||099|39|4|bp=1}} | ||
{{Pokemon/Wild row|RB||120|29,31|15|bp=1}} | {{Pokemon/Wild row|RB||120|29,31|15|bp=1}} | ||
{{Pokemon/Wild row}} | {{Pokemon/Wild row}} | ||
|} | |} | ||
| Line 160: | Line 154: | ||
{{Pokemon/Wild row|YEL||072|20,25,30,35,40|70|bp=1}} | {{Pokemon/Wild row|YEL||072|20,25,30,35,40|70|bp=1}} | ||
{{Pokemon/Wild row|YEL||120|20|30|bp=1}} | {{Pokemon/Wild row|YEL||120|20|30|bp=1}} | ||
|} | |} | ||
</div> | </div> | ||
| Line 194: | Line 187: | ||
{{Pokemon/Wild row|RB||090|31,33|30|bp=1}} | {{Pokemon/Wild row|RB||090|31,33|30|bp=1}} | ||
{{Pokemon/Wild row|RB||116|31,33|35|bp=1}} | {{Pokemon/Wild row|RB||116|31,33|35|bp=1}} | ||
{{Pokemon/Wild row}} | {{Pokemon/Wild row}} | ||
|} | |} | ||
| Line 205: | Line 196: | ||
{{Pokemon/Wild row|RB||098|31,33|35|bp=1}} | {{Pokemon/Wild row|RB||098|31,33|35|bp=1}} | ||
{{Pokemon/Wild row|RB||120|31,33|30|bp=1}} | {{Pokemon/Wild row|RB||120|31,33|30|bp=1}} | ||
{{Pokemon/Wild row}} | {{Pokemon/Wild row}} | ||
|} | |} | ||
| Line 219: | Line 208: | ||
{{Pokemon/Wild row|YEL||072|20,25,30,35,40|70|bp=1}} | {{Pokemon/Wild row|YEL||072|20,25,30,35,40|70|bp=1}} | ||
{{Pokemon/Wild row|YEL||120|30|30|bp=1}} | {{Pokemon/Wild row|YEL||120|30|30|bp=1}} | ||
|} | |} | ||
</div> | </div> | ||
| Line 248: | Line 236: | ||
{{Pokemon/New|title=#87 Dewgong|contents={{PokePic|Dewgong|left}} | {{Pokemon/New|title=#87 Dewgong|contents={{PokePic|Dewgong|left}} | ||
You can catch the fairly uncommon Dewgong (and its awkward unevolved form, {{bp|Seel}}) in the Seafoam Islands, but you would be better off trading for one at [[../Cinnabar Island | You can catch the fairly uncommon Dewgong (and its awkward unevolved form, {{bp|Seel}}) in the Seafoam Islands, but you would be better off trading for one at [[../Cinnabar Island/]]. Being traded Pokemon, the Dewgong (Yellow) or Seel (Red/Blue) available at Cinnabar will gain experience 50% faster, making it a lot better at catching up to the rest of your team. While it has a lot of competition, its boosts to Water and Ice-type attacks give it an advantage over Blastoise and Articuno, and it hits significantly harder than Cloyster as well. Access to Horn Drill secures Dewgong's place as one of the best in-game Pokemon in Red, Blue and Yellow. As mentioned though, don't catch one; go trade for one. | ||
}} | }} | ||
{{Pokemon/New|title=#144 Articuno|contents={{PokePic|Articuno|right}} | {{Pokemon/New|title=#144 Articuno|contents={{PokePic|Articuno|right}} | ||
If you use some Electric attacks to soften it up a bit, Articuno should give you much less trouble than Zapdos did. | If you use some Electric attacks to soften it up a bit, Articuno should give you much less trouble than Zapdos did. Just beware you don't overdo it — Zapdos' Thunder attack can kill this legendary bird in one shot! Once it's in the red zone, it could still take dozens of tries before Articuno goes quietly into a Poké Ball, so try to put it to Sleep or Paralyze it if possible. | ||
Like Zapdos, level 50 Ice/Flyer Articuno has strong stats and learns his best technique (Blizzard) at level 51. | Like Zapdos, level 50 Ice/Flyer Articuno has strong stats and learns his best technique (Blizzard) at level 51. | ||
Revision as of 01:22, 22 March 2024
The way through the Seafoam Island caves is full of twists and turns, and you'll have to puzzle your way through to reach the south side of the island. Use the maps on this page to negotiate your way through the treacherous underground pathway. If you leave the cave before you find the southern exit, all of the puzzles will reset.
Only the strong may enter

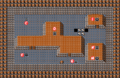
Don't even enter the Seafoam Islands unless you have a Pokémon who knows the Strength technique. You'll need his might to knock the two sets of boulders on the first floor and the third basement into the lower floors, blocking the current so you can swim safely.
The two boulders on the first floor block the current on the third basement level, which makes it easier to get around, but is not necessary for catching Articuno, the only actual prize in this dungeon. It's the two in the third basement that are important: knock the other boulders out of the way so you can get to the ones in line with the holes (if you mess up, leave this floor and they'll reset), then jump in after them, swim to the island in the northwest, and save the game before you fight Articuno. You should bring a lot of Ultra Balls, but this fight will be much easier than the last one, thanks to Zapdos' ability to knock Articuno near the red zone with just two Thundershocks.
Rock & Roll
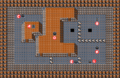
As you descend, use your Strength to roll the loose boulders into the dark pits. The idea is to use the boulders to block the river in B3 — if you don't block the river first, the current will sweep you down to B4. Once the current is blocked, cross over to the right side of level three and climb up the ladder marked H on the map. Keep climbing up the ladders until you reach Floor 1 again and the southeastern exit. Also, there is a hidden Nugget by the boulder you cannot move in Basement 2.
Plan carefully
Strength alone is not enough to solve the mystery of the boulders in the lower-left corner. You must also use your brain. Push the right-most boulder all the way up, and push the boulder directly under the ladder marked F to the left. Push the boulder above the left pit down. Return to the first boulder, and stand above the one that was next to it. Push it down one square, then push it two spaces to the left, and push it down once more into the pit. When you're done, jump into the pit yourself. The current should be blocked, and you'll be able to reach Articuno.
There is a hidden Max Elixer on the rock below the right-most boulder.
-
Seafoam Island B1F
-
Seafoam Island B2F
-
Seafoam Island B3F


Blockade runner

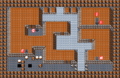
To reach Articuno, first climb down to the third level and roll a boulder into each of the two pits in the lower-left corner. This will block the river on the level below and keep you from being swept away. Take the ladder marked G on the map to the next level down. Use the Surf ability to enter the river on the left. Paddle north until you come to a stone platform. If you want to capture Articuno, it is recommended that you use Ultra Balls and Sleep-inducing attacks.
There is a hidden Ultra ball on the lone piece of land in the bottom-right of B4F.
Pokémon found
1F
| Red | |||
|---|---|---|---|
| Pokémon | Level | Rate | |
| Zubat | 21 | 10% | |
| Golbat | 29 | 5% | |
| Psyduck | 28 | 5% | |
| Golduck | 38 | 1% | |
| Slowpoke | 30 | 20% | |
| Seel | 30 | 19% | |
| Shellder | 28,30 | 20% | |
| Horsea | 28,30 | 20% | |
| Blue | |||
|---|---|---|---|
| Pokémon | Level | Rate | |
| Zubat | 21 | 10% | |
| Golbat | 29 | 5% | |
| Psyduck | 30 | 20% | |
| Slowpoke | 28 | 5% | |
| Slowbro | 38 | 1% | |
| Seel | 30 | 20% | |
| Krabby | 28,30 | 20% | |
| Staryu | 28,30 | 19% | |
| Yellow | |||||||||||
|---|---|---|---|---|---|---|---|---|---|---|---|
| Pokémon | Level | Rate | |||||||||
| Zubat | 9,18,27,36 | 50% | |||||||||
| Golbat | 27,36 | 5% | |||||||||
| Slowpoke | 28,30 | 15% | |||||||||
| Krabby | 25,27 | 30% | |||||||||
B1F
| Red | |||
|---|---|---|---|
| Pokémon | Level | Rate | |
| Slowpoke | 28,30 | 15% | |
| Seel | 28,30 | 15% | |
| Dewgong | 38 | 4% | |
| Shellder | 32 | 15% | |
| Horsea | 30,32 | 30% | |
| Seadra | 37 | 1% | |
| Staryu | 30 | 20% | |
| Blue | |||
|---|---|---|---|
| Pokémon | Level | Rate | |
| Psyduck | 28,30 | 15% | |
| Seel | 28,30 | 15% | |
| Dewgong | 38 | 4% | |
| Shellder | 30 | 20% | |
| Krabby | 30,32 | 30% | |
| Kingler | 37 | 1% | |
| Staryu | 32 | 15% | |
| Yellow | |||||||||||
|---|---|---|---|---|---|---|---|---|---|---|---|
| Pokémon | Level | Rate | |||||||||
| Zubat | 18,27,36 | 45% | |||||||||
| Golbat | 27 | 10% | |||||||||
| Slowpoke | 29 | 10% | |||||||||
| Seel | 22,26 | 5% | |||||||||
| Krabby | 26,28 | 25% | |||||||||
| Kingler | 28 | 5% | |||||||||
B2F
| Red | |||
|---|---|---|---|
| Pokémon | Level | Rate | |
| Golbat | 30 | 4% | |
| Slowpoke | 30,32 | 30% | |
| Slowbro | 37 | 1% | |
| Seel | 30,32 | 35% | |
| Shellder | 28 | 5% | |
| Horsea | 28,30 | 15% | |
| Staryu | 30 | 10% | |
| Blue | |||
|---|---|---|---|
| Pokémon | Level | Rate | |
| Golbat | 30 | 4% | |
| Psyduck | 30,32 | 30% | |
| Golduck | 37 | 1% | |
| Seel | 30,32 | 35% | |
| Shellder | 30 | 10% | |
| Krabby | 28,30 | 15% | |
| Staryu | 28 | 5% | |
| Yellow | |||
|---|---|---|---|
| Pokémon | Level | Rate | |
| Zubat | 27,36 | 40% | |
| Golbat | 27,36 | 15% | |
| Slowpoke | 31 | 4% | |
| Slowbro | 31 | 1% | |
| Seel | 24 | 10% | |
| Krabby | 27,29 | 20% | |
| Kingler | 28 | 10% | |
B3F
| Red | |||||||||||
|---|---|---|---|---|---|---|---|---|---|---|---|
| Pokémon | Level | Rate | |||||||||
| Slowpoke | 31,33 | 35% | |||||||||
| Seel | 31,33 | 30% | |||||||||
| Dewgong | 37 | 1% | |||||||||
| Shellder | 29,31 | 15% | |||||||||
| Horsea | 29,31 | 15% | |||||||||
| Seadra | 39 | 4% | |||||||||
| Blue | |||||||||||
|---|---|---|---|---|---|---|---|---|---|---|---|
| Pokémon | Level | Rate | |||||||||
| Psyduck | 31,33 | 35% | |||||||||
| Seel | 31,33 | 30% | |||||||||
| Dewgong | 37 | 1% | |||||||||
| Krabby | 29,31 | 15% | |||||||||
| Kingler | 39 | 4% | |||||||||
| Staryu | 29,31 | 15% | |||||||||
| Yellow | |||||||||||||||||||||||||||||||||||||||||||||||||||||||||||||||||||||||||||||||||||||||||||||||||||
|---|---|---|---|---|---|---|---|---|---|---|---|---|---|---|---|---|---|---|---|---|---|---|---|---|---|---|---|---|---|---|---|---|---|---|---|---|---|---|---|---|---|---|---|---|---|---|---|---|---|---|---|---|---|---|---|---|---|---|---|---|---|---|---|---|---|---|---|---|---|---|---|---|---|---|---|---|---|---|---|---|---|---|---|---|---|---|---|---|---|---|---|---|---|---|---|---|---|---|---|
| Pokémon | Level | Rate | |||||||||||||||||||||||||||||||||||||||||||||||||||||||||||||||||||||||||||||||||||||||||||||||||
| Zubat | 27,36 | 25% | |||||||||||||||||||||||||||||||||||||||||||||||||||||||||||||||||||||||||||||||||||||||||||||||||
| Golbat | 27 | 25% | |||||||||||||||||||||||||||||||||||||||||||||||||||||||||||||||||||||||||||||||||||||||||||||||||
| Seel | 26,30 | 15% | |||||||||||||||||||||||||||||||||||||||||||||||||||||||||||||||||||||||||||||||||||||||||||||||||
| Dewgong | 28,32 | 5% | |||||||||||||||||||||||||||||||||||||||||||||||||||||||||||||||||||||||||||||||||||||||||||||||||
| Krabby | 29,31 | 20% | |||||||||||||||||||||||||||||||||||||||||||||||||||||||||||||||||||||||||||||||||||||||||||||||||
| Kingler | 30 | 10% | |||||||||||||||||||||||||||||||||||||||||||||||||||||||||||||||||||||||||||||||||||||||||||||||||
| Surfing | |||||||||||||||||||||||||||||||||||||||||||||||||||||||||||||||||||||||||||||||||||||||||||||||||||
| Tentacool | 20,25,30,35,40 | 70% | |||||||||||||||||||||||||||||||||||||||||||||||||||||||||||||||||||||||||||||||||||||||||||||||||
| Staryu | 20 | 30% | |||||||||||||||||||||||||||||||||||||||||||||||||||||||||||||||||||||||||||||||||||||||||||||||||
| Red and Blue | |||||
|---|---|---|---|---|---|
| Pokémon | Level | Old Rod | Good Rod | Super Rod | |
| Magikarp | 5 | 100% | - | - | |
| Poliwag | 10 | - | 50% | - | |
| Goldeen | 10 | - | 50% | - | |
| Shellder | 15 | - | - | 25% | |
| Horsea | 15 | - | - | 25% | |
| Goldeen | 15 | - | - | 25% | |
| Staryu | 15 | - | - | 25% | |
| Yellow | |||||
|---|---|---|---|---|---|
| Pokémon | Level | Old Rod | Good Rod | Super Rod | |
| Magikarp | 5 | 100% | - | - | |
| Poliwag | 10 | - | 50% | - | |
| Goldeen | 10 | - | 50% | - | |
| Krabby | 25 | - | - | 40% | |
| Kingler | 35 | - | - | 20% | |
| Staryu | 20,40 | - | - | 40% | |
B4F
| Red | |||||||||||
|---|---|---|---|---|---|---|---|---|---|---|---|
| Pokémon | Level | Rate | |||||||||
| Golbat | 32 | 1% | |||||||||
| Slowpoke | 29,31 | 15% | |||||||||
| Slowbro | 39 | 4% | |||||||||
| Seel | 29,31 | 15% | |||||||||
| Shellder | 31,33 | 30% | |||||||||
| Horsea | 31,33 | 35% | |||||||||
| Blue | |||||||||||
|---|---|---|---|---|---|---|---|---|---|---|---|
| Pokémon | Level | Rate | |||||||||
| Golbat | 32 | 1% | |||||||||
| Psyduck | 29,31 | 15% | |||||||||
| Golduck | 39 | 4% | |||||||||
| Seel | 29,31 | 15% | |||||||||
| Krabby | 31,33 | 35% | |||||||||
| Staryu | 31,33 | 30% | |||||||||
| Yellow | |||||||||||||||||||||||||||||||||||||||||||||||||||||||||||||||||||||||||||||||||||||||||||||||||||
|---|---|---|---|---|---|---|---|---|---|---|---|---|---|---|---|---|---|---|---|---|---|---|---|---|---|---|---|---|---|---|---|---|---|---|---|---|---|---|---|---|---|---|---|---|---|---|---|---|---|---|---|---|---|---|---|---|---|---|---|---|---|---|---|---|---|---|---|---|---|---|---|---|---|---|---|---|---|---|---|---|---|---|---|---|---|---|---|---|---|---|---|---|---|---|---|---|---|---|---|
| Pokémon | Level | Rate | |||||||||||||||||||||||||||||||||||||||||||||||||||||||||||||||||||||||||||||||||||||||||||||||||
| Zubat | 36,45 | 20% | |||||||||||||||||||||||||||||||||||||||||||||||||||||||||||||||||||||||||||||||||||||||||||||||||
| Golbat | 27,36 | 30% | |||||||||||||||||||||||||||||||||||||||||||||||||||||||||||||||||||||||||||||||||||||||||||||||||
| Seel | 28,32 | 20% | |||||||||||||||||||||||||||||||||||||||||||||||||||||||||||||||||||||||||||||||||||||||||||||||||
| Dewgong | 30,34 | 5% | |||||||||||||||||||||||||||||||||||||||||||||||||||||||||||||||||||||||||||||||||||||||||||||||||
| Krabby | 30 | 15% | |||||||||||||||||||||||||||||||||||||||||||||||||||||||||||||||||||||||||||||||||||||||||||||||||
| Kingler | 32 | 10% | |||||||||||||||||||||||||||||||||||||||||||||||||||||||||||||||||||||||||||||||||||||||||||||||||
| Surfing | |||||||||||||||||||||||||||||||||||||||||||||||||||||||||||||||||||||||||||||||||||||||||||||||||||
| Tentacool | 20,25,30,35,40 | 70% | |||||||||||||||||||||||||||||||||||||||||||||||||||||||||||||||||||||||||||||||||||||||||||||||||
| Staryu | 30 | 30% | |||||||||||||||||||||||||||||||||||||||||||||||||||||||||||||||||||||||||||||||||||||||||||||||||
| Red and Blue | |||||
|---|---|---|---|---|---|
| Pokémon | Level | Old Rod | Good Rod | Super Rod | |
| Magikarp | 5 | 100% | - | - | |
| Poliwag | 10 | - | 50% | - | |
| Goldeen | 10 | - | 50% | - | |
| Shellder | 15 | - | - | 25% | |
| Horsea | 15 | - | - | 25% | |
| Goldeen | 15 | - | - | 25% | |
| Staryu | 15 | - | - | 25% | |
| Yellow | |||||
|---|---|---|---|---|---|
| Pokémon | Level | Old Rod | Good Rod | Super Rod | |
| Magikarp | 5 | 100% | - | - | |
| Poliwag | 10 | - | 50% | - | |
| Goldeen | 10 | - | 50% | - | |
| Krabby | 25 | - | - | 40% | |
| Kingler | 35 | - | - | 20% | |
| Staryu | 20,40 | - | - | 40% | |
New Pokémon

You can catch the fairly uncommon Dewgong (and its awkward unevolved form, Seel) in the Seafoam Islands, but you would be better off trading for one at Cinnabar Island. Being traded Pokemon, the Dewgong (Yellow) or Seel (Red/Blue) available at Cinnabar will gain experience 50% faster, making it a lot better at catching up to the rest of your team. While it has a lot of competition, its boosts to Water and Ice-type attacks give it an advantage over Blastoise and Articuno, and it hits significantly harder than Cloyster as well. Access to Horn Drill secures Dewgong's place as one of the best in-game Pokemon in Red, Blue and Yellow. As mentioned though, don't catch one; go trade for one.

If you use some Electric attacks to soften it up a bit, Articuno should give you much less trouble than Zapdos did. Just beware you don't overdo it — Zapdos' Thunder attack can kill this legendary bird in one shot! Once it's in the red zone, it could still take dozens of tries before Articuno goes quietly into a Poké Ball, so try to put it to Sleep or Paralyze it if possible.
Like Zapdos, level 50 Ice/Flyer Articuno has strong stats and learns his best technique (Blizzard) at level 51.