(advanced, portals) |
Notmyhandle (talk | contribs) (cleanup) |
||
| Line 1: | Line 1: | ||
{{Header Nav|game=Portal}} | {{Header Nav|game=Portal}} | ||
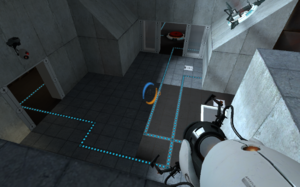
[[ | [[File:Portal_Chamber_17_platform_power.png|thumb|right|Overview of the main puzzle area.]] | ||
== The weighted companion cube == | == The weighted companion cube == | ||
[[ | [[File:Portal_Chamber_17_companion_cube.png|thumb|left|The companion cube.]] | ||
This is your introduction to the weighted companion cube. It will accompany you for the entire chamber, providing any assistance you require. Throughout the test, GLaDOS will make odd remarks about the companion cube, indicating how it is not alive, as if you are very attached to it and insisting that it is going to talk or do things. | This is your introduction to the weighted companion cube. It will accompany you for the entire chamber, providing any assistance you require. Throughout the test, GLaDOS will make odd remarks about the companion cube, indicating how it is not alive, as if you are very attached to it and insisting that it is going to talk or do things. | ||
{{-}} | {{-}} | ||
[[ | |||
[[File:Portal_Chamber_17_cube_step.png|thumb|right|Use the cube as an intermediate stair.]] | |||
When it drops from the transport tube, pick it up. The first area is about using the companion cube to help get you through to the platform area. You will notice the steps are too high to jump on, so you will have to set the cube down, climb on it, continue to the step, and then grab the cube and do the same thing for the next step. | When it drops from the transport tube, pick it up. The first area is about using the companion cube to help get you through to the platform area. You will notice the steps are too high to jump on, so you will have to set the cube down, climb on it, continue to the step, and then grab the cube and do the same thing for the next step. | ||
{{-}} | {{-}} | ||
[[ | |||
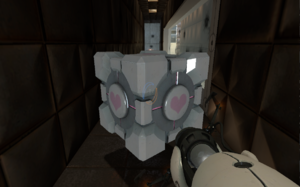
[[File:Portal_Chamber_17_cube_shield.png|thumb|left|The companion cube will protect you.]] | |||
{{Achievement|name=[[Portal/Camera Shy|Camera Shy]]|width=300px|image=Portal_achievement_camera_shy.jpg|progress=28|total=33|description=There are 2 reachable cameras (ignore those on non-portalable surfaces): | {{Achievement|name=[[Portal/Camera Shy|Camera Shy]]|width=300px|image=Portal_achievement_camera_shy.jpg|progress=28|total=33|description=There are 2 reachable cameras (ignore those on non-portalable surfaces): | ||
#Next to where the second pellet hits the wall. | #Next to where the second pellet hits the wall. | ||
| Line 15: | Line 17: | ||
Once at the top, you should now see a corridor with energy pellets bouncing back and forth - hold the cube in front of you to deflect the pellets harmlessly. After going through both corridors, you should reach the main test area where you need to raise three platforms, by bringing pellets to the three receivers. These can be done in any order, but the way described here is probably from easiest to hardest. | Once at the top, you should now see a corridor with energy pellets bouncing back and forth - hold the cube in front of you to deflect the pellets harmlessly. After going through both corridors, you should reach the main test area where you need to raise three platforms, by bringing pellets to the three receivers. These can be done in any order, but the way described here is probably from easiest to hardest. | ||
{{-}} | {{-}} | ||
== Receiver 1 == | == Receiver 1 == | ||
[[ | [[File:Portal_Chamber_17_receiver_1.png|thumb|left|Portal placement for first receiver.]] | ||
{{sidebar|float=right|width=400px|contents=There are some things to note about the order of these three tasks. First off, the platforms are not connected to specific receivers, and thus whichever receiver captures a pellet first, platform 1 will rise up, then 2, then 3. Also, receiver 2’s pellet will always shut off the launcher located in that room, no matter which pellet actually made it in there. Lastly, whichever is first out of receivers 1 and 3 will shut off the second corridor’s launcher, and then the remaining receiver will shut off the first corridor’s launcher. This can be very useful information for the bonus challenges.}} | {{sidebar|float=right|width=400px|contents=There are some things to note about the order of these three tasks. First off, the platforms are not connected to specific receivers, and thus whichever receiver captures a pellet first, platform 1 will rise up, then 2, then 3. Also, receiver 2’s pellet will always shut off the launcher located in that room, no matter which pellet actually made it in there. Lastly, whichever is first out of receivers 1 and 3 will shut off the second corridor’s launcher, and then the remaining receiver will shut off the first corridor’s launcher. This can be very useful information for the bonus challenges.}} | ||
One of the platforms is easily raised without assistance from the cube. Place a portal within the second pellet corridor (the one easiest to get to from here, where the pellet hits the wall), and the other on the angled platform across from the angled platform with the pellet receiver. The pellet will bounce off the ceiling and hit the receiver. | One of the platforms is easily raised without assistance from the cube. Place a portal within the second pellet corridor (the one easiest to get to from here, where the pellet hits the wall), and the other on the angled platform across from the angled platform with the pellet receiver. The pellet will bounce off the ceiling and hit the receiver. | ||
{{-}} | {{-}} | ||
== Receiver 2 == | == Receiver 2 == | ||
[[ | [[File:Portal_Chamber_17_receiver_2.png|thumb|left|Deflect with your companion.]] | ||
The doorway under the camera contains a pellet launcher firing a pellet perpendicular to the receiver, but there is no method to place a portal. However, you can bounce the pellet using the cube into the receiver. | The doorway under the camera contains a pellet launcher firing a pellet perpendicular to the receiver, but there is no method to place a portal. However, you can bounce the pellet using the cube into the receiver. | ||
{{-}} | {{-}} | ||
[[ | |||
[[ | [[File:Portal_Chamber_17_ratman_location.png|thumb|left|Portal into the secret area.]] | ||
[[File:Portal_Chamber_17_ratman_den.png|thumb|right|A lot of info... a lot of questions...]] | |||
Before you travel back up to the ledge, notice that there is an area behind the ground-level extended panel. While you cannot crawl into this, you can create a portal inside the area and explore. Some interesting pictures and writings may make you wonder what all has gone on in these test chambers in the past. | Before you travel back up to the ledge, notice that there is an area behind the ground-level extended panel. While you cannot crawl into this, you can create a portal inside the area and explore. Some interesting pictures and writings may make you wonder what all has gone on in these test chambers in the past. | ||
{{-}} | {{-}} | ||
== Receiver 3 == | == Receiver 3 == | ||
{{Achievement|name=[[Portal/Transmission_Received|Transmission Received]]|image=Portal achievement Transmission Received.jpg|description=The radio is located underneath the third platform, and cannot be grabbed until after it is raised. Take it to the cube incinerator.|progress=19|total=26}} | {{Achievement|name=[[Portal/Transmission_Received|Transmission Received]]|image=Portal achievement Transmission Received.jpg|description=The radio is located underneath the third platform, and cannot be grabbed until after it is raised. Take it to the cube incinerator.|progress=19|total=26}} | ||
[[ | [[File:Portal_Chamber_17_receiver_3.png|thumb|left|Teamwork opens the two doors!]] | ||
In the final side room, there is a pellet receiver blocked by 2 doors, each powered by a button. Go ahead and portal back up to the ledge, and shoot a portal on the wall where the remaining pellet is bouncing. Come back down and shoot the other color portal on the extended panel. You can place the cube on the raised button, however if you simply stand on the second button, the pellet will run into you. Either stand on the very side edge of the button, or wait until the pellet just passes, then quickly stand on the button to open the door before the pellet hits it. | In the final side room, there is a pellet receiver blocked by 2 doors, each powered by a button. Go ahead and portal back up to the ledge, and shoot a portal on the wall where the remaining pellet is bouncing. Come back down and shoot the other color portal on the extended panel. You can place the cube on the raised button, however if you simply stand on the second button, the pellet will run into you. Either stand on the very side edge of the button, or wait until the pellet just passes, then quickly stand on the button to open the door before the pellet hits it. | ||
{{-}} | {{-}} | ||
== Exit == | == Exit == | ||
{{achievement| | {{achievement| | ||
| Line 40: | Line 47: | ||
|description=Do whatever it takes to survive. | |description=Do whatever it takes to survive. | ||
}} | }} | ||
Once all three platforms are raised, shoot a portal onto the ceiling or high wall, and bring the cube with you. Jump across all three platforms and onto the next level, and then place the cube on the next button. | Once all three platforms are raised, shoot a portal onto the ceiling or high wall, and bring the cube with you. Jump across all three platforms and onto the next level, and then place the cube on the next button. | ||
| Line 61: | Line 69: | ||
== Challenges == | == Challenges == | ||
=== Portals=== | === Portals=== | ||
;Bronze at 4 portals: | |||
Bronze at 4 portals: | |||
Proceed with the cube to the three-platform area. | Proceed with the cube to the three-platform area. | ||
# Blue portal on the second pellet’s scorch mark. | # Blue portal on the second pellet’s scorch mark. | ||
| Line 70: | Line 76: | ||
# Orange portal on the extended ground level panel. Activate the other two platforms as normal, walk through the orange portal with the cube, and proceed all the way to the exit. | # Orange portal on the extended ground level panel. Activate the other two platforms as normal, walk through the orange portal with the cube, and proceed all the way to the exit. | ||
Silver at 3 portals | ;Silver at 3 portals | ||
# Blue portal on the first pellet’s scorch mark. Proceed with the cube to the three-platform area. | # Blue portal on the first pellet’s scorch mark. Proceed with the cube to the three-platform area. | ||
# Orange portal on the angled platform to direct the pellet into the receiver. Notice that this deactivates the second pellet, and thus there is still a pellet entering the existing blue portal (see sidebar in this chamber’s walkthrough). | # Orange portal on the angled platform to direct the pellet into the receiver. Notice that this deactivates the second pellet, and thus there is still a pellet entering the existing blue portal (see sidebar in this chamber’s walkthrough). | ||
# Orange portal on the extended ground level panel. Activate the other two platforms as normal, walk through the orange portal with the cube, and proceed all the way to the exit. | # Orange portal on the extended ground level panel. Activate the other two platforms as normal, walk through the orange portal with the cube, and proceed all the way to the exit. | ||
Gold at 2 portals: | ;Gold at 2 portals: | ||
Solution 1: | |||
# Blue portal on the first pellet’s scorch mark. Proceed with the cube to the three-platform area. | # Blue portal on the first pellet’s scorch mark. Proceed with the cube to the three-platform area. | ||
# Orange portal on the extended ground level panel. Activate the second and third receivers as normal. In this situation, the angled platform receiver is trickiest. Place or hold the cube such that the pellet will bounce off the edge of it, and hopefully rebound into the receiver eventually. This will be a bit of trial and error. Then walk through the orange portal with the cube, and proceed all the way to the exit. | # Orange portal on the extended ground level panel. Activate the second and third receivers as normal. In this situation, the angled platform receiver is trickiest. Place or hold the cube such that the pellet will bounce off the edge of it, and hopefully rebound into the receiver eventually. This will be a bit of trial and error. Then walk through the orange portal with the cube, and proceed all the way to the exit. | ||
Revision as of 18:34, 18 August 2012
The weighted companion cube
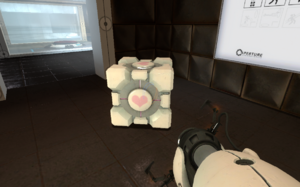
This is your introduction to the weighted companion cube. It will accompany you for the entire chamber, providing any assistance you require. Throughout the test, GLaDOS will make odd remarks about the companion cube, indicating how it is not alive, as if you are very attached to it and insisting that it is going to talk or do things.
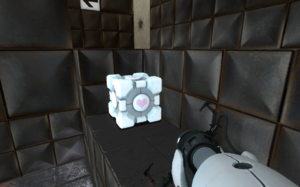
When it drops from the transport tube, pick it up. The first area is about using the companion cube to help get you through to the platform area. You will notice the steps are too high to jump on, so you will have to set the cube down, climb on it, continue to the step, and then grab the cube and do the same thing for the next step.
- Next to where the second pellet hits the wall.
- Above the doorway to the small pellet launcher room.
Once at the top, you should now see a corridor with energy pellets bouncing back and forth - hold the cube in front of you to deflect the pellets harmlessly. After going through both corridors, you should reach the main test area where you need to raise three platforms, by bringing pellets to the three receivers. These can be done in any order, but the way described here is probably from easiest to hardest.
Receiver 1
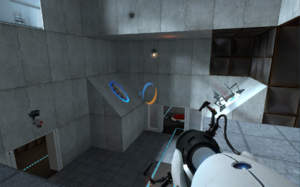
One of the platforms is easily raised without assistance from the cube. Place a portal within the second pellet corridor (the one easiest to get to from here, where the pellet hits the wall), and the other on the angled platform across from the angled platform with the pellet receiver. The pellet will bounce off the ceiling and hit the receiver.
Receiver 2
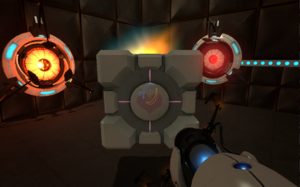
The doorway under the camera contains a pellet launcher firing a pellet perpendicular to the receiver, but there is no method to place a portal. However, you can bounce the pellet using the cube into the receiver.
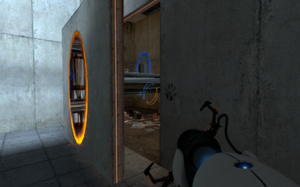

Before you travel back up to the ledge, notice that there is an area behind the ground-level extended panel. While you cannot crawl into this, you can create a portal inside the area and explore. Some interesting pictures and writings may make you wonder what all has gone on in these test chambers in the past.
Receiver 3
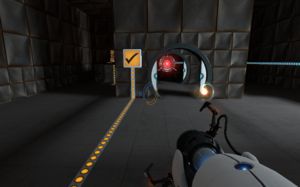
In the final side room, there is a pellet receiver blocked by 2 doors, each powered by a button. Go ahead and portal back up to the ledge, and shoot a portal on the wall where the remaining pellet is bouncing. Come back down and shoot the other color portal on the extended panel. You can place the cube on the raised button, however if you simply stand on the second button, the pellet will run into you. Either stand on the very side edge of the button, or wait until the pellet just passes, then quickly stand on the button to open the door before the pellet hits it.
Exit
Once all three platforms are raised, shoot a portal onto the ceiling or high wall, and bring the cube with you. Jump across all three platforms and onto the next level, and then place the cube on the next button.
GlaDOS will explain that you must euthanize the cube by placing it in the incinerator. Proceed into the open room and press the button to open the incinerator, then quickly grab the cube and drop it in. The chamberlock will then open.
Advanced
In the advanced chamber, the weighted companion cube has become a ball, the platform activations are tougher, and an extra step has been added towards the end.
You may quickly find that the ball seems to have a mind of its own, in that even if you set it down in a stationary setting, it may roll around aimlessly anyway. Do your best to climb the stairs as before, and then rebound the pellets as you move through the halls.
The first receiver has a glass barrier preventing the normal method of placing a portal on the angled platform. It is easy enough, however, to place one on the ceiling above the angled platform, and the pellet will bounce off and into the receiver.
The second receiver has a glass barrier as well, making it more difficult to bounce the pellet in. Just use trial and error, bouncing it at different angles with the ball, and you’ll get there. Try not to get hit in the process.
The third receiver has both buttons in the back, at a higher level. Hold the ball onto the first door’s button, wait for the pellet to pass, then lift the ball off so that the pellet is bouncing in between the doors. Quickly move the ball to the other button before the pellet disappears, and it will bounce into the receiver.
Alternately, if you knock down a camera, you can place the ball on one button, and hop onto the camera, giving you enough height to hop to the other button yourself.
As you cross the platforms, you’ll notice the normal exit to the right is no longer there. Proceed to the left instead, and you’ll find an accuracy fling test. You can’t just fling from the top, as that will shoot you out too high. Instead place the portal on the seam between the top two panel layers. Drop the ball through first to make sure it’s accurate, and then fly through yourself. A simple portal on the wall to get up, and it’s off to the exit as normal.
Challenges
Portals
- Bronze at 4 portals
Proceed with the cube to the three-platform area.
- Blue portal on the second pellet’s scorch mark.
- Orange portal on the angled platform to direct the pellet into the receiver.
- Blue portal on the first pellet’s scorch mark.
- Orange portal on the extended ground level panel. Activate the other two platforms as normal, walk through the orange portal with the cube, and proceed all the way to the exit.
- Silver at 3 portals
- Blue portal on the first pellet’s scorch mark. Proceed with the cube to the three-platform area.
- Orange portal on the angled platform to direct the pellet into the receiver. Notice that this deactivates the second pellet, and thus there is still a pellet entering the existing blue portal (see sidebar in this chamber’s walkthrough).
- Orange portal on the extended ground level panel. Activate the other two platforms as normal, walk through the orange portal with the cube, and proceed all the way to the exit.
- Gold at 2 portals
Solution 1:
- Blue portal on the first pellet’s scorch mark. Proceed with the cube to the three-platform area.
- Orange portal on the extended ground level panel. Activate the second and third receivers as normal. In this situation, the angled platform receiver is trickiest. Place or hold the cube such that the pellet will bounce off the edge of it, and hopefully rebound into the receiver eventually. This will be a bit of trial and error. Then walk through the orange portal with the cube, and proceed all the way to the exit.
Solution 2:
This solution utilizes a glitch that is difficult, but reasonable to perform under normal circumstances with the game as is. Navigate with the companion cube and enter the room where the three lifts are in the floor. Take the cube past the lifts, and place it as close to the exit hallway on the right as possible. Jump on top of the cube, and then while pressing forward (towards the exit hallway), but looking partially down, proceed to jump and grab (E) alternatively until you get onto the raised section. Note that it is possible to get up there with the cube (and thus being able to solve the chamber with 0 portals), but it is very difficult, partially due to an invisible force that pushes the cube back away from the exit hallway (in order to prevent players making themselves stuck). Once on the raised section, proceed to the area with the button.
- Blue portal on the ground next to button. Return to your cube.
- Orange portal anywhere in lift room. Proceed as normal.
Steps
Awards at 215...
Time
Awards at 2:20, 1:45...