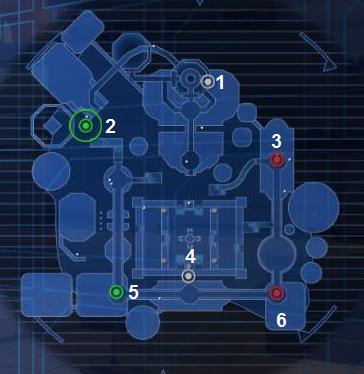
- Although capturing the Carbon Freezing Chamber is one of your secondary objectives, it has no more effect on reinforcements than any other command post does.
- This is your starting command post on ground level, and it is the closest to the Carbon Freezing Chamber.
- Some of the biggest firefights in the game happen around this command post, which is on the upper level of the map.
- A neutral CP overlooking the square. It will change hands several times throughout the game.
- This CP is also on the map's top level, and it is crucial that you maintain control of it.
- The intense battles that happen around this CP are second only to the ones you will face in the next level.
Overview
- Your faction: Rebels
- Easy reinforcements: 200
- Opposing army: Empire
- Easy reinforcements: 250
- Vehicles on map: none
- Jedi hero: none
Walkthrough
As you can see from the map legend, this level is intense. There are more fast-paced firefights in this level than in possibly all the levels before it. Unless, of course, you decide to play as a sniper, in which case here are your instructions: spawn at CP 5 and walk north far enough to see a good part of the courtyard. Shoot any enemy units you see.
If you elected to battle this one out in the trenches, start out as a grunt soldier on the top level (5) and run east. Look out: the enemy AI seems to know how to use grenades to their advantage in these narrow hallways. If you still haven't mastered that art, try to imitate what the Imperial soldiers are doing. Fight your way along slowly, and be sure not to expose yourself to fire from more than one direction. Make sure to have backup in these halls; attacking alone is suicide. Snipers shine in this particular hallway, as enemies cannot strafe enough to effectively dodge and are thus easy headshots. Another thing: make sure you have an escape route in case you don't see a grenade until it's halfway to you. Wait for the opportune time to rush in and capture CP 6; sometimes it will take 3 or 4 minutes to clear out all the opposing units. Once that one is taken, move north, still on the upper level, towards CP 3. Use the same tactics to take this one that you used for the last CP. From here, try to make your way down the ramp and to the Carbon Freezing Chamber (1). If you get killed (and you probably will), you can either keep trying to get to CP 1 or you can spawn as a sniper and shoot people in the courtyard from the stair landing. The choice is yours, but keep in mind that by this time, there won't be much more than 15 enemy units remaining. Note: if that last enemy unit is hiding from you, look in the corner underneath CP 5.
