Jump to navigation
Jump to search
m (→Dodongo's Cavern: image) |
E-123Wario54 (talk | contribs) m (cleanup) |
||
| (10 intermediate revisions by 5 users not shown) | |||
| Line 1: | Line 1: | ||
{{ | {{Header Nav|game=The Legend of Zelda: Ocarina of Time}} | ||
{{floatingtoc}} | |||
These maps are of the dungeon layouts. Click on each image to enlarge. All dungeons have maps that can be found in chests, with the exception of the [[../Gerudo Training Grounds/]]. | |||
These maps are of the dungeon layouts. | |||
[[Image:OoT_Overworld.jpg|Overworld.]] | |||
==Great Deku Tree== | |||
<gallery> | |||
Image:LOZ_OOT_Dekutreefloor1.jpg|First floor | |||
Image:LOZ_OOT_Dekutreefloor23.jpg|Second and third floors | |||
Image:LOZ_OOT_DekutreefloorB1.jpg|Basement | |||
</gallery> | |||
{{-}} | {{-}} | ||
==Dodongo's Cavern== | |||
<gallery> | |||
Image:LoZ_OOT_Dodongofloor1.jpg|First floor | |||
Image:LoZ_OOT_Dodongofloor2.jpg|Second floor | |||
</gallery> | |||
{{-}} | {{-}} | ||
==Jabu Jabu's Belly== | |||
<gallery> | |||
Image:LoZ_OOT_Jabubellyfloor1.jpg|First floor | |||
Image:LoZ_OOT_Jabubellyfloor2B1.jpg|Second floor and basement | |||
</gallery> | |||
{{-}} | {{-}} | ||
{{Footer Nav|game=The Legend of Zelda: Ocarina of Time|prevpage=Glitches|nextpage=Ocarina Songs}} | |||
Latest revision as of 17:26, 23 January 2020

These maps are of the dungeon layouts. Click on each image to enlarge. All dungeons have maps that can be found in chests, with the exception of the Gerudo Training Grounds.

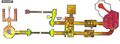
Great Deku Tree[edit]
-
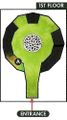
First floor
-
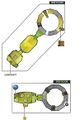
Second and third floors
-
Basement


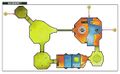
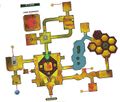
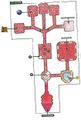
Dodongo's Cavern[edit]
-
First floor
-
Second floor

Jabu Jabu's Belly[edit]
-
First floor
-
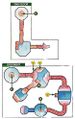
Second floor and basement

