m (→Town of Amur: Misspelling of ‘Gysahl’) |
|||
| (17 intermediate revisions by 10 users not shown) | |||
| Line 2: | Line 2: | ||
{{floatingtoc}} | {{floatingtoc}} | ||
''The restoration of the Water Crystal allowed the continents to re-emerge from the | ''The restoration of the Water Crystal resumed the flow of time, and allowed the continents to re-emerge from the darkness that covered the world. But the Warriors of Light were injured in the earthquake, and the greedy Goldor locked up their ship. The four find another obstacle in their path, delaying them from restoring the light of the Crystals once again.'' | ||
Suggested party: | |||
* Thief | |||
* Knight | |||
* Scholar | |||
* Ranger | |||
{{-}} | {{-}} | ||
== Town of Amur == | == Town of Amur == | ||
Items in ''italics'' may not need to be purchased because they can be found for free. | |||
{|{{prettytable|text center=1}} | |||
!colspan=2| Weapon shop !!rowspan=14| !!colspan=2| Item Shop !!rowspan=14| !!colspan=2| Armor shop | |||
|- | |||
! Weapons !! Cost !! Item !! Cost !! Armor !! Cost | |||
|- | |||
| {{yes|Battleaxe}} || 5000/7400 || Potion (3D) || 50 || {{yes|Viking Helm}} || 3000/5500 | |||
|- | |||
| {{yes|Morning Star (NES)}} || 8000 || Hi-Potion || 1200/600 || {{yes|Viking Mail}} || 4000/8000 | |||
|- | |||
| {{yes|Main Gauche}} || 7000 || Gold needle || 300/100 || {{n/a|''Heroic Shield''}} || 3500 | |||
|- | |||
| {{n/a|''Kaiser Knuckles (NES)''}} || 7000 || Maiden's kiss (NES) || 100 || {{n/a|''Thief Gloves''}} || 2500 | |||
|- | |||
| {{yes|Thunder Spear (3D)}} || 8000 || Echo herbs || 100 || {{n/a|''Black Garb''}} || 3000/5000 | |||
|- | |||
| {{yes|Selene Bow (3D)}} || 16000 || Mallet (NES) || 100 || {{n/a|''Black Cowl''}} || 2000/4000 | |||
|- | |||
| {{yes|Boomerang}} || 9000 || Eye drops || 40 || {{yes|Black Belt Gi}} || 3800/6000 | |||
|- | |||
| {{yes|Iron Arrow (3D)}} || 8 || Antidote || 80 || {{yes|Chakra Band}} || 3800/4500 | |||
|- | |||
| {{yes|Holy Arrow (3D)}} || 12 || || || || | |||
|- | |||
| {{yes|Madhura Harp (3D)}} || 10000 || || || || | |||
|} | |||
Go | {|{{prettytable|float=left|notwide=1}} | ||
!colspan=1|Town of Amur Checklist: | |||
|- | |||
| | |||
;Equipment: | |||
*Black Garb | |||
*Black Cowl | |||
*Thief Gloves | |||
;Items: | |||
*Gysahl Greens x 4 | |||
|} | |||
Go around town and talk to the townspeople to learn about the greedy Goldor and the bottomless bog. Since your ship has been locked up by a giant golden chain, you’ll need to search for Goldor to retrieve the key. However, to cross the bottomless bog separating you from Goldor Manor, you'll need Delilah's '''Levigrass Shoes'''. You can find them in the sewers, but the entrance is locked. | |||
Talk to a villager in the south of town, near the trees, and she will introduce you to Amur's Four Warriors of Light. They rush off into the sewers to retrieve the Levigrass Shoes for themselves. Cross the bridge to the east of the woman, and then north into a house where Gill lives. He will unlock the sewers for you. | |||
Before going to the sewers, go north up the waterway to a garden with four '''Gysahl Greens''' ready to harvest. From the garden, follow the waterway west. After passing under a bridge take the path north up the waterfall, where you’ll find an island with trees on it. Zoom in to find the '''Black Cowl''', the '''Black Garb''', and the '''Thief Gloves''' - all good pieces of equipment for your Thief. | |||
Go back to the gate that Gill unlocked and enter the Sewers. | |||
== Sewers of Amur == | == Sewers of Amur == | ||
[[File:Final Fantasy III Amur Sewer.gif|thumb|Amur sewer]] | [[File:Final Fantasy III Amur Sewer.gif|thumb|Amur sewer]] | ||
{{ | {|{{prettytable|float=left|notwide=1}} | ||
!colspan=1|Town of Amur Checklist: | |||
|- | |||
| | |||
;Equipment: | |||
*Cat Claws | |||
*Diamond Bell | |||
*Hammer | |||
*Kaiser Knuckles | |||
*Poison Dagger | |||
*Power Bracers | |||
|} | |||
The first floor is straightforward and devoid of any secrets. Simply go across the bridge and down the stairs. | |||
On the second floor, go south before the first bridge to find a chest containing the '''Cat Claws'''. Continue across the bridges and go to the next floor. | |||
On the second floor, go east until you see that Amur's four Warriors of Light are in trouble! Fortunately, the real Warriors of Light are here, and you will step in to fight four Gigan Toads. After you win the battle, continue east to the stairs. | |||
If you were starting to wonder where all the loot was here, you need look no further than the fourth floor. Follow the only path to a bridge, but instead of crossing over it, go south. There are two hidden passages to the east and west at the end of the southern passage. The secret room to the east holds two chests: one contains a '''Diamond Bell''' the other, a '''Hammer'''. The secret room to the west holds three chests with '''Kaiser Knuckles''', a '''Poison Dagger''' and '''Power Bracers'''. Equip the Poison Dagger to your Thief. Return to the bridge and follow the path to a set of stairs. | |||
Follow the | |||
On the fifth floor, you’ll meet Delilah and she’ll give you the '''Levigrass Shoes'''. Or, well, a bomb that just happened to look like a pair of shoes. Fortunately, Amur's Warriors of Light are looking out for you, and tell you to dodge at the last minute. They admit that they aren't actually the Warriors of Light, and that you are. It's a real shock; take the time you need to process this information. Delilah acknowledges your status, and gives you another pair of shoes - not a bomb this time. The old men formerly known as Amur's Warriors of Light escort you out of the sewers and back to Amur. | |||
== Goldor Manor == | == Goldor Manor == | ||
[[File:Final Fantasy III Goldors Mansion.gif|thumb|Goldor's Mansion]] | [[File:Final Fantasy III Goldors Mansion.gif|thumb|Goldor's Mansion]] | ||
{{ | {|{{prettytable|float=left|notwide=1}} | ||
!colspan=1|Goldor Manor Checklist: | |||
|- | |||
| | |||
;Equipment: | |||
*Golden Sword x 11 | |||
*Wyvern Claws | |||
|} | |||
From Amur go south until you see desert. From there, go east, then north across the swamp, and you’ll find Goldor Manor. | |||
Inside Goldor Manor, everything is a lovely shade of gold - even the enemies! You may think the enemies are just a charming attraction, but they are able to cast status effects such as '''Confusion''' and '''Paralysis''' so don't underestimate them. | |||
The | There are four doors in the main room, and a set of stairs in the back. The northeast door of the room takes you to Goldor. Ignore that door for now, and take the stairs at the top of the room. There is a secret passage in the west wall - slip through to find your party on another floor. Go all the way around to the southeast side of the room to find a whopping 12 treasure chests! Opening the first 11 chests yields the useless-in-battle '''Golden Sword''' each time, but fortunately the last chest has a useful item: '''Wyvern Claws'''. | ||
Goldor surprisingly doesn't keep any other loot around, so it's time to go beat him up. Exit the treasure room, and take the set of stairs in the north side of the entrance hall. Weave around the statues and hallways in the second floor to reach Goldor's Chamber. | |||
=== Boss: Goldor === | === Boss: Goldor === | ||
{|{{prettytable}} | |||
| Level 26 || HP: 9000 (DS) 2250 (NES) || Weakness: - || Gil: 9900 || Exp: 6560 | |||
|} | |||
[[File:FinalFantasy3 Boss10.png|thumb|256px|NES version]] | [[File:FinalFantasy3 Boss10.png|thumb|256px|NES version]] | ||
Goldor is extremely resistant to magic attacks thanks to his golden armor. However, we've recommended a party of primarily physical attackers! | |||
'''Remake-specific notes:''' Swapping your '''Knight''' for a '''Dark Knight''' grants you access to the '''Souleater''' ability, which does a good amount of damage to Goldor. If Goldor uses protect on himself, use the Scholar's '''Study''' ability to dispel it. | |||
After defeating Goldor, he uses the last of his strength to destroy the Earth Crystal! The Warriors of Light are understandably upset, but they press on. | |||
{{Footer Nav|game=Final Fantasy III|prevpage=Cave of Tides|nextpage=Saronia}} | {{Footer Nav|game=Final Fantasy III|prevpage=Cave of Tides|nextpage=Saronia}} | ||
Latest revision as of 12:20, 19 January 2024
The restoration of the Water Crystal resumed the flow of time, and allowed the continents to re-emerge from the darkness that covered the world. But the Warriors of Light were injured in the earthquake, and the greedy Goldor locked up their ship. The four find another obstacle in their path, delaying them from restoring the light of the Crystals once again.
Suggested party:
- Thief
- Knight
- Scholar
- Ranger
Town of Amur[edit]
Items in italics may not need to be purchased because they can be found for free.
| Weapon shop | Item Shop | Armor shop | |||||
|---|---|---|---|---|---|---|---|
| Weapons | Cost | Item | Cost | Armor | Cost | ||
| Battleaxe | 5000/7400 | Potion (3D) | 50 | Viking Helm | 3000/5500 | ||
| Morning Star (NES) | 8000 | Hi-Potion | 1200/600 | Viking Mail | 4000/8000 | ||
| Main Gauche | 7000 | Gold needle | 300/100 | Heroic Shield | 3500 | ||
| Kaiser Knuckles (NES) | 7000 | Maiden's kiss (NES) | 100 | Thief Gloves | 2500 | ||
| Thunder Spear (3D) | 8000 | Echo herbs | 100 | Black Garb | 3000/5000 | ||
| Selene Bow (3D) | 16000 | Mallet (NES) | 100 | Black Cowl | 2000/4000 | ||
| Boomerang | 9000 | Eye drops | 40 | Black Belt Gi | 3800/6000 | ||
| Iron Arrow (3D) | 8 | Antidote | 80 | Chakra Band | 3800/4500 | ||
| Holy Arrow (3D) | 12 | ||||||
| Madhura Harp (3D) | 10000 | ||||||
| Town of Amur Checklist: |
|---|
|
Go around town and talk to the townspeople to learn about the greedy Goldor and the bottomless bog. Since your ship has been locked up by a giant golden chain, you’ll need to search for Goldor to retrieve the key. However, to cross the bottomless bog separating you from Goldor Manor, you'll need Delilah's Levigrass Shoes. You can find them in the sewers, but the entrance is locked.
Talk to a villager in the south of town, near the trees, and she will introduce you to Amur's Four Warriors of Light. They rush off into the sewers to retrieve the Levigrass Shoes for themselves. Cross the bridge to the east of the woman, and then north into a house where Gill lives. He will unlock the sewers for you.
Before going to the sewers, go north up the waterway to a garden with four Gysahl Greens ready to harvest. From the garden, follow the waterway west. After passing under a bridge take the path north up the waterfall, where you’ll find an island with trees on it. Zoom in to find the Black Cowl, the Black Garb, and the Thief Gloves - all good pieces of equipment for your Thief.
Go back to the gate that Gill unlocked and enter the Sewers.
Sewers of Amur[edit]

| Town of Amur Checklist: |
|---|
|
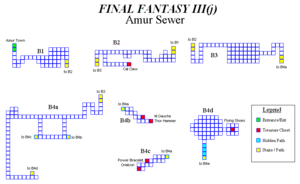
The first floor is straightforward and devoid of any secrets. Simply go across the bridge and down the stairs.
On the second floor, go south before the first bridge to find a chest containing the Cat Claws. Continue across the bridges and go to the next floor.
On the second floor, go east until you see that Amur's four Warriors of Light are in trouble! Fortunately, the real Warriors of Light are here, and you will step in to fight four Gigan Toads. After you win the battle, continue east to the stairs.
If you were starting to wonder where all the loot was here, you need look no further than the fourth floor. Follow the only path to a bridge, but instead of crossing over it, go south. There are two hidden passages to the east and west at the end of the southern passage. The secret room to the east holds two chests: one contains a Diamond Bell the other, a Hammer. The secret room to the west holds three chests with Kaiser Knuckles, a Poison Dagger and Power Bracers. Equip the Poison Dagger to your Thief. Return to the bridge and follow the path to a set of stairs.
On the fifth floor, you’ll meet Delilah and she’ll give you the Levigrass Shoes. Or, well, a bomb that just happened to look like a pair of shoes. Fortunately, Amur's Warriors of Light are looking out for you, and tell you to dodge at the last minute. They admit that they aren't actually the Warriors of Light, and that you are. It's a real shock; take the time you need to process this information. Delilah acknowledges your status, and gives you another pair of shoes - not a bomb this time. The old men formerly known as Amur's Warriors of Light escort you out of the sewers and back to Amur.
Goldor Manor[edit]

| Goldor Manor Checklist: |
|---|
|
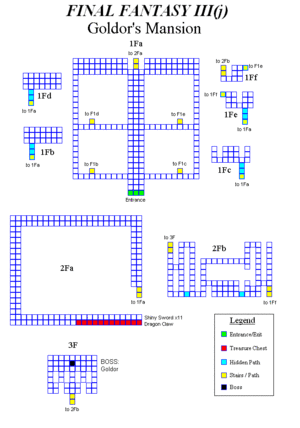
From Amur go south until you see desert. From there, go east, then north across the swamp, and you’ll find Goldor Manor.
Inside Goldor Manor, everything is a lovely shade of gold - even the enemies! You may think the enemies are just a charming attraction, but they are able to cast status effects such as Confusion and Paralysis so don't underestimate them.
There are four doors in the main room, and a set of stairs in the back. The northeast door of the room takes you to Goldor. Ignore that door for now, and take the stairs at the top of the room. There is a secret passage in the west wall - slip through to find your party on another floor. Go all the way around to the southeast side of the room to find a whopping 12 treasure chests! Opening the first 11 chests yields the useless-in-battle Golden Sword each time, but fortunately the last chest has a useful item: Wyvern Claws.
Goldor surprisingly doesn't keep any other loot around, so it's time to go beat him up. Exit the treasure room, and take the set of stairs in the north side of the entrance hall. Weave around the statues and hallways in the second floor to reach Goldor's Chamber.
Boss: Goldor[edit]
| Level 26 | HP: 9000 (DS) 2250 (NES) | Weakness: - | Gil: 9900 | Exp: 6560 |

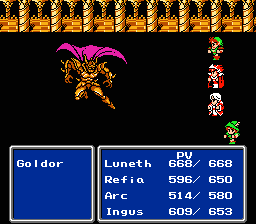
Goldor is extremely resistant to magic attacks thanks to his golden armor. However, we've recommended a party of primarily physical attackers!
Remake-specific notes: Swapping your Knight for a Dark Knight grants you access to the Souleater ability, which does a good amount of damage to Goldor. If Goldor uses protect on himself, use the Scholar's Study ability to dispel it.
After defeating Goldor, he uses the last of his strength to destroy the Earth Crystal! The Warriors of Light are understandably upset, but they press on.
