Using the power of Noah's Lute, the Warriors of Light awaken Unei, Master of Dreams. She joins the party and helps restore an old and powerful airship, the Invincible. With this new airship many new areas can be accessed and explored. The Fang of Earth is almost in your hands, and it is key to get the Earth Crystal.
| Famicom original |
3D remakes |
Notes | |
|---|---|---|---|
| Physical attackers |
Dragoon Viking (Black Belt) |
Dragoon Viking Dark Knight |
Keep one Dragoon from the previous chapter, then swap it out for a Viking. The Dark Knight is mandatory against splitting enemies. |
| Healers | Dark Knight | Bard | The Famicom Dark Knight and the remade Bard are somehow weak healers. Will you accept the challenge, or will you "chicken out" and use an obsolete job? Remember that the Evoker can perform some healing, too, and that healing items exist. |
| Special skills |
Bard Evoker Geomancer |
Evoker | Give up the Geomancer. The Famicom Bard is best used now, since the Dark Knight makes a good second physical attacker who benefits from Cheer. Keep using the Evoker, so that some extra healing and support can be provided, but also to use the powerful summons that will be obtained. |
Recommended party:
- Dragoon, then switch to Viking (physical attackers; Vikings can use weapons effective against water enemies)
- Dark Knight (physical attacker; also healer in the original)
- Bard (special skills; also healer in the remakes)
- Evoker (special skills & healer)
Unei's Shrine[edit]
Now that you have Noah's Lute, you can wake Unei. Unei is resting at her Shrine, which is just north of the Temple of Time.
After you use Noah's Lute, Unei awakens, and joins your party. She instructs you to go to the Ancient Ruins, so you can retrieve the legendary airship Invincible. Before you leave, she also thrusts the Fang of Fire into your hands.
Ancient Ruins[edit]
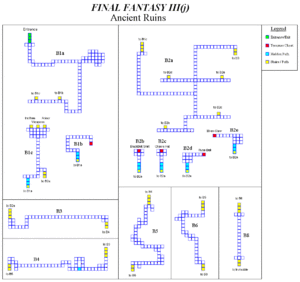
From Unei's Shrine, go east and follow the mountains north, and around to the east until you come to a river. You can land and walk the rest of the way if you want to earn more experience, or just continue flying. Follow the river west, until it curves north to a T intersection. Go east at the T and follow the river north. At another T, head west briefly before going north towards the cave on the map, which is Ancient Ruins.
Shops and a lootlist? Inhabitants and enemies? What kind of place is this...?
Head south and around the path to the east, where you'll see a few researchers milling around in an open area. They say that adamantite from a recent cave in has blocked the way deeper into the caves, and that they've been separated from the other research team there.
Items in italics may not need to be purchased because they can be found for free.
| Item shop | Weapon shop | Armor shop | |||
|---|---|---|---|---|---|
| Items | Cost | Weapons | Cost | Armor | Cost |
| Hi-Potion | 1200/600 | Blood Sword (NES) | 16500 | Diamond Shield | 18000 |
| Gold Needle | 300/100 | Defender | 16500/28000 | Diamond Helm | 20000/18000 |
| Maiden's Kiss | 100 | Triton Hammer (NES) | 20000 | Diamond Mail | 33000/32000 |
| Echo Herbs | 100 | Tomahawk (NES) | 20000 | Diamond Bracers | 10000 |
| Mallet | 100 | Ancient Sword (NES) | 16500 | Diamond Gloves | 15000/0000 |
| Eye Drops | 40 | Blood Lance (3D) | 28000 | White Robe (3D) | 27000 |
| Antidote | 80 | Medusa Arrow (3D) | 300 | Black Robe (3D) | 27000 |
| Gysahl Greens | 150 | ||||
| Ancient Ruins Checklist: |
|---|
|
Venture south until a large boulder blocks your way. Examine the rock and Unei will break it. Continue south, then follow the path to the west. There will be two doors in the northern part of the hall. The first door takes you to a room with Reflect Mail. The second door takes you to an area with a few shops, and an inn to rest up in. After you've rested and bought anything you may need, continue to the next floor.
On the next floor, follow the path until you come to a north/south split in the path. Go south, then west at the second split. There is a door to a room holding a chest with Black Belt Gi. Leave the room, then go all the way to the east for another room with a chest, this time a Chakra Band. Go back to the split in the path and go north until you come to a three-way crossroads. Don't go north for now; first head west to grab the Rune Bell out of the chest in the room, then go east for Faerie Claws in another room with a chest. Now return to the crossroads and head north, and around to the next floor.
The next five floors have no loot, and no really confusing branching paths or anything. Just follow the path for five floors and fight monsters along the way; it's that simple. Eventually, you will find the Invincible.
The Invincible[edit]
| Item shop | Weapon shop (NES) | Weapon shop (3D) | Armor shop | Magic shop | |||||
|---|---|---|---|---|---|---|---|---|---|
| Items | Cost | Weapons | Cost | Weapons | Cost | Armor | Cost | Magic | Cost |
| Potion (3D) | 50 | Defender | 16500 | Sleep Arrow | 200 | Diamond Shield | 18000 | Quake | 20000 |
| Hi-Potion | 1200/600 | Greataxe | 14000 | Poison Arrow | 200 | Diamond Helm | 20000/18000 | Breakga | 20000 |
| Gold Needle | 300/100 | Tome of Fire | 15000 | Medusa Arrow | 200 | Diamond Mail | 33000/32000 | Drain | 20000 |
| Echo Herbs | 100 | Tome of Ice | 15000 | Magic Arrow | 200 | Diamond Bracers | 10000 | Curaja | 20000 |
| Eye Drops | 100/40 | Tome of Light | 15000 | Dark Knife | 20000 | Diamond Gloves | 15000/10000 | Esuna | 20000 |
| Antidote | 80 | Yoichi Arrow | 200 | Rune Axe | 35000 | White Robe (3D) | 27000 | Reflect | 20000 |
| Ottershroom | 2000 | Loki Harp | 40000 | Dragon Lance | 40000 | Black Robe (3D) | 27000 | ||
| Gysahl Greens | 150 | Rune Bell | 5500 | Gaia Vest | 4000/7600 | ||||
| Gnomish Bread | 200 | ||||||||
Throw out your old airship, because Unei is giving you the incredible Invincible! With this airship, you basically control a moving town, complete with an inn, shops, Fat Chocobo, and a Moogle.
The Invincible doesn't land like the Nautilus, so you can't really board it the same way. Stand under the airship's shadow and press B (Cross on PSP). To exit the Invincible to the world surface, head for the stairs at the southeast part of the ship. While flying the ship, press A (Circle on PSP) to take a break and hang out on the inside of the ship.
When you're near mountains and see a "!", press B (Cross on PSP) to boost up the engines and jump over them. Just note that Unei's idea of crossable mountains is those tiny little hills that are like one square wide, and not huge swaths of mountain ranges.
One downside of the Invincible is that it's quite slow, so it can't go through the gales surrounding the Dalg continent... and of course it can't go underwater. If you just want to putter around the ocean floor or world surface without jumping mountains or having access to your free inn and store, the Nautilus is right where you left it outside of the Ancient Ruins.
Now that you have the Invincible, more of the world is open to you. Falgabard is closest, so head there first if you want some weapons and armor for your Dark Knight. There are also some optional areas open to you back on the Floating Continent: Lake Dohr and Bahamut's Lair. Anyway, you can skip these areas and progress the story by clearing the Cave of Shadows.
Falgabard[edit]
| Item shop | Weapon shop | Armor shop | Magic shop | ||||
|---|---|---|---|---|---|---|---|
| Items | Cost | Weapons | Cost | Armor | Cost | Spells | Cost |
| Hi-Potion | 1200/600 | Ashura | 20000/16000 | Demon Mail | 25000 | Fira | 1500 |
| Gold Needle (3D) | 100 | Yoichi Bow | 42000 | Demon Shield | 12500 | Blizzara | 1500 |
| Echo Herbs (3D) | 100 | Yoichi Arrow | 200/500 | Thundara | 1500 | ||
| Eye Drops (3D) | 40 | Demon Axe (3D) | 40000 | Cura | 1500 | ||
| Antidote (3D) | 80 | Teleport | 1500 | ||||
| Ottershroom (3D) | 2000 | Blindna | 1500 | ||||
| Gysahl Greens | 150 | ||||||
| Gnomish Bread | 200 | ||||||
| Falgabard checklist: |
|---|
|
The Invincible rises up out of the sea just south of Duster. Head northwest to Saronia. From the southwest corner of Saronia, head west, then slightly south through a mountain pass. Jump the two small jumpable mountains just to the south, follow the path, and then jump another mountain (to prove the first time wasn't just a fluke, I guess). Falgabard is just to the west.
At the northwest side of town, there is a cave guarded by an old man who says that only adepts of the dark blade can defeat the beings in the cave. Ignore him for now, and head east from here, through the trees to the side of a river. Go north, into the waterfall.
Take the first set of stairs down into the water, and follow the river back outside the cave, and down to a small island in a pond. Zoom in to find hidden items in the four corners of the island: Demon Armor, Demon Shield, Hi-Potion, and Blessed Hammer. Go back into the waterfall cave, back up the stairs, and further north until you see an old man at the end of the cave. Talk to him to start a fight!
Boss: Shinobi[edit]
| Level 46 | HP: 11000 (DS) 1100 (NES) | Weakness: - | Gil: 3700 | Exp: 8800 |

Despite being labeled a boss fight, the Shinobi is not a unique boss, and you will fight more in the future! Also, since it is not technically a boss, the Shinobi can only attack once per turn. Take advantage of this and pile on the attacks. You should easily take him down after a few turns of strong attacks.
After defeating the Shinobi, you obtain the Kiku-Ichimonji, your first dark blade for your Dark Knight.
Falgabard Cave[edit]
 |
| Falgabard Cave checklist: |
|---|
|
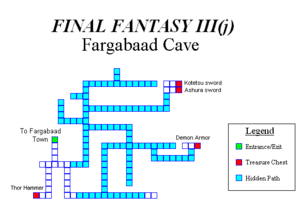
This cave is optional: there are no bosses, and it doesn't count toward the "??? Dungeon" side quest. If you don't need the experience or items within, feel free to skip it. Like the Ancient Ruins, enemies here divide to conquer, so just remember to apply status effects to pesky monsters to keep them from overwhelming you.
In 3D versions of the game, the structure of this cave is much simpler. If you are playing the NES version, refer to the map above.
Enter the cave and find a Blessed Hammer in the middle of the room. Go east, then south, through a secret passage back out into the open. Follow the path to the east, back around to the west, and around another curve to the east once more for a chest with Demon Armor. Just east of the chest is a hidden passage; follow the passage around to the north for Ashura, Kotetsu, and Dual Tomahawk. Head out of the cave when you're finished.
Side quests[edit]
Lake Dohr[edit]
| Lake Dohr checklist: |
|---|
|
To access Lake Dohr, head back to the Floating Continent first. Then, go west from Castle Argus, then south around the mountain rage to hop over a tiny mountain. Exit the airship, and row your canoe to the middle of the lake.
The enemies within the cave are all quite strong, but if your team is in the mid to high 40s, you should have relatively few problems making it through. Most enemies, including the boss, are weak to Lightning, so equip all of your strong lightning weapons and let loose. Make sure you have plenty of Gold Needles, since the enemies and boss's attacks can petrify. Your new airship can sell you some, if you're low!
With that said, let's explore the dungeon and get the loot!
On the first floor, head south for four chests, containing Phoenix Down, Arctic Wind, Heavenly Wrath, and Earthen Drums. Return to the north to get four more chests, with 3 Hi-Potions and one Elixir. Head down the stairs to the south of the last four chests.
Wind around the path and pick up the White Musk from the chest (try not to trip on it). Go northwest, and open the chests for Aegis Shield, Platinum Hammer, Turtle Shell and Bacchus's Cider. Head south and down the stairs.
Go northwest, then southwest at the crossroads. The two chests contain Lillith's Kiss, and Raven's Yawn. Go northeast, and open the three chests for Platinum Hammer, Black Hole, and Reflect Mail. Head a little farther west and grab Black Musk. Head back to the center of the room, and then head west, and down the stairs.
Go east around the lake, to the south, and then a little west. Make sure your team is healed up and ready to fight the boss: Leviathan!
Boss: Leviathan[edit]
| Level 43 | HP: 32000 (DS) 7000 (NES) | Weakness: Lightning (3D) | Gil: 17100 | Exp: 20000 |

Leviathan can be tricky to take out if you get unlucky. Leviathan can cast massive team-damaging spells (Tsunami and Blizzaga) that can take out a full party's HP if you aren't careful. Leviathan's physical attacks are not very strong, but don't let your guard down: they can also petrify. Have any party member toss a Gold Needle to the affected party member.
It can also cast Protect and Haste, so have your Evoker equipped with the Rune Staff and ready to cast Erase (3D only; no such Leviathan buffs or debuffing staff in the original). Magic jobs are very good against Leviathan, since they can cast extremely damaging Lightning-element spells. Right now, your Evoker should summon Ramuh for the lightning and Titan for a 100% sure hit.
A Viking can equip an excellent Lightning-elemental Blessed Hammer and use Provoke (together with a shield) to keep Leviathan's focus away from the less-bulky casters. The Dark Knight comes in handy in any version of the game: white magic in the Famicom, pure attacker in the remakes.
The Bard (NES) should keep cheering the two physical attackers: it is the same as a small but cumulative Haste. Similarly, the Bard (3D) should swap between different harps sing various songs to support the party in many ways. If you are afraid of losing the battle, you can replace the bard with a White Mage (absolutely obsolete by now) who can support the party with Reflect and Protect. While you're at it, have him or her also buff any physical attackers with Haste, so they can hit even harder.
After you defeat Leviathan, you receive the Leviath spell for your Evoker (later Summoner).
Bahamut's Lair[edit]
 |
| Bahamut's Lair checklist: |
|---|
|
Do you remember when we ran away from Bahamut at the beginning of the game? Perhaps it's time to go back and settle the score....
To get back to Bahamut's Lair, head back to Tozus, which is southeast of Canaan. The mountain ridge just west of Tozus is jumpable, so hop over it and head into the cave.
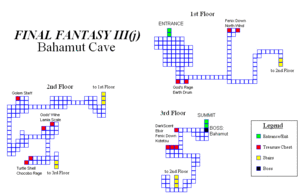
The text instructions below only apply to the remakes of the game.
Cross the bridge south, then cross the east bridge. Open the two chests at the end for Phoenix Down and Arctic Wind. Go back west, cross two bridges for Earthen Drums and Heavenly Wrath. Go back over the bridge you came from, and head south to the next floor.
Go west across one bridge, and open the chest for a Golem Staff. Cross the next bridge to the south, and then a bridge to the north, then open the chest for White Musk. Cross the bridge to the east and grab Bacchus's Cider from the chest. Cross the southern bridge and open the two chests for Chocobo's Wrath and Turtle Shell, then head down the stairs.
Open the chest immediately to the west for Eurytos Bow. Around the corner to the east are three more chests: Phoenix Down, Elixir, and Kotetsu. Heal up now before crossing the bridge. Once you cross far enough that you can see the cave exit, Bahamut will force you into battle!
Boss: Bahamut[edit]
| Level 45 | HP: 34000 (DS) 7500 (NES) | Weakness: Wind | Gil: 16500 | Exp: 20000 |
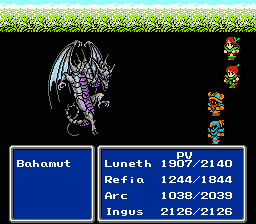
Your second attempt against Bahamut will definitely not go as poorly as the first time. You could even be able to beat him in three turns or less!
If you have already beaten Odin and Leviathan, the Evoker can summon them for a lot of damage (although these mass-damaging summons are better spent during the dungeon). In any case, Titan is always a sure hit, and Ifrit can heal the party.
Your Dark Knight and Viking should use the Chocobo's Wrath and the Raven's Yawn you found in Bahamut's Cave, then just attack over and over again. In the original, the former can cast some White Magic; in the remakes, the latter can Provoke the enemy so the light-armored characters can keep doing their job.
The Bard should cheer the party (Famicom) or sing with different harps (remakes); either way, this job should buff the allies instead of attack directly. If you are afraid to lose the battle, you can replace the Bard with a White Mage (awfully old by now), who could cast party buffs, or Aeroga, depending on how confident you are that the party can take a few hits.
Once you're even with Bahamut, you'll receive the summon Bahamur.
Cave of Shadows[edit]
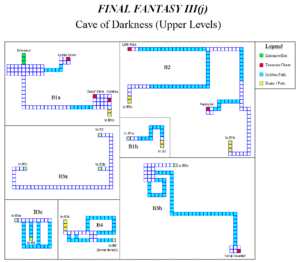
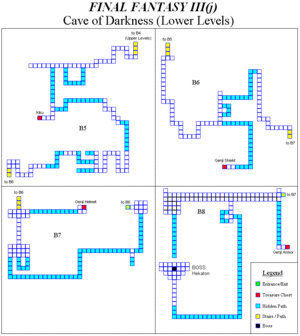
The healing skills of the Water Crystal jobs (Evoker's Ifrit, NES Dark Knight, remakes' Bard) should be sufficient for this dungeon. If you still feel underpowered, feel free to purchase any amount of healing items (or to steal some with a temporary party of thieves).
Next up is the Cave of Shadows, where you'll retrieve the Fang of Earth. To get there, head to the central part of the eastern continent. You should pass over a desert and an oasis, then see a small mountain pass. Jump over the mountains to the west to enter the mountain maze. Luckily, it's not too difficult. You won't have many choices of mountains to jump, but generally you'll want to go east, then north, then back to the west, then south to the Cave of Shadows.
The text instructions below only apply to the 3D versions of the game.
Secret passages are very prevalent in this dungeon, so be sure to check every nook and cranny!
On the first floor, go east for Black Musk, then head back to the main room. Go south and around the corner to the east for Dark Claws, then talk to the dying Dark Knight to inherit a Kotetsu.
On the second floor, head east, then north, but not too far. Take the hidden passage on the west side of the path for Tranquilizer. Return to the main path, and west through a secret passage in the dead end. There's a chest through the passage with Lillith's Kiss. After opening the chest, head southeast through the hidden passage. Then, head through the hidden passage in the northwest to find another room with the stairs down.
The third floor is fairly straightforward and treasure-free. Go south, west, then back north, and seek the hidden passage concealing the stairs on the eastern wall.
On the fourth floor, head east through a secret passage, then south through another secret passage. Open the chest for Genji Gloves and make sure you equip them! Head down to the next floor, just to the south of the chest.
On the fifth floor, go south and enter the secret passage. Follow it west, then northwest. Then, go immediately south into another secret passage, and follow it back to the southeast. In the next room, take the short secret passage to the south. Then, take another secret passage on the western wall, and follow it around to the northwest. Go south, yet again, through another secret passage, and take the stairs on the east side of the room down.
On the sixth floor, go east immediately through a secret passage. Go south to the end of the room, then through another secret passage on the west wall. Open the chest with Kiku-Ichimonji, then take the stairs down.
On the seventh floor, grab the chest with Genji Shield, then go east through a secret passage. Go south to the end of the room, then through another secret passage on the west wall. (Didn't we do this last floor?) Take the stairs down.
On the eighth floor, head east across a creepy bone bridge, then grab the chest with Genji Helm. Take the stairs up to the next floor.
We've finally arrived on the last floor, meaning the boss is just up ahead, but don't miss the Genji Armor in a chest through a hidden passage on the east wall as soon as you enter. Heal up and cross the bridge. You'll see the Fang of Earth chilling on the altar, but you'd be a fool to assume you can just take it. First, you have to fight the boss, Hecatoncheir.
Boss: Hecatoncheir[edit]
| Level 43 | HP: 30000 (DS) 6500 (NES) | Weakness: - | Gil: 8800 | Exp: 3600 |

Hecatoncheir hits with strong physical attacks every turn, so you should make good use of your Water Crystal healing and support skills. The Evoker can summon Ifrit for healing and Bahamut for a good buff. When Hecatoncheir gets low on health, he starts casting Quake, so don't let him get that opportunity! Again, remember your Evoker and summon Odin for magic protection.
The Bard should just power-up the allies, especially your two physical attackers, Viking and Dark Knight. A Dark Knight equipped with a Kiku-Ichimonji will deal a good amount of damage every turn, and can wear the powerful Genji gear (shield included) you just got in the Cave of Shadows. In the Famicom original, he can also cure the allies, if needed.
If you've been doing the optional dungeons, you should have no problem with him, though; he is technically lower level than Bahamut and Leviathan, and has less health.
After you defeat Hecatoncheir, pick up the Fang of Earth for real this time. Refia says you should take the fang back to Doga's Manor, and says she can't wait to see Unei and Doga again. Don't keep the girl waiting: head back to Doga's Manor!
