Notmyhandle (talk | contribs) (image->File, replaced broken gif with png) |
(Expanded page. Could use some work with NES differences since I played the PSP version,) |
||
| Line 2: | Line 2: | ||
{{floatingtoc}} | {{floatingtoc}} | ||
Go all-out! This is the final dungeon! | |||
Suggested team: | Suggested team: | ||
* Sage | * Sage | ||
* Ninja | * Ninja | ||
* Onion Knight | * Onion Knight (only if the job level is high enough and it is wearing the Onion set. Replace with a high job level character otherwise) | ||
* Devout | * Devout | ||
The Sage's Titan summon can to quickly destroy groups of monsters, but save stronger summons for the bosses. The Devout's Holy and Tornado (if it hits) spells deal heavy damage to single targets. Equip the Ninja with Muramasa and Masamune, but consider throwing Shuriken against bosses. The Onion Knight has the best armor, and can stay in the front row. | |||
Don't worry if you have an entirely different team composition that is working well for you. Other jobs can shine here, including Geomancer, Viking, and Black Belt. You will lose a lot of progress if you die three or four bosses in, so stick with something safe for sure. | |||
{{-}} | {{-}} | ||
== Free the four Warriors of Darkness == | == Free the four Warriors of Darkness == | ||
[[File:Final Fantasy III Dark World.png|thumb|500px|World of Darkness | [[File:Final Fantasy III Dark World.png|thumb|500px|Map of the World of Darkness]] | ||
Upon entering the World of Darkness, you'll find yourself on a platform with paths to the northeast, northwest, southeast, and southwest. There is also a teleport pad in the center that leads directly to the boss. However, you shouldn't go there just yet... | |||
First you should free the four Warriors of Darkness, your counterparts trapped here in the World of Darkness. If you free all of the Warriors of Darkness, you will be stronger against the final boss. However, four sub-bosses protect each Warrior. In this guide, the four sub-bosses are sorted corresponding to the order that you obtained the Crystals of Light. | |||
All of the bosses have the same amount of health - 99999 HP - which is the same amount as a Red Dragon. If you were able to defeat the Red Dragons fairly quickly before arriving here, you should do fine. All of the bosses can do a status ailment with their attack, so make sure you equip '''Ribbon''' as you find them to each party member. In general, a good strategy for defeating these bosses is to, take a Viking and equip two shields, then continuously use Provoke to direct all attacks to the Viking while your other attackers can dish out the damage. Be sure to cast Protect on the Viking as well, and keep them cured every turn. Meanwhile, attack with strong attackers. The following strategies for the bosses will simply detail additional tactics that are effective. | |||
{{sidebar|float=left|width=250px|title=Need more Ribbons?|contents=In each of the four passages there is a trapped chest with a '''Ribbon''', which will be extremely useful against the status effects of the sub bosses. Xande Clones guard the chests, but they have less HP than the original Xande.}} | |||
{{-}} | {{-}} | ||
=== Air Crystal: Cerberus === | |||
=== Air Crystal sub-boss: Cerberus === | |||
{|{{prettytable}} | |||
| Level 55 || HP: 99999 || Weakness: - || Gil: 66666 || Exp: 66666 | |||
|} | |||
[[File:FinalFantasy3_Boss19a.png|frame|NES version]] | [[File:FinalFantasy3_Boss19a.png|frame|NES version]] | ||
'''Passage:''' | '''Passage:''' Northwest | ||
Winding invisible tunnels remind you of the wind | Winding invisible tunnels remind you of the flow of the wind. Follow the path to the teleport pad on the end. In the 3D versions of the game, the purple clouds are where you should walk. Refer to the map above for the path for the NES version. | ||
After | After you teleport, you'll be forced into an encounter with the first boss: Cerberus. | ||
If you did not fight Kunoichi in Eureka, Cerberus will be the first encounter where the boss can attack three times per turn. He can also poison your party with his attacks. Cerberus knows each type of magic: Blizzaga, Firaga and Thundaga, so be ready to heal the entire party every round just in case it decides to throw a huge spell on the party. | |||
=== Fire Crystal: Two-Headed Dragon === | |||
Take a Ninja and Throw '''Shuriken'''. Even if the damage shows up as 9999, the attack can do even more than that. Black Belts can also Boost, and attack for much more damage. | |||
After Cerberus is defeated, a Warrior of Darkness will appear and offer his help to your Warriors of Light. In the NES version of the game, the Dark Crystals do not restore Health and Magic Points as the Light Crystals did. However, in the 3D remakes, they do. | |||
=== Fire Crystal sub-boss: Two-Headed Dragon === | |||
{|{{prettytable}} | |||
| Level 55 || HP: 99999 || Weakness: - || Gil: 66666 || Exp: 66666 | |||
|} | |||
[[File:FinalFantasy3_Boss19b.png|frame|NES version]] | [[File:FinalFantasy3_Boss19b.png|frame|NES version]] | ||
'''Passage:''' | '''Passage:''' Northwest | ||
Follow the linear passage around, grabbing the chest with the '''Ribbon'''. Step on the teleporter to be taken to the Dark Fire Crystal. You will face the Two-Headed Dragon! | |||
The | Unlike Cerberus, the Two-Headed Dragon relies primarily on physical attacks, and does not use any magic at all. It can also only attack twice per turn like other normal bosses. The Two-Headed Dragon can silence attackers with its physical hits. If you don't have very many '''Ribbon''' at this point, make sure to equip them to your casters who would suffer the most from Silence. | ||
{{-}} | {{-}} | ||
=== Water Crystal: Echidna === | === Water Crystal sub-boss: Echidna === | ||
{|{{prettytable}} | |||
| Level 55 || HP: 99999 || Weakness: - || Gil: 66666 || Exp: 66666 | |||
|} | |||
[[File:FinalFantasy3_Boss19c.png|frame|NES version]] | [[File:FinalFantasy3_Boss19c.png|frame|NES version]] | ||
'''Passage:''' | '''Passage:''' Southwest | ||
The passages here wind lazily through like the countless rivers on the surface of the world from which you came. After you enter, head west, to the last branching path. Go north and follow the path around for a '''Ribbon'''. Return to the main path, and take the second path from the left. Heal up and get ready to fight! | |||
Echidna's biggest threats are the spells in her arsenal, such as Death, Tornado, Quake, and Drain but luckily the '''Ribbon''' you have been getting will protect your party from Death, the worst of it. Tornado has low accuracy and if it does connect, can easily be recovered from with a well-placed Curaja. Quake can do quite a bit of damage, especially if she follows it up with an attack on your lowest health party member. | |||
{{-}} | {{-}} | ||
=== Earth Crystal: Ahriman === | === Earth Crystal sub-boss: Ahriman === | ||
{|{{prettytable}} | |||
| Level 55 || HP: 99999 || Weakness: Wind || Gil: 66666 || Exp: 66666 | |||
|} | |||
[[File:FinalFantasy3_Boss19d.png|frame|NES version]] | [[File:FinalFantasy3_Boss19d.png|frame|NES version]] | ||
'''Passage:''' | '''Passage:''' Southeast | ||
Head north and grab the '''Ribbon''' from the chest. You may not need it, since this is the fifth '''Ribbon''' you come across in the game, but you should grab it for chest opening completion. Head either east or west around the path that is shaped like an Ahriman's wings before meeting the Ahriman itself. | |||
Ahriman is the only sub-boss weak to something, so exploit his wind weakness. If your Dragoon has high job levels, equip '''Wind Spear''' in both slots and Jump every turn. Ahriman also has the ability to heal itself each turn, which can actually work to your advantage; it won't be damaging your team for its action that turn. With less overall damage going out, your healer may be able to get in an Aeroga or two before needing to heal. | |||
{{-}} | {{-}} | ||
== Final boss: Cloud of Darkness == | == Final boss: Cloud of Darkness == | ||
[[File:FinalFantasy3_Boss19e.png|frame| | {|{{prettytable}} | ||
The | | Level 60 || HP: 120000 || Weakness: - || Gil: 70000 || Exp: 99999 | ||
|} | |||
[[File:FinalFantasy3_Boss19e.png|frame|Cloud of Darkness]] | |||
After freeing all of the Warriors of Darkness, return to the center and step on the teleport pad. Follow the lines to the last platform with a teleport pad, and step on it. Heal up, walk through the stars, and confront the boss! | |||
The strategy for this boss differs between the NES and 3D versions of the game. | |||
In the NES version, Cloud of Darkness usually only casts Flare Wave, which can take out about 1,000 HP from each party member. At least one or two healers should constantly be healing each turn. If you bring a Sage, they can summon Bahamut in their downtime - if you manage to find any. Ninjas are quite effective, throwing any stockpiled '''Shuriken''' you have. If you can heal through Cloud of Darkness's constant damage output, you should have victory. | |||
In the 3D version, there is a bit more strategy. The Cloud of Darkness is accompanied by two tentacles that can also cast spells. The tentacle on your left casts a devastating Lightning attack every turn, and is immune to magic. The tentacle on your right can buff the enemy party, deal physical damage, and is immune to physical attacks. Have your physical attackers focus down the left tentacle first, while your healer heals the party each turn that it is up. Once the left tentacle is down, you can focus the boss, or also defeat the right tentacle. You may find that the right tentacle goes down naturally if you bring a Summoner and cast Bahamut every turn. | |||
The Cloud of Darkness herself will cast a few spells: Bad Breath and Particle Beam. If you kept your '''Ribbons''' equipped, Bad Breath will effectively do nothing. Particle Beam does damage to the entire party, so be ready with a strong Curaga or Curaja as the situation calls for it. Just keep hoping that she casts Bad Breath! | |||
You should have the fight once you defeat both tentacles; just keep casting powerful spells and using strong attacks. Ninjas throwing '''Shuriken''' is an NES strategy that is still applicable here. Buffing spells such as Haste and Protect are useful, but you may not want to skip a turn of healing or attacking. | |||
If you fail to defeat the Cloud of Darkness, you must load your last save and try again from the beginning - winding all the way back through Crystal Tower and rescuing the Warriors of Darkness. But don't lose hope! Simply take some time to raise your party's levels and try again. In general, you should be ready to face the boss once your overall level is 75 or higher. | |||
If you succeed, congratulations! Enjoy the final cutscene and credits. | |||
{{Footer Nav|game=Final Fantasy III|prevpage=Crystal Tower|nextpage=}} | {{Footer Nav|game=Final Fantasy III|prevpage=Crystal Tower|nextpage=}} | ||
Revision as of 21:29, 23 April 2018
Go all-out! This is the final dungeon!
Suggested team:
- Sage
- Ninja
- Onion Knight (only if the job level is high enough and it is wearing the Onion set. Replace with a high job level character otherwise)
- Devout
The Sage's Titan summon can to quickly destroy groups of monsters, but save stronger summons for the bosses. The Devout's Holy and Tornado (if it hits) spells deal heavy damage to single targets. Equip the Ninja with Muramasa and Masamune, but consider throwing Shuriken against bosses. The Onion Knight has the best armor, and can stay in the front row.
Don't worry if you have an entirely different team composition that is working well for you. Other jobs can shine here, including Geomancer, Viking, and Black Belt. You will lose a lot of progress if you die three or four bosses in, so stick with something safe for sure.
Free the four Warriors of Darkness
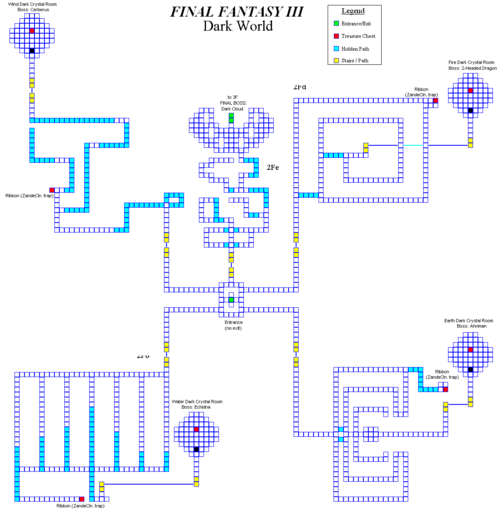
Upon entering the World of Darkness, you'll find yourself on a platform with paths to the northeast, northwest, southeast, and southwest. There is also a teleport pad in the center that leads directly to the boss. However, you shouldn't go there just yet...
First you should free the four Warriors of Darkness, your counterparts trapped here in the World of Darkness. If you free all of the Warriors of Darkness, you will be stronger against the final boss. However, four sub-bosses protect each Warrior. In this guide, the four sub-bosses are sorted corresponding to the order that you obtained the Crystals of Light.
All of the bosses have the same amount of health - 99999 HP - which is the same amount as a Red Dragon. If you were able to defeat the Red Dragons fairly quickly before arriving here, you should do fine. All of the bosses can do a status ailment with their attack, so make sure you equip Ribbon as you find them to each party member. In general, a good strategy for defeating these bosses is to, take a Viking and equip two shields, then continuously use Provoke to direct all attacks to the Viking while your other attackers can dish out the damage. Be sure to cast Protect on the Viking as well, and keep them cured every turn. Meanwhile, attack with strong attackers. The following strategies for the bosses will simply detail additional tactics that are effective.
Air Crystal sub-boss: Cerberus
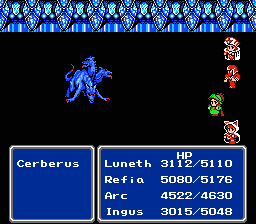
| Level 55 | HP: 99999 | Weakness: - | Gil: 66666 | Exp: 66666 |
Passage: Northwest
Winding invisible tunnels remind you of the flow of the wind. Follow the path to the teleport pad on the end. In the 3D versions of the game, the purple clouds are where you should walk. Refer to the map above for the path for the NES version.
After you teleport, you'll be forced into an encounter with the first boss: Cerberus.
If you did not fight Kunoichi in Eureka, Cerberus will be the first encounter where the boss can attack three times per turn. He can also poison your party with his attacks. Cerberus knows each type of magic: Blizzaga, Firaga and Thundaga, so be ready to heal the entire party every round just in case it decides to throw a huge spell on the party.
Take a Ninja and Throw Shuriken. Even if the damage shows up as 9999, the attack can do even more than that. Black Belts can also Boost, and attack for much more damage.
After Cerberus is defeated, a Warrior of Darkness will appear and offer his help to your Warriors of Light. In the NES version of the game, the Dark Crystals do not restore Health and Magic Points as the Light Crystals did. However, in the 3D remakes, they do.
Fire Crystal sub-boss: Two-Headed Dragon
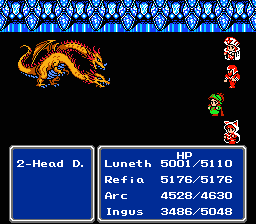
| Level 55 | HP: 99999 | Weakness: - | Gil: 66666 | Exp: 66666 |
Passage: Northwest
Follow the linear passage around, grabbing the chest with the Ribbon. Step on the teleporter to be taken to the Dark Fire Crystal. You will face the Two-Headed Dragon!
Unlike Cerberus, the Two-Headed Dragon relies primarily on physical attacks, and does not use any magic at all. It can also only attack twice per turn like other normal bosses. The Two-Headed Dragon can silence attackers with its physical hits. If you don't have very many Ribbon at this point, make sure to equip them to your casters who would suffer the most from Silence.
Water Crystal sub-boss: Echidna
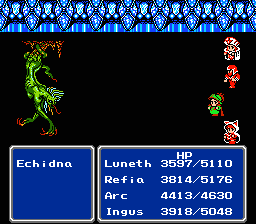
| Level 55 | HP: 99999 | Weakness: - | Gil: 66666 | Exp: 66666 |
Passage: Southwest
The passages here wind lazily through like the countless rivers on the surface of the world from which you came. After you enter, head west, to the last branching path. Go north and follow the path around for a Ribbon. Return to the main path, and take the second path from the left. Heal up and get ready to fight!
Echidna's biggest threats are the spells in her arsenal, such as Death, Tornado, Quake, and Drain but luckily the Ribbon you have been getting will protect your party from Death, the worst of it. Tornado has low accuracy and if it does connect, can easily be recovered from with a well-placed Curaja. Quake can do quite a bit of damage, especially if she follows it up with an attack on your lowest health party member.
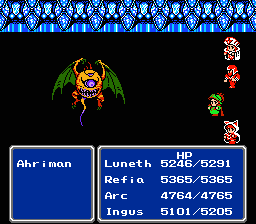
Earth Crystal sub-boss: Ahriman
| Level 55 | HP: 99999 | Weakness: Wind | Gil: 66666 | Exp: 66666 |
Passage: Southeast
Head north and grab the Ribbon from the chest. You may not need it, since this is the fifth Ribbon you come across in the game, but you should grab it for chest opening completion. Head either east or west around the path that is shaped like an Ahriman's wings before meeting the Ahriman itself.
Ahriman is the only sub-boss weak to something, so exploit his wind weakness. If your Dragoon has high job levels, equip Wind Spear in both slots and Jump every turn. Ahriman also has the ability to heal itself each turn, which can actually work to your advantage; it won't be damaging your team for its action that turn. With less overall damage going out, your healer may be able to get in an Aeroga or two before needing to heal.
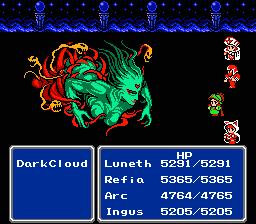
Final boss: Cloud of Darkness
| Level 60 | HP: 120000 | Weakness: - | Gil: 70000 | Exp: 99999 |
After freeing all of the Warriors of Darkness, return to the center and step on the teleport pad. Follow the lines to the last platform with a teleport pad, and step on it. Heal up, walk through the stars, and confront the boss!
The strategy for this boss differs between the NES and 3D versions of the game.
In the NES version, Cloud of Darkness usually only casts Flare Wave, which can take out about 1,000 HP from each party member. At least one or two healers should constantly be healing each turn. If you bring a Sage, they can summon Bahamut in their downtime - if you manage to find any. Ninjas are quite effective, throwing any stockpiled Shuriken you have. If you can heal through Cloud of Darkness's constant damage output, you should have victory.
In the 3D version, there is a bit more strategy. The Cloud of Darkness is accompanied by two tentacles that can also cast spells. The tentacle on your left casts a devastating Lightning attack every turn, and is immune to magic. The tentacle on your right can buff the enemy party, deal physical damage, and is immune to physical attacks. Have your physical attackers focus down the left tentacle first, while your healer heals the party each turn that it is up. Once the left tentacle is down, you can focus the boss, or also defeat the right tentacle. You may find that the right tentacle goes down naturally if you bring a Summoner and cast Bahamut every turn.
The Cloud of Darkness herself will cast a few spells: Bad Breath and Particle Beam. If you kept your Ribbons equipped, Bad Breath will effectively do nothing. Particle Beam does damage to the entire party, so be ready with a strong Curaga or Curaja as the situation calls for it. Just keep hoping that she casts Bad Breath!
You should have the fight once you defeat both tentacles; just keep casting powerful spells and using strong attacks. Ninjas throwing Shuriken is an NES strategy that is still applicable here. Buffing spells such as Haste and Protect are useful, but you may not want to skip a turn of healing or attacking.
If you fail to defeat the Cloud of Darkness, you must load your last save and try again from the beginning - winding all the way back through Crystal Tower and rescuing the Warriors of Darkness. But don't lose hope! Simply take some time to raise your party's levels and try again. In general, you should be ready to face the boss once your overall level is 75 or higher.
If you succeed, congratulations! Enjoy the final cutscene and credits.
