Jump to navigation
Jump to search
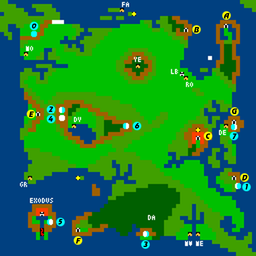
The "C" marks the location of the Dungeon of Fire
m (Abacos moved page Ultima III: Exodus/Fires of Hell to Ultima III: Exodus/Dungeon of Fire: Real name of the Dungeon) |
(adjusted prevpage/nextpage) |
||
| (3 intermediate revisions by the same user not shown) | |||
| Line 1: | Line 1: | ||
{{Header Nav|game=Ultima III: Exodus}} | {{Header Nav|game=Ultima III: Exodus}} | ||
== | [[file:Ultima_III_Sosaria_map.png|left|256px|thumb|The '''"C"''' marks the location of the Dungeon of Fire]] | ||
The Dungeon of Fire is located straight South of Britain, and it is surrounded by a circle of mountains and lava pits. Overall, it's probably the most difficult dungeon, with a high number of traps and a low number of chests. It conceals both the Mark of Force and the Mark of Fire, that can be acquired in easier dungeons. | |||
The Dungeon of Fire is the only one that kept its name in the NES version. | |||
{{-}} | |||
== Maps == | |||
Legend: | |||
* '''G =''' Gremlin (steals food) | |||
* '''T =''' Trap | |||
* '''W =''' Strange wind (blows out torches) | |||
{| | {| | ||
| | | ||style="background:black; color:white" | '''X''' || = False wall | ||
|} | |||
| ''' | |||
{|{{prettytable}} | |||
!width=10%| Floor !!width=35%| Map !! Notes | |||
|- | |- | ||
| ''' | | Floor 1 || [[Image:Ultima III Hell F1.png]] || Sign 1: "Beware, the Fires of Hell!" <br /><br /> '''C =''' Cure poison fountain <br /> '''P =''' Poison fountain | ||
|- | |- | ||
| | | Floor 2 || [[Image:Ultima III Hell F2.png]] || Sign 2: "Trapped door!" <br /><br /> '''C =''' Cure poison fountain <br /> '''H =''' Healing fountain <br /> '''D =''' Damage fountain | ||
|- | |- | ||
| | | Floor 3 || [[Image:Ultima III Hell F3.png]] || Sign 3: "Twisty Maze!" <br /> | ||
|- | |- | ||
| | | Floor 4 || [[Image:Ultima III Hell F4.png]] || Sign 4: "Windy Walk!" <br /> | ||
|- | |- | ||
| | | Floor 5 || [[Image:Ultima III Hell F5.png]] || Sign 5: "Gremlin City!" <br /><br /> '''H =''' Healing fountain | ||
|- | |- | ||
| | | Floor 6 || [[Image:Ultima III Hell F6.png]] || Sign 6: "Devil's Den!" <br /> | ||
|- | |- | ||
| | | Floor 7 || [[Image:Ultima III Hell F7.png]] || Sign 7: "Go back! Pits!" <br /> | ||
|- | |- | ||
| | | Floor 8 || [[Image:Ultima III Hell F8.png]] || Sign 8: "Chamber of Fire!" <br /> '''f =''' Mark of Force <br /> '''i =''' Mark of Fire <br /><br /> '''C =''' Cure poison fountain <br /> '''H =''' Healing fountain <br /> '''P =''' Poison fountain <br /> '''D =''' Damage fountain | ||
|} | |} | ||
{{Footer Nav|game=Ultima III: Exodus|prevpage= | {{Footer Nav|game=Ultima III: Exodus|prevpage=Perinian Depths|nextpage=Exodus Castle}} | ||
Latest revision as of 11:00, 20 March 2017

The Dungeon of Fire is located straight South of Britain, and it is surrounded by a circle of mountains and lava pits. Overall, it's probably the most difficult dungeon, with a high number of traps and a low number of chests. It conceals both the Mark of Force and the Mark of Fire, that can be acquired in easier dungeons.
The Dungeon of Fire is the only one that kept its name in the NES version.
Maps[edit]
Legend:
- G = Gremlin (steals food)
- T = Trap
- W = Strange wind (blows out torches)
| X | = False wall |
| Floor | Map | Notes |
|---|---|---|
| Floor 1 |  |
Sign 1: "Beware, the Fires of Hell!" C = Cure poison fountain P = Poison fountain |
| Floor 2 |  |
Sign 2: "Trapped door!" C = Cure poison fountain H = Healing fountain D = Damage fountain |
| Floor 3 |  |
Sign 3: "Twisty Maze!" |
| Floor 4 |  |
Sign 4: "Windy Walk!" |
| Floor 5 |  |
Sign 5: "Gremlin City!" H = Healing fountain |
| Floor 6 |  |
Sign 6: "Devil's Den!" |
| Floor 7 |  |
Sign 7: "Go back! Pits!" |
| Floor 8 |  |
Sign 8: "Chamber of Fire!" f = Mark of Force i = Mark of Fire C = Cure poison fountain H = Healing fountain P = Poison fountain D = Damage fountain |