Jump to navigation
Jump to search
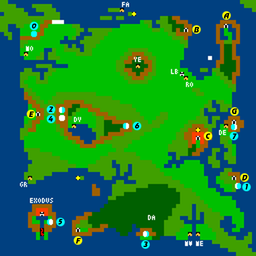
The "F" marks the location of Dungeon Doom
(typo) |
(adjusted prevpage/nextpage) |
||
| (9 intermediate revisions by 3 users not shown) | |||
| Line 1: | Line 1: | ||
{{Header Nav|game=Ultima III: Exodus}} | {{Header Nav|game=Ultima III: Exodus}} | ||
== | [[file:Ultima_III_Sosaria_map.png|left|256px|thumb|The '''"F"''' marks the location of Dungeon Doom]] | ||
The Dungeon of Doom is located beyond the Great Forest, straight West of Montor. It conceals the '''Mark of Force''', that can also be found in the [[../Dungeon of Fire|Dungeon of Fire]], but Dungeon Doom is easier to navigate. | |||
This dungeon was nameless in the original ports; the misty writings near the entrance read: "Welcome, fool, to your doom!". Therefore, the Japanese Ponycanyon ports (NES, etc.) called it "Cave of Fool", while external material in the USA called it "Dungeon Doom". | |||
{{-}} | |||
== Maps == | |||
Legend: | |||
* '''G =''' Gremlin (steals food) | |||
* '''T =''' Trap | |||
* '''W =''' Strange wind (blows out torches) | |||
{| | {| | ||
| ''' | | ||style="background:black; color:white" | '''X''' || = False wall | ||
|} | |||
{|{{prettytable}} | |||
!width=10%| Floor !!width=35%| Map !! Notes | |||
|- | |- | ||
| ''' | | Floor 1 || [[Image:Ultima III Doom F1.png]] || Sign 1: "Welcome, fools, to your doom!!" <br>NES port: "Cave of Fool" <br /><br /> '''C =''' Cure poison fountain | ||
|- | |- | ||
| | | Floor 2 || [[Image:Ultima III Doom F2.png]] || Sign 2: "Secret corners!" <br /><br /> | ||
|- | |- | ||
| | | Floor 3 || [[Image:Ultima III Doom F3.png]] || Sign 3: "Traps & Treasure" <br /><br /> | ||
|- | |- | ||
| | | Floor 4 || [[Image:Ultima III Doom F4.png]] || Sign 4: "Beware the Winds" <br /><br /> | ||
|- | |- | ||
| | | Floor 5 || [[Image:Ultima III Doom F5.png]] || Sign 5: "Danger!" <br /><br /> '''C =''' Cure poison fountain <br /> '''H =''' Healing fountain | ||
|- | |- | ||
| | | Floor 6 || [[Image:Ultima III Doom F6.png]] || Sign 6: "Map well!!!" <br /><br /> '''D =''' Damage fountain | ||
|- | |- | ||
| | | Floor 7 || [[Image:Ultima III Doom F7.png]] || Sign 7: "Reach up!" <br /><br /> | ||
|- | |- | ||
| | | Floor 8 || [[Image:Ultima III Doom F8.png]] || Sign 8: "Windy secret" <br /> '''f =''' Mark of Force <br /><br /> '''C =''' Cure poison fountain <br /> '''H =''' Healing fountain <br /> '''D =''' Damage fountain <br /> '''P =''' Poison fountain | ||
|} | |} | ||
{{Footer Nav|game=Ultima III: Exodus|prevpage= | {{Footer Nav|game=Ultima III: Exodus|prevpage=Dungeon of Time|nextpage=Perinian Depths}} | ||
Latest revision as of 10:57, 20 March 2017

The Dungeon of Doom is located beyond the Great Forest, straight West of Montor. It conceals the Mark of Force, that can also be found in the Dungeon of Fire, but Dungeon Doom is easier to navigate.
This dungeon was nameless in the original ports; the misty writings near the entrance read: "Welcome, fool, to your doom!". Therefore, the Japanese Ponycanyon ports (NES, etc.) called it "Cave of Fool", while external material in the USA called it "Dungeon Doom".
Maps[edit]
Legend:
- G = Gremlin (steals food)
- T = Trap
- W = Strange wind (blows out torches)
| X | = False wall |
| Floor | Map | Notes |
|---|---|---|
| Floor 1 |  |
Sign 1: "Welcome, fools, to your doom!!" NES port: "Cave of Fool" C = Cure poison fountain |
| Floor 2 |  |
Sign 2: "Secret corners!" |
| Floor 3 |  |
Sign 3: "Traps & Treasure" |
| Floor 4 |  |
Sign 4: "Beware the Winds" |
| Floor 5 |  |
Sign 5: "Danger!" C = Cure poison fountain H = Healing fountain |
| Floor 6 |  |
Sign 6: "Map well!!!" D = Damage fountain |
| Floor 7 |  |
Sign 7: "Reach up!" |
| Floor 8 |  |
Sign 8: "Windy secret" f = Mark of Force C = Cure poison fountain H = Healing fountain D = Damage fountain P = Poison fountain |