(changed format, added information) |
(adjusted prevpage/nextpage) |
||
| (4 intermediate revisions by the same user not shown) | |||
| Line 3: | Line 3: | ||
[[file:Ultima_III_Sosaria_map.png|left|256px|thumb|The '''"D"''' marks the location of Dungeon Snake]] | [[file:Ultima_III_Sosaria_map.png|left|256px|thumb|The '''"D"''' marks the location of Dungeon Snake]] | ||
The Dungeon of the Snake is located on an island south-east of the Royal City and north-east of Montor. It can be accessed by ship, but also using the [[../Moongates|Moongates]]. It is the only dungeon that conceals the '''Mark of Snake''', therefore it is the only absolutely mandatory dungeon. | The Dungeon of the Snake is located on an island south-east of Britain (the Royal City) and north-east of Montor. It can be accessed by ship, but also using the [[../Moongates|Moongates]]. It is the only dungeon that conceals the '''Mark of Snake''', therefore it is the only absolutely mandatory dungeon (even if you cheat to skip the Time Lord). | ||
It's the easiest dungeon, because it has the lowest number of traps; all in all, a good choice to begin with dungeon exploration. Most of its chests (21 out of 53, i.e. 40%) are on the top floor, where enemies are weaker. You can repeatedly loot this floor to quickly raise gold, before you start a proper exploraion of the seven dungeons. | |||
In the original ports, the dungeon is nameless. It was named '''"Cave of Sol"''' in the NES version. External sources named it "Dungeon of Snake", probably an abbreviation for '''"Dungeon of the Snake Mark"'''. | |||
'''Port differences:''' in the NES, the Mark of Kings is replaced by the Mark of Fire. | |||
{{-}} | {{-}} | ||
| Line 21: | Line 25: | ||
!width=10%| Floor !!width=35%| Map !! Notes | !width=10%| Floor !!width=35%| Map !! Notes | ||
|- | |- | ||
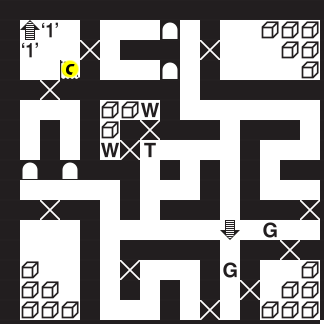
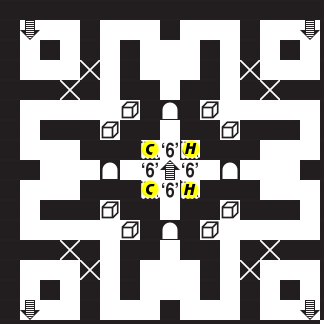
| Floor 1 || [[Image:Ultima III Clues F1.png]] || Sign 1: "Clues to | | Floor 1 || [[Image:Ultima III Clues F1.png]] || Sign 1: "Clues to follow!" <br> NES sign: "Cave of Sol" <br /><br /> '''C =''' Cure poison fountain | ||
|- | |- | ||
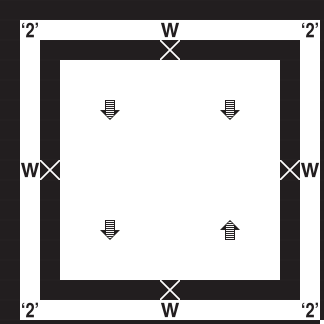
| Floor 2 || [[Image:Ultima III Clues F2.png]] || Sign 2: "<INSERT> cards into Exodus!" <br | | Floor 2 || [[Image:Ultima III Clues F2.png]] || Sign 2: "<INSERT> cards into Exodus!" <br> NES sign: "Pray [at] the altar!" | ||
|- | |- | ||
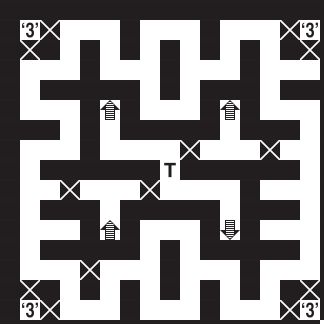
| Floor 3 || [[Image:Ultima III Clues F3.png]] || Sign 3: "<SEARCH> the shrines!" <br | | Floor 3 || [[Image:Ultima III Clues F3.png]] || Sign 3: "<SEARCH> the shrines!" <br> NES sign: "Pray [at] the Shrines!" | ||
|- | |- | ||
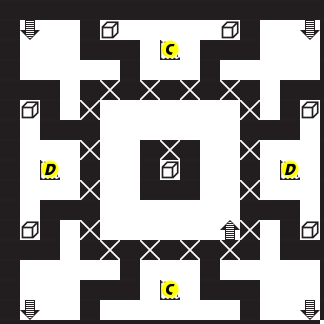
| Floor 4 || [[Image:Ultima III Clues F4.png]] || Sign 4: ''(n/a)'' <br /><br /> '''C =''' | | Floor 4 || [[Image:Ultima III Clues F4.png]] || Sign 4: ''(n/a)'' <br /><br /> '''C =''' Poison fountain (no cure) <br /> '''D =''' Damage fountain | ||
|- | |- | ||
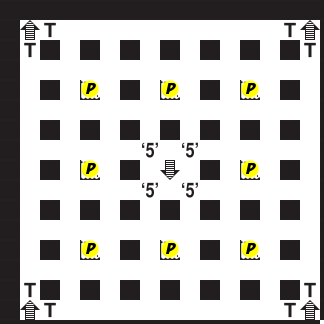
| Floor 5 || [[Image:Ultima III Clues F5.png]] || Sign 5: "Don't drink!" <br /><br /> '''P =''' Poison fountain | | Floor 5 || [[Image:Ultima III Clues F5.png]] || Sign 5: "Don't drink!" <br /><br /> '''P =''' Poison fountain | ||
| Line 35: | Line 39: | ||
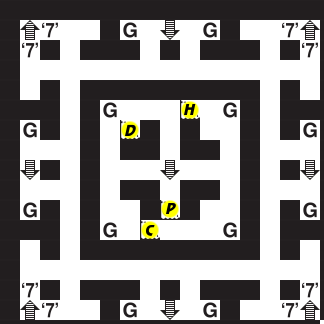
| Floor 7 || [[Image:Ultima III Clues F7.png]] || Sign 7: "Gremlins!" <br /><br /> '''H =''' Healing fountain <br /> '''C =''' Cure poison fountain <br /> '''D =''' Damage fountain <br /> '''P =''' Poison fountain | | Floor 7 || [[Image:Ultima III Clues F7.png]] || Sign 7: "Gremlins!" <br /><br /> '''H =''' Healing fountain <br /> '''C =''' Cure poison fountain <br /> '''D =''' Damage fountain <br /> '''P =''' Poison fountain | ||
|- | |- | ||
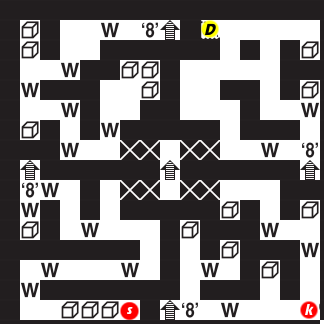
| Floor 8 || [[Image:Ultima III Clues F8.png]] || Sign 8: "Windy gold!" <br /> '''s =''' Mark of Snake <br /> '''k =''' Mark of Kings <br /><br /> '''D =''' Damage fountain | | Floor 8 || [[Image:Ultima III Clues F8.png]] || Sign 8: "Windy gold!" <br /> '''s =''' Mark of Snake <br /> '''k =''' Mark of Kings (NES: Mark of Fire) <br /><br /> '''D =''' Damage fountain | ||
|} | |} | ||
{{Footer Nav|game=Ultima III: Exodus|prevpage= | {{Footer Nav|game=Ultima III: Exodus|prevpage=Dungeons|nextpage=Mines of Morinia}} | ||
Latest revision as of 10:19, 20 March 2017
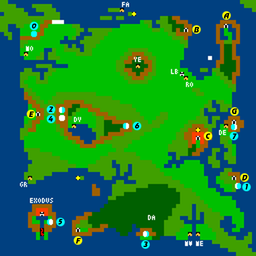
The Dungeon of the Snake is located on an island south-east of Britain (the Royal City) and north-east of Montor. It can be accessed by ship, but also using the Moongates. It is the only dungeon that conceals the Mark of Snake, therefore it is the only absolutely mandatory dungeon (even if you cheat to skip the Time Lord).
It's the easiest dungeon, because it has the lowest number of traps; all in all, a good choice to begin with dungeon exploration. Most of its chests (21 out of 53, i.e. 40%) are on the top floor, where enemies are weaker. You can repeatedly loot this floor to quickly raise gold, before you start a proper exploraion of the seven dungeons.
In the original ports, the dungeon is nameless. It was named "Cave of Sol" in the NES version. External sources named it "Dungeon of Snake", probably an abbreviation for "Dungeon of the Snake Mark".
Port differences: in the NES, the Mark of Kings is replaced by the Mark of Fire.
Maps[edit]
Legend:
- G = Gremlin (steals food)
- T = Trap
- W = Strange wind (blows out torches)
| X | = False wall |
