(2 intermediate revisions by the same user not shown)
Line 2:
Line 2:
== Weapons ==
== Weapons ==
Ranged weapons give a great tactical advantage, because only few enemies can attack from the distance; furthermore, they can be used for '''both melee and ranged''' combat. Subsequently, most melee weapons are of '''secondary importance'''.
Abbreviations of profession names are from the NES port.
{|{{prettytable|sortable=1|notwide=1}}
! Computer <br /> name || NES <br /> name || Price || Shops || Range || Wielders
{| {{prettytable|sortable=1}}
|-
! Computer <br /> Name || NES <br /> Name || Price || Shops || Range || Wielders
| Dagger || Dagger ||align="right"| 5 || any || ranged/melee<ref><small>A dagger can be used continuously as a regular melee weapon, but it may be used once as a ranged weapon. Once it is used as a ranged weapon, it is lost. </small></ref> ||style="background:black;"| [[Image:Ultima III character fighter.gif]][[Image:Ultima III character barbarian.gif]][[Image:Ultima III character paladin.gif]][[Image:Ultima III character lark.gif]] [[Image:Ultima III character ranger.gif]][[Image:Ultima III character thief.gif]][[Image:Ultima III character illusionist.gif]][[Image:Ultima III character priest.gif]][[Image:Ultima III character druid.gif]][[Image:Ultima III character alchemist.gif]][[Image:Ultima III character wizard.gif]]
| Mace || Mace ||align="right"| 30 || any || melee ||style="background:black;"| [[Image:Ultima III character fighter.gif]][[Image:Ultima III character barbarian.gif]][[Image:Ultima III character paladin.gif]][[Image:Ultima III character lark.gif]] [[Image:Ultima III character ranger.gif]][[Image:Ultima III character thief.gif]][[Image:Ultima III character illusionist.gif]][[Image:Ultima III character priest.gif]][[Image:Ultima III character druid.gif]]
| Sling || Sling ||align="right"| 60 || any || {{yes|ranged}} ||style="background:black;"| [[Image:Ultima III character fighter.gif]][[Image:Ultima III character barbarian.gif]][[Image:Ultima III character paladin.gif]][[Image:Ultima III character lark.gif]] [[Image:Ultima III character ranger.gif]][[Image:Ultima III character thief.gif]]
| Bow || Blowgun ||align="right"| 350 || any || {{yes|ranged}} ||style="background:black;"| [[Image:Ultima III character fighter.gif]][[Image:Ultima III character barbarian.gif]][[Image:Ultima III character paladin.gif]][[Image:Ultima III character lark.gif]] [[Image:Ultima III character ranger.gif]][[Image:Ultima III character thief.gif]]
| +2 Bow || Bow ||align="right"| 1050 || Dawn || {{yes|ranged}} ||style="background:black;"| [[Image:Ultima III character fighter.gif]][[Image:Ultima III character barbarian.gif]][[Image:Ultima III character paladin.gif]][[Image:Ultima III character lark.gif]] [[Image:Ultima III character ranger.gif]]
| +4 Bow || Silver bow ||align="right"| 6550 || Dawn || {{yes|ranged}} ||style="background:black;"| [[Image:Ultima III character fighter.gif]][[Image:Ultima III character barbarian.gif]][[Image:Ultima III character paladin.gif]][[Image:Ultima III character lark.gif]]
| Exotic <br>weapon || Mystic <br>sword ||align="right"| 0 || ''n/a'' || melee ||style="background:black;"| [[Image:Ultima III character fighter.gif]][[Image:Ultima III character barbarian.gif]][[Image:Ultima III character paladin.gif]][[Image:Ultima III character lark.gif]] [[Image:Ultima III character ranger.gif]][[Image:Ultima III character thief.gif]][[Image:Ultima III character illusionist.gif]][[Image:Ultima III character priest.gif]][[Image:Ultima III character druid.gif]][[Image:Ultima III character alchemist.gif]][[Image:Ultima III character wizard.gif]]
| +2 Axe || Broad Axe || 400 || Dawn only || melee || Ftr., Brbrn., Lark, Pldn., Rngr.
| Axe || Axe ||align="right"| 125 || any || melee ||style="background:black;"| [[Image:Ultima III character fighter.gif]][[Image:Ultima III character barbarian.gif]][[Image:Ultima III character paladin.gif]][[Image:Ultima III character lark.gif]] [[Image:Ultima III character ranger.gif]][[Image:Ultima III character thief.gif]]
|-
|-
| +2 Sword || Iron Sword || 800 || Dawn only || melee || Ftr., Brbrn., Lark, Pldn., Rngr.
| Sword || Sword ||align="right"| 200 || any || melee ||style="background:black;"| [[Image:Ultima III character fighter.gif]][[Image:Ultima III character barbarian.gif]][[Image:Ultima III character paladin.gif]][[Image:Ultima III character lark.gif]] [[Image:Ultima III character ranger.gif]][[Image:Ultima III character thief.gif]]
|-
|-
| +2 Bow || Bow || 1050 || Dawn only || ranged || Ftr., Brbrn., Lark, Pldn., Rngr.
| 2-H sword || Spear ||align="right"| 250 || any || melee ||style="background:black;"| [[Image:Ultima III character fighter.gif]][[Image:Ultima III character barbarian.gif]][[Image:Ultima III character paladin.gif]][[Image:Ultima III character lark.gif]] [[Image:Ultima III character ranger.gif]]
|-
|-
| Gloves || Gloves || 1200 || Dawn only || melee || Ftr., Brbrn., Lark, Pldn.
| +2 Axe || Broad axe ||align="right"| 400 || Dawn || melee ||style="background:black;"| [[Image:Ultima III character fighter.gif]][[Image:Ultima III character barbarian.gif]][[Image:Ultima III character paladin.gif]][[Image:Ultima III character lark.gif]] [[Image:Ultima III character ranger.gif]]
|-
|-
| +4 Axe || Fighter's Axe || 2700 || Dawn only || melee || Ftr., Brbrn., Lark, Pldn.
| +2 Sword || Iron sword ||align="right"| 800 || Dawn || melee ||style="background:black;"| [[Image:Ultima III character fighter.gif]][[Image:Ultima III character barbarian.gif]][[Image:Ultima III character paladin.gif]][[Image:Ultima III character lark.gif]] [[Image:Ultima III character ranger.gif]]
|-
|-
| +4 Sword || Sun Sword || 4550 || Dawn only || melee || Ftr., Brbrn., Lark, Pldn.
| Gloves || Gloves ||align="right"| 1200 || Dawn || melee ||style="background:black;"| [[Image:Ultima III character fighter.gif]][[Image:Ultima III character barbarian.gif]][[Image:Ultima III character paladin.gif]][[Image:Ultima III character lark.gif]]
|-
|-
| +4 Bow || Silver Bow || 6550 || Dawn only || ranged || Ftr., Brbrn., Lark, Pldn.
| +4 Axe || Halberd ||align="right"| 2700 || Dawn || melee ||style="background:black;"| [[Image:Ultima III character fighter.gif]][[Image:Ultima III character barbarian.gif]][[Image:Ultima III character paladin.gif]][[Image:Ultima III character lark.gif]]
| +4 Sword || Sun sword ||align="right"| 4550 || Dawn || melee ||style="background:black;"| [[Image:Ultima III character fighter.gif]][[Image:Ultima III character barbarian.gif]][[Image:Ultima III character paladin.gif]][[Image:Ultima III character lark.gif]]
|}
|}
<nowiki>*</nowiki> A dagger can be used continuously as a regular melee weapon, but it may be used once as a ranged weapon. Once it is used as a ranged weapon, it is lost.
<references/>
== Armor ==
== Armor ==
{| {{prettytable}}
{|{{prettytable|notwide=1|sortable=1}}
! Computer Name || NES Name || Price || Wearers
! Computer <br>name || NES <br>name || Price || Wearers
| Cloth || Cloth ||align="right"| 75 ||style="background:black;"| [[Image:Ultima III character fighter.gif]][[Image:Ultima III character ranger.gif]][[Image:Ultima III character paladin.gif]][[Image:Ultima III character priest.gif]][[Image:Ultima III character illusionist.gif]][[Image:Ultima III character barbarian.gif]][[Image:Ultima III character thief.gif]][[Image:Ultima III character lark.gif]][[Image:Ultima III character druid.gif]][[Image:Ultima III character alchemist.gif]][[Image:Ultima III character wizard.gif]]
| Leather || Leather ||align="right"| 195 ||style="background:black;"| [[Image:Ultima III character fighter.gif]][[Image:Ultima III character ranger.gif]][[Image:Ultima III character paladin.gif]][[Image:Ultima III character priest.gif]][[Image:Ultima III character illusionist.gif]][[Image:Ultima III character barbarian.gif]][[Image:Ultima III character thief.gif]]
| Chain || Bronze ||align="right"| 575 ||style="background:black;"| [[Image:Ultima III character fighter.gif]][[Image:Ultima III character ranger.gif]][[Image:Ultima III character paladin.gif]][[Image:Ultima III character priest.gif]]
|-
|-
| Plate || Iron || 2500 || Ftr., Rngr., Pldn.
| Plate || Iron ||align="right"| 2500 ||style="background:black;"| [[Image:Ultima III character fighter.gif]][[Image:Ultima III character ranger.gif]][[Image:Ultima III character paladin.gif]]
|-
|-
| +2 Chain || Steel || 6130 || Ftr., Rngr.
| +2 Chain || Steel ||align="right"| 6130 ||style="background:black;"| [[Image:Ultima III character fighter.gif]][[Image:Ultima III character ranger.gif]]
|-
|-
| +2 Plate || Dragon Armor || 8250 || Ftr., Rngr.
| +2 Plate || Dragon ||align="right"| 8250 ||style="background:black;"| [[Image:Ultima III character fighter.gif]][[Image:Ultima III character ranger.gif]]
| Exotic || Mystic ||align="right"| 0 ||style="background:black;"| [[Image:Ultima III character fighter.gif]][[Image:Ultima III character ranger.gif]][[Image:Ultima III character paladin.gif]][[Image:Ultima III character priest.gif]][[Image:Ultima III character illusionist.gif]][[Image:Ultima III character barbarian.gif]][[Image:Ultima III character thief.gif]][[Image:Ultima III character lark.gif]][[Image:Ultima III character druid.gif]][[Image:Ultima III character alchemist.gif]][[Image:Ultima III character wizard.gif]]
|}
|}
Line 65:
Line 66:
== Items ==
== Items ==
=== Purchasable Items ===
=== Purchasable items ===
{| {{prettytable}}
{| {{prettytable}}
! Computer Name || NES Name || Price || Description
! Computer Name || NES Name || Price || Description
Line 84:
Line 85:
|}
|}
=== Key Items ===
=== Key items ===
Note that it is sufficient to explore three [[../Dungeons|Dungeons]] to collect all the four Marks and meet the Lord of Time.
{| {{prettytable}}
{| {{prettytable}}
! Computer Name || NES Name || Description
! Computer Name || NES Name || Location ||width=55%| Description
|-
|-
| Mark of Force || Force || With this mark, your party members will be able to walk across barriers without dying.
| Mark of Snake || Snake || '''Dungeon of the Snake''' || This mark is required to get past the large snake that blocks the entrance to Exodus' Castle.
|-
|-
| Mark of Fire || Fire || This mark will allow you to walk on lava without receiving damage.
| Mark of Force || Force || Dungeon of Doom <br /> Dungeon of Fire || With this mark, your party members will be able to walk across barriers without dying.
|-
|-
| Mark of Kings || King || This mark will allow your party to reach levels above five.
| Mark of Fire || Fire || '''Dungeon of Time''' <br /> ''3 more dungeons'' || This mark will allow you to walk on lava without receiving damage.
|-
|-
| Mark of Snake || Snake || This mark is required to get past the large snake that blocks the entrance to Exodus' Castle.
| Mark of Kings || King || '''Dungeon of Time''' <br /> '''Dungeon of the Snake''' <br /> ''3 more dungeons'' || This mark will allow your party (and the monsters, too) to reach levels above five. Remember that a higher level means stronger monsters.
|-
|-
| Death Card || Death || One of four cards required for the end of the game.
| Lord of Time || Time Lord || '''Dungeon of Time''' || He tells you the correct order to use the four Cards.
|-
|-
| Sol Card || Sol || One of four cards required for the end of the game.
| Death Card || Death || Shrine of Wisdom || One of four cards required for the end of the game.
|-
|-
| Love Card || Love || One of four cards required for the end of the game.
| Sol Card || Sol || Shrine of Dexterity || One of four cards required for the end of the game.
|-
|-
| Moons Card || Moons || One of four cards required for the end of the game.
| Love Card || Love || Shrine of Strength || One of four cards required for the end of the game.
|-
|-
| - || Gold Pick || Use it to dig for the "Mystic Armor".
| Moons Card || Moons || Shrine of Intelligence || One of four cards required for the end of the game.
|}
* '''NES-only items:'''
{| {{prettytable}}
! NES Name || Location ||width=70%| Description
|-
| Gold Pick || Dawn || Partially replaces the "Dig" command: use it to dig for the "Mystic Armor".
|-
|-
| - || Silver Pick || Use it to dig for the "Mystic Sword".
| Silver Pick || Cave of Death <br /> (''Dardin's Pit'') || Partially replaces the "Dig" command: use it to dig for the "Mystic Sword".
|-
|-
| - || Silver Horn || Repels the "Great Earth Serpent" that guards the entrance to Exodus' Castle.
| Silver Horn || Yew || Replaces the "Yell" command (and the word "Evocare"): repels the "Great Earth Serpent" that guards the entrance to Exodus' Castle.
|-
|-
| - || Flower || Give it to Sherry to receive a Heart Compass.
| Flower || Ambrosia || Give it to Sherry to receive a Heart Compass.
|-
|-
| - || Compass Heart || Use it and your party will be instantly teleported back to Lord British.
| Compass Heart || Royal City || Use it and your party will be instantly teleported back to Lord British's royal castle. If the party is on a ship, the ship will be teleported to the nearby shore.
|}
|}
===Key item locations===
{{spoilers}}
{{spoilers}}
==Key Item Locations==
[[File:Ultima_III_Yew_Horn.png|left]]
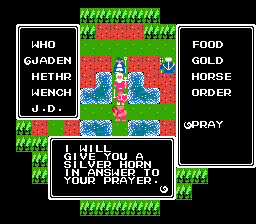
'''Silver Horn''' (NES)
Yew; learn the "Pray" command in the temple to the North.
{{-}}
'''Silver Horn''' (NES)<br />
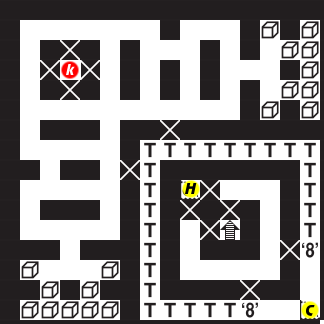
[[File:Ultima_III_Dardin_F8.png|left]]
[[File:Ultima_III_Yew_Horn.png]]<br />
'''Silver Pick''' (NES)
Yew - Learn the "Pray" command in the temple to the North
'''Silver Pick'''<br />
Level 8 of the '''[[Ultima III: Exodus/Dardin's Pit|Cave of Death]]'''; open the chest in the South-West corner.
[[File:Ultima_III_Dardin_F8.png]]<br />
This ^ Chest<br />
Level 8 of '''[[Ultima III: Exodus/Dardin's Pit|Dardin's Pit]]''' Chest in the South-West corner
Ranged weapons give a great tactical advantage, because only few enemies can attack from the distance; furthermore, they can be used for both melee and ranged combat. Subsequently, most melee weapons are of secondary importance.
↑A dagger can be used continuously as a regular melee weapon, but it may be used once as a ranged weapon. Once it is used as a ranged weapon, it is lost.
Note that it is sufficient to explore three Dungeons to collect all the four Marks and meet the Lord of Time.
Computer Name
NES Name
Location
Description
Mark of Snake
Snake
Dungeon of the Snake
This mark is required to get past the large snake that blocks the entrance to Exodus' Castle.
Mark of Force
Force
Dungeon of Doom Dungeon of Fire
With this mark, your party members will be able to walk across barriers without dying.
Mark of Fire
Fire
Dungeon of Time 3 more dungeons
This mark will allow you to walk on lava without receiving damage.
Mark of Kings
King
Dungeon of Time Dungeon of the Snake 3 more dungeons
This mark will allow your party (and the monsters, too) to reach levels above five. Remember that a higher level means stronger monsters.
Lord of Time
Time Lord
Dungeon of Time
He tells you the correct order to use the four Cards.
Death Card
Death
Shrine of Wisdom
One of four cards required for the end of the game.
Sol Card
Sol
Shrine of Dexterity
One of four cards required for the end of the game.
Love Card
Love
Shrine of Strength
One of four cards required for the end of the game.
Moons Card
Moons
Shrine of Intelligence
One of four cards required for the end of the game.
NES-only items:
NES Name
Location
Description
Gold Pick
Dawn
Partially replaces the "Dig" command: use it to dig for the "Mystic Armor".
Silver Pick
Cave of Death (Dardin's Pit)
Partially replaces the "Dig" command: use it to dig for the "Mystic Sword".
Silver Horn
Yew
Replaces the "Yell" command (and the word "Evocare"): repels the "Great Earth Serpent" that guards the entrance to Exodus' Castle.
Flower
Ambrosia
Give it to Sherry to receive a Heart Compass.
Compass Heart
Royal City
Use it and your party will be instantly teleported back to Lord British's royal castle. If the party is on a ship, the ship will be teleported to the nearby shore.