 Select controller:
SNES,PlayStation,DS
The final quest you have to complete is going through the Black Omen to defeat Zeal and confront Lavos. You can ram the epoch into Lavos or just use the bucket at the end of time naturally, but you'll only activate the New Game + if you beat the Black Omen the regular way. You can visit it in 2300 A.D. to see an eerie message from Zeal, and you can also fight through the fortress three times if you go in 1000 A.D., 600 A.D., and 12,000 B.C. in that order. You'll encounter all of the bosses the first time through, but only Zeal on the second and third. Unless you want to max out your experience in that order, you might as well finish it off in 12,000 B.C when you feel ready to continue the story.
A few people on the northern continent and elsewhere will also comment on the Black Omen as they're chatting about the weather, until you get rid of it that is. Hopefully you'll have completed all the other sidequests and challenged Spekkio for the last set of items you'll get until you hit level 99/**, so take your party to the Black Omen by flying the Epoch into it.
Arrival[edit]
After you destroy the lasers on the outside, Zeal will inform you how long the planet has left to live. Head inside for the first boss fight with Mega Mutant.
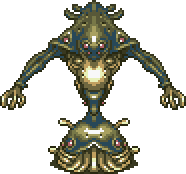
Mega Mutant

|
HP
4600 top, 3850 bottom |
Weaknesses
None |
Strengths
None
|
Absorbs
None
|
Charmables
1x Vigil Hat (bottom), 1x Elixir (top) |
Drops
None |
XP
900 |
TP
50 |
Gold
0
|
Attacks
- Top
- Bottom
|
Description/Strategy
Since it does not have any resistances or weaknesses, just hit it with your strongest attacks and make sure you put the best equipment on your party before starting the fight. This battle isn't too hard if your party is strong. This fight is meant to gauge whether or you should continue into The Black Omen or go back to leveling elsewhere. It attacks quickly so if need be, have Marle cast Haste on everybody (this is not necessary depending on your level). Make sure you have either a lot of Heals in your inventory, or have status protecting armor, because this mutant casts Chaos frequently. Take out the top half first, then go for the bottom half, and you should be fine.
|
Continue on, but be careful with the goons since they absorb magic, and in general just use your best multi-enemy techs, you should have learned about all of them by now. Be aware that there are a lot of useful [items which can be charmed from the enemies here, such as Speed Tabs from the Panels, Gold Studs from the Flyclops, etc. Note that each of the Panels can only be fought once, even you go through the Black Omen in the order 1000 A.D., 600 A.D., and finally 12,000 B.C. All of the treasure chests can only be opened once. Eventually you'll come to an elevator where you may have a few random fights while you're riding it.
Pick up a couple chests in the next room (MegaElixir, 30,000 G), and head into the next room for a few more fights and a chest containing a Magic Seal. Be careful of the Ruminators, since they can kill you in one hit if they get the chance. The next area will have 6 chests (Vigil Hat, Elixir, MegaElixir, Nova Armor, Haste Helm, MegaElixir) and a save point and two Nus, the left one of which will sell you items, the right one will offer you a chance to escape the Black Omen if you ask him to "wake [you] up." Use a shelter if you like, then head into the next room to face a Tubster. These guys counter-attack aggressively and are immune to shadow magic, but they're not too tough. Pick up a Zodiac Cape near the Ruminators running through the hall, and head through another room with a MegaElixir and a bunch of monsters looking for a fight.
Grab a Power Seal in the next room, and fight a Tubster with a couple Flyclops and a few more monsters, grabbing a Speed Tab in a chest in the bottom right corner at the end. There will also be another Speed Tab in the next room, and then a transport. You'll fight a few sets of Aliens with some nasty instant death counters; you can pick up an Elixir in the south-west corner of this room, pick up a Speed Tab and a MegaElixir at the end of the room. You'll come to a save point, heal up and prepare to fight Giga Mutant.
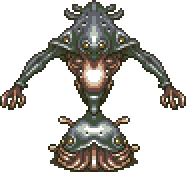
Giga Mutant

|
HP
5800 (top), 4950 (bottom) |
Weaknesses
None |
Strengths
None
|
Absorbs
None
|
Charmables
Wall Ring (top), Hit Ring (bottom) |
Drops
None |
XP
1500 |
TP
0 |
Gold
2000
|
Attacks
- Top
- Drain MP: The top half of the beast will throw a tongue at one ally and suck around 10 MP from them.
- Mutant Gas/Sleep: Deals around 100 damage and attempts to put one ally to sleep.
- Mutant Gas/Poison: Deals around 50 damage to the entire party and attempts to poison them.
- Red Explosion: Deals around 30 damage to one ally.
- Shining Bit: Deals lightning damage to one ally.
- Bottom
- Attack: The bottom half deals physical damage to one ally.
- Spiked ball: The bottom half spits a spiked ball at one ally.
- Life Shaver: Drops the health of one ally to 1.
|
Description/Strategy
The Giga Mutant is much more powerful than the Mega Mutant. It's immune to physical attacks including multi-element attacks that have a physical side to them (Bubble Hit, for example). Thus, you'll have to rely on all magic attacks and magic triple attacks (the Deltas, Poyozo Dance which you won't have the first time through, Ayla's Tailspin, etc.). This means that Magus and the Marle/Lucca combo are a pretty good choice (Antipode 3 for example), however you won't have a problem with any combo in particular. Whenever it uses Life Shaver, heal immediately because it will target a random ally soon after; thus you have a good chance of dying.
|
Remember to use a shelter at the previous save point after beating Giga Mutant! Head through another transport and up another elevator, preparing for fights along the way. Fight through another room of generic enemies, and you'll come to a room with four Panels you'll have to fight to reveal a save point. A Speed Tab will also be waiting in the chest nearby. Save and heal again, because you're about to face the next version of the "mutant" monster, the Terra Mutant.
TerraMutant
(Tera Mutant)

|
HP
7800 top, 20000 bottom |
Weaknesses
None |
Strengths
None
|
Absorbs
Magic (bottom)
|
Charmables
MuscleRing (Top), Power Seal (Bottom) |
Drops
None |
XP
2000 |
TP
0 |
Gold
3800
|
Attacks
- Top
- Absorb: The top drains the life from the bottom for about 1000.
- Drain Life: Sucks the HP out of one ally and heals itself.
- Eruption: Fires fiery rocks onto the party for about 75 damage.
- Chaotic Zone/Chaos: Damages the entire party with lightning damage for about 100 damage and attempts to inflict the Chaos status on them.
- Fire Breath: Fires five balls of fire at one ally for about 150 damage.
- Bottom
- Life Shaver: If attacked, counters with this.
|
Description/Strategy
The final Mutant boss on the Black Omen. This one's top drains life from the bottom half (healing ~1000 each time). This is annoying, but it will help to defeat the bottom half. The bottom absorbs magic damage and will counter with Life Shaver if attacked with a physical type attack and the top is highly resistant to physical attacks like the Giga Mutant. Just concentrate your techniques on the top and the bottom will fall eventually. There are two methods to beating him: the fast way and the slow way.
- Fast way
The fast way is to simply cast your most powerful magic spells over and over, such as Luminaire.
- Slow way
The slow way is to wait for it to kill the bottom half while you take damage and heal yourself. Note that when the top dies, so will the bottom, but not the other way around.
|
Pick up a MegaElixir and the White Rock (to enable a triple tech, Poyozo Dance, with the three girls). By now you should have all five triple tech rocks.
You can save and use a shelter again if you really want, but it probably won't be necessary. Go forward through another room and prepare to face a particularly nasty Lavos Spawn.
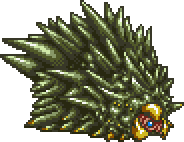
Lavos Spawn
(Elder Lavos Spawn)

|
HP
13,500 (shell), 10,000 (head) |
Weaknesses
None |
Strengths
None
|
Absorbs
None
|
Charmables
Safe Helm (Shell), Haste Helm (Head) |
Drops
None |
XP
2450 (original), 0 (DS) |
TP
0 |
Gold
2500 (original), 4950 (DS)
|
Attacks
- Shell
- Attacks with "Lavos Spawn Needle.": Will counter with this if attacked; deals about 450-600 physical damage to the attacker.
- Lavos Spawn Needle: Disorder: Damages the party for about 90-150 physical damage.
- Head
- Water Rise/Water / Water Surge: Damages one ally for about 100 water damage.
- Dark Bomb: Damages single target for 150-600 shadow damage.
- Destruction zone / Annihilation Zone: Damages the party for about 100-500 fire damage.
|
Description/Strategy
The Lavos Spawn is just like the previous ones, but more powerful. Although it deals more damage and has more HP, it has better items to be charmed and it pays out a better reward. Like the first ones you encountered, don't attack the shell and don't use multi-target techs (such as Lightning2, Falcon Hit, Ice Water, etc.). Focus completely on the head and use your strongest attacks (i.e. triple/dual techs). Once the head is destroyed, the shell will die after a few seconds but note that if attacked it will still retaliate.
In the Spanish version, this boss is called "LavosLarva".
|
Head into the next room for another set of panels, keep in mind that you can charm these enemies for tabs. A save point will appear, so heal up and save because you're about to deal with Zeal. This is also a good time to use those tabs if you haven't already, they each raise a particular stat by one. Keep in mind that speed never goes up as you gain levels and it maxes out at 16. Lucca and Magus will max out magic on their own eventually, and everyone but Lucca and Marle will max out power, although power does not affect the damage caused by using "Attack".
The final room[edit]
The fight with Zeal will go through three main phases. Having someone who can heal the whole party is important since you'll be having your whole party's HP drained to one by Zeal's attacks in the first phase, and it just makes sense for a long boss fight like this, so Frog or Robo would be helpful. As far as attackers go, Crono is an obvious choice for both magical and physical attacks, and Magus makes the fight interesting by adding some extra dialogue to the fight with Zeal. His theme will play during the battle with her third form.
Queen Zeal

|
HP
12000 |
Weaknesses
None |
Strengths
None
|
Absorbs
None
|
Charmables
2xMegaElixir |
Drops
1xMegaElixir |
XP
0 |
TP
0 |
Gold
0
|
Attacks
- Hallation/HP goes to 1: Drops the entire party's health to 1; the animation is the same as Aura Whirl.
- Kiss: Drains about 10 MP from one ally.
- Fire Balls: Fires five fireballs at one ally for about 100 fire magic damage.
|
Description/Strategy
In Zeal's first form, she'll periodically deplete your whole party's HP to one (she starts with this attack) and laugh at you. Make sure you have a technique that will restore your party's health (or a Lapis) so you don't get killed immediately. This would also be a convenient time to use something like Frog Squash or even Frog Flare if you can time it so you don't get killed. She has two other attacks, one in which she'll drain 10 MP from a single party member and a fireball attack where she deals some minimal (around 100) damage to one person.
The fight will only go on for a little while so remember to charm her for some extra MegaElixirs.
|
After defeat she will then try to toss you into the Mammon Machine, thereby initiating her second form.
Mammon M.

|
HP
18000 |
Weaknesses
None |
Strengths
None
|
Absorbs
None
|
Charmables
1xMegaElixir |
Drops
None |
XP
0 |
TP
0 |
Gold
0
|
Attacks
- Release Energy: Damages the entire party for 100-200 damage.
- Point Flare: Damages one ally for about 150 fire damage.
|
Description/Strategy
The remains of the Mammon Machine, now fused with Queen Zeal, will become an active vessel for her to fight you with. It will begin the fight by noting that it "Modifies all energy"; thus the Mammon Machine has a combat mechanic involving buffs. If you attack with physical damage, it increases its defense (it will have no affect against 3D Attack). If you attack with magical damage, it increases its attack power. You can hit it with the Masamune to absorb the energy (removing the buffs).
Just make sure your health is full and keep using your strongest techniques. It will occasionally release its energy as a powerful attack. Even if you let it use the charged attack, you should be able to survive it with the equipment available at this point in the game.
|
Finally, you will have to fight Zeal again, however in a much different form.
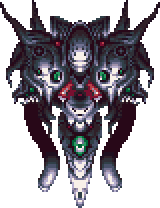
Zeal

|
HP
20,000 (Face), 28,000 (for each hand) |
Weaknesses
None |
Strengths
None
|
Absorbs
None
|
Charmables
1xPrism Helm (Right Hand), 1xPrism Dress (Left Hand), 1xMegaElixir (Head) |
Drops
1xMegaElixir |
XP
0 |
TP
0 |
Gold
0
|
Attacks
- Left hand
- Laser: Damages one ally for about 50 damage.
- counter-attack: Life Shaver: Retaliates, taking the attacker down to 1 HP.
- Right hand
- Purple Beam: Damages one ally for about 50 damage.
- counter-attack: MP Buster: Retaliates, taking the attacker's MP down to 0.
- Face
- Skygate/Lightning: Damages one ally for about 100 lightning damage.
- Hexagon Mist/Water: Damages the party for about 150 water damage.
- Dark Gear/Shadow: Damages the party for about 150 shadow damage.
- Hallation/HP goes to 1: Drops the entire party's health to 1; the animation is the same as Aura Whirl.
- MP Buster: Drains all of the MP from one character and gives it to the Head.
|
Description/Strategy
Queen Zeal will summon you atop the Black Omen, she'll curse you and then transform into this three piece avatar. This time the queen will have transformed into a monster composed of three separate parts: a face and two hands. If you have Magus along for the ride he'll comment and it will play his theme music for the battle.
Note that by targeting the hands at all you will pay for it, even if you try and charm them. The left hand will use life shaver on you if you attack it and the right hand will use MP buster, so you're best off just attacking the face with single target physical attacks like Confuse, Triple Kick, or Uzzi Punch. It will pull some nasty techniques that do in the vicinity of 300 damage, as well as the Hallation attack which sends everyone's HP to 1.
The charmables from this boss are extremely generous, so Ayla is vital. Note that in the DS version, the rewards from charming the hands are switched (the Right Hand gives a Prism Dress, and the Left Hand gives a Prism Helm). Other than messing with getting charms, its an easy fight.
Just focus on the head and heal up when needed. Remember to heal up after the head casts Hallation, otherwise you will die quickly. Anything will save you, even a Lapis. Destroying the head will bring the whole Zeal trio down.
|
Eventually you'll wear Zeal down, and she'll decide to have Lavos destroy you directly. The Black Omen will sink into the sea and crumble through a time gate that sends you directly to Lavos at 1999 AD (as proven if you are defeated by Lavos during this battle OR if you defeated Lavos previously).
