(and with that another 8 pics are being used now.) |
(exapnded) |
||
| (7 intermediate revisions by 3 users not shown) | |||
| Line 1: | Line 1: | ||
{{Header Nav|game=Ultima III: Exodus}} | {{Header Nav|game=Ultima III: Exodus}} | ||
== | [[file:Ultima_III_Sosaria_map.png|left|256px|thumb|The '''"E"''' marks the location of the Mines of Morinia]] | ||
The Mines of Morinia can be found following the coast north of Gray. They conceal the Mark of Fire and the Mark of Kings in every port of the game. It is an easy dungeon, where the bottom level can be accessed quickly from the entrance ladder. | |||
The Mines of Morinia were renamed '''"Cave of Madness"''' in the NES version. | |||
The floors from 2 to 7 can only be accessed using magic. | |||
From the entrance, climb the ladder straight down to the 8th level, get the 24 chests and the two Marks. Then, from the Fire Mark location, use a spell to climb to the 7th floor. Climb the ladder up to the "hub" on the first floor. From there, you should choose the floors that are the richest in gold chests: n.4 and n.6. The remaining floors (2-3-5) mean more trouble than gain. | |||
{{-}} | |||
== Maps == | |||
Legend: | |||
* '''G =''' Gremlin (steals food) | |||
* '''T =''' Trap | |||
* '''W =''' Strange wind (blows out torches) | |||
{| | {| | ||
| | | ||style="background:black; color:white" | '''X''' || = False wall | ||
|} | |||
| ''' | |||
{|{{prettytable}} | |||
!width=10%| Floor !!width=35%| Map !! Notes | |||
|- | |- | ||
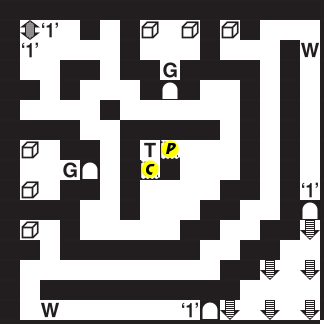
| ''' | | Floor 1 || [[Image:Ultima III Mines F1.png]] || Sign 1: "Mines of Morinia" <br /><br /> '''C =''' Cure poison fountain <br /> '''P =''' Poison fountain | ||
|- | |- | ||
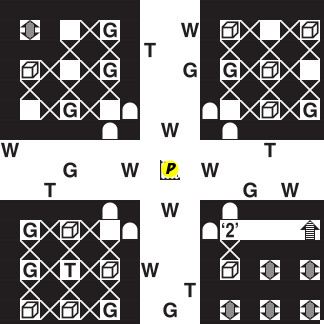
| | | Floor 2 || [[Image:Ultima III Mines F2.png]] || Sign 2: "Terror tunnels!" <br /><br /> '''P =''' Poison fountain | ||
|- | |- | ||
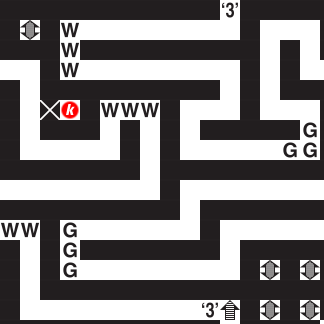
| | | Floor 3 || [[Image:Ultima III Mines F3.png]] || Sign 3: "Long march!" <br /> '''k =''' Mark of Kings <br /> | ||
|- | |- | ||
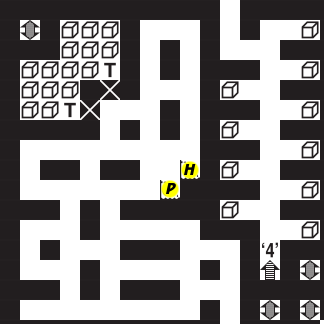
| | | Floor 4 || [[Image:Ultima III Mines F4.png]] || Sign 4: "Misty mines!" <br /><br /> '''H =''' Healing fountain (NES: damage fountain) <br /> '''P =''' Poison fountain | ||
|- | |- | ||
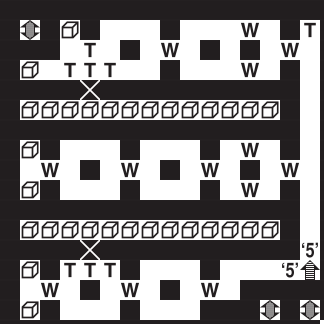
| | | Floor 5 || [[Image:Ultima III Mines F5.png]] || Sign 5: "Mines of madness" <br /> | ||
|- | |- | ||
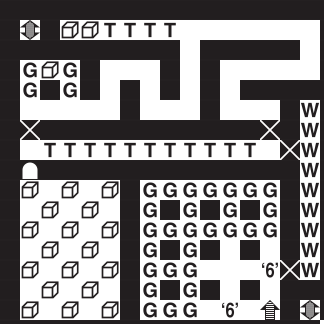
| | | Floor 6 || [[Image:Ultima III Mines F6.png]] || Sign 6: "G, T & G!" <br /> NES sign: "Gold, Trap & Gremlins!" | ||
|- | |- | ||
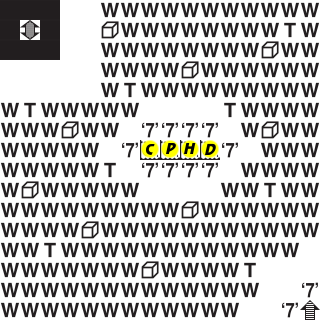
| | | Floor 7 || [[Image:Ultima III Mines F7.png]] || Sign 7: "Dark prevailes" <br /><br /> '''C =''' Cure poison fountain <br /> '''P =''' Poison fountain <br /> '''H =''' Healing fountain <br /> '''D =''' Damage fountain | ||
|- | |- | ||
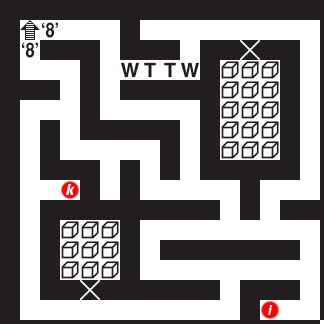
| | | Floor 8 || [[Image:Ultima III Mines F8.png]] || Sign 8: "Dry hole" <br /> '''i =''' Mark of Fire <br /> '''k =''' Mark of Kings <br /> | ||
|} | |} | ||
{{Footer Nav|game=Ultima III: Exodus|prevpage= | {{Footer Nav|game=Ultima III: Exodus|prevpage=Dungeon of the Snake|nextpage=Town of Dawn}} | ||
Latest revision as of 10:26, 20 March 2017
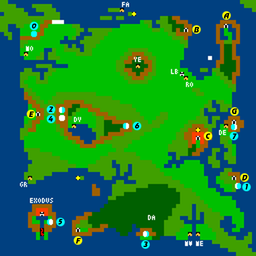
The Mines of Morinia can be found following the coast north of Gray. They conceal the Mark of Fire and the Mark of Kings in every port of the game. It is an easy dungeon, where the bottom level can be accessed quickly from the entrance ladder.
The Mines of Morinia were renamed "Cave of Madness" in the NES version.
The floors from 2 to 7 can only be accessed using magic.
From the entrance, climb the ladder straight down to the 8th level, get the 24 chests and the two Marks. Then, from the Fire Mark location, use a spell to climb to the 7th floor. Climb the ladder up to the "hub" on the first floor. From there, you should choose the floors that are the richest in gold chests: n.4 and n.6. The remaining floors (2-3-5) mean more trouble than gain.
Maps[edit]
Legend:
- G = Gremlin (steals food)
- T = Trap
- W = Strange wind (blows out torches)
| X | = False wall |
